Now this is clever. The roof tiles come as laser cut strips of thick paper. To finish the roof, all I had to do was release them and stick them in place. The strips had to be cut to length and you need to be careful to line things up properly but other than that it couldn’t be easier.
I’ve cut strips of tiles similar to this by hand. It’s a lot nice to have the hard work done for you. I wonder if there would be a market for laser cuts tiles in other scales. They might even be available already, just not in the UK.
Thursday, January 31, 2008

Wednesday, January 30, 2008
Roofing
This is a tough kit to describe. The problem is that all the bits fit. If they didn’t I could go on about all the fettling and fiddling required to assemble the building sounding like a real expert. I’m sure it would make a much more interesting read !
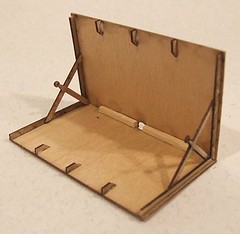
Anyway, the roof is two bits of ply. I ran a bead of PVA along the edge of one and then put them on the building so the angle was right. Once the glue had grabbed I split a matchstick in half and used this to brace the joint. I wanted a removable item to allow interior detail to be fitted in the future.
Bargeboards are attached to the wooden fret with the tinniest of tabs easily removed with a sharp knife. Once glued on the interesting inverted cross detail is affixed behind. This braces the roof further.
I did keep testing the assembly in place to make sure I hadn’t moved anything and wasn’t going to end up with a gap at the top of the walls. The bracing is more than decorating though, it really makes the structure strong enough to get away with it not being attached to the rest of the building.
The little bits of wood along the side represent the rafters. On many kits these would be knocked up out of scrap wood but here they are supplied ready to fix. I only used 3 per side, 4 are supplied but I felt that was excessive.
Next – tiling…
Monday, January 28, 2008
Framing and windows
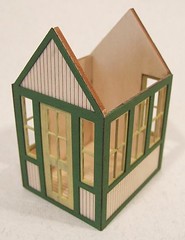
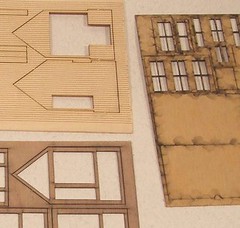
Here’s a clever idea. The framing for the shanty is very thin plywood with a self adhesive backing.
First it has to be painted. This is a piece of cake as each side is a single part strong enough to handle. Once dry, just peel off the backing sheet and stick it to the carcass of the building. The glue grabs enough to hold the part but needs pushing firmly to get it stuck properly. This allows a little light re-positioning of the part. I’m not sure I’d fancy trying to remove it once stuck properly though, as the wood is incredibly thin.
The windows are another marvel of the laser cutters art. The frames are so thin – well under a millimetre across. They accept paint (Humbrol enamel) very well without a hint of the furriness that some woods exhibit.
The only difficult bit is making sure each window is the right way up. Get it wrong and it won’t line up with the hole in the frame. Guess how I know this…
Sunday, January 27, 2008
First attempts with plywood building parts
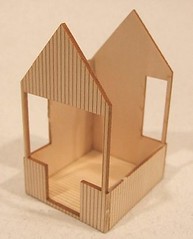
Building he basic shanty shell is nice and easy. Each part is removed from the wooden fret by cutting the minuscule tags that hold it in the sheet with a sharp scalpel. In this respect it’s like an etched brass kit although the material is thicker and softer.
The remains of the tabs were sanded away with the finest sandpaper I had to hand. Although all but one will be hidden there is a slight chance they could affect the fit of later parts.
One minor problem is that the wood is only planked on one side. This gives it the tendency to curl away from the planking. Some quick setting 5 Star adhesives PVA grabs quickly and once the parts are fixed to each other flatness is restored but it’s unnerving when you first release the bits.
Saturday, January 26, 2008
Gee Dee models
Fancying a day out, I got on a train with little idea where I would end up other than it involved a change at Birmingham. Now, days out like this involve a railway journey reading a book and listening to music with an interesting town at the end.
As a model maker, in a perfect world, that town will feature at least one decent model shop.
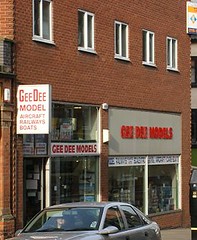
Hence I finish at Nottingham, home of Gee Dee Models.
Gee Dee's is different from most shops for a couple of reasons. First, it's huge. Two floor, three if you count the die cast display as a separate floor rather than a mezzanine.
Second, the huge stock covers most disciplines. The top floor is railways and plastic kits. An excellent range of RTR is for sale alongside a pretty decent stock of loco, wagon & building kits - not something you find very often nowadays. Military modellers are well looked after too with kits from the usual suspects plus loads from the old eastern block countries.
Downstairs are radio controlled cars, boats and aircraft. Again, the store is unusual in that you can walk in and buy a boat kit plus all the bits you need to finish the model. A large range of fittings sits on several racks in the window.
There was even a sale on. Plenty of the kits were at tempting prices and only the strongest of will power plus the knowledge of how many I have in stock already, kept the money in my wallet. It was a close run thing though.
As a model maker, in a perfect world, that town will feature at least one decent model shop.
Hence I finish at Nottingham, home of Gee Dee Models.
Gee Dee's is different from most shops for a couple of reasons. First, it's huge. Two floor, three if you count the die cast display as a separate floor rather than a mezzanine.
Second, the huge stock covers most disciplines. The top floor is railways and plastic kits. An excellent range of RTR is for sale alongside a pretty decent stock of loco, wagon & building kits - not something you find very often nowadays. Military modellers are well looked after too with kits from the usual suspects plus loads from the old eastern block countries.
Downstairs are radio controlled cars, boats and aircraft. Again, the store is unusual in that you can walk in and buy a boat kit plus all the bits you need to finish the model. A large range of fittings sits on several racks in the window.
There was even a sale on. Plenty of the kits were at tempting prices and only the strongest of will power plus the knowledge of how many I have in stock already, kept the money in my wallet. It was a close run thing though.
Friday, January 25, 2008
Banta Modelworks Crossing Shanty Kit
Ever since I built the cardboard model boat, I’ve been fascinated by laser cut wood. That kit was fantastic – no effort was required to cut the parts out or scribe planks, yet you were still working with lovely material.
For a couple of years I’ve bought an American Model Railway magazine for finescale modeller. Some of the most interesting content is the advertising. Pages and pages of it, many ads referring to laser cut kits for buildings. When I found a UK supplier – NG Trains – I decided I had to have a go.
So here we are with the Banta Models C&NW Crossing Shanty. A model picked not for its suitability for a future model railway, but simply because I liked the look of the finished product. The 7mm scale version suits the growing collection of Bachmann On30 rolling stock.
Out of the bag the parts look promising. As well as plywood there is cardboard and clear plastic along with a whitemetal chimney. The cutting is excellent and I’m keen to get started.
Watch this space for updates on the building.
Wednesday, January 23, 2008
Fixing an Antex soldering iron
While I probably pack too many tools when I go to an exhibition, there are some that I definitely wouldn’t go without. In fact if I realised that I’d forgotten to pack them, a quick u-turn would be executed to go back and get them.
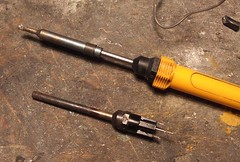
One such tool is my soldering iron. It’s an Antex 25W model which I have customised (“pimped” for the MTV generation) with a 8ft long power lead. This allows its use on the layout whilst plugged in to a 4-way block on the floor. It’s amazing how much difference this makes when you struggle to re-solder a switch blade to a tiebar in front of a crowd impatient to see trains run again. No need to find a way to get the socket on to the layout or supporting it as it dangles in mid-air !
However, nothing lasts forever and my iron packed up. But as I can’t bear to throw things away when they can be fixed I ordered a replacement element for 12 quid from Squires and carefully disassembled the iron to replace it.
Really all I have left of the iron I once bought after this is a handle and couple of screws but it’s still cheaper than buying a new one and so much more environmentally friendly.
A second iron is required for the fix as you have to unsolder the wires from the old element and solder the new one in. A matter of minutes work but a show stopper if you are fixing the only soldering device you have.
After carefully putting everything back together a quick test showed all was well and the tool can return to the exhibition box to resume its travels around the country. Soldering irons are pretty simple tools – just an element in the end of a lead really. There are only two screws to undo to release the lead and three soldered connections. It just goes to show, the simplest ideas are the best.
Tuesday, January 22, 2008
Brixham trawler
Welcome to those who have found this blog from topmodelboatsites.com.
For your enjoyment I post a picture of a modern fishing boat I took last year in Brixham harbour. I’ve been interested in these for a while – almost as soon as I was bought a 1/12th kit for a slightly smaller vessel in fact !
The interesting parts are those at the back. I’ve got to scratchbuild the gantry so I’ve collected a host of photos showing the detail. I can’t seem to find much in the way of plans so I suspect that many are built as one-offs to suit the captain’s requirements.
Whatever, with enough pics I’m sure I can do something sensible. The structure looks pretty simple to build from K&S brass bits when I get the time.
Monday, January 21, 2008
Brick colours
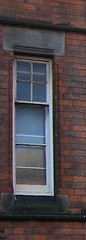
He’s a handy link for the modeller. If you’ve ever approached a model building with a paintbrush, hopefully the thought has gone through your mind, “What colour should I use”.
I tripped over the Jewson Brick Library today. It’s fantastic. You can look up all the different brick types on sale today and get full colour pictures of each one..
The surprise is the shear number of colours available. Obviously you need to try and match the colour to the sort of material used in the area you are modelling but the pictures on the site give you a really useful palette to work with. Even modern bricks exhibit a wide variety of shades. Really good modellers will print the appropriate image off and match their paints to it. The rest of us will just see if we can mix a bit of dark brown in the rust coloured paint…
Sunday, January 20, 2008
Operating session
Good day today. I started with an hour spent operating Hoath Hill Halt, a marvellous 3mm 14.2 gauge railway layout some will have seen in a recent MRJ. Peter Bossom generously gave me a quick explanation of the controls before going for a wander so I could get the hang of it without feeling my every move was being watched.
This worked pretty well as after a couple of false starts (on the first move I managed to couple the loco to another on shed ‘cos I started off in the wrong direction) I think I got the hang of it. While I won’t claim to be great at spotting the B&B couplings on magnets, nor to be the most imaginative operator on the model ever. I think I managed to entertain the early morning crowd.
Hoath Hill works fantastically though. Had I brought it with me, I’d have been very tempted to swap the chassis under my Y7 for Peter’s version. When mine works it is fine, but his is always great. Shunting is a breeze with no stuttering or stalling.
A couple of sessions in the car park did nothing to convince me to like a couple of footballers fathers, who seemed to drive like they were on a rally stage rather than entering a school. By far the largest group though, were happy and seemed to have enjoyed themselves at the show. Smiling faces on the way out means that hopefully we get to see them again next year. Partly for mercenary reasons, we need the cash to keep the club running, but also because I like people to enjoy the hobby.
Of course just when you are tired after the weekend, the real work starts. Every stand has to be helped into the back of their vehicle. Every table moved from one room to the next has to go back and every chair neatly stacked. You discover that no matter what notes and photos are taken, there are some areas where the pre-show room layout remains a mystery. We’ve done out best to put things back neatly and tidily, so I hope this is OK.
One person who will sleep better tonight will be our exhibition manager, Chris Mead, The days running up to a show are never fun for the guy in charge but this was a successful event with happy punters, traders and layout owners, so we all look forward to next year.
Saturday, January 19, 2008
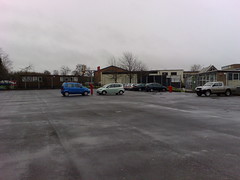
I made a car park
Ok, it’s not the sort of thing I normally write about but this photo shows the only thing I set up today. A car park at our exhibition.
Now you might say that this just looks like some cars sat in a school playground, which in essence is what it is, but the important thing is where they are parked. The playground is lamentably lacking in lines indicating parking bays so either you let visitors to the show work it out for themselves or you tell people where to go and arrange them in nice neat lines. Those cars next to the netball hoop aren’t there by chance you know, that’s the start of the middle row.
The former method results in about ten cars parked and large numbers turned away at the gate. The later involves a little pre-planning and lets you get a hundred or so vehicles into the space. Admittedly some people aren’t happy such as the guy who was asked to move his car nearer another and moaned, ”I don’t want to hit his door with mine”. As they were only just in the same postcode to do this he’d need to unbolt his door and carry it across the gap so I suggested he might be able to get a little closer without risk.
Another thing that fascinates me is the number of people who ask what time the show opens (10am) and then ask if it’s possible to get in before this. Call me a pedant but that is what “opening time” means – it’s when we open. If you can get in earlier, then opening time is earlier. Simple really.
Finally, I’d like to award a prize for the first person out of the door – 10.35am. He left after little more than half an hour clutching a bag of stuff from the second-hand stall, presumably happy with his visit. I can’t help feeling he missed out though, there are some nice layouts to look at too and with the state of the weather it wasn’t like the garden was calling out for attention.
Friday, January 18, 2008
Setting up the show
This is what a model railway show (specifically the Leamington & Warwick exhibition) looks like when it's being set up. Lots of boxes and general chaos. It's difficult to beleive that in a couple of hours order will be restored.
Putting the show together for an average model railway club member is the time for lots of lifting and carrying. Tonight it was mostly tables but I also carried some trade stand stock in. Luckily all the layouts are in place already which is a relief.
Best of all, despite having no less than 2 (yes 2!) classrooms full of second hand stall, there is nothing on there to tempt me !
Maybe my "new project seeking radar" is on the blink ?
Wednesday, January 16, 2008
Raffle Prize
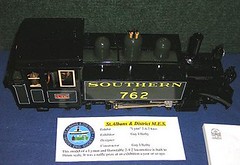
The card attached to this model says it all. This locomotive was won as a raffle prize. A G gauge, live steam railway locomotive.
How come I never see this sort of raffle ?
How come I never see this sort of raffle ?
Tuesday, January 15, 2008
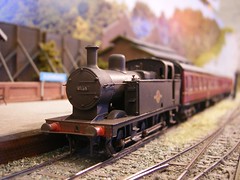
Jinties first show
St Albans was the show where my newly built Jinty was due to get its first proper testing. It doesn’t matter how many miles are put in on the rolling road, plonk it on the track in front of an audience and you see a whole new side to the model.
Anyway, on Friday once we’d set up I ran the locomotive around the entire layout to test we had power in all the track. This went OK so I decided to try it again on Saturday morning. The very slight occasional stutter I put down to needing running in. There was plenty of time before the public swarmed in so another run and things looked good – right up until the con rod fell off one of the front wheels.
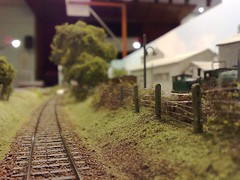
Finding a tiny nut on a layout covered in nylon grass. It’s effective both as a representation of ground cover and hiding small bits of metal. 5 minutes later we got lucky and I replaced the offending item. A smear of superglue across the top fixed it in place and glued the rod up.
With the glue not fully hardened I removed the nut with pliers and desperation, cleaned it all up and smeared WD40 everywhere I didn’t want glue. The rod, nut & washer went back on and the model was tested. Great, the wheels rotated 4/5th of the way round and then jammed with the compensation at a funny angle. I gave up at this point as we were nearly open.
Later that day with the locomotive upside down in a cradle I spotted the problem – the front steps had bent and hit the rods, stopping them rotating all the way. Bending it back cured the problem.
The Jinty ran around the railway nicely now but still had the occasional stutter and trip off the track. Looking at ground level the problem was obvious. A bright spark told me that the guard irons were fractionally too long and clipped the rails on crossovers.
What I should have done was bent them out of the way, what I did was clip them back half a millimetre or so. Result, a nice running railway loco. A morning spent on the passenger train (my running in turn) was followed by full service shunting goods.
Now it’s in the box and I’m looking for my next project.
Anyway, on Friday once we’d set up I ran the locomotive around the entire layout to test we had power in all the track. This went OK so I decided to try it again on Saturday morning. The very slight occasional stutter I put down to needing running in. There was plenty of time before the public swarmed in so another run and things looked good – right up until the con rod fell off one of the front wheels.
Finding a tiny nut on a layout covered in nylon grass. It’s effective both as a representation of ground cover and hiding small bits of metal. 5 minutes later we got lucky and I replaced the offending item. A smear of superglue across the top fixed it in place and glued the rod up.
With the glue not fully hardened I removed the nut with pliers and desperation, cleaned it all up and smeared WD40 everywhere I didn’t want glue. The rod, nut & washer went back on and the model was tested. Great, the wheels rotated 4/5th of the way round and then jammed with the compensation at a funny angle. I gave up at this point as we were nearly open.
Later that day with the locomotive upside down in a cradle I spotted the problem – the front steps had bent and hit the rods, stopping them rotating all the way. Bending it back cured the problem.
The Jinty ran around the railway nicely now but still had the occasional stutter and trip off the track. Looking at ground level the problem was obvious. A bright spark told me that the guard irons were fractionally too long and clipped the rails on crossovers.
What I should have done was bent them out of the way, what I did was clip them back half a millimetre or so. Result, a nice running railway loco. A morning spent on the passenger train (my running in turn) was followed by full service shunting goods.
Now it’s in the box and I’m looking for my next project.
Monday, January 14, 2008
St Albans Model Railway Exhibition

What a cracking show !
First, Flockburgh went very well. All the stock behaved itself with no real problems. Obviously I’m not going to claim a complete lack of derailments or stalling locomotives, but those were very few and far between. Generally everything was good. Considering the grief that accompanied the building of this model, that is fantastic.
The scenic extension made a huge difference to the model. As you can see from Saturday’s picture, the curved end to the quayside really helps complete the scene. For such a short section of scenery it received a disproportionate amount of attention. Since the layout has been on the exhibition circuit for a while, many people we looking for a second time. Although it’s not done that many shows, 3mm Society members often make a real effort to get out and see the few models in the scale – exhibition mangers please note !
Anyway, we spent quite a long while explaining the rationale behind the model and the methods used to achieve it. Quite a few people surreptitiously poked the water to see if it was wet too !
The show was very busy on Saturday and pretty full on Sunday too. There was a lot of chat about modelling something that is rare with enthusiast as they often prefer not to ask questions.
The others railway layouts were superb too. Gordon & Maggie Gravett showed their French narrow gauge line for the first time. Dirty track troubled the model both days, something the St Albans hall is notorious for. The modelling couldn’t be faulted though. I loved the scene around the river. It’s a definite case of, “I wish I could do that”. Mind you ,there were echoes of their previous railway layouts in there, the little shops looked very similar (in spirit) to those seen on Ditchling Green years ago.
Next to us was a demo of 7mm scale narrow gauge American railway modelling. The picture shows the model I most wanted take home with me – a brass Shay. Costing around be around the £1000 mark I won’t be rushing…
You can watch it on video here.
Outside the show, our accommodation was lovely. You stop in the Ardmore Hotel – comfy and with a reasonable breakfast. They were accommodating enough to do this early so we could get to the show comfortably. With the hotel being a short walk from the venue, and the venue being in the middle of town, we didn’t have to drive at all on Saturday meaning a pleasant lunchtime pint. Food was served in the pub next door. They struggled a bit but as we were on two big tables, this just gave us all time to meat old friends and make new ones, so much better than eating behind layouts.
A good weekend.
Saturday, January 12, 2008
Flockburgh at St Albans
Day one - All OK so far. Lots of chat and a few exhibition invites so far. Top quality show too.
Friday, January 11, 2008
Flockburgh off to St Albans
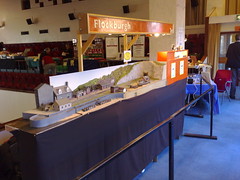
We’re on the road again this weekend, this time off to sunny St Albans with Flockburgh.
The scenic extension isn’t finished by a long way but we’re still going to take it. The photo shows the state a couple of weeks ago so if you see us you’ll notice some changes. As usual the jobs always take a twice as long as we expected. And I’d allowed twice as long as expected. Where does the time go ?
Anyway, despite having a dislike of unfinished layouts appearing at shows, I think enough has been done to be of interest to the viewers. More important, what we have is not detrimental to the overall appearance of the model. It ought to spark off some conversations during the weekend..
Incidentally if you do say hello, and please do, then let me know you read the blog. I know people do but it’s always nice to see your happy smiling faces.
Thursday, January 10, 2008
London underground model
A trip to London for work today saw me with some spare time after my meeting. Now, I could have rushed back on the train to put in 20 minutes at my desk – but as they owe me some time, I decided to go and have a look at the newly re-opened London Transport Museum.
The museum itself is pricey (8 quid entry fee !) but nicely laid out with clear and interesting information. The vehicles are accessible and even for the enthusiast the captions aren’t patronising. The clever thing is that there is something for everyone. Water traffic gets a look in as well as the usual tram, tube and bus stuff. Even taxis make an appearance to give a rounded picture. There is enough “proper” museum to satisfy with just a few pointless gizmos thought up by Marketing to show we have a 21st century exhibition space.
One hint – go when the schools aren’t on holiday. I had a reasonably quiet walk around sharing the experience with only a few tourists. There are lots of child friendly activities but I suspect a big group of ankle-biters would get very annoying very quickly.
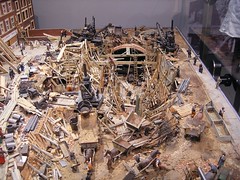
Anyway, the photos shows a truly breathtaking model of cut-and-cover tube construction. The scale appears to be 7mm:1foot. Click on the photo to see a larger version in Flickr – the thumbnail really doesn’t do justice to the sheer level of detail exhibited. I’d suspect that the scene has been compressed a little but not much. I have seen this sort of thing in photographs of the period and it looks accurate.
I loved the spoil carts lined up and ready to haul the earth away, all the wood shuttering keeping the hole er, whole and a very nice little boiler in the corner that would look lovely on the back of a wagon on my hospital railway.
You really get an impression of the chaos that surrounded this sort of work. I can well understand by contemporary accounts described how people didn’t look forward to the arrival of the railway. I doubt anyone would put up with it nowadays !
The museum itself is pricey (8 quid entry fee !) but nicely laid out with clear and interesting information. The vehicles are accessible and even for the enthusiast the captions aren’t patronising. The clever thing is that there is something for everyone. Water traffic gets a look in as well as the usual tram, tube and bus stuff. Even taxis make an appearance to give a rounded picture. There is enough “proper” museum to satisfy with just a few pointless gizmos thought up by Marketing to show we have a 21st century exhibition space.
One hint – go when the schools aren’t on holiday. I had a reasonably quiet walk around sharing the experience with only a few tourists. There are lots of child friendly activities but I suspect a big group of ankle-biters would get very annoying very quickly.
Anyway, the photos shows a truly breathtaking model of cut-and-cover tube construction. The scale appears to be 7mm:1foot. Click on the photo to see a larger version in Flickr – the thumbnail really doesn’t do justice to the sheer level of detail exhibited. I’d suspect that the scene has been compressed a little but not much. I have seen this sort of thing in photographs of the period and it looks accurate.
I loved the spoil carts lined up and ready to haul the earth away, all the wood shuttering keeping the hole er, whole and a very nice little boiler in the corner that would look lovely on the back of a wagon on my hospital railway.
You really get an impression of the chaos that surrounded this sort of work. I can well understand by contemporary accounts described how people didn’t look forward to the arrival of the railway. I doubt anyone would put up with it nowadays !
Wednesday, January 09, 2008
Build the Flying Scotsman Part 2
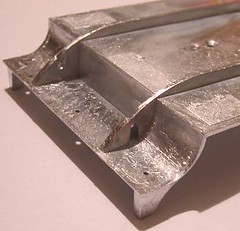
What weight 210 grams, is 29.5 cm long and appears to be made out of pewter ?
Part 2 of the “Build the Flying Scotsman” partwork.
I had said that I wasn’t going to get into this but my friendly newsagent did a hard sell on me and it is only £2.99 this time so I delved in.
This week’s part is a footplate. A single piece casting which seems pretty clean and suprisingly light. I think it’s made out of pewter rather than whitemetal. The later is unsuitable for the general public due to the high lead content in case they decide to eat rather than build with it. DJH have made a name with quality pewter castings – I have a Class 37 kit tucked away which is made of a similar looking metal.
Of course this makes the part useless to me. I can’t even cut it up and use it as wagon weights ! The chances of me ever scratchbuilding an A3 are pretty slim. Still, that’s what the bits box is for…
The magazine gave me a surprise. It recommends Modelex for your tools – run by Pat Ryan who I’ve known on the exhibition circuit for years. I hope he gets a useful boost in sales for this clever bit of marketing.
This model has generated a lot of chat on message boards across the web. I picked up a lot of on Model Boat Mayhem but have seen it on railway modelling boards and even one that is just for people in Sheffield !
Many have pointed out that you can buy a ready to run brass model from Tower that is very similar but costs less money. You have to ignore the fact the brass model needs painting to make the numbers work, unless you can wield the spray can yourself.
People have said it must be expensive because you can just go and buy a kit. True, but as I pointed out recently the numbers aren’t that much in your favour. And you don’t get the very explicit instructions and a magazine written for the people who buy those very generic railway books. This time you find out about caboose’s (is that the correct plural, cabeese perhaps ?) and the Stockton to Darlington railway. If you enjoy that sort of book I suspect the kit as a whole would be too complicated – this isn’t a criticism as everyone has to start somewhere – so this is a good starting point.
Others have criticised it just for being a part-work. The attitude is that they are all rubbish and abandon the readers half way through. I know some don’t survive but most must otherwise the publishers will go bust. The first couple of issues are loss-leaders with high advertising spends and high print runs. You’ve got to catch people very fast or you never get them. The money must come in later on when you can produce almost exactly the number of issues required.
Personally I hope it works. In a couple of years I’d love to see dozens of happy people with Flying Scotsman Locomotives at shows. Perhaps a few of them will try another kit too. It doesn’t matter, as long as they have enjoyed building their model then that is a good thing.
Anyway, I definitly won't be building this model, so go and visit someone who is.
Tuesday, January 08, 2008
Promenade handrails
Railway modellers have huge numbers of bits and pieces available. You’d think there would be nothing a layout builder could want for. Not true though, when I’m being a 3mm scale modeller I often find I have to improvise – good news as that’s the bit I like best. There’s no satisfaction (for me anyway, you may feel differently) in just buying things and plonking them down on the railway.
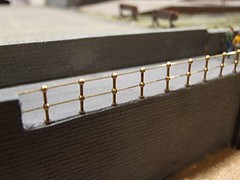
For the promenade I needed some handrails. We don’t want the little people falling into the sea do we ? The trade seems to have omitted them from their plans.
No worries though. 1:100 is a common boat modelling scale and I build model boats. The other handrail stanchions came from Deans Marine. Sadly they didn’t have any at the model boat show. While mail order may be OK, I can’t do a credit card thing for less than a couple of quid can I ?
A trip to Midway Models in Leicester sorted me out though. They had some lovely brass ones that take 0.45mm wire. I drilled small pilot holes and then banged them into place with a hammer – the ends are pointed like nails so I assume that’s how you are supposed to work. Hitting things with a hammer is never a bad idea is it ?
Sunday, January 06, 2008
Building a beach
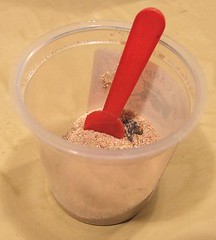
The only element carried over from the railways existing boards to the new one is a small section of beach. Being unsure how to model this last time I went for the simplest option – real sand.
The sand used is from Southwold and stored, since the holiday when I collected it, in an old ice cream pot. The ice cream was particularly nice as I recall. These elements combine to give this material a proper seaside provenance.
Of course the big problem is scale. Each grain of sand is 100 times too large. It’s a beach covered with sand coloured golf balls. We’ve all been to British beaches like this but they are pebbles and that’s a different colour.
Colour matters to my eye more than the scale of the sand. If you look at the stuff the hue is simple enough but the way light reflects both of and through it is impossible to replicate – at least for me.
Anyway, I spooned the sand onto the area to be beached with a ice cream spoon. This looks like a spade (as in bucket and) which makes me happy. It’s an easy to use tool too which is why I kept it in the bottom of the tool drawer.
The sand is stuck down with watered down PVA (49% PVA, 50% water 1% washing up liquid) but this alters the colour slightly. When it’s dry then, I painted neat PVA over the dunes and sprinkled more sand on to.
Finishing touches include a bit of flock powder to give the effect of grass as seen on dues at the top of a beach.
Now, how do I make a 1:100 sandcastle ?
Saturday, January 05, 2008
Modelling water part 2
Wet enough for you ? This is the current state of the “water” on my model railway.
The secret is simple. Ronseal yacht varnish. Currently 4 coats of it but I’ll probably add a couple more to get the best results.
For those who aren’t familiar with yacht varnish, it’s a high gloss clear substance that just happens to have a very appropriate name for this purpose. While a couple of coats will do the job, the more you do the greater the apparent depth of the water is. Don’t make the mistake of pouring it on like you might with resin though, it won’t dry properly and you’ll get unrealistic wrinkles.
The surface isn’t perfect but those imperfections that do exist I think add to the effect so I’m leaving them. Perhaps a better modeller than I would carefully sand each coat with flour paper to get perfect coats but that seems a lot more work than it’s worth.
Oh, and don't forget to dust and polish the surface at every model railway exhibition. Nothing looks dafter than dusty water !
Friday, January 04, 2008
Modelling water part 1
Model water has (apparently) been the source of problems for many years. If you want to create a static version of a fast flowing river then it’s true, you are stuffed, as it’s never really going to look right. OK, I know people have had a go at this and in photos sometimes it doesn’t look too bad, but waters’ one of those things that really needs to move as it’s not the water itself that eye sees but the movement of foam and ripples.
Anyway, the trick as far as I’m concerned the trick is to pick static water or at least the stuff that isn’t moving much. Handily, this is exactly what I’m working on for Flockburgh’s quayside.
Now I have been here before. There is nice static water on Melbridge Dock that has fooled people for years. We often get finger marks as visitors touch it expecting to get wet !
Stage 1 is to smooth the baseboard. I’ve used Polyfiller as there was some handy in the garage but I’m sure any similar filler will do.
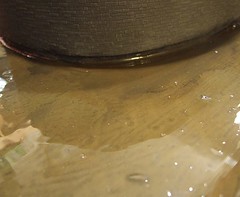
Next, paint the surface with a Humbrol chocolate brown enamel paint. Not sure if it has to be enamel but that’s what I’ve used.
When this is dry, wash over with very thinned down black. Streak it out from the quayside in random fashion. This gave me the effect as seen in the photo. Check back tomorrow for the finishing touches.
Anyway, the trick as far as I’m concerned the trick is to pick static water or at least the stuff that isn’t moving much. Handily, this is exactly what I’m working on for Flockburgh’s quayside.
Now I have been here before. There is nice static water on Melbridge Dock that has fooled people for years. We often get finger marks as visitors touch it expecting to get wet !
Stage 1 is to smooth the baseboard. I’ve used Polyfiller as there was some handy in the garage but I’m sure any similar filler will do.
Next, paint the surface with a Humbrol chocolate brown enamel paint. Not sure if it has to be enamel but that’s what I’ve used.
When this is dry, wash over with very thinned down black. Streak it out from the quayside in random fashion. This gave me the effect as seen in the photo. Check back tomorrow for the finishing touches.
Thursday, January 03, 2008
Railway video
Messing around with my 'phone this evening, I shot this on the O gauge layout "Kimble".
The thing about 7mm scale is that when you can watch the trains go by, they are so impressive. Real anoraks will be delighted to see that the signal moves at the right time - we're not just playing trains you know !
For more about the layout, visit the website.
The thing about 7mm scale is that when you can watch the trains go by, they are so impressive. Real anoraks will be delighted to see that the signal moves at the right time - we're not just playing trains you know !
For more about the layout, visit the website.
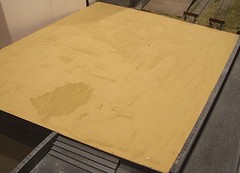
Painting concrete
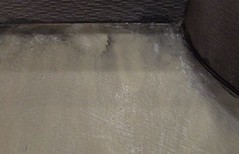
So I start on the dockside with a wash of greyish paint. Not a particularly dark grey but blacker than a mid grey. This was brushed over the ochre liberally and left to dry. There were problems getting it to stick to the area I had spilt PVA on – you can see it in the last picture as a darker blob – but working it in seemed to help.
The result was, erm, different. The grey was too dark and the result too patchy. I’d hoped the well watered down paint would gently tint the base coat. Instead I had pools of colour. Some looked OK if I squinted but there was too much contrast between the colours.
Soooo I tried to sand it off with some very fine paper. Not back to the bare wood but just trying to take the grey off or at least reduce its effect. This went very well actually, I was much happier with the effect.
I still needed to get some more colour in so I mixed a watery brown/grey mix and brushed it in well. The colour looked good but I think the older coats lifted and I found I was swashing around quite a thick mix. Worse I was leaving brush marks.
Desperation set in and I tried patting the paint with a wet kitchen towel. To start with this looked a bit regular too but with more water and random patting I thought I might be getting there. At this point I decided to give up and let it dry.
The result looks OK I think. With the buildings on top it is even better. The problem is that I want a surface people ignore so if you ever see the layout at a show, please pretend not to see this bit.
Wednesday, January 02, 2008
Big ochre
Daunting isn’t it. Where writers get scared of a blank page, modellers can be nervous of blank areas on the model.
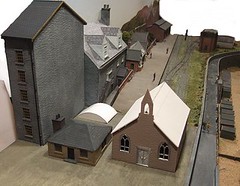
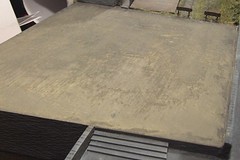
This is the quayside area on Flockburgh’s extension. In this space will appear the end of a warehouse, small office and a chapel. These are at various stages of construction. Before they are finished though, I have to paint this area.
First coat is a pale ochre/grey mix. I’m going for a concrete finish rather than cobbles. Looking at pictures in books it’s often difficult to tell exactly what the ground cover is in many docks. I doubt tarmac would be employed and the pictures would bear me out – they often just show a pale area but no detail. Bigger docks were tributes to concrete anyway so I’ll assume that someone did the same here.
The paint used is cheap poster stuff from a cut-price bookshop. The bottles on sale for 99p do nicely for this work. I mixed in a little plaster of paris to give some texture. The wood had already been skimmed with Polyfiller which will help.
My plan when this lot is dry will be to try some washes of colour to break up the area. I fancy some greys with a hint of brown but will see how this looks after a few coats.
Tuesday, January 01, 2008
2nd Birthday

It's the 2nd Birthday of my blog. 2007 has seen 292 posts, a few more than last year which either indicates that I'm getting better at writing, doing more modelling or should get out more...
Looking back through the posts is interesting, for me at least. I always wonder what I've whiled away time on.
There has been the cardboard boat, African Queen, Puffer and Tomsk on the water. Of course the first was started in 2006 and on the next two I did very small amounts of work.
Slingshot racing went well too. I'm stupidly slightly proud of winning the series, although the greatest achievement was that I managed to keep the boat running most of the year. Nothing wrong with the model you understand, I just tend to be jinxed when it comes to competitions.
Talking of winning, I managed to score a win with my mineral engine, one of the few models I actually built for the railway this year and even that was started some time before ! I did manage a Jinty in 3mm and a Class 14 though.
As usual the Type 2 has given me the sort of grief that classic car owners are supposed to love but in reality we would prefer to avoid. I suppose some big jobs have been completed - the engine is back in with the refurbished fuel tank and the front beam has been replaced. With only one night away this year I don't exactly have a huge target to beat on 2008 !
Finally I was suprised to see I've clocked up four magazine articles this year. Most of them in VW mags too. Nothing in the railway line but there are reasons for that. Perhaps next year I'll get back on track (pun intended, please groan).
Anyway, there are several projects lined up for this year. I need to finish the 1361 class locomotive and footy fishing boat. Flockburgh's extension will be going to show in a couple of weeks too. After that there is a Caledonian loco in HO, a couple of little diesels and possibly even a Garratt or two...
Subscribe to:
Posts (Atom)