This is my 400th post to this blog, quite a milestone in a world where most blogs only have two entries:
Entry 1 – “This is my blog”
Entry 2, a month later – “Oh, I haven’t updated my blog. I must do this more often.”
And then nothing.
Anyway, I’m feeling pleased with myself, not for writing this much rubbish and cluttering up cyberspace, but because my 1971 VW Type 2 Campervan passed it’s annual MOT at the first attempt. There was mention of a slightly sticky calliper on the offside front but apart from that, flying colours. Any owner of a classic car will understand the elation I felt at this news.
No it wasn’t a dodgy garage, and I would thank you for keeping such suggestions to yourself.
To be honest I don’t see the point of getting a dodgy MOT. If the vehicle fails then you were going to be in trouble at some point anyway. Better for the brakes not to make the grade on the testers rollers than on a steep hill with you in the front seat. With that seat being so close to the windscreen in a T2, this is something I care about…
My elation was short lived when I discovered on the way home that the fuel gauge was accurate and I really did have very little petrol on board. So little that on every steep hill the engine suffered fuel starvation. There are some very steep hills near the garage and not many places selling petrol, I think I arrived on fumes. Oh well, at least I know to believe the fuel gauge now.
Tuesday, July 31, 2007

Monday, July 30, 2007
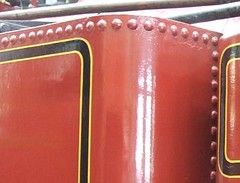
Rivet problem
Here’s a problem. On Isle of Man locomotives there are several lines of rivets on the tank sides. Unfortunately the whitemetal kit for these locos doesn’t.
So I need to find a way to fix this omission.
If they were bolts I could add them from cubes of plastic stuck in individually. Admittedly I’d go mad doing this but at least it would be possible.
Rivets though are smaller and flatter. They also have a domed profile. How the hell am I going to make these ?
The only think I can think if is drops of PVA glue applied with a syringe but I doubt my ability to let a consistent amount out each time. Perhaps some sort of thick ink would work ? But what sort of pen to use to dot it on the surface ?
Any suggestions ? I admit to being stumped here.
Sunday, July 29, 2007
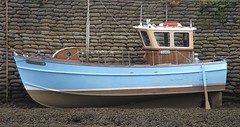
Sailing Pigeon Pie
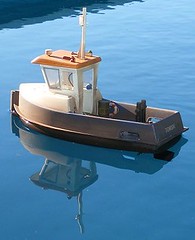
Doesn’t this look lovely ? Pigeon Pie - the largest, most complex and expensive moadel boat I have ever built - complete and on the water. Today was bright and sunny with a stiff breeze, an ideal day to go sailing. Good news as we were supposed to be Slingshot racing as well.
On the water the boat behaved impeccably. Although the wind catches it in some directions there is plenty of power to overcome this. Even side on to the breeze there is little pitching as it’s very stable.
And the model looks smashing. Adding fenders really brought it to life, a bit like dressing a stage set. Some small holes in the bottom of the tyres might be a good idea though as one or two had water in them after the voyage but if that’s as bad as it gets I’m not complaining.
All this means that I can throw away the huge box the model came in. It’s not served any useful purpose for a while but I kept it to remind me that the model needed the finishing touches. A stupid superstitious part of me also likes the “full stop” that chucking the leftovers away gives a project. Tidy people would do this as the project progresses but I prefer to see it as a celebration of successfully getting something finished.
Saturday, July 28, 2007
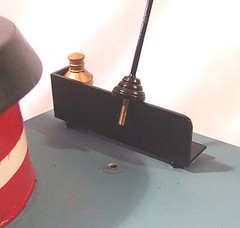
Aerial
I think this is ingenious, even though I say so myself.
Because the aerial on this boat is too tall for the box when the model is packed away, it needs to be removable. However I don’t want it falling off on the water so I also needs to be firmly attached.
So I took the whitemetal base and tapped the bottom for an 8BA bolt. Then I fitted the brass aerial in the top.
A nut was soldering into a large brass washer and expoxied under a small hole in the wheelhouse roof. Once dry the aerial can be screwed into this with fingers so it’s easy to attach or remove.
Simple huh ?
OK, so the first time I superglued the nut under the roof and when I tested things glued the whole lot up solid leading to lots of swearing and careful fiddling, but now I’ve finished the results look good.
Friday, July 27, 2007
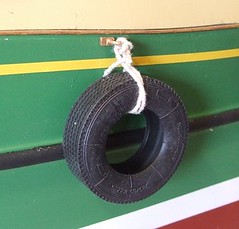
Fenders
Once the “handles” had dried out I carefully plotted the position on the side of the boat and drilled the fixing holes. The castings were then attached with superglue. To ensure correct positioning on the hull I made a up a little jig – a plasticard off-cut with a hole drilled in it that was placed under the top rail for each fixing.
The tyres are from a model shop in York. The looked about the right size and were nicely moulded. A feed pip was trimmed with small sharp scissors and then I dry brushed the rubber with dark grey (Humbrol 67) to stop it looking so shiny. In the raw it looked like I nicked them off a toy lorry !
Tying them on was fun. My stock of coarse string was limited so I had to be as economical as possible. The tyres are set at the same level as the rubber rubbing strip as this looked right. All the knots were soaked in superglue to make sure they don’t come undone or at least I hope they don’t. There are working parts, the paint has already taken a few knocks so these fenders will serve the same purpose as on a real boat.
The artist in me likes the ugliness of the fenders, in contrast the rest of the model looks so refined. It’s the same effect as a “beauty spot” on a person. They also help to bring the model to life giving it “texture” and turning a model boat built from a kit into a model of a boat.
Thursday, July 26, 2007
Finishing touches
At present my plan is to finish as many of the projects I have kicking around as I can before being tempted to dig out anything new. I’ve said this before though so we’ll see how long it lasts.
Anyway – next on the list for finishing off is Pigeon Pie, my 1:12 tug-yacht. While it has been sailing for some time there are a few bits and pieces to do before I can say it’s truly finished. Nothing to difficult I hope, just paint stuff and stick it on.
Most of the work is around or on top of the wheelhouse, except for these rings. Apparently they are attached to the side of the boat and I assume, have tyres tied to them to act as fenders. These parts never show up in photos of tugs so I am relying on the supplier (Metcalf Mouldings) to get this right.
The castings were pretty clean and so I drilled holes in my painting wood for the spigot on each. Then splashing a coat of paint over the whole lot was a piece of cake. Much better than trying to do the job with the bits stuck to the model while avoiding surrounding paintwork.
Wednesday, July 25, 2007
Small fishing boat
Since taking up boat modelling I’m always on the lookout for attractive prototypes to build. This isn’t that easy when you live as far away from water as it’s possible to get in the UK. However my trip to the Isle of Man gave me a more fruitful hunting ground.
The vessel was spotted in Ramsey harbour - a simple fishing boat that doesn’t look to be too long (anyone want to hazard a guess on the length ?) or covered in fiddly bits. It’s not dissimilar to George Turner’s footie fishing boat in many ways.
Since the boat is sitting on the mud you get a good view of the hull and rudder. An interesting detail is the pair of legs to hold the boat upright when it is sitting on dry land. The colour scheme is also nice and clear. Not sure if the bottom is meant to be mud coloured, or if’ it’s just ended up like this though.
If anyone fancies having a go at this boat, I’ve a couple more pictures showing the front and back more clearly so send me an e-mail. To be honest I have far more kits in the building queue than I know what to do with so it will be a looooong time before I get to this one, if ever.
Tuesday, July 24, 2007
Loch
OK, I'm back. Since I'm too tired to post anything model releated and anyway, haven't done anything like that for the last few days (you aren't allowed sharp tools on aeroplanes) here's one of the pictures I took while away.
You are looking at Loch in steam at Douglas station, Isle of Man. Since I'm building a model of one of these, I took copious pictures, to add to my already well stocked cupboard of images. Still, you can't do too much research can you ?
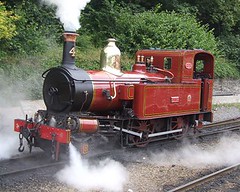
You are looking at Loch in steam at Douglas station, Isle of Man. Since I'm building a model of one of these, I took copious pictures, to add to my already well stocked cupboard of images. Still, you can't do too much research can you ?
Thursday, July 19, 2007
Holiday
No posting for a few days as I'm off to the sunny (I hope) Isle of Man. Have a dig through the archives if you need something to read, with nearly 400 posts to chose from I'm sure there is something to entertain you.
Back soon.
Back soon.
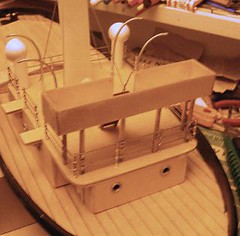
Flying Bridge
My Dad makes wooden boats. He’s currently working on a tugboat based on a plan that pre-dates me by at least 20 years. It’s so old that radio control isn’t considered and a Bassett-Lowke motor is the suggested powerplant.
One of the more interesting features is the flying bridge. Rather than a conventional (for now) enclosed design this is little more than an open platform on sticks. It’s a bit like early Clyde Puffers which offered their crews no protection from the elements. Heaven knows what life would have been like onboard in anything other than nice weather – or in the case of the Clyde, 360 days of the year !
Holding this bridge up are 6 lengths of square brass tube. Originally these were epoxy glued to the boat top and bottom. A gentle nudge against the side of the pool on the maiden voyage broke most of these joints so a new plan was needed.
Aged brainpower not being what it was, the model comes to me to sort this problem out. I added a central core from wire, which sticks out of the top of the tube, and through holes in the bridge floor. Also, I actually studied the plan properly making me realise I could get away with soldering the uprights to the handrails. As these are well fixed down I think this should take the odd knock.
The model itself is looking lovely. I appreciate that this picture, taken indoors with only an incandescent light bulb, doesn’t do it justice. Removing the strong orange colour cast from the bulb hasn’t helped either ! When I get the boat for painting I’ll add some better pics.
Tuesday, July 17, 2007
Manx cab roof
I was going to write how impressed I was with the way the Peacock locomotive’s roof had gone. It’s made up of three parts – the middle one being flat with the rear flange and sitting between the front and rear cab sheets which include the bends. All were soldered with low melt solder and carefully cleaned.
In real life you can’t see the join. In the photo it’s all too obvious. I’ve commented on the cruelty of the camera lens before but this is the best example I’ve seen.
Fortunately people only see the model in real life – before all the evidence gets covered in paint anyway – and not in picture, except here.
Sunday, July 15, 2007
Rain restarts play
It’s raining outside. Not the torrents of water hurling themselves from the sky that we’ve seen recently but enough for the KMBC barbecue to be cancelled. I don’t think anyone fancied yet another wet days sailing. The food wouldn’t be much to look at either if the charcoal got wet.
Anyway, once I tidied away the boats I had prepared there was an empty afternoon to fill. This time next week I should be on the Isle of Man so the moment seemed to have arrived for me to finish the locomotive I started months ago.
When I packed it away the chassis had been built and tested but nothing else was done. Today I cracked on with the whitemetal body. Despite being a aged GEM kit this goes together OK. Quite a bit of work was required with the mini-drill and dental bits to remove metal that gets in the way of the mechanical parts. Much of the floor has vanished to clear the wheels and the boiler metal is quite a bit thinner too.
Despite being tested the chassis also took some tinkering. If I’d spotted that there were a few under-gauge sections on the test track I’d have saved myself some work but not much. Both sets of driving wheels moved outward on their axles and the gears had tightened up (how does thins happen ?!) but all was solvable in a couple of hours. The loco now runs up and down the track reasonably nicely.
Of course however steep the learning curve is on this model, I have no choice but to go through it. If I want to build and IOM layout, and I do, then I’ll need to do at least three more of these…
Saturday, July 14, 2007
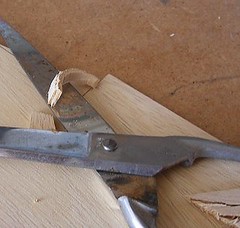
Cutting wood
I know you are supposed to cut wood with a saw but I was in a hurry and the piece was going to be hidden. Anyway, I’m sure I read about a proper modeller who used scissors on wood.
Doesn’t make me a bad person does it ?
Doesn’t make me a bad person does it ?
Friday, July 13, 2007
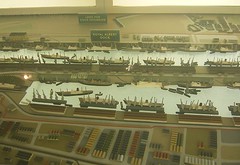
London docks
This isn’t one of mine, it’s a small part of a fascinating large model showing most of the London dock system in the late 1960’s. You can find it in the ship gallery of the Science Museum in London.
The model is over 20 feet long and shows just how huge the system was. I can’t image this sort of industry in the centre of the capital, but it was there – I’ve seen the films and the photographs.
I was in London for a meeting that finished at 2pm, so rather then rush home I took the tube down to the museum for no better reason than it was free and I haven’t been there for years. Once you get away from the crowds who seem mostly interested in the shop, it’s great. Better still, in the older galleries such as the one with the dock model it’s like a proper old-fashioned museum. Lots of display cases with exhibits in. Many of the captions are over 30 years old judging from the wonderful use of a strict sans-serif font and proper plastic lettering rather than something knocked up on a Mac and a printer.
Many of the displays are models, especially in the ship section. In fact there are some of the largest ship models I’ve ever seen there with many over 8 feet in length. Of course these are from the days when a manufacturer or owner would commission a model as well as the real boat. Then they’d need the space in the office and offload the thing to the museum.
The best miniature work was reserved for the tractor (OK, history of farming) gallery. I have no idea who built them but they were superb. Even the figures were superb quality, pretty unusual as the models tend to be built by engineers rather than artists.
All this makes me think – our models are often historical documents as well as interesting items. Sometimes the only way you can appreciate a prototype, such as Londons inland port network, is in miniature. I just hope that no-one decides an interactive multi-media display isn’t a better use of space than this amazing relic though.
Wednesday, July 11, 2007
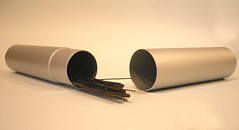
Tube
Storage of the various bits we modellers need can be challenging. Traditionalists rely on tobacco boxes and indeed many a shed contains a fine stash of these. No-one in our family since my Granddad smoked roll-ups but we’ve got a fine selection in the garage.
These are too short for some things though. A point in case being fretsaw blades – too long for most boxes but too fine even in quantity to fill a decent sized container.
I used to use a plastic toothbrush container but after a lot of years in the drawer this had finally given up the ghost. Suggestions on various e-mail lists ranged around Bill Clinton’s favourite toy, the cigar tube. Since I don’t smoke the chances of finding something suitable were limited.
A trip into Muji last week supplied me with just the thing. An aluminium pencil case. Achingly trendy and not a hint of tobacco in sight.
I might need to look at the supply of tobacco tins though.
Monday, July 09, 2007
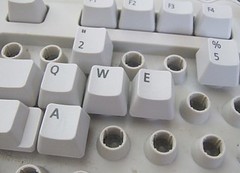
Eco-keyboard
Does anyone else clean computer keyboards ?
Mine has been getting murkier and murkier, but since it’s a gradual process I hadn’t really noticed. It’s often like this, look at some else’s keyboard at work and see how revolting it is. You’ll be amazed at the levels of grime that people are willing to put up with.
At work it’s cheaper to replace a keyboard than clean it properly. I know you can use wipes and giant cotton buds but let’s face it, you only do it to avoid working and unless you are really fastidious it doesn’t really work properly.
No, the only way to clean a keyboard is to take it to bits. The keys were all flipped up using the screwdriver bit on my penknife. Then they were washed in the sink and left in the sun to dry. While that happened I vacuumed the dust, dirt and bits of food up from where they had been hidden. A paintbrush was employed to disturb the dirt where the suction wouldn’t do the job on its own.
Finally the keys are popped back into place. Being a touch typist would help but I’m not so I started up Word and poked at keys with a pen to work out what went where.
Result – a keyboard that is as good as new. Cost – nothing but time. Much more eco-friendly than listening to James Blunt singing…
Sunday, July 08, 2007
HO Barclay - done
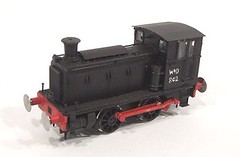
Another completed project – this is turning out to be a good weekend !
The Barclay is ready to go – everything works and looks fine. I don’t normally finish models in ex-works livery but this one certainly looks very smart like this.
The buffers are particularly nice, previous models have had whitemetal ones whereas these are Gibson. The steel heads are just the right colour, hardly suprising as they are just the right material, and with the clean paintwork look spot on.
This Barclay is a funny little loco. A diesel with a chimney like a steam engine (I know it’s for weight distribution but it still seems odd to me…). It’s cute though, a feeling lots of people share judging by the number of kits that have been sold. I just hope no-one spots this and brings out a RTR version !
Saturday, July 07, 2007
Tomsk
Tomsk has sailed. He’s had half an hour around our pool – which is a very pleasant way to spend a rare dry and warm evening. All was well with the controls acting as they should, no water on the decks and little list. He looked smashing too.
With this, I think I can say that this boat is complete. There are a couple of outstanding jobs- the radar still needs replacement and I have to wire up the navigation lights, but then you never really finish a model.
For the moment I need to stop. Like an artist who keeps daubing paint on a canvas and eventually ruins the work, I don’t want to risk tinkering forever and always being dissatisfied. At present I’m happy.
And that’s what it’s all about.
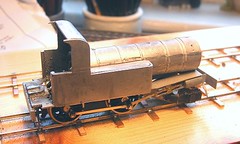
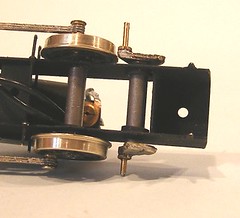
Cranky afternoon
Lots of grumbling this afternoon.
The EM gauge axle arrived and so I was able to fit the cranks to the locomotive. This wasn’t too painful – clip the threaded portion off the ends of the axle then solder the cranks on. With a hot iron, whiff of flux and tiny amount of solder the job is soon done. It’s something that’s a lot easier if you are confident. Trying to hold the heat on for too long is a route to disaster as the laminations that make up the cranks separate.
The trouble starts when the rods are attached and you want the wheels to go round.
First, the cranks don’t stick out beyond the wheels so the rods have to be bent in to meet the pins. This effectively makes them shorter so the holes have to be elongated to compensate.
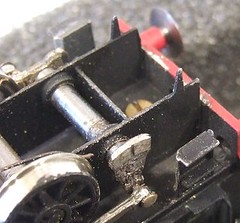
Having got the wheels rotating with the body off, this is fitted and the cab steps get in the way. Only a little, but enough to jam everything up solid. So a “happy” hour of filing the crank pins down as small as they can go and chamfering the edge of the steps ensues. You can see the result in the photo. The cranks and steps miss by less than a millimetre but it’s enough.
With the clearances restored I then discover that the rear holding nut has come off inside the cab. Since I don’t want to remove the roof I tapped the hole out to 8BA (Originally it was 10BA) and use the bigger bolt. It’s not got much to bit on but the result seems to work.
Oh, and tightening up either retaining bolt hard twists the chassis so don’t do that either.
But it’s done. A little touching up of the paintwork where I filed metal away for clearances, a dash of red on the waggly bits and we are finished I think.
The EM gauge axle arrived and so I was able to fit the cranks to the locomotive. This wasn’t too painful – clip the threaded portion off the ends of the axle then solder the cranks on. With a hot iron, whiff of flux and tiny amount of solder the job is soon done. It’s something that’s a lot easier if you are confident. Trying to hold the heat on for too long is a route to disaster as the laminations that make up the cranks separate.
The trouble starts when the rods are attached and you want the wheels to go round.
First, the cranks don’t stick out beyond the wheels so the rods have to be bent in to meet the pins. This effectively makes them shorter so the holes have to be elongated to compensate.
Having got the wheels rotating with the body off, this is fitted and the cab steps get in the way. Only a little, but enough to jam everything up solid. So a “happy” hour of filing the crank pins down as small as they can go and chamfering the edge of the steps ensues. You can see the result in the photo. The cranks and steps miss by less than a millimetre but it’s enough.
With the clearances restored I then discover that the rear holding nut has come off inside the cab. Since I don’t want to remove the roof I tapped the hole out to 8BA (Originally it was 10BA) and use the bigger bolt. It’s not got much to bit on but the result seems to work.
Oh, and tightening up either retaining bolt hard twists the chassis so don’t do that either.
But it’s done. A little touching up of the paintwork where I filed metal away for clearances, a dash of red on the waggly bits and we are finished I think.
Friday, July 06, 2007
Dirty
Tomsk will be very different from most model boats. He’s going to be dirty. Not a little grubby from handling but properly dirty - just like the prototype boat would be if it existed.
Looking at most boat shows you will find lots of models whose owners would be horrified at the concept of weathering them. Many still can’t get their heads around the idea of using matt paint and insist on finishing warships and working tubs in gloss.
Coming from the model railway world this seems to be the thinking of the early sixties. All the religious debates over weathering or not have been finished, with the general acceptance that if you want a model too look right, it needs to show signs of wear and use. Basically paint what you see not what you want to see. There is still a place for the “ex-works” item but not on anything that claims a shred of realism. Anyway, a high gloss finish is much harder to get right than something less pristine so the pragmatists have their way…
The best way I have found to get the level of dirt I want is to airbrush on lots of coats of very thinned paint. That way the grime builds up in a controllable way. I use thinned rust, rust brown, dark brown & grey. These are randomly sloshed into a paint cup full of thinners and sot at the model. I did my best to keep the glass clean as the skipper would see to this. The hull though got a real blast. You can still see it’s blue but not very.
Perhaps I have gone too far but I like it and on the water I think the end result will be pretty realistic.
Wednesday, July 04, 2007
Waggly bits working
Still no axle for the cranks – a reminder ‘phone call will be made tonight.
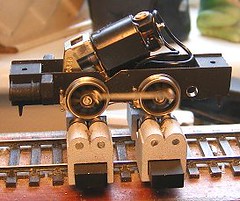
In the meantime I have fitted some pickups and wired the loco up. It’s now sitting on the rolling road running in. Apart from a light reaming out of the holes in the rods everything seems OK.
There was a slight bind when the model was first started but a touch of oil on the gears and bearings cured this. The running in process wears the tiny bits of paint that are left in the bearings and weren’t removed by the post spraying reaming process. No matter how hard I try I never quite get everything out. Part of the problem is that I won’t loosen up the axles in the bearings too much preferring to let the running in do this. Obviously everything needs to work but I prefer to get all the mechanical bits bedding in at the same time.
Looking at the picture I'm struck by the similarity between my chassis and the cheapo Hornby 0-4-0 one that turns up under things like thier Caledonian Pug. Those aren't cylinders at the front, they are air tanks and sand boxes.
Tuesday, July 03, 2007
Body beautiful
Sometimes you just can’t get what you want no matter how had you look. I’ve never been able to track down any transfers for WD locomotives so I have to do something I hate – hand paint the stuff on the side of the cab.
I’m no signwriter unfortunately so I just keep bodging at the numbers and arrow with little brushes to get something that is passable. This loco is to be delivered with an ex-works finish too, so there isn’t even any chance of hiding my handywork under a layer of muck.
On boats I can print names and graphics using my printer and the Supercal system but the one colour this can’t do is white. I am pleased with the text colour though. It’s a mix of white and 147 pale grey which looks like white but isn’t so glaring.
Once this was done I blasted the whole body with satin varnish. Using cellulose thinners again worked OK so I guess this will become part of my standard method now.
Now all I need is the crank axle and I can finish this beast.
Sunday, July 01, 2007
Size matters sometimes
There I am gamely making swift progress with the Barclay when I hit a show-stopping snag.
At the back of the chassis is a crank axle. On the model this whirls round and looks pretty but otherwise doesn’t do anything, except in this case – it gets in the way. Thanks to the slightly oversize flanges on model wheels and the reduction the fret has had from 4 to 3.5mm scale, the clanks overlap the flanges a fraction. This is less than a millimetre so it isn’t normally a problem. You just make sure that the cranks are in front of the flanges.
Easy enough if you have an EM gauge axle. Thanks to a packing error, I have a OO (or HO) one which just put the cranks in the wrong place.
A new axle is winging its way to me once the Post Office has gone back to work and everything will be fine.
Pity about this as I’d make a nice job of the cranks. They’ve been soldered with the RSU so there is little mess. I even tapped the crank pins with so they screw in rather than just drilling a suitable hole and soldering them in. That’s as close as I get to proper engineering.
Subscribe to:
Posts (Atom)