If you are going to put the effort into building a kit there is no point in skimping on the parts if you don’t have to. One of the most important areas are the mechanical parts – if the model runs well you can forgive it any number of deficiencies in the bodywork. On the other hand a perfect model that lumps along the track will always be a disappointment.
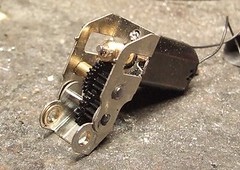
Fortunately good gearboxes are reasonably cheap and easy to come by. This one is from High Level models with Mashima motor hanging off the back. Although it looks like a fearsome beast it goes together very easily. The toughest part is reaming out the holes for the intermediate shafts. These need to be done slowly so there isn’t any slop. Not a problem for most people but I have to stop myself taking too much material out - clean the hole, check, clean some more and check again. Little and often.
The shafts are supposed to be cut with a slitting disk in the mini drill. I prefer to use some big (Zebra) wire cutters as they don’t heat the metal up like the friction created by the disk does. The cutters have done no end of shafts, including the ones on motors, which are especially hard, and survived although I could really do with a new pair after 15 years !
One good thing about these ‘boxes is that they don’t require total precision. There is lee-way in the gears so perfect meshing isn’t required. Since I can’t mesh gears for toffee this is a relief. In fact my inability with gear meshing is the reason I started putting gearboxes in models in the first place.
Sunday, December 31, 2006
Thursday, December 28, 2006
Death to Railway Modellers
I know it’s a bit early for new years resolutions but never mind. One thing I plan to do is rid my life of Railway Modeller magazines.
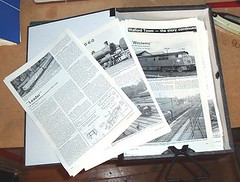
This isn’t because it’s a terrible magazine – although it’s not as good as it used to be as there are too many layout articles and not enough on making things – it’s because I need the space. The shelf where the 18 or so years sit is full and other books and magazines are building up elsewhere. In the end the RM’s are the publication I need least.
So, I am busy reducing the pile. Plans and anything that looks like it could be interesting stay, everything else goes to the recycling centre. You are looking at about eight years worth of surviving text here. It doesn’t even fill half a box file.
Wednesday, December 27, 2006
Armstrong Chassis
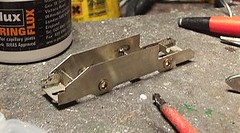
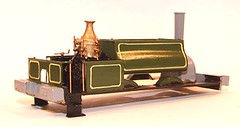
I think this is what the chassis should look like. It seems to fit the body and has the axle holes in the correct places so it ought to do the job.
Having messed around with the original K’s chassis, I’ve no idea how this was supposed to work. One problem is that the rear axle will, if the kit is built as intended, go straight through the footplate floor. At least it would if the axles weren’t several millimetres below the outside frames instead of poking through the holes they are supposed to.
My method for working this out was to solder two thicknesses of nickel silver together, mark the axle positions and then chop away until the part fits in the body. For no partially good reason I started with frames 15mm deep which were then reduced in places as required. Obviously you can’t go too thin as mechanical strength would be lot and anyway, the frame bushes need a couple of mm around them or you can’t solder them in place ! Once I was happy the sides were unsoldered and cleaned up to give to identical pieces.
Frame spacers are from Comet. I didn’t fancy trying to cut really accurate ones from raw metal when perfectly acceptable versions are available etched. No point in making any job harder than it already is !
Tuesday, December 26, 2006
Boiler battles
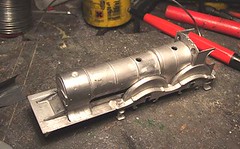
If there is one thing worse than flash in a white metal locomotive kit, it is mould mis-alignment.
K’s didn’t do me any favours with the boiler on this loco. At least an hour has been devoted to scraping, filing and polishing the part into something that resembles round while keeping the boiler bands and sundry detail. The alignment was out by about half a boiler band. Not much, but enough to ruin a model if not corrected.
Most of the work was carried out with a three-sided scraper. I’ve never been averse to using a file despite the warnings of doom normally associated with this. The lead-based alloy will clog the teeth of a file, although using a course one helps, but these can be cleaned out simply enough using a file card or wire brush.
The body has now been tacked together using low-melt solder so I can work out the chassis. I’m not planning to use the horrible K’s item but it’s not obvious what shape works best. Tacking the item together means I can fiddle around and experiment. And if there is a problem or it all falls apart then I’ve not wasted too much effort.
Monday, December 25, 2006
Merry Crimbo
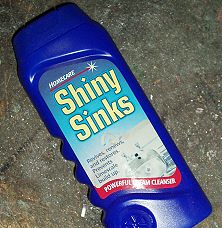
It’s always nice to get a surprise present at Christmas. In my stoking I received a nice new bottle of "Shiny Sinks" cleaner. Just as the one I am using to clean etched kits after an evening soldering is running out.
Santa really does work hard !
Santa really does work hard !
Saturday, December 23, 2006
Flash - aaarhh !
You don’t get kits like this any more. Proper kits where you have to carve the bits out of a whitemetal mess with your bare hands. Kits for real men. This is macho modelling.
It’s also a right pain in the backside. You forget how bad mouldings used to be a couple of decades ago. We used to think this sort of thing was normal. Now the quality of castings has improved immeasurably. Even the guy doing it in his shed as part of a cottage industry is better.
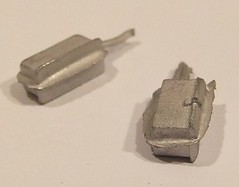
Ideally I’d send these back but since the firm went out of business years ago that isn’t going to work. Of course as a “real man” I just set to and sculpt the bits to look right. Luck is on my side as the lime of flash doesn’t run across any detail. Even if it did, on the tender toolbox I could replace it with microstrip.
The boiler on the other hand, now that is proving more of a handful.
It’s also a right pain in the backside. You forget how bad mouldings used to be a couple of decades ago. We used to think this sort of thing was normal. Now the quality of castings has improved immeasurably. Even the guy doing it in his shed as part of a cottage industry is better.
Ideally I’d send these back but since the firm went out of business years ago that isn’t going to work. Of course as a “real man” I just set to and sculpt the bits to look right. Luck is on my side as the lime of flash doesn’t run across any detail. Even if it did, on the tender toolbox I could replace it with microstrip.
The boiler on the other hand, now that is proving more of a handful.
Friday, December 22, 2006
Sponges
On the right, you see the sponge from my soldering iron stand. On the left, a replacement bought this week from Squires.
What a poor, tired thing the old sponge was. At about a third the thickness and full of solder it really wasn’t doing its job.
Proper modellers clean the tip of their iron every time they make a joint. I probably do this every third or fourth joint. A clean iron makes better joins, it’s that simple. Back in the old days people would file excess solder and that weird black muck off the end of the iron. This also removes the plating and dramatically shortens the life of the bit. File too hard and it dramatically reduces the length and shape of the bit as well.
The old sponge has been in use for at least five years. I wonder if the new one will last as long ?
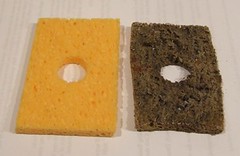
Thursday, December 21, 2006
Fame again
January Model Boats magazine – An article about the building of my George Turner Models Day Boat, “Pootle”.
Lots of pictures of the inside, as that is where all the action is. For a cheap kits, and at under a tenner they don’t get much cheaper, there is a lot of fun in this little model.
Buy the magazine to read over the festive period. Then send the editor a letter demanding more from the same excellent author !
Wednesday, December 20, 2006
Fun and games with rails
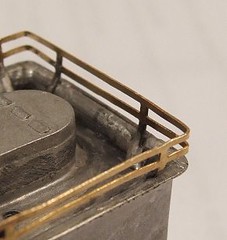
The coal rails have given me grief and loads of it.
First attempt – Use the supplied etched ones. These have to be bent to go around the corners and then the uprights are curved to fit the tender flair. I tined the bits to be soldered to the whitemetal with normal solder so the whitemetal version would stick. Nothing seemed to work. One of the uprights on each side got in the way of the divider at the back of the coal space. I fiddled away for an hour or so and pulled them off in frustration. They didn’t look much like the version on the prototype anyway.
Second attempt – Marking the positions using a plan, I made some uprights using 0.45mm wire. I then ran wire around for the rails. All soldering was carried out with low-melt solder. It sort of worked except at the front ends where I couldn’t get the curves right. The horizontals weren’t great either as they could be a bit lumpy where the solder ran along them. The joints were also weak but I couldn’t use proper solder as it would melt the sides.
Third attempt – After leaving things for a night and coming back fresh, I straightened out the etched rails and re-tinned them. Looking at the plan one upright does coincide with the back of the coal space so I clipped off the let that gets in the way. The mid point was marked and the corners bent so the rails were the right shape rather than trying to form and fit.
The end result is pretty good. I’m still not entirely happy that they are flat rather than round in profile, but what I have looks neat and tidy which is more important. When replacing parts in a kit it’s important that the replacement doesn’t look worse than the original – or there’s not much point in making the change.
Tuesday, December 19, 2006
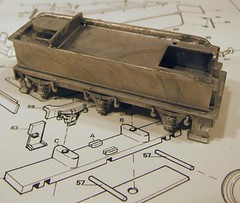
Start at the back
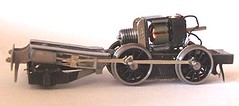
A tender locomotive consists of two separate kits. The kettle and the water carrier. In the case of the Armstrong I have decided to start with the watery end. This is a good ploy that many modellers employ as it gives you a chance to get aquatinted with the vagaries of the design of whatever kit you are working on whilst building something that will stand a certain amount of fudgery. Lets face it, mess the motorised end of the model up too much and it won’t work.
The K’s kit has a very nice exploded diagram to follow and some instructions I didn’t bother to read properly. A good picture is worth a thousand words and this is certainly a good picture.
So far everything has gone together OK. Assembly is carried out with low melt solder. I know people are often scared of this having been warned not to turn the precious parts into a molten lump. In reality this is difficult to do as the solder has a lower melting point than the kit. Simply set the temperature of the iron hot enough for one but too cold for the other. Do not attempt this without an iron you can’t control.
All the parts have been assembled as supplied except the side frames which needed to be thinned down and moved out slightly. The kit is designed for OO and this will be an EM gauge model so I needed to squeeze a bit more room or the wheels wouldn’t rotate – not a feature anyone wants in a model locomotive.
Monday, December 18, 2006
Another one for the stockbox
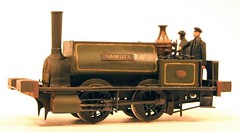
The Neilson mineral engine is finished. Possibly the longest gestation period for any model locomotive I have ever built is over.
With the chassis finished I reattached the body and started weathering. Since reading “The Art of Weathering” I have airbrushed a gentle weak mix of browns & greys over locos to take the edge off all the colours and provide the look of general grime that covers everything railway – at least in the bits I model anyway.
The trick from the book is to dirty the model and then clean it using a cotton bud dipped in turps. This simulates the efforts of the driver to keep his locomotive presentable. I had given quite a good coat so the cleaning really stood out. This was helped by painting the green bits in satin varnish so they stood out against the matt dirt.
Of course nothing stays clean forever and so another light coat of grime is applied. This means the “uncleaned” areas get even muckier and those that were wiped down don’t shine quite so much. Dirt clings in hard to reach crevasses exactly as it does on the real thing.
Whatever the science, the results look good, to me anyway. A little dry brushing on step edges and at the front where ash would be pulled out of the firebox finished the job.
All I had to do then was add coal in the bunkers, put the crew in place and clean the wheels.
Then I have another one for the stockbox.
Sunday, December 17, 2006
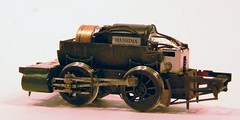
Chassis done
Chassis always need special weathering, The mechanical bits either need to be kept clean or be cleaned before you finish. Without the body access is always easier as we don’t want the footplate getting in the way and resulting in clean paint showing do we ? The motor gave me something to hold on to anyway.
I usually just dry-brush some tank grey (Humbrol 67) on anything black and then add in track colour and rust where required. The important thing is to hide any pure black and highlight any detail. If you put rivets on anything, they need highlighting or no one will see them.
Dry brush work also gives a bit of the texture that real dirt has. We don’t want to go mad with this as this is real dirt scaled down 76 times – for all intents and purposes this means smooth. A bit of grain bounces the light around though, which looks authentic.
The last job is to go for it with some weathering powders. I’m not a huge fan of these as they don’t stand up to handling. In the inaccessible areas this isn’t a problem, and there is little better for simulating really think rust as found on the bottom of fireboxes and fronts of cylinders.
Friday, December 15, 2006
Putting the brakes on
The mineral engine kit has, as is usual from High Level Model, superb brake gear. The prototype is unusual as all four shoes bear on the rear pair of wheels. This is possibly because it had to handle heavy stone trains or maybe just a foible of Neilson’s.
Construction is very cleverly planned with all parts being easy to assemble. The shoes are three layers of etch and slot into the hanger. A small piece of wire hooks into the chassis so you don’t even have those annoying wires running all the way through and getting in the way. There is certainly no chance of clobbering the coupling rods with this method. In theory you can build the brakes and paint them before attaching to the model. You shouldn’t even need to solder anything to the chassis – I wouldn’t fancy risking this but others might.
Needles to say I managed to screw things up. Making the last brake assembly it pinged off into the distance, never to be found again. I paused for a while (several days) while thinking about the solution. In the end I just used two shoes instead of four. Since the loco isn’t really supposed to appear on the Hellingly Hospital Railway anyway, I think a bit of modellers licence can be applied here.
The rest of the bits fitted well filling up the back of the chassis. That little bit of detail puts some much-needed life into this part of the model. I like to see a bit of complexity below the footplate or it all looks a bit plain. Once upon a time this was how model railway were but nowadays we expect better.
All of this coincided with me dropping the chassis and bending everything behind the gearbox quite a lot. A bit of desoldering the frame spacer and bending the sides cured this but I don’t advise try it !
Wednesday, December 13, 2006
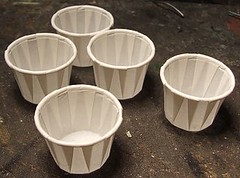
McDonalds, the model makers friend part 2
Yet again I find myself in a McDonalds, and yet again I manage to pick up some modelling tools.
This time there is something for the painters – small wax paper pots. Each is 3.5cm wide and 2.5cm deep. To be honest I don’t know what you are supposed to use them for so can only guess they are provided for mixing small amounts of model paint it. They might also come in handy for holding small chassis parts such as screws while you dismantle things.
Now I am sure that Ronald M doesn’t want modellers around the world helping themselves to all his pots and stirring sticks but I say he can get stuffed. Let us band together and with a concentrated effort, bring this king of capitalism crashing down by our excessive collection of freebies. We will make the world of commerce quake at the threat of direct action. The Financial Times will be replaced with British Railway Modelling as the read of choice for the city trader.
Come to think of it, red curly wig might be OK if it were dyed and used for scenics…
Sunday, December 10, 2006
Why don't kits come complete ?
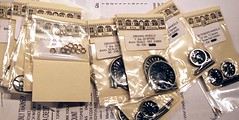
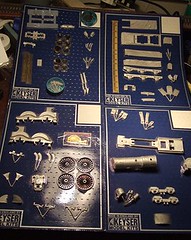
This is a small selection of the parts needed to finish the GWR Armstrong locomotive kit. Mostly it consists of wheels but there are some other odds and sods. What’s not there is a motor or gearbox, these are still in the post. 70 quids worth of bits to add to the cost of the kit.
Most newbies wonder why model locomotive kits aren’t supplied with all the parts needed to complete them. It is a bit of a shock to look at the price of a box of bits only to realise that you have to add another chunk of cash, sometimes doubling the final bill, if you want to finish and run the model.
Some kitmakers provide beginners kits that are complete, others give you wheels or gearboxes as they manufacture their own and want you to use them. Most don’t bother leaving the poor modeller to work out what else is required. In the popular scales they usually help with a list but get off the beaten track (e.g. to 3mm scale) and you are on your own.
Now I don’t care. Having built more locos than is good for me, I have my favourite wheels, motors and gearboxes. When I buy a model I know roughly how much to add and where to get the extra parts. For the record, my favourites are: Romford wheels, Mashima Can motors & High Level or Branchlines gearboxes depending on the model.
Of course the beginner knows nothing of this. He or she wants it all in a box and wants to know why the model railway world has grown up in this apparently user-unfriendly way.
The reason is simple. It might at first glance appear to make things difficult but actually makes life easier. The Armstrong is to be built to EM gauge – so I need EM wheels. There are OO ones in the kit and they will be left over at the end. There’s nothing I can do about this. Motors and gearboxes are similar. If this kit had included one, it would have been a K’s one-piece unit. Fine if you like the smoke effects produced when this gives up the ghost but I prefer to put a good unit in first time so the loco is only assembled once.
Complete kits have to be built down to a price. This means you get cheap parts and not necessarily good ones. Worse, if you want to change something then you still have to pay for the part you don’t want and then replace it with the one you do.
In theory the model shop fills in the gap. New modellers want to buy a kit and the experienced man behind the counter offers sensible advice based on years of experience to help with the extra parts. Of course there are very few model shops and even fewer that supply locomotive kits. Mail order and chasing the cheapest price have seen to this. Manufacturers now have to fill in the gaps – fine most of the time but they often don’t stock all the parts themselves so you don’t have the one-stop solution.
I suppose this is all part of the learning curve for a modeller contemplating building their first locomotive. It is certainly a good reason for joining a club so you can learn from others mistakes.
Friday, December 08, 2006
Lines
Brian very kindly lent me a Bob Moore lining pen some time ago. I’ve tried painting think lines on rolling stock in the past with a bow pen but it seems like hard work. The Bob Moore pen looked easier but at 90 quid any experiment would be expensive. Fortunately Brian didn’t get on with his so I had a go.
As you can see the results aren’t half bad. The trick is to accept that the professionals don’t get it perfect first time and fill in corners or erase mistakes with a small brush.
I used the pen with Precision lining yellow and a bit of care. Only the straight lines were pen’d. I did the best I could to keep them straight and in line with the nearest edge on the bodywork. Once they were in I filled the corners with yellow to allow for the curve using my only pure sable brush. Finally the green was used to make the curves and fix my lining wobbles.
Last job was to spray the whole lot with satin varnish. Not to protect anything, just to bring the mat colours alive a bit. The result is too shinny and looks a bit toy-like but I hope that a good heavy weathering will calm everything down.
The lining pen was reasonably easy to use. It comes with only one size of nib but you can buy others. It’s not as flexible as a bow pen because you are very limited to the size of line. I know you can rule an extra line beside the first but that second one will be difficult to keep in line and neat. The secret is to make proper plasticard guides. For the IOM locos this will be on the “to do” list.
Wednesday, December 06, 2006
A Bit dead
If you leave your soldering iron on for over 24 hours this is what happens to the bit.
Looking on the positive side, the iron (50W Antex) didn’t come to any harm. The same can’t be said for the bit though. No amount of cleaning and re-tinning would save it.
I’ve probably done my bit for global warming as well. At least I didn’t set fire to the house !
Still, after all the service this bit has done, all the kits it has seen and the fact I tend to use whitemetal and normal solder without cleaning it properly I suppose it was overdue for retirement.
Actually, the new bit worked a lot better than the old one. Perhaps there is a lesson in this ?
Tuesday, December 05, 2006
Manx Chassis
OK, so this is a bit late as I got this far on Friday but I thought I might as well blog it anyway.
The Isle of Man Peacock chassis is finished. Not completely, there is still brake gear to add, but enough for me to be happy I can build these things and make them work.
This is a pretty fiddly build. Not that this is the fault of the kitmaker, Beyer Peacock have to take the blame. If only they had used a more conventional design. Everything assembles OK as long as you take care to open slots a little or file cusp away. Nothing too challenging although perhaps off-putting for the beginner. If you’ve done a couple of etched kits and take your time then this is do-able.
One point to watch is the front pony, which is fiddly to hold while keeping everything square. The bearings need to be pushed in a bit to grip the axle properly and this is the first time I have preferred top hat to waisted.
Anyway it’s back in the box now. Once day I’ll get around to building the body to go with it.
Sunday, December 03, 2006
(Not) Planning ahead
Yesterday I was walking around the largest model railway exhibition in the country.
Today I decided to get out the Armstrong locomotive kit I promised top build for George.
Then I discovered that the box didn’t contain the motor, wheels or gears required to complete the model. Guess who now has to order all the bits he could have bought over the counter 24 hours ago…
The Armstrong will be an interesting project. I’ve always considered anything Great Western to be beneath me. Lets face it, GWR modellers aren’t really all there are they ? Lots of bucolic branch lines and pannier tanks but no proper engines. They take themselves soooo seriously too – some of us still remember the fuss they made when “City of Truro” was painted BR black for an April Fool years ago.
Perhaps I am jaundiced from the early years of my railway modelling life when every second layout was a GWR branch, probably Ashburton, so exhibitions all looked the same. I wanted something different which probably explains my love of little industrial engines. Preferably grimy, ugly ones.
Anyway, George seems to have a knack of picking the good ‘uns. This loco has the outside frames and elegant lines of a true thoroughbred. It has style and beauty and class. This is going to be a good looking model.
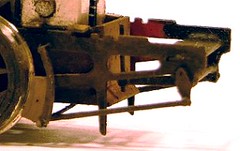
A problem solved
I think it makes sense to finish the chassis for my model Isle of Man Peacock before putting it away again. If I’m confident it is running up and down the track, I’m confident that I can finish the model. Then I can get stuck in with something else. Also if all the bits are soldered in place I can’t lose any of them can I ?
Anyway, I have the chassis trundling up and down a bit of GEM flexitrack (I think that’s what it is – it looks older than me) and decide to fit the rods and cross heads. The model continues to work but not awfully well. It’s a bit hesitant at some parts of the wheel revolution. I put this down to stiffness, iffy pick-ups or dodgy quartering. Things do seem to improve a bit as the model runs.
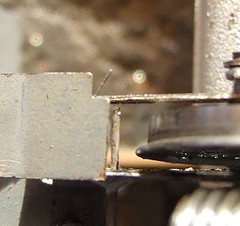
Then I spot the obvious. The rods are touching the wires to support the brake hangers. Not enough to jam things solid – I have been there before – but enough to make the wheel pause as it rotates.
There is no need to have the wires that long. On the finished model they need not reach as far as the face of the wheel but it is convenient to leave them longer than required while building as it saves measuring things.
Of course I have now chopped the wire back as the photo shows and the chassis runs a lot better for it. Perhaps by adding this to the blog I’ll remember next time !
Anyway, I have the chassis trundling up and down a bit of GEM flexitrack (I think that’s what it is – it looks older than me) and decide to fit the rods and cross heads. The model continues to work but not awfully well. It’s a bit hesitant at some parts of the wheel revolution. I put this down to stiffness, iffy pick-ups or dodgy quartering. Things do seem to improve a bit as the model runs.
Then I spot the obvious. The rods are touching the wires to support the brake hangers. Not enough to jam things solid – I have been there before – but enough to make the wheel pause as it rotates.
There is no need to have the wires that long. On the finished model they need not reach as far as the face of the wheel but it is convenient to leave them longer than required while building as it saves measuring things.
Of course I have now chopped the wire back as the photo shows and the chassis runs a lot better for it. Perhaps by adding this to the blog I’ll remember next time !
Saturday, December 02, 2006
Warley & the demise of the hobby.
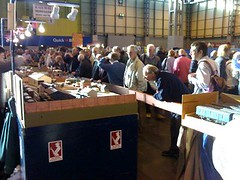
This is the view from behind a layout appearing at the Warley NEC show at about 11:30 today.
As you can see there is hardly anyone in the hall. Look at the empty gangways and the tumbleweed rolling through the venue.
This is obviously a hobby that is, as we are often told by wise letter writers, in it’s death throws. No one is taking part. The people who are interested are dying off. Strangely I remember that this has always been said. The attendees at exhibitions have always been middle aged and older men. Presumably they have dies off and been replaced by other middle aged and older men. I wonder if this is a pattern.
The show itself is excellent. I wouldn’t say it is the best in the world – something this big simply can’t guarantee that every layout and every trader is the best possible in the hobby. What you get is quantity. Hopefully there is something for everyone and most people will see something they haven’t seen before. On this basis you should leave happy.
I managed to spend money as expected. I was also very good and resisted some of the goodies on offer. If you bought an Impetus kit for a 4mm scale Fowler diesel then than me for leaving it there even though I really wanted to bring it home to my “pending” pile. Yet again I didn’t buy a Russian locomotive kit either. Or any Garrets (Ok, I’ve sort of ordered one but it is from a friend of a friend). Or anything for the garden railway (nice boxy loco kits from GRS for only £150, tempting). I couldn’t get to the Squires stand to buy a new tapered reamer either because of the crowds.
In fact there were only two downsides. First I had to come away at 3pm although the NEC is pretty tiring (not that I came back from the pub last night late) and the idiot who barged past me violently while I was queuing at a stand. Note to idiots: if you say, “Excuse me” people will often get out of the way. Otherwise you are obviously the sort of sad act with not interpersonal skills the media loves to portray railway modellers as. And that goes for you Mr Exceptionally smelly at the Bachmann stand as well.
If you are reading this on Saturday night you still have Sunday to get down to the NEC. Do it, you won’t be disappointed.
Friday, December 01, 2006
Running - sort of
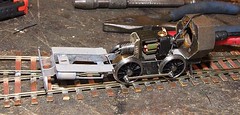
The experiment has been a success. Well nearly anyway.
It looks like I can build an IOM loco chassis and get it running without too much pain. Good news as the new layout isn’t really viable without them and I can’t see Hornby coming to my rescue any time soon.
Obviously there is supposed to be a front bogie to keep the nose out of the sleepers – I’ve built this but need another half hour to fit it. Instead a big nut on the back balances things out.
Quartering was “fun” as the jig wouldn’t fit the front ‘cos the running boards get in the way. The back was OK though so I set this and adjusted the fronts. Getting the rods over the fat Gibson bushes was interesting too. Not much metal left at the end of those rods.
However it looks like it works and so tomorrow I plan to spend some money with Mr Branchlines.
Subscribe to:
Posts (Atom)