A tender locomotive consists of two separate kits. The kettle and the water carrier. In the case of the Armstrong I have decided to start with the watery end. This is a good ploy that many modellers employ as it gives you a chance to get aquatinted with the vagaries of the design of whatever kit you are working on whilst building something that will stand a certain amount of fudgery. Lets face it, mess the motorised end of the model up too much and it won’t work.
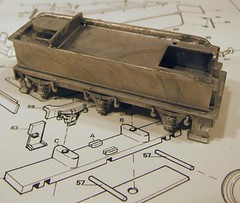
The K’s kit has a very nice exploded diagram to follow and some instructions I didn’t bother to read properly. A good picture is worth a thousand words and this is certainly a good picture.
So far everything has gone together OK. Assembly is carried out with low melt solder. I know people are often scared of this having been warned not to turn the precious parts into a molten lump. In reality this is difficult to do as the solder has a lower melting point than the kit. Simply set the temperature of the iron hot enough for one but too cold for the other. Do not attempt this without an iron you can’t control.
All the parts have been assembled as supplied except the side frames which needed to be thinned down and moved out slightly. The kit is designed for OO and this will be an EM gauge model so I needed to squeeze a bit more room or the wheels wouldn’t rotate – not a feature anyone wants in a model locomotive.
No comments:
Post a Comment