Sunday, May 31, 2015

Railex 2015

ContainersTo Stoke Mandaville with a shopping list!

Railex is one of THE shows to attend if you want top pick up lots of modelling bits and pieces in one hall without all that pesky mail-order nonsense. As such, it would be worth the trip even if it wasn't 65 minutes fairly easy drive away. The only problem is that parking is limited so those heading that way on Sunday (when the crowds are lower and talking to people easier) need to get an early start or end up on the (excellent) shuttlebus.

Layouts are normally of the highest quality and this year was no exception. While I spent more time shopping and chatting than leaning on a barrier, Im confident that there wasn't a duff one in attendance.

To celebrate the 50th Anniversary of the 3mm Society being formed, a corner was given over to the scale, possibly the largest collection of such layouts ever seen.

Underground stock

In the middle of the hall we had a rare appearance by Pete Kaizer's superb model of Corris station.

Coris veg plot

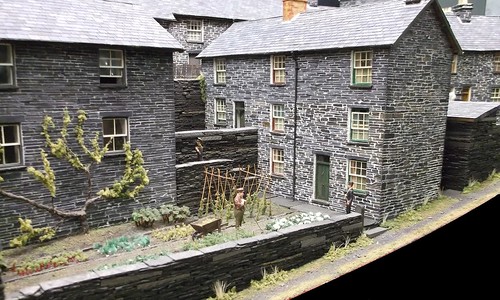
Thanks to the weight of the slate and plaster built scenery, the layout sees less outings than it might, making any appearance special.

While Pete's stock and locos are excellent, my eye is caught by the little details in the scenery such as veg plots and washing lines. These are handled as well as anything you are likely to see. I also had a sneak preview of a couple of new locos he's built - early versions of Talylyn No's 1 and 2 in cabless form. Both are scratchbuilt with only motor and gears bought in. This sort of modelling is incredibly rare in our modern RTR obsessed hobby. Maybe I'm alone, but I'd love to see more of this and less box opening.

Wagons

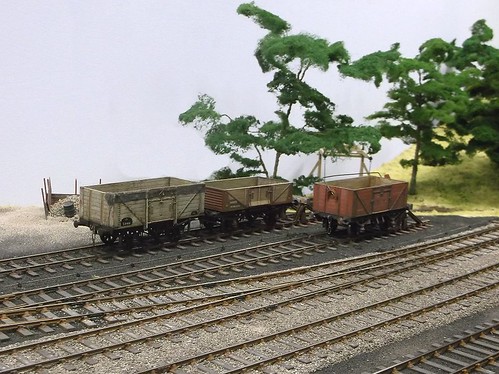
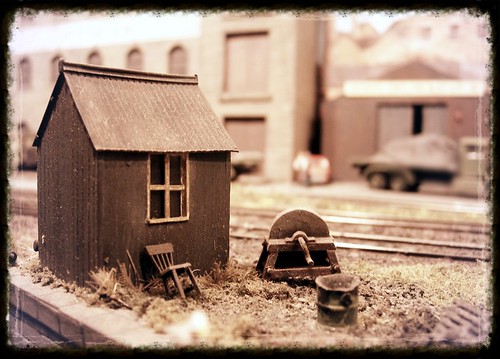
With an eye for detail, I was spotting all sorts of interesting modelling. The ballast bin, roughly assembled out of corrugated iron particularly appealed to me. I know everyone else was eyeing up the G2s trundling around but I know what I like.

NCB Shunter

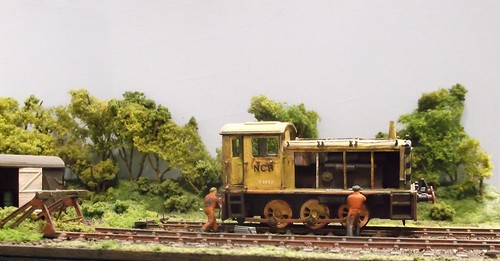
The corner of the P4 Society stand featured a lovely little diorama with an NCB shunter under repair. I say lovely, but I'd an idea for a very similar model so perhaps that will have to wait until everyone has forgotten this one lest someone accuse me of model plagiarism!

The good news is that the shopping list was mostly fulfilled apart from one trader who wasn't there (and never was, I should check the exhibition website properly before I go) but apart from a single set of transfers, everything was for work projects. Like a proper railway modeller, I had a full rucksack by the end of the day.

More photos on Flickr.

Saturday, May 30, 2015

Pen/shovel

Model Engineering penshovel

Sorry, I've been very busy lately, so you'll have to make do with a photo of a souvenir from the 58th Model Engineer exhibition in 1990.

Call a spade and spade? Not when it's also a pen...

Friday, May 29, 2015

Little Phil puts on his specs

Little Phil wearing glasses

One thing that "Little Phil", the 3cm tall 3D printed model of me was missing, was a pair of glasses.

I've worn 'specs since I was 10 but it seems that 3D scanners struggle with glasses , so like a passport photo, you have to take them off.

Fine, but then it doesn't really look much like me, so yesterday, I spent a few minutes with some 0.33mm brass wire and a soldering iron, making a pair.

It's much harder then it looks to do this. The end result is a bit more rock star (anyone who said Dame Edna Everage can leave now) than I'd like but they will do for the moment.

Incidentally, if you want your own Little Phil, you can download the model:


If you want to know more about the scanner used to do this, it was the Structure scanner in combination with the ItSeez3D app for iPad. And I want one.

Thursday, May 28, 2015

#3dBenchy

3dBenchy3

Wandering around the 3D Print show, I spotted a little orange boat. Being a bit of a boat fan, I took a closer look. I liked the cartoony style - it had a definite "cute" about it.

Then I saw another one on a different stand.

3dBenchy2

and another

3dBenchy1

What was happening? Was it an invasion? Was the Spanish Armada back in miniature form?

The answer came in the far corner of the show.

3dBenchyflotila

The model is #3DBenchy, a design that has been made freely available for people to download and print. The idea is that you have the design as a control file which can be sent to different printers. The designers provide dimensions so the printer can be checked and calibrated.

Different printers can be compared against each other too. The stereo lithography clear print above looks better than any of the others for example.

Of course, I wonder if I could print one off big enough, would it float and could I stick a motor in it?

More details at the 3D Benchy website.

Wednesday, May 27, 2015

Hopefully, THIS video works


Apparently yesterday's video showing 3D printing didn't work for some people. Sorry about that.

The problem was that I had put the film on Flickr, and they recently "upgraded" their service so that it doesn't work in Internet Explorer 9 - the web browser I use and can't upgrade until I get to a version of Windows beyond Vista.

Since I have a Windows 8 laptop, and consider this operating system to be the greatest advert in favour of software piracy (they are stealing mine and lots of peoples time with this stupid, unusable software, we should be able to raid Microsoft's HQ and steal all their stationery for a start), I'm waiting for Windows 10.

The workaround is to use Firefox as my browser, but even here, Flickr's "improvements" get in the way and you can't easily share video, at least not without it breaking it seems.

Uploaded to YouTube, the video now works (I hope) and you can enjoy it above. Of course, this also required Firefox (Or Google Chrome, which is also evil) so that's taken me rather longer than it should.

And people say building kits is hard work...

Tuesday, May 26, 2015

Video: 3D printing


I mentioned yesterday, that I was filming 3D printers in action when I was leapt upon and scanned.

Even though I've seen the process many times, I still find it mesmerising - hopefully you do too, as here's the results of the filming.

Monday, May 25, 2015

3D printed "little" Phil

Lat week, I visited the London 3D print show. Waiting around for my colleagues to join me, I filmed a printer producing little head and shoulder models of visitors. While doing this, I was leapt on by one of the stand staff and offered the chance to be immortalised in PLA.

How could I resist?

Making little phil

To support the chin and front of head, sacrificial supports are printed into the model. These can be trimmed off with sharp knife, revealing the finished article:

Little Phil

Not too bad a likeness, at least as good as you get in 3cm tall plastic models! Printing time was 40 minutes on an Ultimaker printer.

Sunday, May 24, 2015

KMBC Model lifeboat day 2015

RNLI FlagFor the last few years, the Lifeboat Enthusiast Society has held a sailing day. The event has moved around the country and this year (and next), it's Knightcote MBCs opportunity to host it.

We're quite well set up for this sort of thing. As well as the pond, on the site there is a small conference centre where talks can be held. For added entertainment, the railway club agreed to open up in case anyone was bored with boats.

I started my day on car parking duty, a chance to wear the hi-vis jacket I bought a few years ago. You can see me from space and on a hot day it's going to be a bit warm, but at least I can pretend to be official. It worked as everyone stopped, to be directed to the correct parking location.

By lunctime we abandoned this as everyone who was coming was there - and ti was an excellent turnout.

Large boats seemed to be the order of the day with several around 5 feet long that required special trolleys to move around. We'd WD40'd the launching ramp the day before and it was working smoothly - but hardly anyone used it. Most were set up to work from the landing stage with the hull being launched and then the superstructure placed on top.

Men and boats

My Brede enjoyed a few laps of the lake until its battery started to run down - I think I need to give it a longer charge or perhaps find a suitable ni-cad.

The talks were entertaining - one on the Arun lifeboats and another by the owner of an ex-RNLI Rother boat. Much as I like the look of the later, owning a real one seems scary expensive and an awful lot of effort. Far more effort than a couple of weeks sailing would seem to justify. I'll stick to models.

The afternoon saw some cracking weather and lots of boats on the water. A good day was had by all and we are looking forward to doing the same next year.

Lifeboat day photos on Flickr

Saturday, May 23, 2015

Preparing the Brede

 
Last week, in preparation for the boat club lifeboat day, I hastily dug out my scratchbuilt Brede Lifeboat planning to give it a sail.
 
While I built the boat a couple of years ago, it's never really sailed in anger. A little messing around on the water for some magazine photos, but a proper sail? I've never had the time.
 

This became obvious when I took the top of it to work out which battery should be fitted. There wasn't one fitted and no obvious place to stick one. A quick look at the magazine article or those photos I've managed to recover on my hard drive didn't help.

Eventually, I decided that something 6V and jelly would do the job. By leaning it on a hull former with some Blu-tack and wedging the top end against the motors, it didn't seem to be going anywhere in a hurry.

Best of all, once charged up, everything worked, so the next day it was off to the water...

Friday, May 22, 2015

Little wooden hut

LittleHut

If you've been looking at MREmag.com this week, you'll know that I've got a fairly major project going on there at the moment building a new website for the magazine. This has coincided with a few other big projects that I actually get paid for - all of which has meant very little time for blogable modelling.

So, for today, I've been digging around on my hard drive and pulled out this photo of one of my favourite models, the little hut at the front of Melbridge Dock. Apply some exciting filters to the image and it has some of the look of an old photo.

The hut is scratchbuilt from plasticard, based on one I saw in Railway Modeller on Henry Hollingsworths amazing 16mm layout. Loved the layout, couldn't build a large scale L&B loco but a little hut caught my eye (I bet everyone else ignored it) and I had to have a 4mm scale version.

The surrounding junk comes from Cooper Craft (grinding wheel), Ratio (chair) and Knightwing (oil drum). I'm particularly fond of the chair - just the sort of thing you see dumped around buildings but not modelled that often. Mind you, it's a fiddly kit, so perhaps that's not a surprise. Mind you, I built a pair of 7mm scale versions earlier this evening...

Thursday, May 21, 2015

Magnetic attraction

Top Clips

Chalk this one up as something I've always wanted to try. The idea of using rare-earth magnets to hold down a model boat superstructure won't be new, but I've not done it before.

The Bantam deck is flat, with limited freeboard to keep water away. Thus, the superstructure needs to be held down well. My first thoughts were to do the whole job with magnets but then a little lateral thought, partly inspired by Iain Rice's ideas about attaching model loco chassis to body's, made me realise that if the front clipped in, only the back needed fixing.

A simple clip was made from plastic sheet - the U-shape fits around the deck. Don't test this when the solvent is still wet though!

At the back, a strip of tinplate is glued under the cabin. A rare-earth magnet (bought as a set of different sized ones on eBay) attached to the plastic shelf grabs this at the back.

Result - the superstructure is fitted and doesn't move. You can't pick the boat up by it, but you can turn it upside down. That seems like about the right strength to me.

Wednesday, May 20, 2015

There's a hole in my hull

Re-starting the Bantam project, I remembered that I wasn't entirely happy with the weight distribution in the hull. While the model sat level when stationary, give it a bit of thrust and the nose dipped down.

No problem, I thought, I'll just take some of the weights out of the front.

I'd used some lead lumps acquired from who knows where, fixed in with cheap epoxy. Tentatively sticking a screwdriver under one, it peeled away, bringing three friends with it.

Thinking I'm on a roll, I tried to remove one from the rear the same way. The idea was that I could re-weight the boat from scratch this way.

Sadly, peeling it from the plastic hull didn't go well.

Big ole

Not good. However, I've been messing around with ABS and plastic weld recently, so I fancied my chances of setting a styrene patch into the ABS hull.

First, the holes was tidied up and then a square patch cut so it was a tight fit. Next, Plastic Weld was liberally sploshed around the join.

All looked good, but to be sure, I ladled on some epoxy over the joint inside. Hopefully we're now watertight.

Patch set in

Tuesday, May 19, 2015

Return of the Bantam

It's probably sacrilege to say so, but sometimes I get few up with model railways. With a load of projects for work on the go, I need a break. I also want to tick of a personal project that is staring at me. So, it's time to return to the Bantam Tugboat.

Bantam Tug

To recap, years ago I spotted a fantastic looking boat at the London Canal Museum. Knowing nothing other than I wanted to build a model, the idea lay dormant for some time until the purchase of a Mastman kit gave me a usable hull.

The rest of the kit didn't look so promising so I started scratchbuilding a superstructure. Work progressed to the stage where I had something on the water. Then life got in the way and it's lain untouched for around a year.

First time on the water

Well, the sunny days are back and I want to sail a colourful boat. A recent project reminded me how much I enjoy noodling around with plasticard and the tug IS small enough to fit on the workbench very comfortably, so perhaps I can get a bit closer to the finishing line this time.

Monday, May 18, 2015

Mystery Tool 6

Egg timers on string

This week's puzzle. Why does anyone need an egg timer on the end of several feet of string?

And they need one enoug to groove the bit of wood, attach the timer properly and fit a loop to tie the string to.

More to the point, it's such a popular requirement that someone made a commerical version in metal.

Why?

Sunday, May 17, 2015

Citroen Berlingo wiper blade changing, a warning

Wiper blade fittings

People are nervous about fiddling with cars nowadays. Manufacturers know that if anything is too easy then the dealer network will be deprived of income. Thus, while cars are generally less in need of a Sunday morning tinkering and the Haynes manual isn't the essential purchase it once was, when things go wrong, it's off to the garage.

Some jobs though, should be easy. Easy enough to do at the side of the road is normal clothes if required. Headlight bulbs for example. When one goes, it would be nice to swap it over in a handy pub or supermarket carpark. Sadly, not. Modern vehicles can be a pig of a job and require weird bulbs that cost a million pounds a pop.

Likewise, windscreen wipers. They wear out, especially if a nearby building site is producing dust to turn your windscreen into sandpaper. Being a handy sort of chap, I though this wouldn't be a problem so nipped in to Halfords, looked at the book and bought a pair. I'd spotted that the car was fitted with new fangled (to me) low-profile single blade types and thought I'd got the right set.

Right up until I got back to the car where I spotted that instead of an identical pair, I needed a 16 and a 26 inch blade. Back to the shop where I queued up behind one of their technicians who had experienced the same problem when fitting a set for a customer. The new price was a few pence higher but the assistant let me off.

Anyway, now with my mis-matched set I headed back home. Then I tried to fit them.

Surprise! The centre fitting isn't the traditional hook and bar thingy that's fiddly but easy to do. No, it's a mega-easy, one-button change fitting. See above (middle wiper) not the one I'd got from following the Halfords book. Grrr.

Back at the shop, they were swopped for yet another set with the correct fitting. These were 12 quid more expensive so they didn't let me off this time.

Fitting was simple. Press the square button to release the old wipers. Don't let the metal arm slap against the windscreen or it will break. Take new wiper out of box, try it, wonder why the result is sloppy.

Take adaptor out of box and reaslise you need to use this. Clip it on the wiper then slide the lot into the metal arm. Good as new. No tools required at all. No wonder the Halfords fitting charge is only 3 quid - if I wasn't so sure of my own abilities, it would have been worth the money to sort the problem in the first place...

The big shock was the price though - £35.98 for a set of front wipers. That's going to see people using their old set until the MOT man makes them change it. You almost hanker for the days when you could buy the rubber inserts and just change that bit!

Saturday, May 16, 2015

You used to be able to buy Burberry check paint...

Old paint tinlets

Some old paint tinlets discovered at the back of a drawer.

On the left Gloy enamel that complies with the 1974 Toy Safety regs and has a picture of a penny-farthing bicycle that looks like the one from "The Prisoner" on the side. The tinlet is taller and narrower than the Humbrol version.

Paint is ST/G/14 - presumably not a number - Buff. No idea how old it is, but it's still liquid.

The Humbrol isn't actually Burberry check colour, it's 133 Deltic Blue and also still liquid.

I'd assumed this was a 1980s tin as I seem to remember adverts with this distinctive pattern packaging but as the volume is marked as 1/2 Fl Oz, could it be be earlier? Surely by the 1980s, even the Humber Oil Company had gone metric?

Friday, May 15, 2015

I'm not sure I'm getting any better at this

Coke Wagons

On the left, the second wagon I ever built. Constructed at least 25 years ago.

On the right, the most recent, constructed about a month ago.

Both are from the same Kenline whitemetal and plywood kit.

I'm not sure the difference in expertise shows. Perhaps the inside of the newer model isn't battered like the old one. One side of the new one is plastic strip too as the parts were missing from the second hand kit - that would have been an impenetrable stumbling block years ago.

But there isn't a quantum leap. I suppose assembling a kit well years ago and the same kit more recently probably won't show great advance but I'm not sure whether to be ashamed at my lack of improvement or proud of my achievement years ago.

Thursday, May 14, 2015

Wagons and a cottage in BRM

GW Wagons

Plenty of wagon action from me in the June issue of British Railway Modelling magazine. I'm hard at work saving a few second hand examples from the bin.

Starting with RTR models, there are a couple of Airfix 5-planks first made in 1978 and therefore older than many readers, but still respectable models, even today. Modifications are limited to these but as a starting point for weathering and tinkering, they are as good as it gets.

Wagon kit

I can't avoid trying an old kit too, but there doesn't seem to be much point building an ancient plastic kit. Instead, I found a really old Kenline kit produced in plywood and whitemetal. This is much older than a lot of the readers, including me. In fact I suspect most modellers will never have heard of the range at all, but then that's the fun of grubbing around in boxes under second hand stalls.

Finished Cottage 1

My other major project this month is a cottage kit from Petite Properties. This is a departure for me as the walls are supplied without any sort of finish. It's up to the modeller so to add this and so I've dabbled with filler and a sharply pointed tool to produce a reasonable stone finish.

You'd think scribing this would be dull but I found it relaxing and surprisingly quick. OK, the stones could be smaller but I'm just at the top end of the prototype according to some measurements I took. The kit itself is really nice and full of character so I'm looking forward to trying more from this supplier.

Finally, with the Bachmann Grain wagon in mind, I've put together a couple of pages for anyone wondering what to do with theirs. No plans to produce a definitive account, just some starting points and an overview. There's plenty to get your teeth in to with the topic so there's a reading list that you might care to work through, perhaps with a pint to hand...

Wednesday, May 13, 2015

Trix electric motor

Trix electric motor

That's a Meccano motor everyone said.

And it turns out we were all wrong. It's actually from a Moto Trix construction set. Looks a bit like Meccano but the holes are spaced differently so the two aren't compatible. You can read more about these sets over on the Brigton Toy and Model Museum website.

I like this because it's pure motor. Nothing is hidden away inside a casing. Back in 1936 when the motor was introduced, electricity was still a bit of a novelty to many people so for the curious child, being able to see how this magic thing worked must have been fascinating.

Best of all, my motor still operates. Given an dose of 9V from a PP3 battery, it whirs away quite happily.

Trix Motor

Tuesday, May 12, 2015

War Department Deans Goods

Dean Goods

A wartime Deans Goods locomotive, manufactured by Mainline and re-painted into this livery by John Webb, as far as we can tell.

62 of the engines headed abroad during WW1 with 46 of them returning at the end of the conflict. They must have been popular as 108 we requisitioned at the start of WW2. All were fitted with Westinghouse brakes and ten gained pannier tanks and condensing gear.

54 engines made it into BR service, the last being withdrawn in 1957 after a lifetime of nearly 80 years.

This model is destined to find a new home with Chris Mead and run on his wartime layout "Overlord". He's already built a pannier tank fitted version so it will be nice to have a standard one for show visitors to compare this against.

After years stored in a box, the model still lept into life when given some power. Sadly, it was the tender that worked (it's where the motor is), the loco wheels need some oil before they will rotate.

Monday, May 11, 2015

Mystery Tool 5

Bompers

I thought I'd finished the mystery tool thread, but then, in the bottom of a bag, I found these.

Each steel rod is 15cm long and on the end is brazed a steel ball. The balls vary in size and weight - 8, 13, 21 and 38 grams.

What I think they are for is reprimanding visitors to exhibitions from behind the safety of a model railway layout. When the nasal whine gets too annoying, hold one end and swing the other so it hits the cause of the problem on the top of his bonce.

The weight swung will depend on the level of annoyance. For a particularly ripe, backpack wielding problem, I recommend the 38g thwack.

Some of you may with to suggest alternative uses for these, if so, please do this in the comments. Be careful though, I am now armed!

Sunday, May 10, 2015

Is a dumb picture worth a thousand smart words?

 
Once upon a time, authors of magazine articles saw very little feedback on their work. The odd letter might wing its way to the editor and, the letter writer would hope, make it to the letters page. Nowadays, we have many more direct methods of communication which sometimes provide feedback, but not always in a helpful way.
 
Reading stuff on-line is an occupational hazard. Sometimes (rarely) you read nice things but most of the time, those who make the effort to comment are moaning. That's not unusual - how often have you complained about poor service compared to the number of time you've made an effort to compliment good service?
 
The usual complain is that magazine's have "dumbed down" since some sort of halcyon days years ago. While digging through some 1990s mags this week, I looked to see how true this might be. After all, I don't want to "dumb down" and so expected to learn something.
 
My specialism is "How to" instructional articles so I ignored those on layouts and any reviews in my reading. What is immediately apparent is that digital photography has changed things dramatically. I illustrate every step of a project as I go - something much harder to do in the past as you relied on film cameras and, as I know to my cost, could easily end up with duff pictures when the shots returned from the processors. If you were a really good photographer with some impressive equipment, you stood a chance but most relied on a few finished shots and long pages of text.
 
Read the criticism and that's apparently what people want, but I wonder. I've built a few old kits where the instructions are a closely typed page and if I'm honest, I didn't bother reading the stuff.
 
Far better is to bullet point each step. That's the way recipes are written and Haynes manuals. I find it difficult to believe every cookbook and the mighty Haynes corporation have got it so wrong.
 
The logical next step is instead of writing long descriptions is to take a photo and show people. Show is, I'm reliably informed, better than tell. Again, follow the Haynes process. The result is a photo with relatively short caption. Is this better? I'd suggest you can see what I'm up to in the photo above without any caption at all. Describing how I paint the rusty streaks on, the patterns etc. would be far more complicated than just looking at a picture.
 
Of course this does make my articles picture-heavy and the result on the page looks very different from older magazines. However, I feel that this, along with the inclusion of sidebars for hints/tips/prototype information makes the pages much denser with information than some of those of the past which could include a fair amount of waffle. Now, I'm made to cut straight to the chase!
 
My feeling is that this is better. You certainly find more articles in a modern mag than those from the 1970s, although the much higher modern page counts help this. Some of those who complain also don't want to follow instructions, they prefer to have something to real, not anything wrong in itself, in lieu of making stuff.
 
Others think I simplify the process too much. If that's a crime, I'm guilty. However, my experience, based on magazine sales figures and talking to people at general shows from behind layouts and stands, is that there are a lot of people at the beginner end of the hobby. Far, far more than in the realm of the experienced modeller (Note: I mean practially experienced from doing some modelling, not just having read books and articles) who probably doesn't need the same level of instruction.
 
I once had an article on building an etched brass loco kit described as a "mundane activity" on a forum but suspect that for most modellers, it represents a very distant dream to work towards. The poster might knock these things out in his sleep but I still find each one a challenge and I've built a few now.
 
To compensate, I always try to include the odd tip that would appeal to me if I were the reader. Some unusual approach or suggestion. It's probably ego, but I like to think that most people can get something out of anything I write, even if they never have any plans to try the same project.

Saturday, May 09, 2015

Duchess of Montrose

Duchess of Montrose

Among the items found in John's collection was this Hornby Dublo Duchess of Montrose in lovely condition. It is boxed complete with packing and spanner but no bottle of oil.

A friend tells me that as shiny paint version, it's an early model. Apparently they moved to a satin finish fairly quickly. This obviously means that the loco is worth a massive fortune.

Except it's not. A quick e-mail Pat Hammond tells me that this Duchess is the most common Dublo model. From a dealer you expect to pay £50-80. Selling, he might give you £25-40. And this is based on old figures. Since they were last checked, the number of Dublo collectors has dropped, as they go to the great model shop in the sky.

To make matters worse, Hornby Dublo stuff is so well made it doesn't wear out. In an atomic war you're probably perfectly safe sheltering under one of the many tons of HD platform to be found overpriced on every 2nd hand stall in the country.

Friday, May 08, 2015

Mystery Tool 4

Mystery Tool

At last, a tool that I think I know the purpose of. Not at first admittedly, but once I dug through all the miscellaneous paperwork (old magazine articles, newspaper cuttings, random plans, postcards) that came with the tools, I reckon I've worked it out.

It's a carriage end painting support.

Place your carriage in vertically and then the end will be perfectly placed for lettering an lining (were carriage ends lined?). John built a lot of Midland coaches and judging by the number of cast parts in the collection, envisaged making an awful lot more.

The support is simple, but very well made. I think this one can go and live with the club airbrush and booth for anyone contemplating a bit of coachwork.

Thursday, May 07, 2015

Mystery Tool 3

MysteryTool3

Now for the one that has the entire club stumped. If you pull the handle, a cam forces down a piece of metal into the slot above the nearest end of the clamp.

It will shear wood (we had some to hand) at 12mm lengths. There doesn't appear to be a way to change this length.

Now, the mechanism is very well built and would stand up to a lot of usage. But for what?

It's quite funny to see people pick the thing up and grandly announce, "I know what it's for..." before then stumbling and realising they don't. This has happened several times.

So, any suggestions in Blogland?

Wednesday, May 06, 2015

Mystery Tool 2

MysteryTool2

This tool would appears to be a drilling jig and our best guess is that it's for Midland Railway carriage sides. That rectangle of holes would be drilled and then joined up to form a round cornered window. More to the point, you could form a series of such windows that were accurate and identical.

The other holes are still a mystery and the guess above might be wide of the mark.

One of our members has claimed this as he thinks he has a use for it. As an engineer, he recognises the quality of the device so at least one has a good home.

Tuesday, May 05, 2015

Mystery Tool 1

MysteryTool1

As some of you may know, I'm helping out with the disbursement of the late John Webb's workshop stuff. Basically, all the tools and materials accumulated over many years modelmaking. They were all put in a room after a move and never sorted out, so it's quite a challenge.

The most interesting items are the tools John made for himself. Several of which have caused a bit of head-scratching as to exactly what they are.

The first appears to be a rivet press - at least that's out best guess. I think it is currently missing a spring under the tool and an anvil underneath it. We've not found either of these sadly.

You might wonder why he didn't use a proprietary tool such as the excellent GW Models version. Well, the consensus of opinion is that this offers the advantage of being able to handle an entire 4mm solebar in one go whereas others require you to move the piece being worked on in the clamp.

Now, all this is a guess as obviously we can't ask the builder. Other suggestions are welcomed.

Monday, May 04, 2015

Modified micro chisel

Moded Micro Chisel

This is a Micro chisel, bought from Little-Cars a few years ago*.

It's very useful as the sharp end is 1mm wide, ideal for removing moulded on detail from model trains whose value on eBay I'm in the process of ruining. The only problem with it was that the bit kept coming loose as it was retained by an Alan bolt. A very tiny Alan bolt that I couldn't find a suitable size key for.

Smaller, yes. Larger yes. Correct size, no.

Eventually I decided to do something about it and found a suitable bolt that fitted the thread pretty well. Some serious shortening (hint: put a nut on first and then once you've cut the bolt shorter, remove the nut and this will help-re-cut the damaged thread) later and it screwed into place, holding the bit perfectly.

Not pretty, but it works.

*The chisels aren't on the new site at time of writing.

Sunday, May 03, 2015

Lessons in light switches

Light SwitchesSome DIY jobs need to be completed quickly - such as changing a light switch.

As this involves turning the power off in the house, it needs doing when there is least demand for electric. Sadly, that's why everyone is in bed but unless you like working by torchlight, it's not an ideal time.

So, the trick is to get things done quickly and that means having all the bits to hand.

Which is why, when the switch in our kitchen started to play up, I'm glad we bought both a new unit AND the box it fits on.

The old unit at the front of the photo, circa 1970, has a domed face and rounded corners. Modern switched are flat and square. New switch doesn't fit old box. If you try, the screws are too long as the bushes in the old box aren't deep enough, presumably to accommodate the curved face.

Changing the box was easy enough (2 screws at the same centres as the new box) and the whole job was done in under 10 minutes. Power restored and the lights now work. Even in the daytime.

Saturday, May 02, 2015

Topp Trains - Stafford

Topp TrainsPeople are always talking about model shops closing down, but there is some good news as others are opening up.

Topp Trains is a relatively new shop but in the few years since it opened its doors, the display space has doubled in size!

Entering the shop you find paint, modelling materials, wagon kits, tools, card building kits, Peco stuff and the counter. Next door is a room full of RTR trains, both new and second hand.

Prices on rolling stock range from the reasonable down to stonking bargains amongst the second hand stuff. I left with an Airfix 0-4-2 and autocoach for a mere £15 for the pair. OK, they were fitted with EM gauge wheels but these alone are worth the money.

Underneath this box was a Dapol Sprinter for a tenner. Not the best model in the world but for 10 quid?

Bachmann and Hornby ranges were well represented in both 2 and 4mm scales. If, like me, you prefer to try before you buy then you'll be well looked after.

Both Humbrol and Railmatch paints are available as well as loads of plastic sheet and strip (Evergreen and Slaters).

For a new(ish) shop, the best thing is there is already plenty of rummaging to be done. I circled it three time finding new goodies on each trip. There were plenty of ranges not normally found such as Peedie Models and the more obscure Gaugemaster bits like laser-cut sheds. That's a good sign for the keener enthusiast and a sign that the place is also run by modellers who know we need more than just train sets.

If you don't fancy the trip to Stafford, there is also a website.


Friday, May 01, 2015

Industrial awning

Canopy

Here's a rather nice industrial detail spotted in Banbury a few days ago. While sensible people take photos of picturesque buildings, I'm attracted by the ugly bits stuck on the side of buildings.

Anyway, this can be seen walking from the station in to town. Crossing a scruffy river, there is a very square brick building on to which someone has added this awning. (I'd add a Google Streetview link for you but it's been "upgraded" so this isn't possible any more.)

I'm interested to know why it has cross braces against the wall - surely it would have made more sense to bolt the steels to the bricks?

The windows are nice. Those concrete surrounds are very model-able and far easier than brick lintels.The drainpipe sends water straight in to the river, certainly easier than plumbing it in to the drains.

I might be building some industrial stuff soon. This looks like a contender for added interest.