Showing posts with label building. Show all posts

Tuesday, February 11, 2020

Gluing Plastikard to MDF


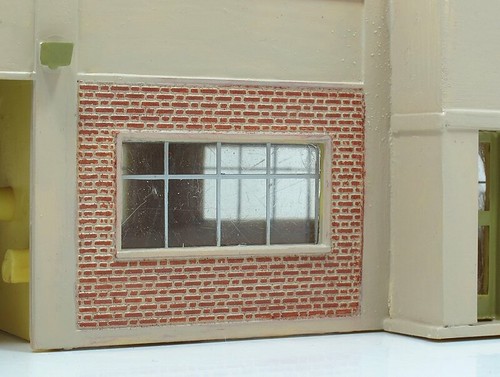
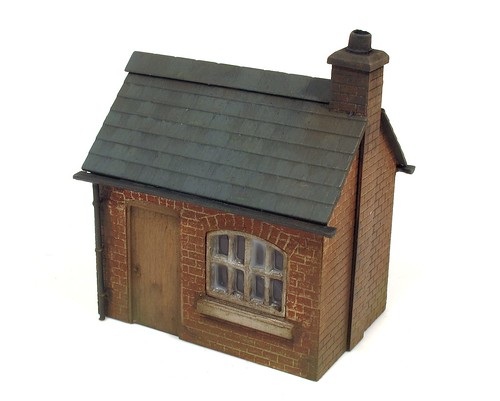
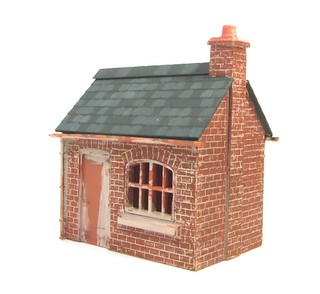
Just as I found with etched brass to plywood, UHU Power works very well. I've always been wary of using solvent-based glue under plastic but this stuff can be spread thinly, left for a couple of minutes to go tacky and then the sheet applied. So far, there have been no ill effects.

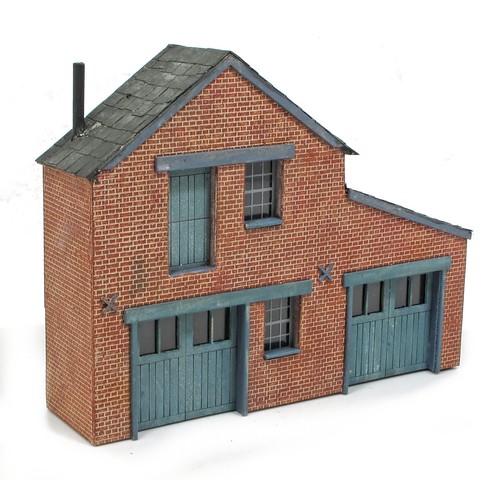
You'll have noticed that the bricks are dry-brush painted rather than pencil crayoned. I find this works better here as you can get in the sides around the windows and doors. As I found out when building Harper's Yard, you can't put Plastikard here, it's too thick. So paint it is.


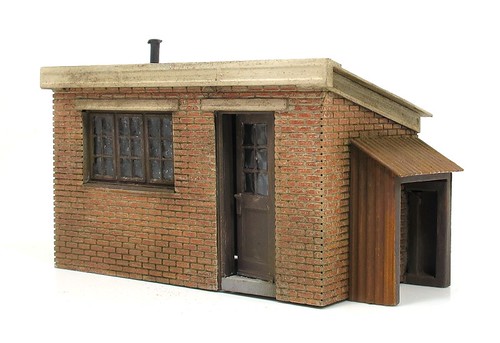
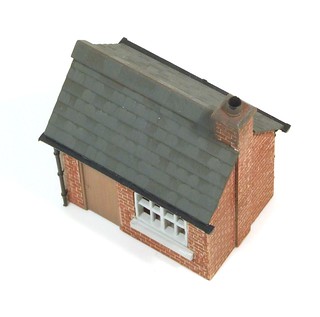
On the roof, I've used some ScaleModelScenery slates. Draw lines 5mm apart on the roof to allow for the overlap and they are easy to line up. You are on your own staggering the joins, but it's not that hard.

The only addition I made to the kit is some cills below the windows which I feel makes the model look more finished. It's a nice easy to assemble kit and as with the rest of the range, looks the part. The hard bit, designing a convincing building, is done for you. The modeller just has to stick the bits together and personalise it to suit themselves. 7 quid well spent.

Monday, February 10, 2020

Building Parker's Lock Up


Apparently, this kit from Petite Properties is named after me, or at least I asked: "Is this named after me?"
"Are you going to buy one?"
"Yes"
"Well, then it is."

OK, not that convincing, but no matter, I was always going to buy and build one.

Like all Petite kits, it's a cheap bag of nicely cut MDF and card parts. Surface decoration is left to the builder which is either a nuisance or opportunity, depending on your approach to modelling. For me, it's the latter.


Looking at the design, it's a good idea to fit all the doors and windows before fixing the front to the back. I decided to use brick Plastikard as I want to use it for contrast in a future video.


The sheet is stuck to the front and once dry, all the windows and doors are carefully cut out. The cardboard doors are painted and fixed behind, as are the printed clear plastic windows. 


Tuesday, January 21, 2020

Finishing touches

After the brickwork is dry, it's time for some finishing touches for the hut. Windows and doors are painted. Glazing is carried out using Deluxe Materials Glue'n'Glaze. Guttering goes on (and looking at the photo I've just spotted the downpipe needs bending back. No idea how that happened) after painting. 

I've used dull colours - Humbrol 147 pale grey for the white and Revel 8 for the black bits. Neither is a pure colour and looking all the better for it. 

The roof is Humbrol 67 (Tank grey, not 69, yellow, as an earlier version of this post said) dry-brushed while tacky with 66 and then a good dusting of talcum powder. Hardly any work but the effect is very good. I'm not a fan of picking out dozens of slates - you need to seriously blend things afterwards if the colour isn't to look forced. 

Anyway, the hut is (for the moment) done. I hope Pete would approve of it. One day I'll build a layout for it to call home. When I do, there will be weathering and perhaps some interior work but that's for another day. 


Tuesday, July 31, 2018

Topping off Harpers Yard

I've been putting off tiling the Harpers Yard roof. Being too stingy to spring for laser-cut roof tiles, I planned to cut them out of paper and apply each one individually. Let's face it, there are so few it should be a quick job.

Only when I started did I remember that it's a dull job cutting the tiles out (7 by 5mm, a bit big but easy to measure) of paper. Worse, even when drawing lines on the roof, I never stick them on as neatly as I would like, not helped by the tiles all being a very slightly different size from each other.

At least this is a backscene building. Anything further forward will get Wills or pre-cut tiles...

Harper's Yard 
The finished model looks every bit as good as I hoped it would though. Building is simple and the design is perfect. Just what the sort of structure I like. 

Monday, July 23, 2018

Putting brick Plastikard on the walls

James asked "A question though. When I scratch build I sort of work backwards from the brickwork, to avoid odd edges and corners where the bricks seem only an inch wide. How do you go about making up the brick panels to add to a kit like this? Do you only do it after you've built the structure?"


I suspect the answer is "I cheat" or more likely, "I don't do it properly". Working on the basis that there is always a wall nearest the viewer, this one gets the bricks stuck on first with a slight overlap around the edge.

The others are then covered with the plastic butting up to the overlap and given a good wash of solvent (the plastic is stuck to the MDF with solvent-free UHU, never use a glue with solvent) to ensure a nice tight join.

Finally, I trim the overlap back to the edge. If I were proper finecale, I'd then cut the mortar horizontal lines before painting, but I reckon that most of the time I can get away without doing this. Maybe if the building is right at the front, but the work needs to be neat or it will look worse than the 1mm thick blank spot. Personally, I think a bit of dirt will help and perhaps a drainpipe to distract the eye.

Another option (I've not tried this) would be to leave loads of overlap, scribe along the edge and then band the plastic back at 90 degrees so it wraps around the model. A wash of solvent to soften it might be a good idea and you'd need to be careful not to scribe all the way though which will be tricky.

Monday, July 16, 2018

Back to the yard

Regular readers might remember that last month I started building a Petite Properties "Harper's Yard" kit. I got as far as sticking some Plastikard on the front, and then it all went quiet.

I had carried out a bit more work - the openings were all lined with plastic and I'd got as far as trying the windows. At this point I realsied that losing 1mm off each side made the pre-printed glazing look odd. On the PP stand, the model is covered with their brickpaper and the problem doesn't occur.

So, the lining was carefully removed despite all the effort I'd gone to to put it in neatly. Then the plastic started to peel from the front. Then it tore. Then I'm embarrassed to say, I had a bit of a meltdown and screwed the whole kit up and lobbed it in the bin.

But, I still like the model and with the bit more care, I think I can do a good job. So I ordered a replacement kit which has arrived and I'm back to making progress.

This time, the inside edges of the openings will just be painted. Some need to be a painted wood colour, others brick. While the lack of mortar lines might annoy me a little, once on a larger model, no-one is going to notice. At least I'm not going to tell them.

So, I'm going to learn from my mistakes. A slightly different tack to the build and no more modelling while stressed.

Tuesday, February 16, 2016

Cast Hut - Part 2

If it's metal, it rusts, as this rather atmospheric iron toilet shows:


With some Lifecolor Rust Wizard paints to hand, I washed my hut's walls with various shades of rust. Starting with the Deep Rust, I ended up with the bright orange and yellow colours in patches. Using these surprised me as I'm not a fan of bright colours but they really work for fresh rust bursting from the metal.
 
 weathered hut

I'll set this on the layout and see how it looks.

Wednesday, August 26, 2015

Formcraft

Over on RMweb, in the discussion about Ruston Quays, someone mentioned the Formcraft building system launched in the 1980s.
 
Long out of production, the concept is reminiscent of Bayko. Blocks were joined together, not with Lego style studs, but with vertical rods. Formcraft rods were made of ABS unlike the Bayko steel ones. Most importantly, the Formcraft blocks were scale 4mm bricks, or at least small groups of bricks.

 
Assembly was incredibly time-consuming and if you weren't very careful, resulted in wobbly walls. Flexible rods might have tied the walls together but they didn't always help with perfect brickwork. for that, the modeller had to take the same care as a real brick layer.
 
The system included windows, doors and kerbstones. These were available separately and still turn up from time to time. I had a feeling they ended up in the C&L range but can't see them on the website. 

 
Not long after production commenced, the makers realised that spending a lifetime putting together a single structure wasn't appealing and introduced some larger modules for plain brickwork. These stopped people going mad at the cost of making the system less flexible.


Thursday, July 16, 2015

Hornby renovated

Finished Hornby Building

After a few finishing touched - large doors and painting the drainpipes - the Hornby building is fully renovated.

Despite it's lowly origins as a 50p buy from a second hand stall, I'm quite pleased with the results. Some early (1980s - early!) plastic kits are pretty good and repay careful building.

In fact, I'd say there is an awful lot of the Hornby accessories range from this era that are unjustifiably ignored by modellers. They are kicking around eBay and second hand stalls - grab them before people realise what they are missing out on!

You might notice that the building is empty. Well, that's part of the tribute to Margate works, which is also empty now Hornby have moved out...

Tuesday, July 14, 2015

Windows

Window

While stripping down the building, I tried to remove the plastic windows carefully, decided they were too well stuck in place and just bust them out with a poking finger.

Replacements were cut from 1mm thick plastic sheet. I tried to mark the bars by scribing them and filling the lines with white ink. This didn't work as the ink pulled out of the scratch as soon as I rubbed the excess away.

The second attempt was made with enamel (Humbrol 147) put on with a bow pen. Although I'm showing the best window, the others are OK, at least for this project. To be honest, I wish I'd gone for the bow pen straight away - a lesson to be learnt for next time. It's certainly the best way to represent steel industrial window frames.

Saturday, July 11, 2015

Stripping paint

Stripped Building

Back at the 50p Hornby building, I've spent half an hour at the sink with some Precision Paints Superstrip in an effort to remove the old paint. As you can see, I had reasonable success with the red brickwork but made no impression on the yellow stuff in the top panels.

Even getting this far took longer than expected. I worked the stripper in to the bricks with an old paintbrush and for about 15 minutes, only the faces cleaned up. Suddenly the chemicals got into the mortar and another quarter of an hour saw most of these cleared. Finally, I picked out the remaining paint with a sharp knife - it was loose but not ready to fall out.

After this, all the corners were re-glued and I filled in the worst of the gaps with Deluxe Materials plastic filler.

All this effort - I wish I'd just bought an unbuilt kit, but then I suppose that wouldn't have been so much fun!

Wednesday, July 08, 2015

Hornby factory


I've become a little obsessed with the Hornby "Town and Country" range of plastic kit buildings. There are several in my collection and I wouldn't mind picking up the rest. While they were badged Hornby, as Simon Kohler reveals in his blog, manufacture was by the European firm, Pola.
 
A little digging on the web finds that my 50 pence building is from their R281 Industrial Buildings kit. In the box you'd find the "Hornby" building and a modern northlight style structure. While long out of production, unused kits can still be found 2nd hand.

It's an odd beast really. Too small at 21cm by 9cm for an actual building but ideal for many model railways. Possibly the best bet would be to use it as the posh entrance to a much larger warehouse building. Basically, stick it on the front of one of the great big tin sheds that populate the out-of-town industrial parks of the nation.

My model is going to be a tribute to the real Hornby factory in Margate, which they moved out of earlier this year. OK, so the plastic version looks nothing like the real thing, I still think it can be made into a presentable model with some properly applied paint and perhaps better windows. It's better than being thrown away anyway, the normal fate of a model building if no-one will pay 50p for it.


Sunday, July 05, 2015

Parker & Son Fabrications

Parker & Son Fabrications

Over on the British Railway Modelling blog, I've written up a quickie project I built to try out some free downloadable building elements supplied on the August 2015 DVD.

The 4mm scale model is based on the sort of industrial units I get to look at while dropping my 206 in for its service or awaiting the bill from same...

Head over to the BRM Blog for full details.

Friday, March 20, 2015

Hut ready to plant

Finished hut

Just a few finishing touches and the hut is ready plant on a layout. I haven't actually built the layout yet, but when I do, there is a ready hut for it.

My brick colouring with pencils worked very well on the etched surface, probably thanks to the primer and matt paint giving a slightly rough finish. After this, dirt from Humbrol weathering powders toned down the colours. The whole model was treated to a dusting. I've always been pleased with powders on buildings and am surprised more people don't use them.

Glazing is Micro Krystal Klear wiped across the back of the windows and doors. This gives a thinner "pane" and is quicker than doing each one individually.

The cruel enlargement (the model is 5.5cm long so you are probably looking at it twice life size) shows up the holes in the mortar on the corners but you can't see them in real life. Were I to do this again, perhaps I'd run a fillet of solder up the inside.

Anyway, nice building. Enjoyable build. Check out the rest of the Severn Models range.

Friday, January 31, 2014

Weathering powders are go

Ratio Hut

I don't know when I first used weathering powders on a model building, it was probably with an air of desperation when traditional methods had let me down or I was fighting a deadline and wished the paint would dry. Now, every building I produce is on the receiving end of a dusting.

The Ratio Yard Office is no exception. Around the lower brickwork there is a hint of Humbrol green to simulate rising damp. After this dark brown with perhaps a hint of rust grubbies up the brickwork. Finally, smoke is heavily applied to the chimney (which has been drilled out so it looks hollow) and dusted on the roof.

The tones are amazingly subtle. Scrubbing away with the bristle brushes seems to blend the colours in a slightly magical way. I'll be pretending that it's all skill but that wouldn't be entirely true.

Overall, a nice little quick project. The only improvement I can think of would be a thinner window, perhaps something etched. Even glazing with Krystal Klear doesn't really hide the depth of the frame. Next time (I'm sure I'll build this again) I could paint the inside edges of the frame with black and only the front surface with white.

Hmmm, you never stop learning.

Thursday, January 30, 2014

More roof work

Little HutAccording to Mr Welch and his book, once you've painted a roof and then picked out individual slates, the modeller should dry-brush the surface with a slightly paler mix of the base colour.

I mixed up from Humbrol 66, let down with a little 27, picked out a small, knackered, brush and worked the colour over the surface. To tone down the picked out tiles, I found quite a bit of paint needed application. Even then, I think I probably should have been a bit more subtle with my highlighting of individual slates.

While I was dry-brushing, the top of the chimney received a little tickle too although this will also get a dose of weathering powders as part of the next stage.

After this, the door, window and guttering have been painted. The last was in Railmatch weathered black which yet again, dried with a satin finish. Why isn't it matt? At least a blast of Dullcote sorted that.

Tuesday, January 28, 2014

Painting the yard office part 1

Part Painted HutYesterday, I was concerned that the bricks on the Ratio Yard Office kit weren't prominent enough for me to use the pencil crayon technique to colour them.

As you can see, I was (happily) wrong about this. A coat of Humbrol 121 for the mortar followed by a good rubbing with 3 shades of brown has done the job. It is important to sharpen the crayons to get them in to the nooks and crannies when doing this. I often file the point to look like the front end of a duck billed platypus as this works well.

On the roof I'm trying a little experiment. I've never been entirely happy with my slate painting so having read the appropriate section from "The Art of Weathering", I'm going to do it "properly".

So far, the roof has had a coat of Humbrol 66 and then individual tiles are picked out with a mix of this and number 27. I put a couple of splodges of each on a bit of plastic (ironically the back of a scrap piece of Wills tiles) and mix then with the brush to get varying amounts of each.

Despite care, the effect is a bit strong at the moment so I had to paint a lot of tiles to avoid it looking like only odd ones had been coloured. Hopefully the next stage will calm things down a bit.