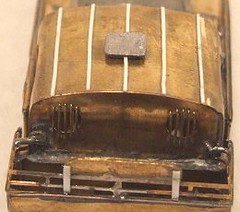
I’m a lazy model maker really. When it comes to the little fiddly bits on a locomotive I quickly give up on solder and proceed to superglue.
The Jinty includes various bits of brass that a better man than I, would carefully form and then solder in place. Stuff that, I replace them with bits of microstrip. Far easier and quicker and they look nearly as good.
Mind you the photo makes it look like the rainstrips snake across the cab roof whereas they look straight in real life, honest.
Wednesday, October 31, 2007
Monday, October 29, 2007
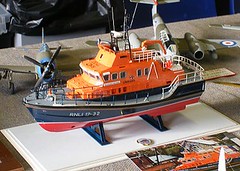
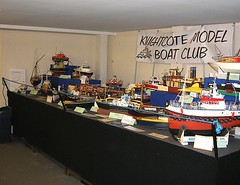
Severn lifeboat
How’s this for an unusual find at a model railway show – the first Airfix Lifeboat I’ve seen actually made up. It looks good too.
Makes me want to dig mine out of the cupboard and get stuck in. I think a couple of stripped down servos will do the job for power. A small battery pack and micro servo for steering and off to the lake.
Well you don’t think I’m going to build a static model do you ?
Makes me want to dig mine out of the cupboard and get stuck in. I think a couple of stripped down servos will do the job for power. A small battery pack and micro servo for steering and off to the lake.
Well you don’t think I’m going to build a static model do you ?
Sunday, October 28, 2007
Banbury Show
Here’s a hint. If you want to see a model railway show and have the space to circulate, ask questions and generally enjoy the event in a relaxed manner, go just after lunch on Sunday.
At that point today, Banbury show was depressingly light on public. Pity really, as it was a decent exhibition.
The trade was very good. Far better than many larger shows I’ve been to. RTR, second hand, kits, tools, if you wanted it you had a pretty good chance of getting it. OK so this isn’t a York or Warley but for a local one day show it was much better than average. I bought 16BA nuts for example. The chances of finding these at many events are nil.
Layouts perhaps weren’t so good. Plenty of middling O gauge including one who proved beyond all doubt why you should put a curtain around the bottom of the layout. My favourtie was undoubtledy the huge Minic Motorway display which ad small cars hurtling around to the joy of the kids (big and little) who stared at it enthralled. Selah (Fruit Row) is a previous favourite of mine and appeared in a shorter form than I’d seen before. Most thought wouldn’t have awed people but would have provided something to aspire to, with a good chance of managing it. The operators were keen to talk as well so you could ask all those questions you wanted answered.
Best layout was won by the L&WMRS O gauge layout which appeared as an end-to-end model. Normally it’s a roundy-roundy but for space reasons they’d had to build a fiddle yard for one end. Unfortunately it was on the stage where there is hardly any light but watching the carriages shunted in the station did look good.
I’d dropped in because:
a) It’s not far away from home and easy to get to.
b) I needed to see Trevor to collect a Class 14 Diesel kit which I need to get built for it’s launch at Warley in a couple of months. Look out for this on the blog soon.
What I don’t really understand is why the crowds stayed away. It’s a good show. Certainly I’ve seen more people at worse events. Do modellers prefer to go only where there are half a dozen RTR sellers trying to compete ? Do they only like the big events ?
Whatever the reason, and comments would be appreciated, it’s their loss. Put it in the diary for next year.
Saturday, October 27, 2007
Handrails
It’s always a good idea to take a proper look at the prototype of any model you are building. If I had, then I wouldn’t have put off adding the handrails to the Jinty for so long.
The trouble is on most steam locos, handrails are a right royal pain. Get them even slightly wonky and you ruin the model. Just to help the designers include a curved rail that wraps around the front of the smokebox and down the sides of the boiler. Of course this has to go on as a single item which means odd shapes to bend – and if you get them wrong too many times the wire is kinkier than a fetish club convention.
So, hooray for the Jinty ! The handrails go nowhere near the front. Instead they are nice simple straight lines in the sides, tanks fronts and in the cab door. The later went in as part of the beading process as the tops are soldered to this. The others fixed in place pretty quickly with hot iron and lots of flux.
Unusually for 3mm scale, none of the holes in the handrail knobs needed enlarging. If the has proper formed bases to space the rail from the bodywork, things would have been perfect. I only dropped one and lot it too so I have a single spare left. Now I wonder where I can put this so it’s found next time I build a kit…
Friday, October 26, 2007
Well timed oil change
Fame again !
Issue 32 - Volkswagen Camper & Comercial (The magazine proper Type 2 fans read, accept no substitutes).
Page 30 & 31 - Oil change by me.
The fee will come in handy toward the front beam bill !

Issue 32 - Volkswagen Camper & Comercial (The magazine proper Type 2 fans read, accept no substitutes).
Page 30 & 31 - Oil change by me.
The fee will come in handy toward the front beam bill !
Thursday, October 25, 2007
The Guardian in positive story about railway modelling shocka !
No need for a blog post tonight. I just need to point you at this article in today's Guardian:
Rod, I salute your train set by Annalisa Barbieri
It's fantastic and pretty much sums up my atitude to the hobby.
Rod, I salute your train set by Annalisa Barbieri
It's fantastic and pretty much sums up my atitude to the hobby.
Wednesday, October 24, 2007
Beginners etched kit
Andy sent in a question, “hello, can you suggest an easy brass loco kit, i haven’t done one yet and would like to have a go so please can you help.”
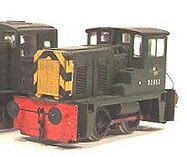
I love this question as it’s so easy to answer. Build the Craftsman Model kit for an 02 Diesel.
While not a new kit, I think it dates from the 1980’s, this is a good and easy to assemble model. With only 4 wheels the chassis is as simple as you can get. Put a Branchlines gearbox and Mashima motor in and you can’t go far wrong. The kit recommends a DS10 but ignore this.
The body has a pre-formed bonnet and a sensible mix of etched and cast bits. The designer knew which bits worked best in each material so there is no folding of tiny parts that you wish were cast.
Best of all the whole thing is slot & tab construction so it’s easy to locate all the main bits. So many etched kits still don’t do this which makes building them so much harder.
The tough bits on this kit are bending the cab roof – patience is the key here and a good selection of round things to bend the bras around – and fixing the overlays on the front and back of the cab. I have soldered these in the past with low melt solder but to be honest it’s a whole lot easier to glue them on with superglue. And no-one will ever be able to tell. Neither parts are show stopper though and ought to be within the capabilities of a keen and reasonably patient newbie.
The downside to this kit, as with many others, is cost. I reckon that if you buy the kit, motor, gearbox & Romford wheels you won’t see any change from 70 quid. For that money you get something pretty decent in the RTR ranges. What you don’t get from these is the incredible satisfaction of building and running something yourself. I can’t explain the pride you sense from doing this. With less and less people actually making things you find yourself in an ever more rarefied club of modellers.
That said, this is not an expensive kit. Most importantly it will go together and that makes it a far better than a cheaper kit that needs a lot of work for assembly.
Source: Branchlines used to sell the whole lot but he’s running the range down at present. Shawplan usually has some in stock though.
Anyway, I hope this helps. Good luck to Andy and anyone else who fancies having a go. Let me know how you get on.
Monday, October 22, 2007
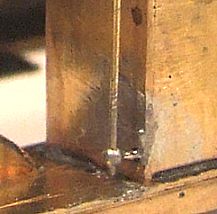
Beading
I um’ed and ah’ed about the beading on the Jinty for quite a white. It’s really tiny and yet if you get it wrong the error will stand out a mile. In this case leaving it off might have been the better option.
The kit provides some etched stuff to do the job but it looked hopelessly over scale. Instead I decided to jump in and have a go with fusewire.
Fusewire is an old fashioned material. I doubt there are many houses where a blown fuse is cause for extracting something Bakelite from the electric cupboard and winding new wire around pins to restore power. Fortunately my local hardware shop still stocks it on cards containing 3 thicknesses. For 3mm I use the thinnest.
For this purpose it is ideal. Copper wire tinned evenly with solder, it could have been designed for the job. Simply clean all the brass and then attach one end of the wire to the start of the run. Pull the rest tight to straighten it and run an iron along the join. Plenty of flux and not too much solder makes for a neat job.
Finally clean up with a fibreglass pencil and needle files. Even in cruel close-up I don’t think it looks bad.
Which reminds me, I need to stock up in for the future.
Sunday, October 21, 2007
Badger Mini Sandblaster
I’ve always wanted a sandblaster. And now I have one. A Badger model 260-1. OK, It’s a only a mini one, but that’s a start.
One of the things that held me back is having a compressor powerful enough to run the device. For airbrushing I have a little diaphragm-powered model which is fine for paint but wouldn’t shift blasting media. Now the proud owner of a second hand unit with airtank and 60psi+ output, I’m in business.
Lacking a blasting cabinet, I improvised with a large cardboard box. The flaps were all taped up as I wanted to try and re-use the media if possible. First surprise was just how fine this was. The nearest comparison I can think of is flour, although ‘cos it’s made of aluminium it’s a bit sharper ! A set of goggles and a mask finished the set-up.
First test was on a roasting tin, which has (like most such tins) gone a little black around the edges. I thought that I couldn’t damage anything and it might clean it up a bit. What I discovered was that even at 40psi I can’t shift caked on carbon.
Next up was my try square that has light surface rusting. This was removed quickly by the gun giving me a mat finished steel colour.
Finally I tested on a etched 7mm locomotive that’s been kicking around for a year or so. The idea is to roughen the surface to allow paint to key properly. Removal of excess solder would be a plus. As you can see from the picture, the keying worked OK with mat finish brass a plenty. With a bit of patience solder can be exorcised too but this is a slow process.
In summary, not quite as powerful a tool as I hoped. I blasted without gloves and in future will use thin rubber ones just to keep my hands clean, this indicates how gentle the action is. Perhaps a change of blasting media will make the tool a bit more aggressive but I need to check what it will handle.
Squishiness
While driving back from Vanfest a couple of months ago I heard a bad clunk. The sort of clunk that could be badness happening to an old VeeDub or just a rock hitting the bottom. Everything seemed to be OK so I carried on.
I have noticed recently that the front end has been bouncier than normal. If I go over a hump things seem “squishier”. The van works OK and as this is such a novelty I’ve kept at it.
I knew that I would need to have a look . In my heart I suspected something bad had happened and it took me less time to find the problem than it did to put on my overalls.
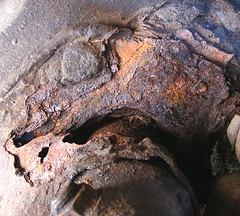
Rust in the front beam. The whole upper damper mount from the top tube upwards has sheared off. The squishiness is a lack of dampers on the passenger side.
But I am managing to be positive about this. Why ? Simple, I predicted this about 3 years ago. In my shed I have a rust free Australian beam bought at the Vintage VW show. It’s greased and painted in POR15. All that it needs is fitting. Of course I’d prefer the beam could stay in the shed and I could spend my money on model loco kits, but that’s the downside of old cars. The same thing happening on a new car would be much more expensive.
OK, so this is going to cost me a load of cash ‘cos I don’t fancy the job myself* but at least I should be able to keep on the road. Also I’m learning the resilience of these vans. You can run on 3 cylinders and drive with a major chunk of suspension missing.
*It’s not the removing of the beam but what you find underneath it that worries me.
I have noticed recently that the front end has been bouncier than normal. If I go over a hump things seem “squishier”. The van works OK and as this is such a novelty I’ve kept at it.
I knew that I would need to have a look . In my heart I suspected something bad had happened and it took me less time to find the problem than it did to put on my overalls.
Rust in the front beam. The whole upper damper mount from the top tube upwards has sheared off. The squishiness is a lack of dampers on the passenger side.
But I am managing to be positive about this. Why ? Simple, I predicted this about 3 years ago. In my shed I have a rust free Australian beam bought at the Vintage VW show. It’s greased and painted in POR15. All that it needs is fitting. Of course I’d prefer the beam could stay in the shed and I could spend my money on model loco kits, but that’s the downside of old cars. The same thing happening on a new car would be much more expensive.
OK, so this is going to cost me a load of cash ‘cos I don’t fancy the job myself* but at least I should be able to keep on the road. Also I’m learning the resilience of these vans. You can run on 3 cylinders and drive with a major chunk of suspension missing.
*It’s not the removing of the beam but what you find underneath it that worries me.
Friday, October 19, 2007
Squeezing things in
The Jinty build is a bit ahead of the blog so I’ll bring things up to date.
Firstly the tanks have been soldered to the footplate. Once in place I removed all the cross pieces as these were going to get in the way of the motor.
The boiler was then prepared from the supplied brass tube. This has to have a chunk cut out of it. Needless to say I cut too much and once I’d fitted the smokebox wrapper, which gives me the height, had to restore some bits of tube so there wasn’t a gap on the top of the tanks. This was achieved with a combination of bits of brass and gobs of solder. Smoothed down this isn’t bad but I suspect the first coat of primer will show I need to do more work here.
The cab was assembled next. Getting the bends right is a matter of trail and error. I didn’t anneal the roof and got away with it. If I had there would be doubtless be a load of extra, unwanted bends as the flexible brass took every teak of my fingers .
To position the cab I fitted the firebox. This comes as a whitemetal casting, which I found about a millimetre too low. A shim of brass cured this and everything was attached using to melt solder.
Then I tried the motor and discovered it wouldn’t fit. The smokebox is hollow as supplied but my shim filled the bottom in. Off it came for alteration (low melt makes this easy, just heat near the area with a big iron) by removing the middle section.
Even then I had to chop a bit off the gearbox to reduce the height. I think it will all fit now.
Thursday, October 18, 2007
Mystery
It’s always source of wonderment to me that you can’t get a railway modeller to a show that isn’t a model railway exhibition.
I know there aren’t that many model locomotives, those that are there are better described as miniatures, but surely they are still worth a look ? And I know that there are other things there like boats and road vehicles but can these be all bad ?
The main reason every modeller should go to an event dedicated to another discipline though is the sharing of ideas. I’ve a layout that’s has points operated by the same mechanics as those found in a model aeroplane for example. Military modellers tend to be better figure painters etc. etc.
If that’s not enough of a reason then what about the savings to be made ?
If you want a fat fibreglass brush then you pay 7 quid at a railway show or £1.50 at the ME show.
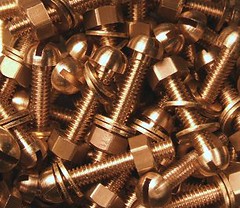
The 8BA bolts shown cost me about a tenner all in – for 50. That’s a fraction of the price elsewhere but it’s what the model engineer market will pay.
If nothing else, surely there is pleasure to be had seeing workmanship of the quality found at any of these events.
Rant over.
I know there aren’t that many model locomotives, those that are there are better described as miniatures, but surely they are still worth a look ? And I know that there are other things there like boats and road vehicles but can these be all bad ?
The main reason every modeller should go to an event dedicated to another discipline though is the sharing of ideas. I’ve a layout that’s has points operated by the same mechanics as those found in a model aeroplane for example. Military modellers tend to be better figure painters etc. etc.
If that’s not enough of a reason then what about the savings to be made ?
If you want a fat fibreglass brush then you pay 7 quid at a railway show or £1.50 at the ME show.
The 8BA bolts shown cost me about a tenner all in – for 50. That’s a fraction of the price elsewhere but it’s what the model engineer market will pay.
If nothing else, surely there is pleasure to be had seeing workmanship of the quality found at any of these events.
Rant over.
Wednesday, October 17, 2007
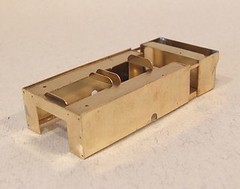
Jinty body
Back to the Jinty for a while.
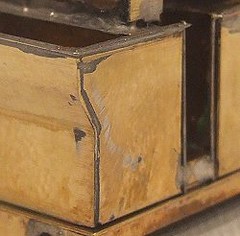
The body is interesting and fairly simple so far. Interesting because most of it isn’t assembled on the footplate as normal kits are. Instead you make up the tanks and bunker as a separate brass box. This is then soldered to the footplate.
The only notable bit of this job is opening out the “key holes”, in reality access for the sandboxes, in the tank sides. On the back of the side there is an etched line showing the outline and a dot in the centre of the circle. I drilled this and the opened the hole with a tapered reamer. Finally the bottom of the hole was created with a square needle file.
This work is necessary because not all Jinties featured the holes. On early ones the fillers must have been on top of the tanks I suppose. I wanted somewhere for the winding up key to go…
Sunday, October 14, 2007
Sore feet and bargains
Another day, another 8 hours on a hard floor. I’m sure it has got worse since yesterday…
On the plus side arrival at the stand doesn’t herald a track and wheel cleaning session. In fact all we did was dump our bags and then go for a wander around the show before the crowds arrived.
I picked up a terrific bargain – a steam boat register with hundreds of photos, for a quid ! Somewhere I have a hull, which is destined to get a steam plant in it if I can find one. Then I will sort out some highly polished woodwork, hence my need for pictures.
I also took time out to attend a lecture – the ME show has a continuous program of these. Getting people in for “The theory of gear cutting” wasn’t going well judging by the number of tannoy announcements but by the time “The life & times of LBSC” was announced a crowd of about 20 were seated in the hall. The talk, which lasted an hour was both interesting and informative. I can’t image in a time when Model Engineer magazine was a weekly publication and featured real controversy in its pages. Nor do I know how a supplier sold 1000 sets of casting for the same 3½ inch gauge loco in a year. Since that year was shortly after WW2, where did the material come from ?
It’s probably tempting fate but a quick look at the model boat class winner made me feel I should have a crack at this competition. The standard of workmanship was good, but I think I could match it. Perhaps that Brede lifeboat needs to be dug out and assembled.
I've put some more pictures on Flickr if you are interested.
Saturday, October 13, 2007
Model engineers have it easy !
At a railway exhibition I have to make things work, fix them when they break and talk to the punters. At this show, all I do is hang around the stand chatting to people occasionally. OK, so the floor is hard to stand on all day, but that’s as bad as it gets.
Wandering around the show there is a huge array of tools for sale. I even understand what some of them do. The world of serious machine tools is still a mystery to me so I do look at a lot of it and wonder why anyone would want such an odd bit of metal.
I found a couple of kits I liked too. One from Maxitrack is for a Sentinel steam lorry at a mere £1875 (gulp) so it’s not going back home with me. For the money you do get a machined kit ready to assemble with the sort of tools I have. It’s got radio control, live steam and everything. Obviously if anyone out there fancies a RTR one, if you get in touch I’ll happily oblige on a “buy 2 kits and I’ll send a finished one back” basis. Don’t all rush at once…
The other “kit” is a set of castings for Polar Bear on the Groudle Glen Railway. Not a kit as such as you don’t get most of it. And the casting need a lot of skilled finishing. And it’s 2.5 inch gauge. Apart from that, perfect.
The photo shows my favourite item so far. A wooden Clyde Puffer Hull. It’s a beauty. The quality of workmanship is exquisite. I am truly awed.
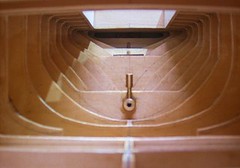
Thursday, October 11, 2007
Setting up
Model Engineers seem to have more time off than the rest of us. That’s the only reason I can see that this years Midlands Model Engineering Show runs from Friday to Tuesday. Even that’s a reduction, it used to be good for 10 days !
This means that setting up the boat club stand has to happen on Thursday night. Pretty early too, it’s a case of get home from work and head straight out there. Good job the exhibition site is only 10 minutes drive away.
Anyway we’re showing the Blue Boat, Puffer & African Queen. The rest of the stand is chocka with models and looks really good in a jumbled sort of way. It’s certainly colourful with not a grey boat to be seen.
It’s good to see The Blue Boat on the stand. After 40 years it it’s looking really good up there.
If you are going, look out for me on the Saturday & Sunday when I’ll be the one hanging around hoping to talk to people.
Tuesday, October 09, 2007
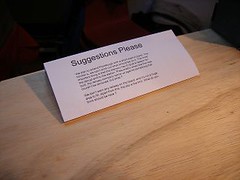
Suggestions please
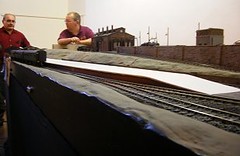
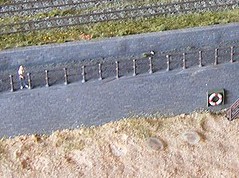
Beyond the station at Flockburgh we need some more scenery. This all started a couple of years ago when Cyril Freezer looked at the layout and suggested that the model would make more sense if there was something to explain why the track finished where it did. He was right so something had to be done.
We built an eighteen inch long board to accommodate this “something” a while ago. Working out exactly what to put on it has taken longer. Whatever goes on the board has to be something important, too important or difficult to be demolished when the railway was built.
With no hard an fast ideas, we though, “lets ask the public”. The board was attached to the model with a couple of clamps and a note attached asking for ideas.
This was amazingly popular. Lots of people made suggestions, some stupid but most sensible. Many involved adding some water in the form of an estuary or harbour inlet. Others mentioned castles or chapels with graveyards. We’ve considered these but considered them too large for the space. Apparently we were wrong as several prototypes were suggested that would fit the spot.
What was really interesting was the seriousness that people treated the request with. Flippancy was rare. Many more asked where the model was set and provided ideas accordingly – there aren’t many Martello towers in Scotland but apparently there are a few small forts in the north.
So we have the ideas and now have to work out what to do. Watch this space.
Monday, October 08, 2007
Sudbury part 3 - Damage report
There was no getting away from it. We had to take a look at the layout sometime and assess the damage. Dropping the board face down made a pretty horrible noise. Fortunately the backscene stopped most of the damage – all the work to make it good and strong paid off in that fraction of a second !
In the end the new wasn’t too bad. Most of the beech huts had come off but apart from some very minor damage, which didn’t look too far off prototypical wear and tear, they could be glued back on. I used an all purpose glue instead of PVA this time as I hope the slight rubberiness will help should this ever happen again. The BRM article was a good guide to the order I placed the huts in before as it had a nice shot of the beech scene. I know it doesn’t matter but I wanted to restore things the way they were before my clumsiness.
The engine shed and water tower roofs had popped off whole and could be glued back the same way. A little fettling of the filler pipe on the tower was needed but the damage has been hidden.
The biggest casualty though was the white clapperboard building. This too the full force of the fall on the front corner of the roof. Despite being card the building survived quite well, except it has squashed in a most unrealistic way. Not a lot but enough that the end wall and chunk of roof will need to be replaced at the very least.
It could all have been so much worse. For now I’ve made the quick repairs and boxed the model up again. Once the model engineer show is out of the way we’ll have another look and put things properly right.
Sunday, October 07, 2007
Sudbury part 2
After a good nights sleep and excellent breakfast at our hotel, we trundled off to the show. Finding a parking space was a challenge – Sudbury has a one way system that is harder to navigate than the deepest jungle. Thankfully, one of the members showed me where to go. For future reference, head down to the station and you’ll find a free all day spot.
Anyway we wandered around before the show opened and discovered some superb chocolate cake in the tea bar. A couple of slices joined the rolling stock in the fiddle yard as we doubted that the supply would last the day.
The show itself was fine. Amazingly there was another 3mm scale model – Petton by Mark Haynes showing. I must admit it won the “Layout Phil would like to build” prize for this show too being a minimum space, cleverly constructed model. The St Neotts N gauge was very nice too as was Vauxhall Road, an old favourite of mine. Generally the layouts were a good mix of scales and gauges. Nothing really outstanding but all worth a look.
Exhibitions are a good place to catch up with old friends. In this case, Ian Futers who was showing Loch Lochy and John (whose surname escapes me as I type) responsible for some excellent Colchester exhibitions in the past.
The visitors tended toward the general public end of the spectrum making for lots of chat and some interesting questions. Generally people liked the model and thanks to the dour hotel at the end, many even thought the location was Scotland. I’ve never been too happy with the effect of “place” the layout gives off so this was heartening.
Everything worked well too. All the rolling stock was a bit sticky but generally wore in OK. One of the points needed a bit of flicking over after early on but wore in after a few uses. The only breakage was a blade coming off a tie-bar and even this was quickly fixed with a soldering iron.
Lunch was good, back in the White Horse very nice bangers & mash was served up. I followed this with more choccie cake since I’d not read the information sheet properly and didn’t know desert could be collected from the tea bar. If I had the choice I’d have gone for the cake as it really was good…
Missing pudding seemed to be the theme though as a check was made later in the day as to who had missed out. Apparently I wasn’t the only one and they were worried how much was left over. Reluctantly I had to agree to eat a nice apple crumble and custard which would have been easier if I hadn’t been operating on my own at the time.
The trade didn’t take much off me, a second hand book, some bolts and a Hornby Christmas wagon costing me all of a tenner all day. I’m not looking for anything and will spend next weekend at the model engineer show anyway.
Once 5 o’clock arrived we packed up and that’s when it went wrong. Everything came apart OK but as I removed the cliff board, the other one fell off the legs and landed face down on the floor. Beech huts were scattered and a quick look revealed a squashed building and missing roofs from the engine shed and water tower. We didn’t look too hard as the crash was a bit sickening and nether of us could face the results by this point in the day. Instead, everything was quickly gathered together and loaded into the car for the trip home.
Two and a half hour later we got back after a good run interrupted by an idiot pulling out from a service station on the A14 causing some heavy breaking. The traffic was light at the time so no harm was done but if you see a fat middle aged business man type in a blue Peaugot 206 then don’t let him out of any side roads will you.
I must admit to enjoying this type of show. I particularly like the town centre location as you can go for a wander during breaks and get away from all the toy trains. The venue was interesting too. However the drive reminded me why we don’t do many 1-day events. It’s hard work even if you get accommodation on one of the nights. It’s probably just me though, as at least one person had travelled there and back in the day, but I’m afraid his 5 hours on the road sound like a whole load of no fun.
Friday, October 05, 2007
Sudbury part 1
It takes just over 3 hours to get from Leamington to Sudbury. Despite reports on the radio there, weren’t any major traffic problems en route. A couple of bits with heavy traffic but nothing you wouldn’t expect from a Friday afternoon.
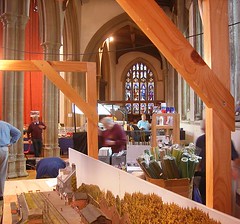
On arrival we find the hall thanks to some good instructions, not always a given even nowadays with electronic mapping easy to find. It’s a church. Not a church hall but a real church – admittedly not one in use but unusual all the same. It’s also bang in the middle of town but there is some handy parking.
Getting the layout in is mildly annoying. We’re the only people unloading and yet the club members stand around chatting. No-one bothers to offer us a hand. While not essential, after the journey it would have been appreciated. It’s not like they were doing anything better ! At our show I’m pleased to say this wouldn’t happen, you don’t get in the door without a flock of people offering help.
Worse, there was no sign of any tea. Requests for toilets were greeted with a wave of a hand and direction to go and use the ones in the pub. Sudbury has several town centre pubs and it was only chance that sent us to the White Horse. What we didn’t know was that they had arranged the use of toilets with the pub so we felt duty bound to have a drink – it solved the thirst problem but did nothing for my nerves. The car was still full of layout and bags out of our site and with the local kids wandering around.
Still, we got in and set up. The space allowed was tight. The end of the layout was about 3 feet from a traders frontage. If his stall got two deep we would have them banging on the fiddle yard. Swinging the model around at an angle made for more room without inconveniencing anyone.
Testing went well so we departed for the pub we were stopping in and booked into a nice room by 7pm.
Thursday, October 04, 2007
Chassis testing
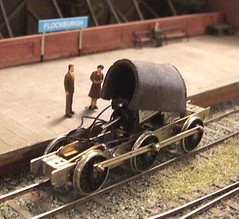
The reason I was so keen the build the Jinty was that Flockborough was going to be available to act as a test track. Only a little midnight oil was needed to allow this photo to be taken.
Once the layout was assembled and the chassis was in one piece I was able to bring the two together.
A lump of lead bent around the motor give the “model” some much needed weight and temporary pickups on four wheels supply the electric juice.
And off the chassis went. Straight up the layout traversing a couple of crossovers and some facing points as it went. All without problems. I was so pleased.
The way back was similar except for a derailment on the final crossover.
We explored sidings and straight running lines. There were odd problems but nothing major. Even in a rough state with not enough pickups the flexi-chassis worked well.
Now all I have to do is take it to bits, paint it and put it back together properly without breaking anything.
Wednesday, October 03, 2007
Jinty footplate
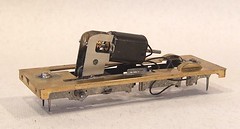
While the wheels dry I moved on to the gearbox and footplate.
The former went together as well as any High Level Models box ever does – i.e. very well as long as you follow the instructions. I left the final stage swinging until the body is built and I can work out how much to bend it so the mechanicals fit inside.
I’ve also made up the footplate. It makes sense to sort out the fixings between this and the chassis early. I’ve played the game of trying to enlarge chassis holes with all the gubbins in place. Never cleaver.
Before assembly the valances had to be bent to right angles. This took bending bars as the hold-n-fold wasn’t man enough. The brass is hard and took a bit of whacking with the little hammer to give a true right angle. Then it was turned in the vice so I could whack out the curve they had formed as the hammered metal had stretched.
Buffer beams needed loads of bolts embossing in the faces. Luckily I noticed that they were different and after checking the plans got the right one each end (I think) so as not to upset the purists.
Tuesday, October 02, 2007
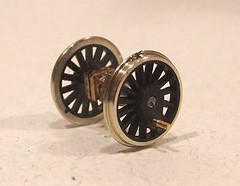
Preparing the wheels
I’ve never got on with the 3mm Society Wheels. They look very nice, have integral crank pins and self-gauging axles. When I first bought a set I was well chuffed with them and expected good things.
Since then however, I have discovered a problem. The axle ends are under size by a very tiny amount. This means that the wheels don’t grip them as well as they should giving the wheelsets a tendency to lose their quartering.
I’ve tried many things to get around this. Loctite never seems to work for me. Cutting a slot across the end of the axle and then pushing a bit of wire into this and the face of the wheel with a soldering iron did the job but doesn’t look nice.
Some people can drill in through the hub into the axle and push a bit of retaining wire in to lock things, but not me. All I do is break drills – effective but pricey. Others replace the axle with 2mm rod or bore the wheels out to 3/32nd. Neither appeals much to me as a method.
So my latest effort involved slow set Araldite. Fortunately I can set the axle up with the quartering jig with it out of the frames. That’s the benefit of a flexi chassis. I’ll let you know if it works.
Subscribe to:
Posts (Atom)