Wednesday, December 31, 2008

LMS Dock Tank Kit


Dock Tank Kit
Originally uploaded by Phil_Parker.

I've built one of these before. The kit is a Mercian etched brass product in 4mm scale (OO) for an ex-LMS dock tank.

More years than I care to think about have passed since I made my model and in the intervening time my skills have increased as has the toolkit available to do the job. This is good news as the kit is best described as "challenging" (in light of the recent comments by the culture secretary I better not put the words I used at the time in here for fear of an X rating for this blog !). In fact my version included a significant amount of scratchbuilding - boiler (I couldn't roll them at that stage), firebox, smokebox and cab roof. This time I expect to be able to use all of the kit. At least building the Garratt has given me plenty of practise making up Walschaerts valve gear !

ex-LMS Dock TankHaving said this, the resulting loco looks fantastic and works pretty well too. It's always been one of my favourite models and hopefully this one will look as good, if not better.

For more detials on the prototype, try Wikipedia

Tuesday, December 30, 2008

Porter 6


Porter 6
Originally uploaded by Phil_Parker.
You should never throw anything away you know...

Porter 6, or the first engine for my On30 layout, has been weathered and is ready for service once I find a suitable crew. Wanting a really dirty engine once I had finished fixing all the bits the post office had carefully removed back on, I blobbed a bit of rust coloured paint in a few place before giving it a blast from the airbrush.

The main dirt colour is the stuff from a jar I tipped the remains of paint into while I was weathering the clyde puffer a few days ago. It's a dirt brown mix pretty close to the dark brown I'd normally use. And free 'cos I didn't have another use for it !

Earth colour under the footplate and weathered black along the top finished the job as usual and the result is a really filthy loco. A quick wheel clean and this model can go back in the box until we get around to building a layout for it.

Monday, December 29, 2008

Broken bits


Broken bits
Originally uploaded by Phil_Parker.
When I delivered the recent batch of Porters to their new owner I picked up the original model locomotive I built. After a trip through the postal system, it needed a bit of repair.

Somehow the model had taken a serious shunt which has removed the front plank, bell, whistle and destroyed the coupling. Apparently the cab was bent back as well but by the time I collected the model this had been bent back.

I'm going to restore these parts and weather the loco so it can join my fleet for the On30 layout. Once this is done I'll have cleared the test track for something new.

Sunday, December 28, 2008

Worst of Brede


Brede plan
Originally uploaded by Phil_Parker.
The plan was to photocopy the sections from the Brede plan, transfer then to plasticard and fit these bulkheads to the vac-formed hull. Simple.

I made the foremost bulkhead and tried it. No way would this fit. Not a hope. Too tall, too wide and not nearly pointy enough.

OK, so the hull wasn't an exact match. I was prepared for this and decided plan B would be to get a couple of bulkheads in that fitted the hull I had and work from there. The hull didn't look too bad so I planned to try and use it, modifying things to fit.

One of the problems with a Bred is the hull has no straight lines. The deck sweeps up from the stern and this really contributes to the "look" of this vessel. Needless to say the plastic hull offered no guidance for this. I took a few measurements from the chine line upwards and then used a bit of plastic strip to join the dots.

The sweep at the bow still didn't look right. Too high and with an odd bend. Any hope of sanding this out and re-establishing a smooth curve disappeared when the attempts to do this with a sander fitted with the finest paper caused the aged plastic to shatter. Things weren't looking good. From the side the curves were wrong. From the top there were problems too - the bow wasn't symmetrical either.

In the end I've had to give up on this "kit". It has followed the Pilot boat into the bin. But, I've not given up on a building a Brede. It is a lovely looking boat and people have been really kind by sending me extra information. There has to be a way for me to build this model, and not one that involves a £120 1/12th kit either...

Saturday, December 27, 2008

Missing link


Boat inner
Originally uploaded by Phil_Parker.
Boxing day. A time for sales apparently. Public demand requires Debenhams staff to be in store at 6am to prepare for opening an hour later. What you need to buy from a department store at 7 in the morning is a mystery to me and will always remain so as I was still in bed. Even when a more sensible time of day had arrived I eshewed the retail opportunities on offer in order to attend the boat clubs Boxing day sail (Geddit ?)

Not knowing how many would bother to turn up I didn't take anything spectacular from the boat collection. A RTR Thunder Tiger fishing boat seemed to be just the thing - large and easy to sail. It's bright red too which makes it festive in my opinion. The battery had been charged overnight and so I expected to unpack the model and be on the water in a matter of minutes. This was not to be.

Thunder Tiger models are excellent with proper radio gear and speed controls. They even use standard jelly cell batteries. These are connected with a short lead with spade terminals on one end and a Tamya plug on the other. This lead is used on the end of the charger - which is where it was when I got to the water.

A kindly fellow club member lent me a set of AA cells in a pack which had the correct plug on the end so I did make it to the water and enjoyed a pleasant half hour tootling around the lake. The favour was repaid slightly as my fellow sailors boat needed a shove a couple of times as it kept cutting out.

By the time we'd finished a few more keen types had arrived. Sadly they had decided to bring yachts but forgotten to carry a bag of wind (not a problem with all the sprouts eaten the previous day you would have thought) as well. One had also managed to leave the receiver battery switched on too. Some people will never learn - motors are a good thing. As long as you remember all the wires that is !

Friday, December 26, 2008

Dirty Puffer


Puffer 3
Originally uploaded by Phil_Parker.

For more years than either of cares to remember, my Dad has had a Clyde Puffer under construction. It's a Caldercraft kit which has proved to have many shortcomings a problems for the unwary model maker. For much of the time the boat has sat on the shelf while he's worked on other things but every so often the plan was blu-tacked up and another burst of activity occurred. The project has advanced in fits and starts but finally has been completed.

My role has been to offer encouragement and a bit of helpfull (sometimes) advice. Buying a completed Puffer from the same kit was also very useful as we could see where another modeller had made adjustments to get the thing built. I've also been in charge of painting and just before Christmas I had to set up the airbrush to perform the final weathering.

My brief was to make a mucky model. The guide was to be a set of photos taken of the "Vital Spark" from the 1990's BBC TV series. On a trip to Scotland years ago he'd taken some photos of the vessel tied up in Crinan harbour. For TV purposes the boat had been weathered heavily and looked good in this guise. The only change we wanted was a different name - everyone has built a "Vital Spark" so we picked "Auld Reekie" which was the boat's previous name and much more redolent of Puffers.

While this isn't a big model in boat terms, for me it's larger than anything I've ever weathered before. I knew that there was no point in trying to do much with dry-brushing techniques as this would take forever. My best option appeared to be to drift dirt on with the airbrush. That way I could build up the effect gradually and hopefully stop work before reaching the point where a repaint would be required to sort things out !

Normally I mix up a weak paint in a paint cup and use this. For the puffer I half filled a paint jar with white spirit and poured in some Humbrol 170 (Dark brown). After testing the result on newspaper more spirit went in to bring the level up to 3/4 of a jar. This was sprayed from a distance of at least 12 inches and often 18. That was to allow drying time from brush to boat which hopefully would impart a little texture to the results. The entire model was treated to this but unevenly. The photos showed that dirt seemed to work up from the waterline and anyway I liked the effect it had on the nicely detailed hull.

Puffer 2Any leftover paint was poured into an old jar and a new mix made up with rust colour. The paint jar wasn't cleaned out so some of the old paint contaminated the new, helping the blending process and avoiding sharp changes of colour. Extra attention was paid to hatches and holes in the hull with rust running down from these a feature very obvious on the real thing.

Finally some Precision "Weathered Black" was made up and smoke residues blown on across the wheelhouse roof and mast where you'd expect the smoke to stick. The areas around the coaling hatches took a shot too as I don't suppose the crew were too careful or cleaned up after fueling !

I think this job only took about an hour - shockingly quick for such a large task. A little finishing up on some detail work, the cap steps were dry-brushed with metalcote steel to represent wear of example, did the job. Close up the weathering look OK but on the water and at a slight distance I've really pleased with it.

Thursday, December 25, 2008

Merry Christmas !

SantaMerry Christmas to all the readers of this blog.

I hope Santa has brought you all the goodies you wanted and that everyone has a new kit or two to be added to the pile of projects to be completed "one day".

Don't forget if you want to send me a present, just click on one of the adverts at the side of this text and Mr Google will send me a bit of money, and best of all it won't cost you a penny !

In the meantime go away and eat too much, watch rubbish telly (except for the excellent Wallace & Gromit which is unmissable - excellent stories, brilliant filming and you get to play "spot where the model bits came from" if you are a real anorak) and perhaps sneak away to your workbench while the rest of the family are too dozy to notice your absence. At least if your hands are busy with a scalpel or paint brush they aren't in the pot of chocolates. Modelmaking is a healthy pursuit !

Wednesday, December 24, 2008

Brede Lifeboat


Brede Kitbits
Originally uploaded by Phil_Parker.

I have a clear modelling bench. This is not natural so I've dragged out a couple of projects, one train and one boat.

Starting with the boat, it's going to be a Brede Class lifeboat. 1/25th scale based on some vac-formed bits I bought at the model boat show a couple of years ago. The omens aren't good for this project as earlier this year I tried to build a pilot boat from the same source and had to abandon the job. The mouldings were horrible and hard information scarce.

One big difference this time is that I have a plan. And what a plan ! A quick e-mail followed by a cheque brought me a 6 foot long sheet of paper with a side, plan and section views with an absolute mass of detail. So much in fact, that my plan to build a reasonably simple model has been replaced with an idea that I'll be aiming significantly higher. One day I'd like to enter it into a competition class at the Midlands Model Engineering show.

The plan is to 1/20th scale so my first stop will be a photocopy shop to get the slices reduced. Then to the local model shop to acquire many sheets of plasticard to make bulkheads.

Obviously the model will be radio controlled - a cheap receiver plugged into a rather more sophisticated than normal speed control from Action Electronics is already in the bit box - bought at last years boat show. Still, 2 years gestation isn't bad for a modeling project is it ?

Oh, and in case you are wondering, here's what the model should look like eventually:


Brede lifeboat


Tuesday, December 23, 2008

Clack Valve

Spencer Sutton asked "Whereabouts is the Clack Valve and what is it used for ?"

Good question. I had to go and look up the answer to this as while I've heard of a clack valve, it's exact purpose hasn't been that important to me. The answer can be found on here.

Essentially the clack valve is part of the injector and normally found on the backhead (the back of the boiler/firebox, above the door coal is shovelled into) of a steam engine. Operated by the fireman (normally) the injector allows water from the tanks or tender into the boiler. The clack valve is a non-return valve that makes sure water only flows one way.

The name by the way, comes from the noise the valve makes when operating.

Making aerosols work better


Underseal
Originally uploaded by Phil_Parker.
Someone clever once said, "Eat a live frog before breakfast and nothing worse will happen to you all day ". I've been staring at a frog for a couple of weeks and finally got around to chomping on it yesterday.

My frog appeared when I crawled under the camper van to try and work out why the heating was even more pathetic than normal. Nothing obvious appeared at the time but I did spot that sometime in the past I've scraped the bottom of the vehicle. Some dented tinware was quickly flattened but the damaged underseal couldn't be fixed at the time as I'd run out.

To buy time I sprayed some normal Waxoyl under there. That's OK for a while but I didn't fancy it's chances with all the water on the roads at present. That water contains road salt or VeeDub killer as it's better known for the ability it has to promote rust. A new can of spray underseal was acquired and has sat in the garage taunting me for a week. A cold and wet week. The sort of week that makes you want plenty of protection on the bottom of a car and yet provides no incentive to crawl around underneath one. And yes I know this sort of job should be done in the summer thank you very much.

With reasonable weather and a conscience biting at me I slipped out to wire brush the affected area (the rear cross member) and give it a shot of Eastwood Rust Encapsulator. This came out very well in a recent rust stopping test in one of the classic car mags so I thought it was a worthwhile thing to do. My plan was to top it off with underseal to protect against flying stones.

So there I am lying on my back under the van having given the spray can a shake for the regulation two minutes, pressed the nozzle. Nothing. Well, not quite nothing but a pathetic excuse for a spray. Another shake and no real improvement. And I really didn't fancy using the brushable stuff for such a small job - it's horribly messy. Forget to wear a big rubber hazardous chemicals protection suit and you'll be washing it off for days in my experience...

My suspicion was that the viscous liquid in the can had solidified while sat in the cold garage. When shaking it I couldn't hear the ball bearing in the can (has anyone ever seen one of these ?) that I assumed would be in there. Perhaps all it needed was warming up ?

With the house empty I made a bath in the sink for the can with lovely hot water from the tap and a bit from the kettle. 15 minutes or so later the can was warm and the ball bearing could be heard on shaking. Best of all the black stuff sprayed out beautifully.

Monday, December 22, 2008

Making letters


Auld Reekie
Originally uploaded by Phil_Parker.
My Dad is just finishing a Clyde Puffer kit and since he is colourblind, I've been handling the painting duties. I also get to apply the name to the boat since "You get on better with those letters than I do.".

So yesterday I was using my normal method of letter a boat when I hit a snag. The part used BEC lettering sheet may have had enough E's on it, good news considering the number of them in the name, it didn't have enough U's. I was precisely one short.

Now I want to see this boat finished, it's been 10 years in the building thanks to some long periods on the shelf while other projects take precedence. It's very nearly there though and this is the final push. Ordering a new sheet of sticky letters during the Christmas period wasn't going to be a good idea.

Scanning the sheet for something I could make a U out of I decided after a fair bit of measuring that the best bet was the bottom curve of an S (the last on the sheet) with verticals from the supplied dashed line. Several other characters were either slightly too wide or too narrow. To be honest the variety of letter widths both surprised and frustrated me.

A bit of poking around with a sharp scalpel has given me a reasonably neat result. This vessel is intended to sail rather than live in a glass case anyway so anyone close enough to notice will have wet feet !

Sunday, December 21, 2008

On30 Tipper wagon


On30 Tipper waggon
Originally uploaded by Phil_Parker.
A coat of primer and it's time to start the painting process. Having read "The Art of Weathering" this model seemed like a suitable candidate for the flaking rust technique. To achieve this the theory is that you paint some bits in rust colours which when dry have Maskol (a rubbery masking substance, think non-stick Evo Stick) blobbed on them. Then you paint the wagon. Once it's dry the Maskol is picked off with tweezers revealing rust.

I tried it and it's rubbish. Mind you I've never really liked the results in the book or when I've seen them carried out on other peoples' models.

I did try to soften the edges of the rust patches with the airbrush but in the end I just painted the whole thing with browns and greys. Once my rust patches had been covered up the results weren't bad.

Feeling that more effort ought to be expended and since this is a test piece so I might as well experiment, I tried out some MIG acrylic paint. This took a fair bit of thinning and when I ran it into the crevasses didn't do anything for me. Mind you I've never got on with acrylic paints.

Finally I attached the model with weathering powders. These have worked for me in the past imparting colour and texture as required. Sadly they reacted with the MIG paint, which hadn't dried fully, and just went black. Overnight drying made things look a whole lot better so I assume the effect is only temporary.

The end result looks pretty nice. It's suitably crusty and worn without being completely knackered - in other words just the sort of thing you'd see on a working railway line.

Saturday, December 20, 2008

Tipper wagon


Tipper
Originally uploaded by Phil_Parker.
One day I will build an On30 model railway. I have the plans, some buildings, a loco or two and some wood for the baseboards. What I'm short of is rolling stock. You see while Bachmann make some very nice RTR models, they are all designed to run behind big locomotives. Put even the smallest tippers behind a Porter or Critter and they loom over it. For the models I want to build, I need something smaller.

Wrightlines (now ABS models) seemed to have the right sort of thing with their v-dump tipper wagon kit. It's O-16.5 so the right scale (sort of, stop being pedantic). At 12 quid we aren't looking at the cheapest kit on the planet but in a specialised scale so it's par for the course. Put in RTR terms, 3 of these will cost the sames at 3 Bachmann v-dumps but you have to build these.

Kit assembly starts with the soldering together of the bottom chassis. This includes axleboxes so you have to trap the wheels during building. With a hot soldering iron this is fairly easy - solder allow the join to be made and then adjusted if required. I needed to fit Kadee couplings and as far as I could tell the way to do this was to hack a hole through the girders and replace this with some real metal. Just to make things more interesting the coupling box has to go right through the structural metalwork. I soldered a bit of nickel silver scrap etch in the bottom and then another in the top, trapping the coupling box. Of course I worked one end at a time and it seemed to work OK.

The bucket is a reasonably simple brass etch. Admittedly there are no aids to location but tack soldering bits in place and adjusting as required worked OK. I decided from the outset that this would be a well weathered model and very tatty so if my building was a little rough around the edges it wouldn't matter.

As a kit I'd say you need to have some building experience to get the best out of it but not much. If you are new to whitemetal and brass then there are simple models out there. It is a lot cheaper than a locomotive though so a useful step on the road (rails ?) toward fully fledged kit building.

Friday, December 19, 2008

Boxed Porter


Boxed Porter
Originally uploaded by Phil_Parker.
These locos have to travel to sunny Leicester (The San Tropez of the East Midlands) tomorrow so they need to be packed up. To me, the obvious plan was to put them back in the nice padded Bachmann boxes the locomotives originally arrived in.

Snag is, thanks to the longer can, and in some cases, fatter chimneys they wouldn't fit. I needed to alter the foam packing. Fortunately this comes as three layers like a sandwich. The "bread" is flat foam and the "filling" is a nutritious fat lump with shaped holes in it.

I carefully marked out the new shape with a felt tipped pen and then tired hacking away with scissor. This was rubbish and untidy so I tried a X-acto saw. This worked better with some neat lines but even the finest blade snagged. Finally I used a cheap snap-off blade knife with the blade fully extended and used in a sawing motion. This worked a treat producing nice neat and straight lines. OK, straightish but they do the job and this model now travels reasonably securely.

Thursday, December 18, 2008

Finished Porter Lineup


Finished Lineup
Originally uploaded by Phil_Parker.
Job done - 5 detailed, painted and weathered On30 Porter locomotives.

Each one is a little different from its brothers yet they all look similar, as though a line had bought them all at the same time yet each had been used slightly differently. Perhaps some were better steamers than others and saw more action. Maybe the shed was a single line and drivers simply took the nearest loco out so on quiet days some didn't get exposed to the elements.

I like them a lot. Bother the stove pipe and spark arresters chimneys looks nice. The later look a lot better than the ones supplied by Bachmann though.

To take a closer look at these models, I have grouped the portraits together here for your enjoyment.

Wednesday, December 17, 2008

Wood pile


Wood pile
Originally uploaded by Phil_Parker.
Tradition has it that American steam locomotives burn wood. As the early white settlers built their way across the country, digging coal out of the ground wasn't a priority and there were plenty of trees to burn so that's what they did. Of course the trees were supplemented by arrows donated by a population who thought they had colonised the country quite effectively and didn't see why anyone else should have a go.

You may notice my entire grasp of US history has been learned from cowboy films, but as these are certain to be accurate this will do.

Anyway, the Porter locomotives needed fuel and that means I can't use my stocks of Welsh Steam Coal. Instead I spent an hour chopping up artists matchsticks to get enough for 5 locomotives. As well as cutting to length I carved and split corners so nothing looked to regular. Mind you, if you've ever split wood with an axe (ax for US readers who apparently have an aversion to vowels) it's amazing how square cornered the results are.

I did wonder about weathering the resulting wood but the colour is pretty good and the fuel wouldn't stick around long before ending up on the fire so it surely wouldn't get that dirty ?

Tuesday, December 16, 2008

Weathering Porters


Weathered Porter
Originally uploaded by Phil_Parker.
At last, a job that is quicker when working on a batch of models - weathering.

Only a light coat of dirt is required so I've been drifting this on from the airbrush. With 4 models to work on I was able to use most of a paint cup of "dirt" each time instead of abandoning most of it.

Today's problem involved temperature, or the lack of it. Our garage isn't heated and when the mercury drops, cellulose thinners cause enamel to go lumpy rather than watery. Switching to white spirit solved the problem and I sprayed away with the airbrush in one hand and a hair drier in the other.

Monday, December 15, 2008

Painted Porters

Painted PortersAfter a quick coat of primer the Porter locomotives received a blast of Precision black paint. This was left to harden overnight and then all the brown wooden bits and brassy metal bits were picked out by brush in the appropriate colours.

Thanks to my own stupidity the lenses on the headlamps had to be cleaned up 'cos I forgot to mask them when priming. Some watch glass cleaner applied using a cotton bud did this and I only had to scrabble on the floor looking for a couple of them when they flicked off the workbench. I'll try and remember to cover them up during the last stage - weathering.

Another touch is that various oil cans have been added to the locos. This, and the numbers, differentiates between some otherwise very similar engines and provide odd highlights of colour amongst the black.

Sunday, December 14, 2008

Filler strip


Plasticard filler strip
Originally uploaded by Phil_Parker.
Taking the steam dome off a Bachmann Porter exposes the worm gear of the mechanism. In the Backwoods kit a bit of brass is provided to fill the hole. I think that the design has changed slightly and pulling the dome off now takes a curved part away as well which runs down the side.

This part could be separated and glued back in place followed by the brass filler bit BUT that way results in a patchwork effect unless hours are spent with filler and files.

Far easier is to cut a bit of the thinnest plasticard 6.5mm wide and fit this over the area. Glued down and painted this looks right. I even contemplated riveting the edge but decided that that wouldn't fit in with the rest of the model.

The photos shows the wheels and waggly bits masked for painting. Since they can't be removed fully I like to get some protection on them from the primer - it's a pig to remove when it gets where you don't want it.

Saturday, December 13, 2008

Cheap tool


Cheap tool
Originally uploaded by Phil_Parker.
Ladies & Gentlemen, allow me to present the most useless wire cutter ever produced. I tried to cut a wire with it and one of the jaws broke off.

There are lessons for us all here I think:
1) Do not grab the nearest to tool to do a job. Get the right one.
2) Just because the wire looks soft it doesn't mean that a little pair of cutters will go through it.
3) Fat wire needs the big cutters. Or better still a piercing saw.
4) If a multipack of pliers and cutters costs the same as a pint of beer, the quality might not be of the highest order.

To top it off, when the cutter broke the handles grabbed the skin on my hand and I now have a lovely little blood blister. Just my lick to find the one pair where the sharp edges are the least destructive part of the package !

Friday, December 12, 2008

Bell rope


Bell rope
Originally uploaded by Phil_Parker.
Attaching a rope to the bell on these model locomotives is harder than it looks. Sure you can superglue a bit of black thread to the operating arm and inside the cab but because the thread is slightly stiff it tends to twist rather than hang in mid air.

The solution I use, which may not be the best and I'd appreciate others, is to brush superglue along it and then tug the "rope" into position with tweezers. Loctite do a nice superglue in a plastic pot with a brush in the cap that's very handy for this. A second advantage is that the hairiness of the tread is reduced.

The other operating control is a handle for the sanding gear. This is bent up from wire and hooked into the sand dome. A support is required at the steam dome and I use another bit of wire for this. Once painted the effect is very nice and these spindly bits add a lot of character to the finished model.

Thursday, December 11, 2008

Bringing things together

Cabs on the PortersHooray ! - I'm bringing the parts together now.

The cabs are back on the locomotives now. To do this the screws in the side of the firebox have to be removed. Then the cab goes back on and the screws put back in. Which would be fine if it wasn't that the screw holes are hidden behind the cab sides. Loads of fiddling and poking followed to try and do these up. Leaving them off occurred to me but this leaves the cab flopping up and down.

Next the footboards are made up and attached. Each of these are laminated from two parts. On the earlier models I used superglue for this but while it work fine, getting accurate alignment is difficult as the glue sets too quickly. This time I ran solder around the edges. At least I can heat it up and re-do the join. A final touch is to drill holes for the sand pipes - 18mm from the back end and 5mm from the side. More pin-vice inflicted blisters for me !

Wednesday, December 10, 2008

White metal bits on


White metal bits on
Originally uploaded by Phil_Parker.

So far building the Porters has been all about making up sub-assemblies. This one is at least attached to the loco.

The steam dome is a whitemetal casting needing only a little cleaning up and a hole drilling in the top for a whistle. A tap is fitted and the pressure gauge rescued from the spare bits pot.

The casting fits pretty tightly on the spigot so you can't really get it out of square which is a relief 'cos I hate doing these sort of jobs as it's too easy to get things looking fine while you build, only to show up wonky once the paint is on !

The water gauge and regulator come next. The gauge looks suspiciously generic to me and is fitted to the backhead in place of the vestigial moulded effort from Bachmann. I filled the spigot flat and superglued it in place which seems more than strong enough. Drilling a hole in close proximity to the gear didn't appeal and anyway, that metal is pretty hard. The regulator arm is etched and has to be bent and glued in place. I've never been convinced that I've ever got these right but they fit, look OK and anyway you can hardly see them on the photos of the made up models.

Tuesday, December 09, 2008

Chimneys


Chimneys
Originally uploaded by Phil_Parker.
These are so much nicer then the original supplied by Bachmann. While their stovepipe funnel is nice, the spark arrestor version looks distinctly Disney rather than prototype to me.

As far as I'm concerned, a spark arrestor is a big fat thing atop the pipe. Backwoods supply a nice whitemetal casting and the builder is left with several options for topping this off. Last time I built up the etched cage but it was a fiddly awkward job and so it was deep joy to be asked to make the model as per the Backwoods web site. This loco has the basic arrestor topped with mesh.

I tried this out but the initial results looked untidy. Then I hit on the idea of using the top ring from the full cage, soldering the mesh to this and glueing it in place over the funnel top. Then the hinges and catch are extended around the lip using microstrip and the whole lot looks very neat and tidy - and more importantly like something that would work in real life.

The bottom is more fun. A hole has to be drilled up the centre to fit the locating spigot. I used a centre finding square to get the first pilot hole in the correct place and then progressively drilled out to 3.2mm. 3 chimneys is about as much as I could do in a single sitting with a pin vice - the palm of my hand was blistering nicely thanks to the back of the tool rotating against it.

Monday, December 08, 2008

Saddle tanks


Saddle tanks
Originally uploaded by Phil_Parker.
Converting Porter saddle tanks is more complicated than it looks. First the handrail is removed to be replaced with a finer one using knobs supplied in the kit. At the same time holes have to be marked and drilled on the other side, the new look locomotive will have double the hand holds of the RTR model. To get a nice level handrail the same height as the original I dug out the odd-leg calipers and scribed lines in the paint with them - so much easier than trying to measure anything.

Three of the locos have spark arrester chimneys which require the bell to be relocated to the side of the tank. Working out where the new bracket is to be fitted I went for a position up against the rails which allows me to brace the joint by sticking it to the handrail knob. The bell bracket needs a little fettling to fit to its new support. Finally a dash of filler sorts out the hole left from the original mounting.

Sunday, December 07, 2008

Bits of Porter


Bits of Porter
Originally uploaded by Phil_Parker.
What a lovely pile of model locomotive bits !

All the Porters have been tested and found working, their reward being reduced to a pile of parts ready for the transformation into beautiful finescale models. To keep track of the parts I used one of the Backwoods boxes as a tray and then some McDonalds wax paper condiment cups for the smaller bits.

Couplings and pony trucks have obviously been saved as they will go straight back on. Another pot holds saddle tank retaining screws, the fourth takes all those details that I'll re-use such as bells, whistles, plates and badges.

Apart from this I now have a selection of Porter cab and bunker parts which are, to me, pretty useless. Does anyone have a Porter with a damaged cab ? I may be able to help you out.

Assembled beam engine

Airfix Beam EngineOK, were are nearly there now with the beam engine. I've finished putting the model together and it's looking good. All the joints work OK and the valve gear looks very nice when you rotate the flywheel.

Some of the pivots and little bits of "metalwork" had to be touched in but the greeny plastic Airfix moulded the kit in doesn't stand out against the metalcote paintwork.

Overall though I think I'm still missing an indefinable "something". If an identical model made from metal painted exactly the same way stood next to this plastic kit I think you would be able to tell the difference. I'm not expecting the paint to perform miracles but even if metal was painted in the same way I think it would look more like metal.

The next stage is some serious pondering. The metalcote will take polishing, which will help to bring the ungreen areas alive a little. Perhaps some washes of black to heighten the shadows as well ? Maybe even a touch of rust ? Dunno yet, I'll think on it and let you know.

Saturday, December 06, 2008

4 Porter cabs


4 Porter cabs
Originally uploaded by Phil_Parker.
No, it's not a model railway version of the 12 days of Christmas, this is yesterday's model making output. 4 cabs for the batch of 0N30 Porter locomotives I'm currently working on.

I thought building these as a batch might speed matters up. It did but not by much. The gains come from having the tools to hand and knowing what to do rather than anything else. Perhaps 1 cabs worth of construction time might have been saved but certainly no more.

Some tasks certainly don't gain anything from repetition - that cab beading was a chore. Worth it though in the end though.

Friday, December 05, 2008

Hornby Magazine photo shoot

Yesterday we were celebrities - or at least three of the layouts were.

At Warley Mike Wild, editor of Hornby magazine, came up to the layout and asked if he could take some photos for the magazine. I said it had been in BRM but in 1997. This didn't worry him as not may will remember it from 11 years ago. I handed over some contact details and he went away promising to get in touch the next week.

True to his word a few days later I had an e-mail looking to arrange a session, but not just for Melbridge Dock but Flockburgh and the Melbridge Box Company as well !

So after a few more mails we arranged to set everything up yesterday so all the models could be done in one hit. As there isn't a room in our house big enough to do this we arranged to use the library area of the L&WMRS.

Mike turned up and started taking pictures, something that took well over 4 hours. Apparently we also chatted about VW vans for a while too although I'm sure it wasn't as long as an hour despite what anyone else says. Comparing the change in methods over the decade and a bit was interesting. In the 90's Tony Wright used a medium format film camera and single hand held spot. Now Mike used a Nikon digital SLR and pair of studio lights. The results should be moodier than before as the aim was to get an early evening look. The view on the back of the camera for the ones I saw looked good anyway.

At the end of the day there were something like 60 shots in total "in the can" covering the layouts. These will now appear in the magazine over the next year. Apparently I have to get the words for the first one read for mid-January in preparation for a March feature.

Icebreaker


Thunder Tiger Fishing Boat
Originally uploaded by Phil_Parker.
Thursday morning seemed like a nice time for a sail. The weather forecast had predicted a new ice age but once the rain had cleared a bright, if parky, day emerged.

Earlier in the week my Dad had bought a RTR Thunder Tiger model boat. We'd plugged the receiver in and charged the battery so it was time for the maiden voyage. On the water the model behaved very well and was soon heading for the far side of the lake to test the radio reception range.

About 2/3rds of the way across it started making horrible grinding sound. A loud crunching that isn't what you want to hear from any model boat. We rushed to the far side with a rescue pole but half way there realised the problem. Despite the nice weather the water had a very thin sheet of ice on it. A what which the pole quickly broke it up. The noise we heard was the boat ploughing its way through this and making a nice neat channel.

Once reversed out the model returned to normal silent running. It;'s an excellent model with a reasonable but not to excessive turn of speed and fantastic maneuverability. It looks pretty good too and with a little detailing should come up a treat. Sadly the model is discontinued but is turning up in plenty of places for a stupidly cheap 99 quid. Well worth it.

Thursday, December 04, 2008

Grease is the word


Slip eccentric
Originally uploaded by Phil_Parker.
When I were a lad several Airfix steam engines passed across my modelling board. Penniless as I was, I hoped to increase my stud of model locomotives on the cheap by building then so they could be pushed around by one of the motorised ones. This meant the wheels would have to rotate and this is where it all went wrong.

Building plastic valve hear isn't easy. On one hand it all had to fit and stay together. On the other the joints have to remain mobile. For a cack-handed youth and a tube of plastic glue this wasn't a likely outcome. I could make strong joints that were immobile as easily as I could fog the cockpit glazing on a Spitfire.

I particularly remember a Schools Class. All the joints were lubricated with petroleum jelly before assembly and still the things wouldn't move. So I approached the waggly bits on the beam engine with trepidation. A static model wasn't of any interest, they had to move.

Luckily I also approached the job with a plastic glue that was controllable. Revel Contacta comes with a nice long, thin metal spout. This allows precision placement of tiny quantities of adhesive. In this instance, liquid glue wouldn't be the right stuff as capillary action gets it into all the wrong places. The pivots were also greased, this time with molybdenum grease which is a much better colour for this job being dark grey.

Result - I managed to make the joins and apart from one they all work and even that one was quickly released and re-made properly. Obviously patience helps - the young Phil would consider speed to be of the essence and not let things dry and harden as he should. It just shows that even for stupid people, age does bring with it some wisdom !

Wednesday, December 03, 2008

Top Telly - G1MRA Diamond Crossing DVD


Diamond Crossing DVD
Originally uploaded by Phil_Parker.
I don't buy railway DVDs. Once upon a time I acquired a couple of videos which I watched and then stuck in a cupboard. Fifteen quid to see a single TV programme - makes the licence fee look like really good value ! I'll be honest I find most films put together by enthusiasts to be unbearably dull. Budget constraints mean the commentary is stilted and presented by the film maker rather than a professional voice over artiste. All the shots will go on too long and the selection will lack interest and variety. I don't buy may railway books for the same reason - 3/4 views of a train in flight aren't much use to me and to be honest they all look the same.

If you want to understand the difference in production values compare anything produced by British Transport Films with something from your local railway video seller. I know the former had a bigger budget, better equipment and easier access to their subject. They also worked professionally with quality scriptwriting and shot selection. And the films are great to watch. Mind you I've never bought a DVD of them either...

Anyway, if I don't do railway films, why am I writing about the 
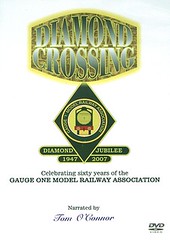
Gauge 1 Association's diamond jubilee DVD ?

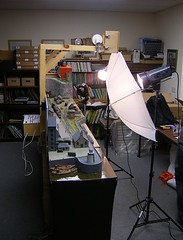
Simple, it's very good. Starting with the basics, you get good value for money - 100 minutes for 6 pounds. Better still the whole thing has been put together by professionals. The production values are very high. None of the shots go on too long. A tripod was used for all model photography. There aren't hours of "look a train going by".

What you get is a nice overview of G1MRA. Plenty of the members get screen time and while they are mostly older gentlemen, none of them comes across as what the popular press would describe as an "anorak". The producers have made sure they all come work well on camera with no stuttering or struggling to speak. It6 helps that they have interesting things to say and then get off the screen to be replaced by something else that is good.

The view sees a potted history of G1MRA and G1 in general. Several members explain how they got into the hobby. Many garden railways are showcased - at G1 get togethers which look like very pleasant meetings of friends.

If I have a criticism, the segment on the jubilee dinner held on the Severn Valley Railway is of limited interest to anyone not knowing the people involved but even that has some nice shots of real trains which are well timed to the background music.

There are jokes, mostly visual but always funny or at least not intrusive. I liked them anyway although it helps to be a bit of a film buff to get some.

Having watched it once, will I watch it again ? Probably. As light background telly you can't beat it. The pace is good and it holds your attention. Of course being a DVD you don't feel the need to watch the whole thing in a single sitting and the format encourages this.

Oh, and the best thing - you get a segment with Bob Symes - never mind Pete Waterman, here's a real superstar of model railways !
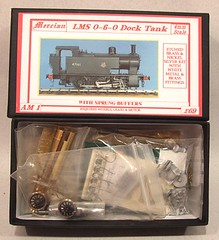
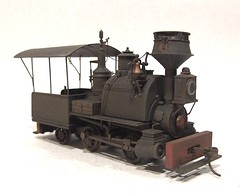
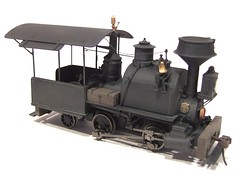
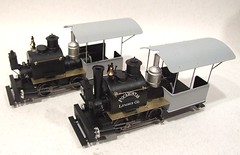
Tuesday, December 02, 2008

Bobs Models, Solihull


Bobs Models, Solihull
Originally uploaded by Phil_Parker.

I'd planned to take a day trip to Nottingham for a visit to Gee Dees amongst other things. However the bus got me to the station a few minutes late so I missed the train. Then the ticket machine informed me that by turning up on the day instead of booking the night before meant the fare would be £26 instead of £18. Humph. I'll go another day I decided.

However some boat fittings were still required and back at home I perused the Hobbys catalogue and noticed that they listed retailers. One of these was Bobs Models in Solihull - 18 miles away.

Parking was fun as the shop is in 1960's precinct but it is free for an hour - which I thought would be plenty. The shop itself is a good size from the outside. The window display is stuffed with Good Things with appealing prices.

Inside it is an average sized shop and full. When I say full, I mean full from floor level to about 10 feet up. And there are counters with stuff in and drawers in the back. This place has been there a long while. Long enough to contain gems. Oh, and there are well made plastic aeroplanes hanging from the ceiling.

The boat fitting (some pulleys for a Puffer) were found in the drawers of such things. The range is good - better than every shop except model boat specialists. Some kits are also available - mainly the wooden sort for static models but also larger plastic kits suitable for motorising. The Thunder Tiger range of RTR boats were on sale for bargain prices too.

Railway modellers are well served. Bachmann and Hornby items are for sale - more of the later with lots of the scenic parts. I also had a dig in the drawers and found lots of bit including 12mm gauge Romford Axles. The drawer also had boxes that claimed to contain wheels but I didn't look inside the tubs. I quite fancied the Hornby tree armatures. They were a bargain for just over 3 quid as I hate winding those. Sadly I'm not building a layout that needs trees at present so they stayed on the shelf.

Plastic kit fans won't be disappointed as the range is good. The 1:35 German rail mounted gun called out to me. If it hadn't been quite a bit of cash and well over a meter long I might have added it to the pile containing a 1:72 version. The matching loco looked good too. Apparently this isn't the largest version either. There is a special order giant kit for a version that ran on two parallel tracks. A kit with 2000 pieces weighing in at over 30lbs - and they have sold more than one !

Obviously there are other modelling supplies including glues and Humbrol paints. Behind the counter were kept all sorts of fillers and other "dangerous" substances that we modellers consume (while modelling anyway, what you do with the dope otherwise is your own affair) along with various tools.

The staff were helpful, generous considering the re-pricing exercises going on to accommodate the new VAT rates, and knowledgeable too. Not "anoraky" either.

I don't understand how I've missed out on this place. It is fantastic. It doesn't take Mystic Meg to predict that more of my money will be finding its way to Solihull soon.

Bobs Models Website - warning, Diescast Car heavy.

Monday, December 01, 2008

Making plastic look like metal

I don't think anyone has ever been fooled that anything painted with a metal look paint is really metal (have you ever seen convincing "chrome" paint), but I though I'd do what I could. To this end the beam engine flywheel has been sprayed with Humbrol Metalcote. This is a well regarded paint which, once dry, can be polished to a sheen.

Spraying it worked very well and the resulting finish is very smooth. Over the primer the result is slightly rough - just like a casting. Sadly what I want for this part is machined steel but it's not bad I suppose.

Polishing the paint makes a difference too. I'm still not convinced that you get something that looks like real metal but it's certainly not bad from a distance.

Painted flywheelWith the "metal" dry I spent ages masking off the rim of the wheel and then dug out some gloss dark green (Humbrol No.2). Spraying this was a nightmare. It wouldn't flow and when I tipped out the paint cup the pigment had broken up into congealed blobs.

In desperation I tried again eshewing my favoured cellulose thinners in preference for cheap white spirit. The results were instantly better with the paint flowing properly. I think this is due to the low temperatures in the garage I spray in. I don't understand why this should be but it's not the first time I've experienced it.