Tuesday, December 31, 2013

Hornby R196 Bungalow

Img_0778

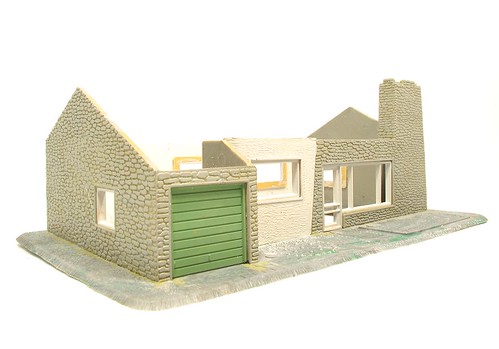
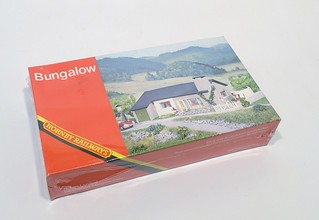
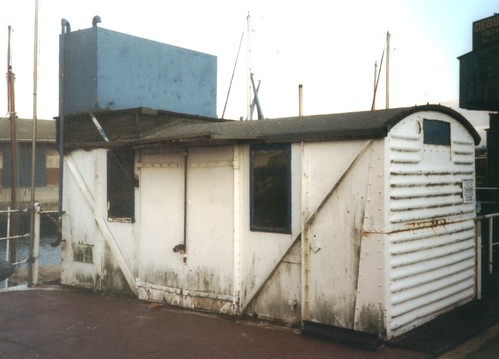
For the last blog post of 2013, it's nice to be able to report on a completed project.

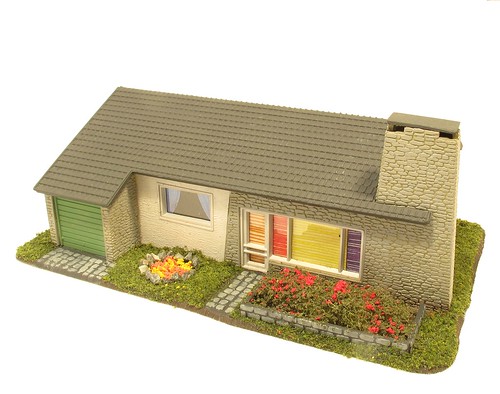
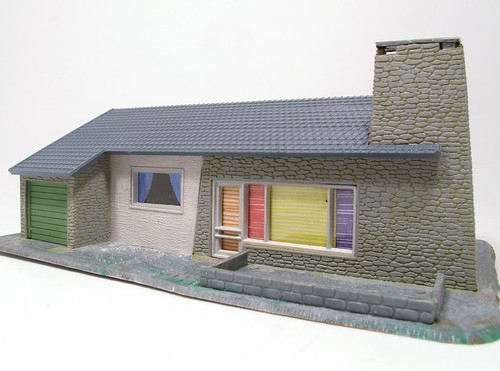
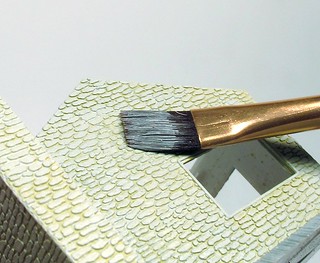
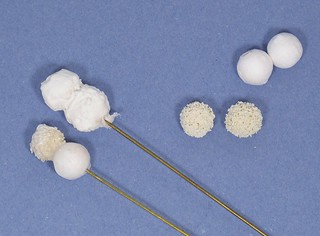
The Hornby bungalow kit is finally painted and a verdant garden has sprung up around the outside. Most of this is simply Woodland Scenics "Blended Turf" flock powder fixed in place with a smear of PVA glue. The bushey thing in the flower bed is teased out fibrey stuff (the label is missing from the bag) sprinkled with ivy coloured flock and some red stuff.

On the other side of the path, Geoscenics rocks are fixed with UHU and the centre filled with more brightly coloured flock. I've tried to copy the position of the round bed moulded in to the plastic base.

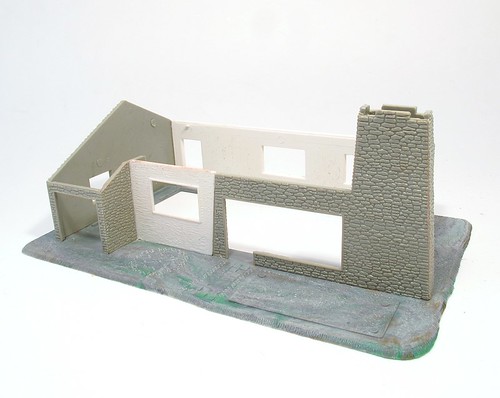
I'm really happy with the finished model. It looks as lovely as I hoped in a kind of 1970s way. Some might wonder why there isn't any smoke weathering around the top of the chimney - I think this is because we don't have a coal fire in there. I think the stack is decorative, or at best a flue for a gas fire. Anyway, I wanted a clean look to the completed building and it's my model so there!

Is it as good as my cornflake packet version built all those years ago?

Yes and no. It's a more realistic model with better detail. My model, which I wish I still owned, took more imagination and ingenuity and probably contributed to me being the modeller I am today. Which in turn, allowed me to build a model like this!

Hornby Bungalow Back

Monday, December 30, 2013

Afterthought parts?

Planning is important. If you are developing a product, it pays to make sure you have all the parts before putting them in the box. I'm not sure Piko were operating at the peak of German efficiency when they designed this bungalow kit.

Back DoorThe first thing that makes me wonder is the back door. It's not on any of the main sprues. Instead it rattles around the box as a separate item.

The design is odd - what's that handle thing moulded in. And why do you have to trim a flange off the bottom to make it fit the hole? Why is it moulded in bright green? I've had to use 2 coats of Humbrol 147 on it to bring the surround in to line with the rest of the doors and windows.

Next, we have the paper sheet containing curtains and blinds. No matter how I squint at the box lid, I don't see the same window fillers as I've been provided with.

The curtains aren't too bad. By separating each swag, running a black pen along the exposed edge and fitting with PVA, they look fine. A rectangle of black card behind this hides the lack of interior - the building would look fab with one but I'm too lazy/busy to build it.

The blinds though don't really match anything. They are lovely 1970s colours and if you can live with the idea they are closed all the time, brighten the building up nicely. It's just that they need to be chopped around a bit to fit the panes of "glass".

Blins in roof on

Finally, the roof is on. This only just reaches the far end of the walls if the cutout for the chimney is fitted hard against it. I could have left a gap to be covered with lead (paper) but this might have looked odd. It would be much better if the part were 3mm longer.

I'm not convinced by the tiles either. It looks like the designer has used the odd trick seen in many old plastic kits of representing groves, in this case the gaps between the slates, with raised lines. I might be wrong and they are some sort of oddball continental roof tile of course so I'll let it go for the moment.

Sunday, December 29, 2013

New Isle of Man Railway diesel

Picture from IOM Today


It's probably a good job that I love ugly things, because the newest arrival on the Isle of Man Steam Railway would test many an enthusiasts aesthetic sensibilities.

Bought in at a cost of £400,000, the 42.5 ton loco will be used to rescue failed trains and during the TT festival for the commuter trains.

I know lots of enthusiasts are going to moan like crazy about the intrusion of an American outline loco in amongst the Victorian steam trains and delightful wooden coaches. However, if it makes the railway more efficient and stave's off other economies then it's a good thing.

We forget that on the IOM, the railway is still owned and run by the government. Although it looks like other preserved lines, it really isn't. Potentially, this could the be a move toward restoring a proper, useful service for residents rather than just a "toy train" for tourists.

There is precedent - Blackpool tramways have recently started running modern vehicles as a service rather than just historic ones with no disabled access, rubbish heating and basic suspension.

If the steam were withdrawn from the IOM, I'd be up in arms. It won't though so I won't be either.
What I would like to do is build a model of this loco. After all, I have its predecessor, Viking, so if anyone can provide a plan, perhaps some G Scale work might take place next year...

Viking

Saturday, December 28, 2013

Lego railway genius

CCT 2 styles and 37

Since it's still the season from some less than serious modelling, I feel I ought to point you towards the Lego genius that is Carl Greatrix. He has developed some amazing models of British railway trains. Not only are they clever, they actually look like the prototypes - something incredibly difficult when you remember that the raw materials are plastic blocks rather than sheets of metal.

LEGO class 116 DMU DCC at PW's HiDef

The scale is roughly 7mm:1foot as shown by this Class 166 DMU posed on Pete Waterman's layout. Working in Lego, this is a pretty small scale but is consistent with the other products in the official range.

A4 Pacific..Destination arrival.

It's not just diesel models either - How about this A4? This is tough stuff to do. I'm not sure that I'd be managing this even if I hadn't (slightly reluctantly) given up Lego building many years ago.

Lots more models on Carl's Flickr site - well worth a visit.

Friday, December 27, 2013

Paint the walls with brown and grey

Walls painted

Back at the bungalow, wall painting has taken place. There are tow surfaces to consider. The white render was simple - a coat of Humbrol 147 dry-brushed with white. I wanted something to contrast with the 147 coloured window frames but nothing as stark as pure white.

The walls are a sort of fake stone I presume. A coat of dark stone was followed by No.64 on the faces of the blocks. My first attempt at this wasn't successful, the base coat hadn't dried enough for the lighter colour to show up. I didn't want it fully dry though as the mix of colours would tone each other down a bit and produce a more harmonious result.

Painting WallLeft to dry overnight, the results of a dry-brush application weren't to my liking either. I wanted more paint so the grey stood out from the brown. Using a sponge to apply the paint might have been an option but keeping the grey off the white walls might have been tricky.

In the end I used a technique I will call "wet dry-brushing". A flat brush is lightly loaded with paint and then applied at a very shallow angle so the entire side of the brush hits the surface in one go. Then it's dragged across the stones leaving paint on the faces. This seems to work with no grey ending up in the mortar lines. You could get the same result with lots of dry-brushing but it would take an awful lot longer.

Finally, the windows and doors were fitted. At this point I discover that the back door isn't mentioned in the instructions, nor on a sprue...

Thursday, December 26, 2013

How to make a 4mm scale snowman

Make a snowman

Yesterday, my bloggy Christmas card featured a 4mm scale snowman. When I thought of the idea, it all seemed so simple.

It wasn't.

In theory, all you need is a couple of small balls and some wire. And perhaps a tiny carrot.

The balls came from 4D models and are made of compressed paper. They also sell sponge versions which I tried as well. The balls are fitted to a length of brass wire like a kebab. That's a tough bit as the wire doesn't just poke through the paper. The trick seems to be to drill a pilot hole in the top, not the bottom which has a hole in.

Snowman BitsNext, the balls are covered with PVA and dipped in snow. I used some from Precision Ice and Snow. Once dipped, the excess was shaken off. Another layer was applied using hair spray as a glue. And another. Finally the surface was sealed with spray varnish. The result on paper balls was realistically uneven, just like the snow on a ball made by rolling it around the garden. Sponge balls are less successful so don't bother with them.

After that, things are a lot easier. The tiny carrot is cut from the end of a cocktail stick and glued in place with superglue. A touch of orangy-brown paint finishes this off. The twiggy arms are fine iron wire twisted and poked into pre-drilled holes.If the snow falls off when you drill, just glue it back with PVA.

Finally, some "coal" from black paint provides buttons, eyes and mouth. I had contemplated a hat and scarf but decided my real snowmen never had them so my model would follow suit.

There is probably an easier way to do this but I'm pleased with the result, even if it did take 3 goes to achieve. How come the simple jobs take the longest?

Wednesday, December 25, 2013

Merry Christmas!

Crimbo Card

Seasons greetings to you all. Thank you for taking time to read all my ramblings. Now, go and have another mince pie - you know you want to!

Tuesday, December 24, 2013

Walls up, ready for Santa

Bungalow Walls Up

Old plastic is hard. Really hard. I had to resort to wire cutters to snip the parts away from the sprue before cleaning up the residue with a knife.

The bits fit together well. Mek-pak works very nicely on them. There won't be any gaps as the technique of sloshing some solvent on the joint and then pushing the bits together hard so the molten plastic splurges out of the join very slightly works a treat.

The only complaint so far is the the finished shell is slightly larger than the area bounded by raised lines on the base so you can't use these as a guide when putting the walls together. Normally this isn't an issue but as you can see, the front wall is two parts with a funky angled joint so it would be nice to used the ridges to line things up. Still, not a problem.

Most importantly, the chimney is up and ready for Santa. I 'll leave the capping stone off for the moment in case he has a particularly bulging sack to try and get down there.

Monday, December 23, 2013

Building my dream home

Bungalow KitIt's a festive week so I'm going to enjoy a project I've dreamed about for many, many, years.

Hornby's R196 bungalow kit dates from the 1970s and I think is a Piko product rather than originating from Margate.

The design is a bit continental. I haven't measured the doors but I bet they are 3.5mm to the foot rather than 4mm. As a building it's very of its time - one of those nice clean 1960s and 70s designs that we were all supposed to be living it while cycling to work or travelling in an electric car.

It could also fit nicely in to a Gerry Anderson programme, perhaps in the suburbs of Marineville or one of those homes that Fab 1 rushes past in Thunderbirds.

I must have liked it, because as a cash-strapped kit, I produced my own version in cardboard snaffled from a cornflake packet. The design wasn't difficult to copy even though I only had a picture in the Hornby catalogue to go on and no measurements. As I recall, I thought my version looked pretty good.

Years later, I was reminded of the model and set off to eBay to try and locate one. After a couple of attempts, I landed a kit for under a tenner including postage. Since then of course I've found another in the back of a cabinet at Hereford Model Centre but we'll let that go. Mine turned up safe an well a couple of days after ordering, still wrapped in it's cellophane.

Bungalow Kit Bits

Tearing the plastic aside (the sound you hear is the sharp intake of breath from kit collectors, perhaps with a little whimpering) the parts inside are nicely moulded and mostly in the correct colours. The model on the box obviously hasn't needed the attentions of a paint brush even though it's set in scenery. The exception is the scenic base, weirdly moulded in grey but with some green plastic granules thrown in to marble it.

Anyway, I'm going to build and paint the model pretty much as it comes. This will make a nice change from all that serious stuff. Well, it is Christmas after all.

Sunday, December 22, 2013

Why do I love ugly things?

On Monday, Hornby announced their new range of models. Which one do I want?

The Crosti 9F. Easily the ugliest locomotive in the range.

When I wandered abound Limehouse Basin in London, among all the lovely boats, which was my favourite?

This one:

Ugly Barge

20 feet long and with an exterior to maximise interior space, this is like a baby budgerigar - so ugly only it's mother could love it. Its mother and me that is.

The thing is, I don't know what. As I looked around, there were plenty of other beautiful boats but this one stuck out. It probably should be there. The neighbours almost certainly wish it would take its sad, algae-stained carcase away. I'm glad it doesn't.

Ugly Barge 2

Even as I looked at this down-at-heel vessel, I was planning how I could preserve it in miniature. At 1:12 scale it would be 20 inches long - I measured it with my feet at about 20 feet, maybe 25. That's a pretty tiny model in this scale.

The hull doesn't look complicated. There's plenty of space to put all the radio gubbins and not much exterior detail to slow up the build even if it were pretty detailed.

Obviously I want to know more. Any canal buffs reading?


Saturday, December 21, 2013

In front of the camera again.


Deep joy. It seems that I don't just write about layouts but apparently I'm to appear on an iPad near you soon. Sign up for BRM Live and in the January (I think) edition, I'll be talking about Edgeworth, the new GWR layout I've been building for the magazine.

Howard came over to the model railway club to handle filming. I thought it the best location as we have space to move and a background of model railway mags. We spent well over an hour at this but the finished result will be in the region of 5 minutes. 5 top quality and action packed minutes with exciting cutaways showing angles you might not have seen so far. The bit you see above with the overbridge is pretty neat even if I do say so myself...

I'll be honest - I'm not a TV natural. My style is a bit rushed and I usually forget to breath properly for the first few takes. I think Howard has some usable footage "in the can" and once I got into it, things seemed to go OK. Well, as long as I don't have to watch them again anyway.


Friday, December 20, 2013

Festive trains in Selfridges

Selfridges Train

Christmas is nearly upon us and the big store windows are full of displays. Not all are mannequins with shiny clothes that don't fit real people though, some places have a tradition of entertaining the crowds.

Slefridges in London have gone to town with one window full of a huge gingerbread town. Very nice but the real star is this Mamod steam engine cloaked (quite badly to be honest) with Tate and Lyle branding and some gold paint. Even the track has been sprayed gold but being Mamod metal stuff, this was peeling off already. Someone should explain to the window dressers about primer.

I'm assuming by the way, that in the spirit of the display, the "snow" is sugar, not one of the excellent model alternatives I used in the latest British Railway Modelling.

Moving along a couple of windows, we have a working model too. This time it's a Marklin Gauge 1 German set with hopper wagons filled with a parcel load. Maybe it's something they should consider marketing?


Thursday, December 19, 2013

P-51 Mustang Egg Plane


A little catch-up time allowed me to finish painting the pilot figure for my egg plane. Being a reasonable "scale" there's space for plenty of detail. To make things even easier - there are transfers provided for the manga-style pilot eyes. I'll come back to eye transfers another day but this is the first time I've used anything like this and it certainly looks good in a cartoonish sort of way.

After this, all I needed to do was fix the canopy in place (once I found it anyway) with a touch of plastic glue and we were ready for take-off.

I'm really pleased with the result. It's not perfect - the hand painted silver on the canopy isn't quite as good as the sprayed version on the body and you can see through it in certain lights. The Humbrol Clear worked well with a suitably glossy finish. Perhaps some polishing would improve it but truth is, I never need a gloss finish so I'm not spending a lot of time in that direction.

Best of all though, this was fun. There wasn't any deadlines to keep an eye on. If it turned out rubbish I've only wasted a few quid so who cares? Nearly as much fun as making the animation at the top of this post. Maybe next time I'll fit a little motor. That would be fun too.

Egg Pilot


Wednesday, December 18, 2013

Interesting and modelable workboats

Micks Tug

On my trip to London, I ignored the proper tourist locations for a stroll around Docklands. As I wandered, I snapped some interesting work boats that would make interesting models either for radio control or tucked in a corner of a model railway.

The first is Mick's Tug Services. The normal 7 foot (actually 6 and some inches if I remember right) wide hull with traditional cabin but much shorter than normal - possibly a cut down narrow boat? I think it was around 20-25 feet overall. At the front there is a raised metal fender for pushing. On the sides a couple of winches and at the rear a couple of tiny towing bollards.

Installing Art

Near Canary Wharf, some art was being installed in the water. The boat is a nice rectangular pontoon hull with a cabin at the back and hiab crane on the front.

I didn't get the chance to measure this one but the width appears to be 15-18 feet and I would suggest that the name "JML 39" on the back indicates 39 feet long. As a modelling proposition, it would be a pretty simple scratchbuild, especially if you are working 1:12 scale when Macs Mouldings could sell you the crane as a kit.

Open Workboat

Finally, the simplest of the lot. An open runabout parked up near the skyscrapers and near the Museum of London Docklands, presumably to pull rubbish and bodies out of the water. The front slopes under the box in the bow but apart from that we are looking at a slab sided hull.

6 feet wide and about twice as long, even in 1:12 scale this would be "interesting" as you've nowhere to fit the radio gear and power. Tucked in to the corner on a model railway waterway though, the boat would be quick and easy to build but make a lovely little detail area that would please visitors.

One question though - how do you empty it of rainwater?

Anyway, I have a few more shots of each boat if anyone seriously fancies making a model of any of them. I'd also be interested to know more about each if anyone has more detail.

Tuesday, December 17, 2013

4D Models, London

4D Models

4d Models is one of those whops that I have been aware of for years without ever having visited or bought anything from.

In my defence, the premises are a little hidden away in a slightly less salubrious area of London so not that easy for those of us living a hundred miles north to drop in to. Also, being off the normal tourist routes, when I did head to the capital, I wasn't usually nearby. All those meetings I went to and none of them had a decency to take place nearby!

Anyway, at the weekend I decided to have a day out in the smoke and one of the locations on my list was 4D. A pleasant 205 bus ride followed by a ten minute walk and I'm there. The shop is well signposted even it it is hidden under the Docklands Light Railway.

Inside, you quickly realise that this isn't a "normal" model shop. The normal clientele are architects and students doing design courses.

For me, the great thing is that this means the stock mostly consists of materials. Racks and racks of foam board, plastics, metals, plywood (lite and normal), cards, weird papers and other stuff.


Modelmaking


Add to this a huge selection of glues, paints, moulding materials and other gungy stuff and it's all looking pretty good. There's a very wide selection of tools on offer too.
 
For the traditional railway modeller, perhaps there is less than you might expect. Yes is are a fine selection of scenic materials including items from well known names like Greenscene, but I suspect the ready made tree selection might scare them with the prices. Architects just bill the client when the materials cost money!
 
I was probably the oldest person in the shop when I visited. All the other customers seemed to be design students who were taking advantage of the expertise of the staff who were able to advise how to use the materials on offer.
 
The shop also offers laser cutting and etching facilities and many of the sheet materials were marked as being suitable for this.
 
Worth a visit? Yes certainly. I came away with a bag of goodies, only a few of which I have definite projects for. Some of the others were just new to me and I have half an idea but nothing definite yet. If it'd not planned a stroll and Crimbo shopping afterwards, some of the larger sheet materials might have come home too. Maybe next time...
 

Monday, December 16, 2013

Horray for Humbrol!

Humbrol Track ColourA surprise package arrived in the post on Friday. 6 pots of Humbrol 173.

Track Colour


The most useful paint in the railway modellers toolkit is now available again. Personally I'd like to find whoever decided to drop it from the range years ago and drown them in a vat of the stuff but in the spirit of the season, we'll let that go.

There has been one change. I'm sure this used to be No. 170 in the range. Now it's No.173 but no one looks at the top of the tin anyway.

Yes, there have been others - Pheonix Precision paints make an excellent alternative. Railmatch Frame Dirt is also good stuff. Humbrol is more widely available though which has got to be a good thing for railway modellers.

After all, if you leave anything long enough on the real railway, it goes a mucky brown so in theory spraying everything with this stuff is all you need to do.

Sunday, December 15, 2013

RTR layout nightmare

RTR layout

Spotted at Warley this year, I think this might be my nightmare. An almost ready to run layout. Just add track and throw some buildings at it and the job is done.

How long before the moulded board has these on it as well?

Then, where is the hobby?

OK, I'm a bit of a puritan and see railway modelling as a craft based hobby. There's an interesting letter in Practical Classics this month by someone berating them for banging on about prices rather than restorations. To the writer, the fun of a classic car is in restoring it, not owning the thing.

I'm like this about train sets. As mentioned in the past, operating doesn't really float my boat. Nor do I desire ownership of a large collection of railway models. For me, it's all about making things.

Which is why the era of RTR layouts, though surely coming, sounds like a nightmare.

Saturday, December 14, 2013

A small, but important addition to my APT collection

APT StuffeBay is a wonderful thing. You discover objects that you didn't know existed, and then develop a desire to own those same objects.

Months ago, I set up a search alert for APT stuff. I've mentioned my fascination with this train in the past. Suddenly a pin badge appeared in the results. Not one of the Railriders ones or even some Gomm thing for trainspotters bobble hats.

This is a proper thing intended for engineers at Crewe. The listing didn't seem to know much more but by this point I wanted one. It even has the original, tubular, design of the train on it.

I'm assuming that the badge was issued as a security measure to those working on the project and you didn't get in to poke around at the supertrain without one.

Anyway, the badge sold for the high side of thirty quid which was a bit rich at that point for my tastes.

A month or so later another example appeared. I missed that one too. Then another. I forgot to big on that one.

Finally a couple of months ago, not one but two badges pop up. I bagged mine for a tenner. Which goes to show that if you keep looking and wait long enough, you can always get what you want.

The only problem is, the other badge was an orange one. I've never seen that colour, so guess what I want now.

Mind you, it's likely to be cheaper than the next bit of APT stuff I'm going to want...

Friday, December 13, 2013

Ipswitch docks grounded van body

Grounded Van body

Dating from 8th September 2001, this grounded van body lived in Ipswich docks long after the railway system has disappeared. I wasn't trespassing, the public could wander around and find this sort of thing. For all I know, they still can.

As you can see, it's rather more sophisticated than most. Someone has taken the time to fit some windows in the plywood bodied van and fill in the end ventilators. On the roof we even have a water tank, something I've never seen before. It's a veritable office made from an old railway wagon.

Thursday, December 12, 2013

Ice, snow, a telephone mast and a new layout in BRM

Telephone MastI love a challenge. Preferably the sort that involves eating several delicious cakes and deciding which one I prefer. Or drinking a nice mug of tea with a biscuit.

No chance of that in the latest BRM. No, someone on RMWeb suggested months ago that it wouldn't be possible to build an etched kit in the two-hour challenge spot. They were wrong. All you need is the right kit.

The PH Designs etched mobile phone mast is just such a kit. Well designed, it goes together well with no fiddling. Painting is simple too - spray with grey primer and whack some Humbrol 147 on the antennae things.

Job done in just under the time limit. Looks good too, all inspired by the same kit being used on Peter's Street which is featured in the same issue.

It's winter time at BRM headquarters so I was presented with a couple of different manufacturers snow and ice making products and told to go away and do something with them.

The result is a pair of small dioramas with vans in country lanes. It makes me feel chilly just looking at them.

Icey Van

The products are from Deluxe Materials and Precision Snow and Ice. Both are different beasts but produce excellent results. If you are a keen winter-look modeller, I'd suggest that they are complimentary too so you could use both.

Finally, the big project. A small layout suitable for beginners.


Edgeworth Plan

Edgeworth is that most unfashionable to concepts, a GWR branch line. Not only that, one built to a Cyril Freezer plan that is 50 years old. Well, sort of. We've fiddled with it a bit but the basic concept is still a 9ft layout with a 6ft scenic section.

Since Beginners layouts are in vogue at the moment, and I've expanded the brief a bit and included a little walk through my own layout history to show I don't get everything right and discussed what goes on inside the barrier at exhibitions too. Something for everyone in the free supplement I hope.

More on all of this over at the British Railway Modelling website.

Wednesday, December 11, 2013

Leftover pots

Leftover Pots

This is one of those "What's going on here?" posts. The track is to be found in the bay Platform at Princess Risborough station.

Now, I understand that re-using old track in sidings is perfectly normal and sensible but I assumed that any electrical bits would be cleaned off the sleepers first. Those look like pots to support rails for electrification.

More to the point, there are pots inside and outside the rails. This presumably means the track panel came from the London Underground system. Can that happen? Do LU sell old track to Network Rail?

It's a mystery - can anyone clear it up?

Tuesday, December 10, 2013

Wire trees from Hornby

Hornby SycamoreSometimes my job allows me free access to products I'd not normally get my paws on. And sometimes these are surprisingly good.

I can't make trees. Those on the Hellingly Hospital Railway are either "Forest in a box" or wire armatures shaped by the talented Denise Insley. That's hwy they look like tress and not bent bits of wire.

It's not like I don't understand the process, it's just that I can't get my head around turning wire in to a 3D tree skeleton. You can bang on about fractals or looking at book, none of it works for me.

Presumably I'm no alone as there are a couple of companies doing the rounds of model railway shows selling trees. The products look great too.

Well, I found another. Hornby. Yes, that Hornby.

Seriously, in the Skale Scenics range there are loads of very nice twisted-wire based trees and they are pretty good, at least to my eye.

Hornby BirchObviously you can't chunk these off an injection moulding machine so they aren't cheap but then neither are anyone else's. Three 75mm high sycamores are a shade over £15. The same number of Birch are just under £13.

What I don't understand is why more people aren't dabbling with these things. The range includes several varieties of tree, not just generic. Someone at Hornby HQ is trying something clever here, let's hope it works.


Hornby R8915 Sycamore
Hornby R8915 Birch

Monday, December 09, 2013

Two portions of model shop to chip shop.

PlaycraftSellerFinding an unexpected model shop is always a good thing. There you are wandering around and suddenly - WHAM - there is a fine emporium purverying goodies for those of us who enjoy the arts of miniture recreation.

Just as intrequing is working out what happened to old model shops that have sadly long gone. Mostly this involves looking in the back of old copies of the Railway Modeller and wondering. This time, things were a little closer to home.

On the back of an old Playcraft cataloguie kicking around our clubrooms, I find the dealers address: Jermil Ltd, 6 Shopping Centrem Whitnash, Leamington Spa.

Huh?

That's 10 minutes stroll from my house. It's where my dentist is and the place I go to post stuff flogged on eBay. There's no model shop there is there?

Sadly, no. Thinking back to when I was always in short trousers, I recall an old newsagent in the shopping arcade. The address would be right so I assume as well as newspapers and magazines, he also sold toys. Many small newsagents still do.

Anyway, I assume this one had a sideline in model railways and thought a Playcraft concession was a good idea. They were sold as toys rather than models if I recall. The Class 29 is still considered one of the worst ever made...

The newsagent is no longer there. I suspect the owner retired. Newspapers now come from the store/Post Office next door that used to be a VG, or the "One Stop" at the end of the row that used to be a Wavey Line.

The newsagents is now a chip shop.

Heathcote Fish Bar

Now, this on it's own isn't that exciting. Model shops close and are replaced by the sort of retail outlets that are now in vogue. I mention the change not just to showcase some top jumpers, but because this isn't the only time this has happened locally.

Just over ten years ago, there was "The Train Shop" in Warwick. It started in a lean-to building and then moved to a proper shop in St Johns, Warwick. From there it moved along the row and then closed.

The first St Johns shop is now:


View Larger Map

It's a good job the one remaining local shop is too small to serve fish!

Sunday, December 08, 2013

Early December in the garden, something stirs

2nd December 2013 and we've tidied up the garden railway a bit. Aftyer cleaning up the leaves and weeding the trackbed, it seemed a shame not to run a train.


Little Otto worked straight away and was soon trundling around the circuit. OK, it's not finescale but it's fun. Anyway, who wants to put P4 stock on the track outside in the cold?

(Sorry for the wobbly mobile phone footage. It seems that conversion from .gp3 files doesn't work very well as they are widescreen and the converter spits out normal ratio)

Saturday, December 07, 2013

Models on the platform for Erlestoke Manor

erlestokeshopAs the Santa special trundled by, I dropped in last weekend to the Erlestoke Manor supporters model shop on Bewdly station at the Severn Valley Railway.

Housed in a coach, there is a fine selection of second hand model railway items on offer. A few new pieces too - mostly Dapol bits, something the next door coach supporting the station also offers.

As befits a preserved line, some railwayana (mostly lamps) is on offer at normal prices. Not giveaway but not stupid either.

The best bit is the book section. Not only is it sizable and reasonably priced, the books on sale aren't just "the usual" suspects that seem to clutter up the same shelves in charity shops and normal used book retailers. I found many volumes that would be in my library if it weren't for a lack of space. I suppose there wasn't anything that jumped out as terribly rare but at least there was variety and it was certainly worth a good look.

If you need magazines, the selection of these is pretty good. No piles of rotting Railway Modellers (OK, some) but prototype stuff and interesting model mags.

For more information, there is a Facebook group.

Friday, December 06, 2013

Manx steam shed 1993

Belt drive equipmentMy first visit to the wonderful Isle of Man was in 1993. This was for the 100th anniversary of the Manx Electric Railway.

While we were there of course, the steam railway was also explored. Chatting to someone at the Groudle Glen Railway, we enquired if it would be possible to visit the steam shed on the main railway.

Apparently it would, we just had to ask nicely for the foreman.

On the basis that there was nothing wasted in trying this, we pottered down to Douglas Station and by luck found ourselves talking to the man we were looking for.

"Don't touch anything sharp and don't fall down any holes" were the only instructions as we were allowed entry.

Remember, this isn't a preserved shed - on the island it's a working steam shed run by the nationalised railway company.

Inside, most of the equipment was still belt driven although if my memory serves me right, not powered by a steam engine any more. Apart from a few guards to stop workers getting all wrapped up in the belt system and fluorescent lighting, it's pretty much as it would have been 50-100 years earlier.

Stationary Engine
 
 
Sadly, visits like this aren't possible any more. If you do get in the shed it's on a supervised trip. Too many stupid enthusiasts thinking they know better than the staff and poking things better left alone I suppose. Also, the numbers who would love to look around would probably overwhelm the space available. These guys are trying to run a railway after all.

Thursday, December 05, 2013

(A)Grounded van bodies

Grounded Vans

You see lots of grounded railway vans in farms but this pair are obviously on holiday at the seaside.

On the left there is an orange fishing buoy and that steel structure leaning on the corrugated end would normally be found adorning the back end of a small, modern(ish) trawler. Looking at the condition, it's probably new and awaiting fitting - these things go rusty when pounded with sea water.

The ground appears to be shingle so these aren't far away from the sea. Sadly, I've no details of the location - can anyone identify them?

Wednesday, December 04, 2013

Pie Puller

Mandator

Odd-ball road vehicle time. Dating from 1970, this AEC Mandator tow truck is being shown off at a vintage vehicle festival. The photo dates from the 80s so the lorry may still be in service, although why it would be at a show is an interesting question.

On the side, the owners name reads "Fleur De Lys Pies Ltd, 142 Emscote Road, Warwick".

Why does a pie company need such a big tow-truck?

I'm not even convinced by the address - it's a row of terraced buildings that have been around for well over 60 years. There was a Fleur De Lys factory nearby though.

The brand was swallowed up (pun intended, they always are on my blog) by the Holland Group in 1972, which might explain why the vehicle was sold on to a collector.

Tuesday, December 03, 2013

A little Midland Signal Box

A photo from the Carnforth (I think) section of my collection. Possibly the smallest Midland Railway style signal box.

Midland Box 1

Midland boxes were a modular design. According to the Internet, this is a 4A version.

Selside Signal Box


The box was moved to the now closed steam centre from Selside, Horton in Ribblesdale. Sadly, it's current state of repair is rotten and falling down. My photos from the 80s show it in a far better state.

Modelling a box like this wouldn't be too hard. Start with the windows from Ratio and some Wills clapperboard. The rest is reasonably pleasant scratchbuilding. Far easier than the job I had building a half-decent model from the Airfix kit for Hornby Magazine's Topley Dale. Sadly, Airfix got the window proportions very, very, wrong and fixing them would have been a lot easier if the brief had allowed me to throw the kit away...


Topley Dale Signal box

Monday, December 02, 2013

Industrial locomotives

I'm stupid busy with other work this week so blogging will be light I'm afraid. In fact, all I've done is haul out a box of old photos to scan for your entertainment.

Anyway, excuses over, here's photo number one - an 0-4-0 + 0-4-0 diesel shunter in Esso livery.

EssoLoco

The second is a fireless loco.

firelessloco

Both came from the section of the drawer marked "Lakeside & Haverthwaite Railway". Assuming this is correct, and since there are some Carneforth it might not be, then I'd guess that these are the sort of engines acquired when a preserved railway is new and will take anything.

Time-wise, the photos date from the 1980s and that's as much as I know. Would anyone care to comment to add a bit more information?