Tuesday, August 31, 2010

Hachette Tiger Tank partwork

Tiger Tank DVDThe summer is over which means it's part work season. This years offering from Hachette is a model of the German WW2 Tiger Tank. As usual part one can be picked up for 50p and comes with parts to make the gun, a DVD and some paperwork.

Looking at the contents I can honestly say that the resulting model will be breathtakingly detailed, very impressive and IMHO a bit pointless.For over 700 quid and 140 magazines you end up with a 1:16 sale static model. For that sort of cash I want radio control. I want to be able to drive the thing around.

The problem is that a lot of the detail will be hidden. All the engines, interior etc. disappears under the bodywork which is a great shame. Assembly looks pretty idiot proof and my Dad's experiences with the same firms Bismark kit show that it will generally be well thought out and manufactured.

I'm sure the marketing men have done their stuff. Focus group research will have shown that there are a large number of people out there who fancy filling their sideboard with miniature German armour but won't they be happier with one of the excellent Tamya kits ? You can buy a R/C version in the same scale for only a couple of hundred quid more than the partwork. I suppose that the static versions aren't that much cheaper than the partwork and the laters instructions will probably be better - they usually are excellent but you do get instant gratification.

One thing I cannot forgive the firm for though is the poster inside the pack. Quite who thought taking a photo of the model and applying the Photoshop watercolour filter was a good idea ?

Visit the official website.

Monday, August 30, 2010

Making a stand

On the Model Boat Mayhem forum I spotted an interesting post entitled "Boats to be inspired by". It's full of photos taken at the San Francisco 2009 model boat convention.

There are some very impressive models on show but after a while it wasn't the boats themselves that inspired me, it was the stands they were displayed on. In the UK boat shows are all about the boats. Very little effort is made on the actual display - the model tend to sit on the stands that are used alongside the sailing pond. There will be functional but not normally very esthetically pleasing.

It doesn't have to be this way, look at the tug boat illustrated. The stand takes up little more space than a basic version would but it shows off the model, and the skill of the model maker so well. Obviously you wouldn't want this when sailing, the water running off the hull wouldn't do it any favours, but for there a basic version made out of something suitably waterproof would be fine.

Another example is this lovely early speedboat. The display stand is made with a wooden pattern that echoes the vessel. It appears to be sat on simple perspex pillars too. That will have taken quite a bit of effort by the builder but how much better than a scruffy bit of plywood.

This seems to be a common difference between UK and US exhibitors. Cars being displayed on this side of the pond will be sat on the ground. We might stuff a mirror underneath to show how clean the chassis and we might open the bonnet, but that's as far as it goes. In the US the vehicle will be jacked up or on a stand. Mirrors will adorn the ground, wheels will be removed so the brakes can be admired, the doors will be open and bikini-clad babes will be draped over the hood. It's all so much more of a show.

Sunday, August 29, 2010

How to get a free loco kit


A mathematician writes:
There is a lot of talk these days about the cost of our hobby. I think that through the power of advanced mathematics, we can all enjoy our favorite pastime at absolutely no cost.

Let us take as our example, a man who works in an office in Solihull doing web stuff. He gets up early in the mornings, and uses the bus and train to get to his place of employment. No savings there I think as the price of petrol and car parking would be very similar if not a little more.

However, when he partakes of his lunchtime refreshments, there is a possibility. Currently he tends to visit Subway for one of their delicious turkey and salad wraps of 6 inch sandwiches. This costs him £2.79

Now if we assume a normal working pattern, then over a year he will consume 235 X 256 = 60160 calories and more importantly will spend £655.65

However, there is also a sandwich delivery to the office. These cost a more reasonable £1.90 each and that at 235 X 1.90 = £446.50 saving a whopping £209.15. Or to put it another way, 2 High Level models locomotive kits, which at his current rate of production would probably take a year to construct !

Of course there is the problem that the office sandwich man doesn't actually make very nice sandwiches and those that he does produce tend to be the flavours no one would want to eat anyway. You'd think he'd learn that coronation chicken wasn't popular when he had to lug them down from the 6th floor every single day.

Now our hero could save even more by making his own lunch in the morning. Sandwiches can be produced for around £7 per week giving a cost of 47 X 7 = £329. That saving of £326.65 put the purchasing power into O gauge kit territory. Mind you that early start would have to get even earlier !

The biggest saving though comes from not buying Marks & Spencer sandwiches. A club sarnie there costs a nice round £3 or over the year 235 X 3 = £705 and that's before you consider the other goodies to tempt the hungry worker, or replacing one of their stupid non-working self serve checkouts when you beat it to death for being useless. Taking your own lunch saves not only a court case but also £376 which would buy you a 7mm scale Ivatt 2P 2-6-2 tank kit and the wheels it needs to stand on !

Saturday, August 28, 2010

Why I'm not a proper classic car owner

DS engine bayLast weekend there was a classic car show in the middle of Warwick. The people of the town finally got what what they have always wanted and the market square was, albeit briefly, turned into a car park.

In the middle of the display was a Citroen DS. A beautiful car and very special to me. You see, its restoration was featured in a Pratical Classics magazine the same month I purchased my Beetle. I bought the magazine because there was an article on what to look at when buying a bug - admittedly after I became the owner of the car, but that doesn't matter - it was an itneresting article but the DS rebuild blew me away.

This was in the very early 1990s

Today, unlike my bug, the DS is still immaculate. You could eat your dinner off the inside of the engine bay.

How do you keep a car in that good a condition ? It's not like it doesn't go out on the road. Admittedly runs are limited to dry summer days but even so. I'm afraid that despite owning two classic cars, I'll never be a proper classic car owner.

You can take a look as the other photos here.

Friday, August 27, 2010

Dorridge Station

Dorridge StationThanks to my interweb problems, which were only fixed late yesterday, modelling time has been pretty much non-existant this week. So instead I bring you a photo of Dorridge station taken nearly a week ago.

Last week I had the "opportunity" to stay in the office until around 7:30pm. That meant I missed a train home by about 5 minutes and faced the prospect of an hour on Solihull station. It's a nice place but you don't want to be there forever. Anyway I was hungry. Luckily there was a train to Dorridge a few minutes later and I remembered seeing a chippy from my seat.

The small cod & chips was excellent and once I'd finished, my slightly greasy fingers took this shot from the footbridge. In my opinion it's turned out very well. The evening light and rain combine into a most pleasing image.

Modelling details abound. For example the canopy is a sympathetically modernised version made from square tubing (there's probably a technical name for this) and pressed metal. Along the front is a UPC fascia. If you knew no better you'd probably think it was original.

All the steps have brightly painted edges and the handrail colour contrasts with the brick walls - in in the name of improved access for the visually impaired. In a similar vein, a noticeboard hides the loop antenna broadcasting direct to hearing aids.

Modern platform furniture includes a permit to travel machine (surely an easy thing to model) and lots of pot plants, also in modeller friendly square tubs. In the distance are some bike lockers. You can probably get etched versions of these but some plasticard would do just as well.

The station itself backs on to a row of shops and a hotel, including the chippy. It marks the edge of the Centro area so traffic is mainly multiple unit based but Voyagers can also be seen belting through, hence the yellow platform lines. Quite a bit of freight is pulled by those things that look like Class 59's but are more modern. There's also a fair bit of PW activity at the moment as well. As a model it would certainly be an appealing prospect.

Thursday, August 26, 2010

Normal service will be resumed as soon as possible

I'm having problems connecting to t'internet at the moment and am spending my spare time arguing with my ISP and BT. If they deign to get me back on line at home in the near future, normal blogging will resume.

In the meantime, go and read some of the old posts you can find on the right hand side of this page. And click on the adverts too.
:-)

Wednesday, August 25, 2010

Baffling boiler

Boiler viewI like a nice pre-rolled boiler and the C15 comes with one. This makes me a happy builder.

Except.

The instructions mention that you might not have to overlap the seam at the bottom. Odd, since there is a half etched section on either side of the gap to ensure a nice clean join.

Anyway, I merrily follow the diagram and solder in the two formers. They push the tube out slightly and so while the ends touch, they don't overlap. "That's what he means" I think. A bit odd but probably a niggle that didn't warrant modifying the etch. The smokebox is quickly and easily assembled and looks like it will fit the slots in the footplate.

Then I try the boiler in the body. It doesn't fit. Not by much but if I want it to go in there I'll need to whack the front with a hammer. Worse, if I do get it in the loco, the centre line will be too low compared to the smokebox. Looking inside the tabs it's supposed to sit on are bent down. Hmmmm

The problem is that either the tank tops are to close together or that the tube is too fat. The former are nigh on impossible to fix as bending the metal back to flat to allow me to remove a little, would see it split along the relieving lines. I hoped putting the boiler on a diet would solve it.

Out came the formers thanks to the persuasive powers of a lot of heat and some poking with metal objects. Not pretty but effective.

Re-fitting the now adjustable boiler things looked a lot better. The unit went in, the tank sides stayed parallel and the smokebox fitted. I tack soldered everything in place and looked again. Still OK. Making up a bracket that joins the tanks over the boiler showed it to be about 1mm under size. I can live with this, or at least I can compared to the alternative.

The boiler/smokebox join had a ring of fat copper wire fitted. Lots of solder, flux and heat made a reasonable job of this but I'll want to tidy up a little with some filler later. I know when it's time to stop waving heat around !

At the end of the day I think the problem is that the tank tops once bent over are slightly too close together. Taking around 0.5mm off each would make things fit better. The trouble is, that's only a theory and I suspect that the amount of metal to be removed depends on how you bend the top corners. And by this point you can't bend them back and removing the metal accurately is now very difficult. It's an example of the prototype not helping us modellers out.

Tuesday, August 24, 2010

Red weed

Red weedAs I recall, in the excellent "War of the Worlds" album by Jeff Wayne, and probably the book of the same name but I've never got around to reading it, the Martians plant a red weed that starts to engulf the Earth. Apparently this is what gives Mars its characteristic colour (I know it isn't but stick to the story).

Anyway, it appears that Martians are in the process of invading Birmingham. I took this photos of the tracks at New Street station a few weeks ago and it clearly shows red weed. I appreciate that the chances of anything coming from Mars are a million-to-one you say, but still, it's here.

Modern railways don't employ the armies of platelayers from days of yore so scenes like this aren't uncommon no matter how embarrassing they might be. For modellers, they provide an opportunity to get a bit of scenic material into the unlikeliest of places, as I showed yesterday. I think if I were to make this stuff I'd be tempted to mix reddish scatter with some hair spray to get a nice clumpy effect. I don't think Woodland Scenics do a course red mix so we'll have to make our own.

Monday, August 23, 2010

Down beside the viaduct

Down beside the viaductHaving talked about reference photos when mending things yesterday, he's a different sort, a reference photo grabbed while I was wandering around town.

The viaduct on the left is disused, it used to take the track into the LMS station and this was demolished many years ago leaving just the GWR one. I liked the view because it shows the sort of unruly mess you find near railway lines. The back of the buildings is a bit of a hotch-potch of extensions built to utilise the maximum space available. The bricks and roofing materials are different denoting different dates of construction.

The gate allows access to the underside of the arch but it hasn't been used for a long while judging by the amount of greenery. In fact plant life is prominent everywhere, the tarmac is vanishing under grass and more plants are hanging down from the disused track bed.

I'm like this sort of odd corner but it's quite difficult to get right on a model. We all tend to make things too neat or too derelict. There's nothing falling down in this scene, in fact the buildings are in good repair, it's just, well, abandoned.

Sunday, August 22, 2010

Reference photos

Ceiling roseIf you buy a Haynes manual, most of the procedures are illustrated by photos taken while the writers have been working on the car. Magazine articles are illustrated in a similar way, I know, I've taken the pictures.

However I often find that with the advent of digital cameras I take photos just for my own reference. Such a photo is shown here. For those who don't recognise it, it's the inside of a ceiling rose. Dangling at the end of the white cable in the middle is a light bulb and shade.

This rose was playing up and needed to be replaced. I took the photo so I could remember where all the wires went once I'd screwed the new rose in place. Good job I did too as I probably wouldn't have remembered the grey wire on the left which runs to the switch needed to go with the live wire to the light. Then there would have been some head scratching and hopefully a lucky guess.

Very handy if you have a rubbish memory or just worry about putting things back together. Best of all, with digital you can shoot away (a compact is good for this) and then delete the photos once you've finished the job. It's like a notepad but quicker.

Saturday, August 21, 2010

Etch brass origami

Bismarck gunMy father is building a Bismarck from the Hachette partwork. So far it's going really well. Construction is time consuming but that's not the point. If you want a quick model, buy something RTR.

The detail is amazing and I particularly liked this little bit of ingenuity. The lower etch bends up at the sides and the main part folds around on itself. The result is a representation of one of the machine guns on the side of bridge. Once you get your head around the fold, it is very simple.

The starting point is only 20mm long. The boat is best part of five feet so there are a lot more bits to build and fit !

Friday, August 20, 2010

Tanked up

Tanked upBoth tanks are now in place. Bending the tops was entertaining - I used a length of brass tube that seemed reasonably close as a former. That and some poking, prodding and bad language !

Actually, it wasn't too bad. The bend starts lower on the side than I initially expected but thanks to the half etched relieving lines the metal could be re-formed without any problems. I was careful to make sure that the top and side were are right angles to each other all the way along. Then when the second side went on I did the same but additionally checking that the two tops were level. Lots of tacking and testing there but hopefully it will all be worth it.

Inside there is an inner tank which includes supports for the boiler. Huge cutouts are included for the wheels - far larger than required in my opinion. I knocked the odd sharp corner off too as my soldering inside the tanks isn't perfect and removing the very tip of the corner lets the parts slide in easily.

Thursday, August 19, 2010

Starting the C15 body

C15 body startTime to disagree with the instructions again. The C15 has unusual curved top tanks. I assume that these were either to allows water to run off when they were overfilled, or just annoy model makers who find square tops a lot easier to build.

The sides are supplied as single etchings. On the back of the curve there are a series of half etched lines to make bending easier. So far, so normal.

In the book of words, the suggestion is that these bends should be left until construction is complete. Quite why you'd want to do this is a mystery since once the boiler is in place you won't be able to get at the metal to curve it properly. The only guide is the front face, there isn't anything at the back. I'd prefer to have a cage to work around but it's not essential otherwise I'd make one up out of spare etch.

The front face also shows the limitation of slot and tab assembly - the slot is slightly too far back and if I rely on it the tanks will have an unusual and wrong recessed front.

Wednesday, August 18, 2010

Book review: Groudle Glen Railway & Sea Lion Rocks Tea Rooms

Groudle Glen Railway BookletRegular readers will know of my obsession with the Groudle Glen Railway and so it will come as no surprise that as soon as this little booklet arrived I read it from cover to cover immediately. And a very good read it is too.

The GGR is unusual in many ways. Firstly it has never been any real use. Instead it was an amusement ride to connect visitors with the end of the walk through the glen and a small zoo. The glen itself was an early version of Alton Towers and this booklet explains some of this history.

Second, the line died after the 1962 season and almost completely disappeared. In the booklet by page 13 you are looking at a scene of complete dereliction. Since then the whole thing has been rebuilt and now goes from strength to strength. Despite being a fan I hadn't appreciated just how much work had needed to be carried out. Of course I'd spotted the old line along the cliffs - somewhat closer to the edge than the current alignment - but what you see now owes an awful lot to the Doddignton Railway which was bought lock, stock and barrel in 1982 to provide materials for the restoration.

Third, it goes up a hill to reach the sea. You can't say that very often.

Nowadays the line is restored and still uses one of the original engines and replica of another. A third lives in the south of England but has paid visits back to its home.

A5 sized, the booklet covers all of this in 45 pages. 50 images in colour and B&W take you through the entire history up to and including this year. Reproduction quality is excellent especially of the very early views which can be a bit fuzzy if not done well.

What strikes me more than anything is how much the trees have grown around the main station. Early postcard views show a clear sky, something you don't get nowadays ! This is in keeping though as apparently many of these were planted by the original owner to make the place leafy and green for visitors. I wonder what he'd think if he could see it now.

Anyway, there is no excuse. If you like unusual railways or narrow gauge of just history, this booklet is £3.50 very well spent. As well as providing a pleasant read, you get to support the line too.

Buy the booklet here.

Tuesday, August 17, 2010

C15 footplate

C15 footplate

According to the instructions for the C15 locomotive kit, I should now be building the upperworks of the model. I tend to view instructions as an interesting piece of packing which I will read but probably ignore. To be fair the author does say they aren't the only way to build the model, just the one he feels works best.

I disagree. I like to get valances and buffer beams onto a footplate early to strengthen the thing up and reduce the possibility of it twisting. I suppose I could fit the footplate to suitable chunk of wood but at the moment all my spare timber is in a shed and not too hand. And I didn't think of this until after I'd started soldering. Maybe next time.

Anyway, the valances are exactly the right length (they aren't always) and fitted in the half etched slots well. OK, so there are gaps for tabs which seem to be absent on the valance but no matter. A little tacking in place with some blobs of solder and I was happy enough to add the buffer beams once these were laminated. Watch out as the front and back ones are not the same - you do need to read the supplied words to get this right.

Monday, August 16, 2010

Front bogie

C15 Bogie

The C15 locomotive front bogie is an interesting construction. You make up the side frames with bearings (again, phosphor bronze) and then inset bolts in the middle. Then equalising beams are soldering place which cover up the bolt heads.

Next the stretcher is folded up and soldered in the corners. The pivot point in the middle is supplied as a hole with a half moon either side. Since this model is to go around corners I elected to join these half moons up to allow the thing to slide side to side as required. Now I'm not sure how much this will help because without side springing it won't be guiding the model around said curves, but for the moment I'll go with it. If needs be I'll restore the hole by soldering a washer in place.

The nuts are put in each side. I didn't solder them in place, just screwed the sideframes on. The nut holes had to be made larger to fit an 8BA nut but that was only a few minutes work with a small, square file. When you can't get a screwdriver into the bolt heads, doing them up is fun. Squashing the beam hard against the bolt seemed to give enough purchase through.

Anyway, after all this you end up with a bogie that incorporates some compensation and can't fail to sit flat on the track. Quite nifty really.

Sunday, August 15, 2010

Prototype for everything - wobbly platform edge

Wobbly platform 1When I was building Flockburgh I encountered a problem. At the end of a crossover locomotive buffers would clip the platform when running around a train. This was annoying and since making 14.2mm track work was enough of a pain, I cheated and trimmed the edge by a millimetre or two so they all cleared. Just.

It's not something I ma proud of, or that I feel looks good but to be honest I doubt anybody notices and if they do, I don't much care. The loco stays on and that is all that matters.

Now though I have been vindicated. A couple of weeks ago disembarking from a train at Birmingham Snow Hill Station, what do I find ? Only that the prototype had Wobbly platform 2exactly the same problem and that the solution thought up by proper engineers was exactly the same as mine. To make things more obvious the edging stones follow the wobble perfectly, and very neatly too.

So after all that concern, it turns out there is a prototype for this and I can sleep easy at night !

Saturday, August 14, 2010

Killin Pug part 1 in Hornby Magazine

September's Hornby Magazine sees a first for my Parker's Guide column - a proper 2 part article. The reason is that the subject is a locomotive kit, Deans Sidings resin bodied Killin Pug.

What's clever (well I think so anyway) is that at the end of each article I finish with a complete model. Part one shows building the basic kit onto the intended Hornby 0-4-0 chassis. In part 2 I get a lot more finescale.

The kit itself is lovely. You get a top quality resin body with some well cast whitemetal bits. I reckon 5 hours would take you from kit to finished loco. Add in about 10 minutes for spraying black and a bit more for transfers. Hardly a huge job by any ones standards. Hugely satisfying too.

The bad news is that I make it into the magazine in person. Page 15 shows me gurning at punter attending Hornby Live. For those of a nervous disposition, you'll be pleased to know that I'm mostly tucked in the fold between the pages...

Friday, August 13, 2010

Rear truck

C15 rear truckAt the back of the C15 you find what I assume on the prototype is a radial truck. The model cheats and uses a pony track hidden in the frames to do the same job for a whole lot less engineering. It's a common enough subterfuge as no one can see the difference from the track side and saves trying to make a bent tube up accurately from soldered bits.

As well as swivelling, the truck is so narrow that there is a load of side play in the axle even with the bearing inserted from the inside of the box and protruding wheelward. I see a lot of spacing washers on the fret but think they can stay there for the time being - until I get to test this model on it's eventual home anyway.

Thursday, August 12, 2010

Wheels in

C15 wheels inThere are days I'm glad this loco isn't mine. That point comes when I look at the price of the Slaters wheels. Let's face it you can't exactly skimp in these - buying some and thinking you'll get the rest later isn't an option. Then I realise that the drivers are only just over half as much again as the Romfords I'd put in a OO version.

Anyway, the wheels have been slipped in the chassis in the usual manner - bearings are soldered in and reamed to allow the axle to turn with no discernible friction. Rods are made up and fitted. Hopefully everything rolls smoothly at this point. I don't have any jig axles to make this process easier so I have to spend extra time making sure the chassis and square and flat. Also that the designer has done his job accuratly and this seems to be the case.

One oddity are the bearings. Normally I see brass but these are phosphor bronze. I'm not sure what benefit this gives but they certainly soldered easily enough. A tiny bit of solder and heat from my 45W iron flashed around the edge rather better than I'd expected. Sometimes you have to resort to a small blowtorch to get enough heat in this joint !

Wednesday, August 11, 2010

Manx Palm tree

Manx PalmAt Hornby Live I was behind a stand for The Model Tree shop. They cater for those who want greenery on their model railways but don't have the inclination or skill to produce them themselves. That's me (I can't bend the wires for a tree skeleton, I've tried but it never looks right) so I was interested.

The products look lovely. All the major scales are covered and the prices, if you take into account the amount of work required, are cheap. Something around 35cm tall will cost you in the region of 25 quid. Smaller plants are cheaper. OK, so you can probably buy some "bog brush" type conifers for pennies but if you are modelling the UK then they look more than a little out of place. If you aren't they still don't really look like trees. Except possibly if used in the background.

Now I aspire to model the Isle of Man and while trees are a common enough sight, the one that really stands out is the classic Manx Palm. Botanists apparently call this Cordyline australis or the cabbage tree, a plant all the way from New Zealand. I'm not that convinced but don't know any better. Worse, I can't find any pictures in my collection of Manx shots. Pretty surprising that as there are a hell of a lot of them (photos not palm trees, although there are plenty of these too).

So I picked up this rather nice palm from the stand for something under 4 quid. That to me is a bargain. The leaves are etched brass, the trunk some sort of plastic I think, and the bushy stuff part of a shaved coconut. Probably. I wouldn't want to make one for that sort of money.

Isle of man Palm treesOf course only after buying the tree do I do some proper research. My excuse is that I didn't have a picture handy. Looking at the real thing, what I have isn't right, but it isn't bad either. The trunk and hairy bit are pretty accurate, it's the green stuff that lets it down. On the other hand it's not too bad to my eye and the alternative of making my own is sufficiently unappealing that if the IOM model ever appears, I'll probably just use them anyway. After all I'll only need 2 or 3 dotted around. It's only a plant after all (ducks as gardeners around the world hurl abuse).

The Model Tree shop - Palm tree selection

Tuesday, August 10, 2010

C15 chassis

C15 chassisYou gotta love nickel silver. Takes solder beautifully yet parts can be held close to the action without worrying too much about singed fingers.

The chassis starts of easily enough - two sides and lots of spacers to join them up.

When I say lots of spacers, I mean it. There are 6 to contend with here. One even has a nut soldered to it and then goes under another to make a box shaped structure.

The only complication is that to get the loco around tight bends, and I've been asked to get this thing around 4 foot radius curves, the back end of the chassis tapers. I think I've manged to get this equal although the spacer looks like it's in a bit wonky.

The keen eyed will have also spotted that this is a 4-4-2 yet there are only holes for 6 wheels. Hmmm.

Monday, August 09, 2010

C15 kit

C15 kitI think everyone is probably bored of the layout in a box for a while, so I'm moving on to something new. The next model on the workbench is a Connoisseur Models O gauge kit for an LNER C15 4-42 tank locomotive.

The kit originates from Majestic Models and has been acquired by Connoisseur and the model is sold pretty much as the original designer intended. No changes to the parts have been made so either it's going to be a nightmare, or as I expect, George Dawson got it all right when he designed it. Only time will tell.

In the box the etches look very nice. There are tabs and slots to aid assembly although the instructions do warn that they final squaring up should be done by the modeller rather than relying on them. That's not bad advice as etching to the levels of accuracy required to avoid this would be exorbitantly expensive. Alternatively making the fit tight just results in me cutting the tabs off 'cos I can't be bothered to open out the slots.

Apart from the kit, the modeller has as usual to provide motor, gears and wheels. The finished model will not go back in the box either. Well not unless you stamp very hard on the lid...

Sunday, August 08, 2010

What's in a name ?

Naming anything is difficult. Parents can spend hours on the subject yet there are still plenty unable to do better than call them after characters in soap operas. I'm writing a book with a friend at the moment (it's fiction so nothing to appear here, however if you are a publisher or agent who fancies something a bit Tom Sharpe-ish though, then please get in touch...) and we haven't got down to the thorny topic of a title. Over 40,000 words down and we're both ignoring the half a dozen on the very first page. Because it's going to be difficult and we hope that something witty and obvious will occur to us.

Anyway, naming layouts is also difficult. If you built a model of a prototype then the decision is made. You just have to hope you got everything right or some twonk will recognise the name, know everything about the real thing having spent all the time they should have been engaging with soap researching the subject. Once they spot you the floodgates will open and spewing forth over the model will come a tidal wave of information and halitosis. Woe betide you if you made any minor mistakes.

This is why I've shied away from modelling the real thing. Even my closed call, The Hellingly Hosptial Railway, is described repeatedly, by me, as a cameo not an accurate recreation. Ask nicely and I'll happily tell you where the mistakes are. Try to engage me with a diatribe about how the area should be tarmaced as you clearly remember it and you'll be firmly put in your place. For a start the model is set in 1900 and you don't remember that date. Secondly the roads nearby didn't get a hard top until the 1950's, I have photos to prove this, so it's unlikely that they did a yard in the hospital 50 years earlier. But I digress.

So far, my layouts have been set in fictional places. Flockburgh is completely made up. Melbridge comes from the film "Random Harvest" and is the town where much of the action happens. Nicking a town name from a film was a lot easier than making a convincing one up. It also means some people think they know the place when of course there is no way they could.

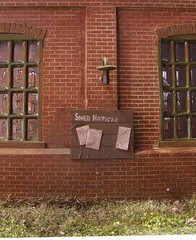
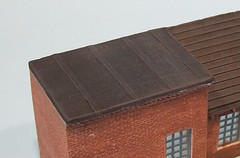
Anyway, this brings me to the point in hand. The model railway that has been known as "The layout in a box" needs a name. I wanted to include "Melbridge" in it and since "The Melbridge Box Company" already exists, more imagination was required.

True to form, this failed me so a message was posted on the DOGA e-mail forum and resulted in a number of suggestions within a day:
  • Melbridge Sidings
  • Melbridge Wharf Shed, since railways & canals kind of lived together
  • Melbridge 38E, or whatever shed code you fancy
  • Melbridge Depot
  • Melbridge Loco
  • Melbridge Croft, meaning waste ground in some local usages
  • Melbridge East
  • Melbridge engineering
  • Melbridge brewing co.
  • Melbridge End
  • Little Melbridge
  • Lower Melbridge
  • Melbridge Goods
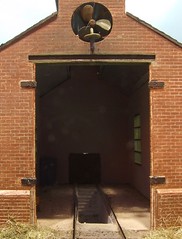
All of these are good and will be kept in mind for future projects, but the one I've gone for was almost the first out of the blocks. Tony Newton suggested and then retracted it as he felt the name was too rural for the model I'd produced. I liked the irony of the idea and that a quick search online threw up one similar location that definitely wasn't rural. So, ladies and gentlemen, I bring you:

Melbridge Parva

Layout in its box

Saturday, August 07, 2010

Lumpy undergrowth

Lumpy SceneryIf the nylon grass mentioned yesterday isn't enough, there are other tricks to produce a suitably untidy example of nature on a model railway. Over the years I've accumulated a couple of shoe boxes containing various scenic stuff.

One packet contains a sort of netting that you use to support leaves on tree armatures. I'm not sure what it is made of but the consistency is like non-sticky candyfloss, just not as tasty. In use it's teased out and stuck in place with some PVA. Then some puffer grass is fired it at. To finish the job it gets a coat of hairspray and a sprinkle of various flocks.

I'm not actually sure what I'm modelling here - probably a sort of low lying bush thing. What I am sure is that I've tried to walk through these in the past so they do exist. Botanists can fill in the details via the comments page please.

Friday, August 06, 2010

The beige, green grass of home

Model grassYears ago my first models saw grass coming from packs of cheap flock powder. Dried sawdust is wonderful stuff except that it came in fairly lurid shades which promptly faded to pale brown as soon as they came into contact with sunlight.

Nowadays we can be a little more sophisticated. Static grass is all the fashion - little nylon fibres charged with electricity standing up properly. I built myself a device to do this some time ago and it works very well. What it doesn't do is shoot fibres into corners. For that the trusty Heiki puffer bottle is required.

In theory, the polythene bottle imparts a charge to the fibres as they are blown through the holes in the cap making them stand up as required. I'm not convinced as the power of puff tends to overcome the static, although if you do some careful vacuuming afterwards you can sort this out apparently. What you do get is grass in every crevice (on the layout, stop sniggering at the back) which looks OK to me.

Wanting some dense undergrowth I then shot cheap hair lacquer over this and drifted on some flock. which gives a real unkempt look to my waste ground. I've even sprinkled a few little flowers in to pretty things up a bit.

Thursday, August 05, 2010

Groundworks

Ground coverBuildings done, I get to have a go at some scenery. Messy, but fun.

First up, ballasting. Not wanting anything coarse or resembling the mainline, I've used sawdust with a little bit of granite mixed in it. The result is lovely and fine but with just a hint of texture. The mix was applied dry and stuck down using the traditional PVA/water mix with a drop of washing up liquid to break the surface tension. Some brown powder paint would have been a good idea too. Since I didn't think of this when I was actually anywhere near somewhere that sold said paint, it will remain a good idea.

Between the track a few lumps and bumps are courtesy of a tube of Wilkinson ready mixed decorating filler. What they would call Pollyfilla but can't for trademark reasons. Applying this is like icing a cake, albeit with something a good deal crunchier. Based on these results, I'm not going to be competing with Jane Asher in a hurry. Not to worry, a bit of smearing around with a palette knife and the basic lumps are OK.

For colour I used Greenscene textured paint. It's a hell of a lot cheaper than Tamya's version and just as brown and gritty. Once dry some matchpot emulsion in various shades of brown (they don't actually call it brown bit it is) got splodged on and mixed.

Finally the track was sprayed with Precision underframe dirt. I started doing this with a paintbrush before realising that even allowing for set up and cleaning, it was a lot quicker to use an airbrush. Better still would have been an aerosol, but I forgot to buy one of those too.

Wednesday, August 04, 2010

Herding cats

Splodge in a boxRegular readers won't be surprised that I'm turning the "Layout in a box" into a magazine article. To that end I've been taking quite a lot of pictures that you won't be seeing here. Since the whole point of the model is that it fits in a plastic box, I though taking a photo of a cat in said box would make an amusing illustration of the size.

Has anyone actually tried to get a cat to pose ?

No, well don't bother. My cunning plan involved putting a few treats in the bottom of said box, waiting for them to sit up from chomping and taking a picture. What could go wrong ?

Well, how about they hop in from the side nearest me and instead of aligning themselves along the length of the container, the little horrors dived into the goodies giving me a fine view of their back ends. As Barrie Cryer would say "That reminds me, I need to sharpen a pencil." The number of publications requiring photos of cats bums is very small and mainly consists of specialist websites.

Fortunately they are greedy little beggars and eventually I persuaded Splodge to sit up, although as you can see he managed to get his own back by licking his nose as the shutter clicked !

Tuesday, August 03, 2010

Felt roof

Felt roofI like a bit of variety in the building materials on a layout. It's too easy to stick to a limited palette of slates, tiles, brick and corrugated iron. Faced with a flat roof on a modified Scaledale building I had a crack at something new. Inspiration came from simply looking out of a window at an extension roof - it's clad in roofing felt.

I'm sure I've seen this done before in model form but for the life of me I can't remember it. Some of the Wills kits have it I think but that doesn't help me much.

Now I'm acquainted with the felt roof having recovered a few sheds in my time. I know from painfully hanging on for dear life that it's a stoney finish but one with little in the way of texture except when you are very close. Certainly in 4mm:1ft scale I wasn't likely to need much.

My plan was simple - masking tape. It has a very fine grain which I hoped would look like distant felt. Best of all, being self-adhesive, application would be a doddle. It just has to be stuck down with something like a 2mm overlap.

What I did forget is that felt isn't grey. It's a sort of greeny colour and my black dry-brushed with dark grey isn't really correct. I might get the dry-brush out again or perhaps some weathering powders would be a better bet.

Monday, August 02, 2010

Shed interior

Shed interiorInside the shed the brickwork has been given a quick wash over with Humbrol 147. Thinned a little bit and swashed around with abandon, I think it looks reasonably close to whitewash which has seen better days and is wearing off the brick surfaces.

Since the shed has plenty of ventilation I've resisted the urge to paint the inside black. Locos wouldn't be in anything other than light steam when going in and out of the building so if there was anything coming out of the chimney it wouldn't have very much soot in it. For the same reason there isn't an enormous blast pattern over the door top - you only get these when the engine is working.

Using my pencil crayon method of colouring the brickwork went well. The faces aren't as pronounced as those on the Slaters version but they still picked up the colour OK. Special efforts had to be made on the angled ares above the stepped out bits at the bottom (can someone enlighten me to the correct technical phrase ?) but a sharpened pencil seemed to do the trick.

Plain backgrounds


Those following my build of the C15 steam locomotive are going to be a bit disappointed this week and the updates will be minimal . I've hit the point in the month where I need to write stuff for Hornby Magazine and that takes precedence over blog stuff I'm afraid.


Nowadays, while the words matter, pictures matter more. This means I have to take a bit of care and do the best I can to provide suitable images to illustrate whatever it is I'm waffling about. This seems to be a bit of a black art but it's not as difficult as it seems with new fangled digital cameras. The most important thing is to get a nice uncluttered background and unsurprisingly this has always been the case. The drawing about is from the April 1941 issue of Model Railway News and is by none other than John Ahern. My set up differs only in that the card background is Blu-taked to the wall rather than propped up on books. There really is nothing new !

Sunday, August 01, 2010

Haaappy Birthday MRJ

MRJ 0 and 200
Note to the kids - that title spelling makes a lot more sense if you sing it along to Neil Sedaka's "Happy Birthday Sweet Sixteen". It's on YouTube to help you.

So the Model Railway Journal has reached 200 issues. That's not 200 months because the publication schedule is a bit sporadic during the summer. Issue number 0 appeared in the Winter of 1985

Back in the old days we had a couple of layouts, a scratchbuilt locomotive (GE class M12), some very good practical advice on Spratt & Winkle couplings, real plans for Ross-on-Wye goods shed, modelling baulk road pointwork and kitbuilding a Class 40 diesel from an etched kit. If we assume that issue 0 is a prototype and issue 1 a production model there isn't a huge change apart from the inclusion of an article called "RTR to finescale - fast".

That last topic still appears in issue 200 where there are no less than 3 piece rattling on about this. However the tone has changed. Iain Rice covered the venerable Airfix GWR 14xx tank. The assumption was that while the body was nice, it needed work. The chassis would be replaced with a Perseverance item. Like most of Rice's articles, the tone is matey and practical. The attitude is that you can do this.

Now the tone has changed. Three RTR models make it into the pages, Bachmanns 04 and Hall plus a Hornby 8F. Over the years, MRJ stalwarts have become very protective of their baby and see it as something very special. Therefore these locos are allowed into the hallowed pages because they have been graciously deemed "good enough". Most of the work carried out of them is covered by the phrase "Alan Gibson drop in wheelsets" apart from the 8F which gets a make over involving a level of engineering that I and most other people couldn't hope to emulate.

This is symptomatic of the finescale world as a whole, something that MRJ has both influenced and been influenced by. There are people out there who can produce the most exquisite models. And there are those who can do this and encourage others to try and do the same. Sadly they are in a minority as the skill  sets are very different. This is my problem, early issues of the magazine seem to encourage me. If I tried to do something I knew it would be appreciated and applauded. Now I feel it's a much colder publication where success is the only thing that matters. This isn't to say I don't expect to see the best modelling in the magazine, it's what you buy it for, but something has (IMHO) changed.

That said, I do own a complete set. Some of them are even in the proper binders made of hens teeth (the rest are in Private Eye binders which fit quite well if you buy some extra rods) but more because I keep expecting it to go bust any time and then the sad completionist in me will want to make up the whole set...

Issue 1 (43 pages) cost £1.50, issue 200 (56 pages) a still very reasonable £3.75.