Wednesday, September 30, 2009

Taking steps to make the Jinty work better

My Jinty is a silky smooth runner. With it's Mashima motor, High-Level gearbox and flexi-chassis all the ingrediants have some together to make a model that works as well as I'd like.

Comparing it with the Triang TT version is like comparing brussel sprouts and banana. They might both be good for you and therefore desirable, but one doesn't taste very nice.

Once in a while though, it all goes wrong. The locomotive stops. Dead.

And I know what the problem is. The front steps get bent in slightly and jam the con rods. A quick tweak with the fingers and all is back to normal again. It's one of the downsides of 14.2mm gauge and probably P4 as well (for you larger scale modellers), limited clearances.

Mind you, the loco has cured the problem itself now. By the end of the show, the steps fell off and now I have to work out how to solder them back without requiring a repaint.

Tuesday, September 29, 2009

2F tinkering

2f chassisOn Saturday, as Flockburgh was set up, I took the chance to tinker with the 2F locomotive I rebuilt some time ago. It wasn't running very as well as it should after all the effort that I'd gone to reworking the iffy solid chassis to a super-dooper compensated one.

On the track, the model stuttered and advanced in a series of jerks rather than the hoped for silky smoothness. I prodded the pick-ups and improved things a little but it was still as pointless as putting lipstick on a pig. More drastic measures were called for.

First the chassis was tested sans body. Once I put some weight over the front end courtesy of an old crab fishing lead lump, things worked very much better. Apart from the out of gauge weight whacking the water crane, running was nearly as good as I wanted. Putting the body back on, things degenerated again. At least I had an idea where the problem was.

On the bench, off came the body. The bits of lead weight came out of the boiler and were replaced with some "Liquid Lead" to get as much mass as possible over the front. This was secured with drops of superglue as the lead reacts with PVA and expands over time causing the locomotives to explode in slow motion.

The chassis got an extra set of pickups on the powered axle. I'd only fitted the front two with them before. Those already in place were tweaked to keep then in touch with the wheel rims at all positions of the wheel.

Testing looked promising until the glue joint holding the final drive gear gave up. Another dollop of superglue fixed this and all appeared to be well. A bit of running on the layout showed promise so the loco could take it's place back on the passenger train - my "running in" turn on the layout.

During the show things were OK most of the time but occasionally the loco wouldn't stop dead a refuse to move forward. A little reverse seemed to sure this and normal service was resumed. OK the running still wasn't great but it did appear to be improving. I put this down to the various bits of metal bedding in properly, especially the hornblocks which I never seem to get perfect. If I'd used Romford wheels I'd have assumed that the crank pins were unscrewing or tightening up, but with these wheels that's not a possibility. Pity, I know how to fix the Romfords...

By the end of the day attention is obviously still required. One thing I spotted was that the ends of the crank pins were shiny. Now this is probably due to handling but might just point to them rubbing on the inside of the valance at the top of rotation. I'll get me magnifying glass out and take a look sometime.

Monday, September 28, 2009

Banbury 2009

Choccie cakeQuiet. That's how we'll remember this years Banbury show. The crowds never seemed to get going really. Despite hitting the organisers break even figure, the atmosphere was that of a quiet Sunday show model railway show. Sadly there hadn't been a busy Saturday to precede it. There were a few grumpy traders around I understand. The trouble with a one day event is that there is only one bite at the cherry for all concerned.

The reason for the lack of numbers is difficult to pin down. The day dawned bright and mild which might have encouraged people to get out and about rather than spend time in a school looking at toy trains. It was also the first weekend after the credit card statement would have arrived with those "back to school" purchases on it. At least one major show was happening elsewhere, but one I'd have expected to sap the audience much for this event.

One problem was a lack of on-line advertising. Banbury MRC don't have a website at present and worse, the entry on UK Modelshops directory hadn't been confirmed and so anyone using Google to find out more would be disappointed by being met with "click here to confirm" by the listing. Now, this was simply because no-one from the club had confirmed it but many people will have wondered if the show was really taking place. OK, so the vital Railway Modeller diary entry had been made but like it or not, more and more people will check the web. I know I did when sat at work wondering what the opening times were.

Anyway, the show itself was pretty good. We turned up with Flockburgh and quickly carried everything from the camper to the classroom. Space was a touch tight but by slewing the layout at an angle we fitted beautifully. Sharing our space was the layout Deltic Avenue and trader Model World @ Oxford.

The morning session was very chatty. Very chatty indeed, Nice to meet a couple of readers (Hello) of this blog. Although my web stats tell me that people are reading this drivel, seeing real live people is better still. At some time my Dad nipped of to get some tea and came back with delicious home made chocolate cake as well. Now this is what matters to exhibitors - good quality cake. The afternoon a lot quieter but with more families.

Being held in a school, the show stretched out over several classrooms and a main hall. In this could be found the winner of the best layout plus a group of guys from Milton Keynes Model Railway Society who were, in my opinion, robbed. Their layout - Milton Quays - is absolutely breathtaking. 40ft of quayside, large MPD and terminus station in EM gauge. Now I'm not one to get excited about larger model railways but this is stupendous. And an excellent pun in the name too. The waterside track plan is spot on. The warehouses are a lovely, and realistic, mix of old and new. There is the Weymouth harbormasters house (as seen on Melbridge Dock too) built as an adjunct to a larger and just as prototypical building. The only downside were some running problems early in the day. Mind you taking a model this size to a one day show shows either enthusiasm or madness.

Milton Quays

Tradewise, there were several RTR merchants and a bit of a mix of other stands. My feeling was that there had been changes since last year and generally these were good news. Again, for a one day show things weren't bad although perhaps a bit light in the 4mm kit area. I didn't need much and so my wallet felt little paint. Just a second hand DVD with African Garratts on it. And a magazine from a pile with a little note begging for them to be taken away free !

Many people ignore the provincial show and in this case I'd have said the three quid entry fee would have been excellent value for money.

Sunday, September 27, 2009

On the road again

Peco point motor, with loose wire.All things being equal, by the time you read this we will be standing around behind Flockburgh at Banbury Model Railway Exhibition.

To this end, the layout was unearthed and set up yesterday to see if it was working. Getting to a show and finding a fault with your model is a whole load of no fun and poking around with a soldering iron when the public are watching does our hobby no favours at all. With any complicated set up, the odd fault is inevitable but I like to avoid these if at all possible even if this does mean spending a few hours checking things over before an outing.

Despite being stored for many months the list of faults was short:

A point motor working in one direction only - One of the wires had fallen off as you can see in the photo. Reattaching took a few minutes once the special exhibition soldering iron (the one with a 6ft long lead) had warmed up. The legs got in the way a little bit but a quick prod sorted things out.

No power to one section of track - Two dry joints at the toe end of a point. Again, a little soldering iron work sorted this after I'd cleaned the area concerned of track dirt. Really I should bond rail joints with bits of wire but I'm a bit lazy about this and if the things work, I don't bother.

All the locomotives seemed to work fine despite their dirty wheels and these were later cleaned up. Considering the trouble we had trying to get everything to work when the layout was constructed, I'm always amazed when turning the power on makes things work. When they don't fall off, amazement gives way to staggeration. I suppose the moral of the story is that you can do anything if you try hard enough. Well, with toy trains anyway.

Anyway, this is the first show of the season. This year I expect to be at Uckfield in October and demonstrating at Warley (NEC) in November. If you want to know more, check out my exhibition diary. See you there.

Saturday, September 26, 2009

3-links

Coupling chainMat asked: I'm interested in fitting 3 link & screw link couplers to my OO gauge models to bring about more realism, plus I'll be using these as the main coupling. I've read up on a few sites and Smiths seems to be the coupler people recommend. What do you think?

Well Matt, my first thought is ARE YOU CRAZY !

DO YOU WANT TO SPEND ALL YOUR TIME POKING AND FIDDLING WITH TINY LINKS WHILE SLOWLY GOING MAD AND BLIND ?!?!?!

But that's not all that helpful. Besides, many excellent modellers have used 3 link couplings and say they work very well. Certainly nothing looks better hanging on a British wagons buffer beam. For all that I love Spratt & Winkle couplings, I have to admit that aren't exactly realistic. The Americans have it much easier with knuckle couplings.

We Brits though are made of sterner stuff and if you want chains then you should have them.

Now I have to preface this by saying that I have never used 3 link couplings in 4mm scale other than as ornaments decorating the end of locomotives. Looks have always been more important than operation in this instance. Therefore you need to take all my suggestions with a pinch of salt.

Smiths couplings are fine. In fact I have stuck them on locos and they look very nice. As far as I know they work too. Make sure however that the chain goes easily into the hook. If it doesn't drop in easily when you'd fiddling on the workbench, you'll really hate them on the layout.

Iain Rice writes about these in one of his books (the detailing RTR one I think) and he recommends Exactoscale or Ambis Engineering hooks slightly opened out combined with EM Gauge Society chain. This stuff, as seen in the photo attached to a resin hook on a Silver Fox loco, is quite fine and slightly larger than scale. That should make it easier to use. It's also steel so you could pick it up with a magnet. My little 3 link use (one someone else's model) experience tells me that bigger chain is easier to use and doesn't look any worse than the dead scale stuff.

When you make your choice, stick to it. At least that way you avoid incompatibility problems. We have all been on layouts where there have been the odd rogue wagon what won't couple with some of the others. Working a train set is hard enough without having to worry about that sort of thing.

Whatever you do, fit up a couple of wagons and practise coupling before doing anything else. Ideally test them on a real layout too with all the access problems this will give you as you try and reach around buildings, signals and station awnings. If you are still building, it's probably worth seeing how you need to adapt the model to avoid too many problems. And while you are at it, getting bucket loads of light on it too so you can see the things. And don't make the baseboard too wide or you'll never reach across it !

Coupling on S gaugeAs far as I've seen, most people use a small torch with a hook taped to it as a coupling pole. Again, you'll need to experiment a bit to find what works for you.


I hope this helps a little. If you are really keen then perhaps having a chat with people using the couplings at a show (they might even let you have a go) would be wise. Most will be only too happily to help and tell you some of the bad bits as well as the good ones. And if you do go for chain, well at least you can surreptitiously poke recalcitrant locos when "the hand of God" is at work !

Friday, September 25, 2009

Tender top - the big bits

Tender bodyAs mentioned a couple of days ago, the tender sides for the Bulldog locomotive were a bit bent when released from the etch but tweaking with fingers and thumbs sorted this out. Forming the flare over a bit of brass rod strengthened things up further. This isn't difficult, you just have to keep fiddling to get it right. Form. Test against the back piece,. Tweak. Test. Repeat until happy.

Then the sides locate into half etched lines in the footplate. A test run showed these to be a touch shallow so I ran the Olfa plasticard cutter along them to take out a bit more metal.

I suppose I should make fitting the parts out to be a big deal and keep you on tenterhooks or wow you with my skills but the truth is that all 4 sides fitted well first time. They were tacked in place and once happy, I finished the joints off all the way along. Even the tender flares, notoriously difficult to get nice and tidy, went well.

The only problem was the tank top. The shape has to be divined with from a sketch in the instructions plus a bucket load of trial and error. Putting the divider in place helps when gauging the height it should be fitted but there still plenty of tacking and adjusting. I think it's right now but have put the finished parts aside as returning with a fresh pair of eyes might show up some errors that need fixing before I progress.

Thursday, September 24, 2009

Body retaining nuts

Body retaining nutA potted guide to body retaining nuts and their application in etched brass model locomotive kits:

1) Remember to fit them. First. Before you build the body. If you don't, normally the won't be any access to do them afterwards. This leads to frustration, bad language and trying to take the thing apart and bending the etched parts. Guess how I know this.

2) Make sure the bolt will go through the hole. They normally won't and you have to ream out the hole. It's better to discover this before you solder the nut in place. Clean the burr off the edge of the hole or the nut won't sit properly.

3) If possible, line the hole in the nut and the hole in the footplate up by eye. Tack the nut in place and see if the bolt goes through. If not, heat the join, poke the nut and try again. This takes time but if you can't do this, the alternative is painful.

4) If step 3 doesn't work then you'll need to bolt the nut in place and then solder. Try to use as little solder as possible. Make sure the threads of the bolt are covered in oil or pen to stop the solder sticking. It's no guarantee but it might help. If you do solder the bolt into the nut it's worth heating the joint and trying to unscrew it while the solder is molten. If that doesn't work you'll have to cut the nut and bolt off and start again. Makes you want to spend more time on 3) doesn't it ?

5) Run the bolt back and forth through the nut. Sometimes you'll find the hole alignment isn't spot on but the bolt cuts a thread in the brass. Engineering types will use a tap for this part but if you don't have one, a steel bolt isn't a bad alternative.

6) Solder the but fully in place. When you've got a complete body, having the retaining nuts come loose because you have only tacked them in place is A Bad Thing. Guess how I know this.

7) Do step 5) again in case any solder has found its way into the join. It happens, trust me on this.

8) Clean the join of flux. It's harder to get at it later.

Wednesday, September 23, 2009

Bendy tender sides


Tender sides
Originally uploaded by Phil_Parker
This is a first for me when building model locomotives - banana shaped tender sides.

All the half etched components have taken on a distinct curve. There's no reason I can think of that this should happen - the etching process wouldn't set up stresses in the metal and it's not something that I've noticed before when building other brass kits.

Fortunately this isn't a problem. All the parts were quickly flattened with gentle tweaking between finger and thumb. Added to this the tender top is flared which braces things and pulls them into shape. The flare is formed around a small brass rod - the thin metal bends easily enough without the need to anneal it.

Tuesday, September 22, 2009

The eyes of the MOT tester


Splined tool
Originally uploaded by Phil_Parker
...spotted that 3 of the bolts holding the drive shaft of my campervan to the gearbox were coming loose.

I didn't read the advisory note properly and started by looking at the wheel end - where they have loosened before - but no, it's higher up. And only one showed real looseness i.e. sticking out of the faceplate. The other two weren't tight but you could only really tell by twisting them with your fingers. I guess that years of poking around under old cars makes you spot these sort of things !

Anyway, five minutes work with the splined tool shown had things tightened up again. It's a job you could do with mole grips but it would be a whole load of no fun and chew the heads up into the bargain.

Monday, September 21, 2009

Tender chassis

Tender chassisThe Bulldog locomotive's tender chassis is actually fiddlier to assemble than the one with the driving wheels. Again, we have two sides connected by spacers but as I can't stick this on a jig, and there is a bit of play in the spacers, there was a fair bit of fiddling around to get it square and flat. The axle holes took quite a bit of opening out too.

At some point I have to attach brake gear but this needs to be carried out after the wheels are fitted. And these have to go on after the chassis is painted. Looks like it will be the red label (non acidic) flux for that job !

One the etch, the origin of the kit is revealed. George Norton designed this model for London Road. This is good news as he's well known as a good kit designer. I built one kit in 3mm for a very similar loco and it went together very nicely.

Sunday, September 20, 2009

Partwork season


Bismark hanger
Originally uploaded by Phil_Parker
The holidays are over so this means it's part work season in your local newsagents. WH Smiths has bins full of cheap first issues tempting you to hand over money on the first stage of what the makers hope will become an addiction you'll be hooked on for the duration of the series.

Across teh interweb, forums are full of disparaging comments about these. Most have totted up the price and say it's too high. Others tell you that the series will be cancelled after a few issues and you'll be left with an unfinished and useless collection. Since this blog still seems to get traffic to my review of the first part of the "Build a Flying Scotsman" series, it's obvious that the world is looking for to me for advice in this area.

Let's start with the Flying Scotsman. There seems to be a good deal of grief associated with this one. One forum describes all sorts of trouble, not helped by Hachette deciding that the model is to be a static item rather than the working locomotive shown on the introductory DVD. There seems to be a lot of demanding money back going on.

However this might be a small number of grumpy people who expect the model to go together like an IKEA bookcase. While I would expect a pricey part work to assemble well, with little or no modification, it's going to attract a lot of newbies who have never built anything before. Any model making takes patience and care, there's going to be some who won't be interested in putting the effort in. Mind you it is being sold to that market.

My scepticism is partly down to the slagging off of the Build the Bismark kit. My Dad is progressing well with his and generally is very pleased with it. The fit of the etched brass parts seems to be excellent - far higher then I've experienced in many locomotive kits. The photo shows one hanger with it's mountain of brass parts, all of which have been super glued in position. I think the results look fantastic, especially from someone who has never worked in this material before. At just of an inch long, it's a tiny part of the much larger model. The level of detail seems pretty consistent so if all goes well for the rest of the issues, and he's getting close to the end of the series, it ought to be an impressive model.

New out this year is a similar kit for building a Lancaster bomber. Again, people have done the maths and come up with a figure of over 600 quid - for a static model. Now the Bismark is going to cost a touch more than this, but for a working boat with radio control. And compared to buying the kit in one lump it's not too out of the way. But Lancaster bombers are easily available in plastic kit form for less than 5% of the price of this model.

You could argue that there is fun in building it and I can't argue with this. Putting those laser cut wooden pits together looks fun to me. The DVD (which didn't work properly on the one I bought) show quite a lot of detail inside the plane but also gives away how the covering will be achieved - at some point you'll be supplied with some thin aluminium sheet which will be riveted with a pinwheel and then stuck over the framework. I'm just not convinced by this - on the real Lanc you can see the covering sagging slightly between the stringers and that won't happen with metal covering.

Worse still, at the end of the day you get a big (1/32nd) aeroplane which you have to store. Displaying it will be difficult due to its size and as a static model when the building is finished, what happens next ? And don't even think of selling it, you'll get next to nothing and certainly not recover the cost of the parts, never mind your labour.

So, if you still fancy a part work, what do I recommend ?

Plastic SkullSimple, there is one out there offering ease of assembly and interesting results. I talk of the "How your body works" series. Issue one gives you a skull with teeth. Keep going and £215 and 34 weeks later you'll be the proud owner of a child sized skeleton complete with innards. All in easy-clean plastic. No skill required, just plug the bits into each other.

As you can see I couldn't even do part one without fiddling. The teeth have been painted with Humbrol acrylic white which looks good. I might even buy part two to get some eyes and a skull cap. Then maybe I'll bury it in the garden and let archaeologists dig it up in a few hundred years as a new Piltdown man !

Saturday, September 19, 2009

Tender wheels


14 and 16mm wheels
Originally uploaded by Phil_Parker
According to the instructions, the Bulldog tender should sit on 16mm wheels. Why I went and bought 14mm one then is a mystery, after all I managed to get the right sized one for the locomotive.

Luckily in my stash of bits I did have 3 axles of 16mm Romford wheels, probably intended for another project now forgotten. These have been painted with matt black - not exactly brush friendly but it has to be done. When dry, the treads are cleaned up with a fibre pen until they shine. I feel pleased to have remembered to do this now rather than after construction, it's so much easier than once the body is on.

Posing the wheels for the photo I was surprised how much difference that extra 2mm diameter makes. You can't really see it in the picture but the correct ones really do look a lot bigger. Good job I spotted the error now or there would have been some real head scratching later !

Friday, September 18, 2009

Critter in Continental Modeller

I get in from work and find a fat envelope from Peco. Inside is the October 2009 issue of Continental Modeller magazine. The reason they have sent it to me (the only publisher who do hint hint) is that the piece I penned on building a "Critter" from a Unit Models kit is to be found on pages 622 and 623.

It's interesting writing about American prototypes especially when there is likely to be a reasonable number of people from that country reading it. The editor has added a short teaser at the top of the page "Phil Parker fell for the charm of a convincing craftsman kit". In the UK I'd initially think "Craftsman Kit" means an etched brass loco model from the firm of the same name. In the US I think it means a kit that has to be assembled and many need some modification or fitting to get it together. Likewise "critter" is an Americanism meaning a small locomotive, often of dubious parentage that has been on the end of several in service modifications.
Modellers of the US prototype will hopefully be versed in the lingo - if not they need to go and buy some magazines from across the pond (easy enough there are several good ones available from UK suppliers - try this, it's fabulous) where no concession is made to British sensibilities. You think they'd remember exactly who invented the language...

Thursday, September 17, 2009

Get a hobby

Quote from the helpfultechnology blog: "Last night, as I was flicking through tweets and Google Reader items, I found myself realising a strange co-incidence. I wasn't just reading social media news or the usual (excellent) fare from government digerati blogging in their spare time."

Which translated means (I think) - "I spend my working life working on electronic government projects. After work I spend my time reading and writing about the same subject. As do lots of other people."

So you live in a bubble. Your work is your life. Your whole life.

I say - get a hobby. Get an interest that is different from your job. You Sad Man.

How can you get perspective from within your bubble ? When do you step back and look properly at things ?

I couldn't live without a hobby. It allows me downtime and a chance to take a break from work to recover. Sitting at the workbench thinking about whatever I'm working on there have been occasions when flashes of inspiration occur. It's like my brain is working away on a problem or idea without me being aware of it.

More importantly, it gets me away from work so that when I go back to it I'm refreshed and can work objectively. This is, to my mind, healthy. It also means you work better. The guys in the bubble only talk (sorry, Twitter) to others in the same bubble. They believe that everyone thinks like them and therefore make plans and decisions, which we as taxpayers are going to have to fund, based on this information. The pace of change in the bubble will accelerate while outside, it will remain slow. Those within the bubble will wonder why the rest of us don't keep up.

I hate to suggest that everyone should be legally required to have a hobby but you do wonder sometimes if it wouldn't be a good idea. Even if you don't have a huge amount of time to devote to an interest, simply having one gives your mind a place to wander to.

It's great if you have a job that you enjoy and want to give yourself over too. When you hate tough but again, having a hobby gives you something else to live for. And for the man who lives in the bubble, wheat happens when it pops and you lose the job. You really have lost everything. Presumably this is why so many people dread retirement. It's not the drop in income, its a terror of having to fill the yawning chasm in your life.

So, I say, don't feel guilty about your hobby, it makes you a better person.

Wednesday, September 16, 2009

Up on its wheels

Bulldog chassis on wheelsThe chassis jig performed it's magic again and once cleaned up I was able to fit the Romford wheels. All 6 touch the surface of a flat thing, in my case I like to use the disk part of an old computer hard disk which is excellent. Solid 0-6-0 chassis are notoriously difficult to get spot on, often locos see-saw on the centre set of wheels. You can tell if this is happening once the model is running, the middle wheels will be dirtier than the outer ones. Many builders actually set this set slightly higher to avoid this.

The rods are laminated up from two parts. To help those who have compensated the locomotive, they are in two halves pivoting on the centre crank pin. This takes a little more effort and care than making them up as whole lengths but nothing beyond even my meagre skills.

While I'm testing, the rods are held in place using insulation stripped from bits of wire. It's slightly smaller than the crank pin and can be slid on and off as required. Eventually I'll replace these bits with the Romford washers and some solder but before then I suppose I ought to put the motor and gears in ! As it is, this assembly rolls and up down a track with the slightest push and no binding. And it looks nice and shiny too.

Tuesday, September 15, 2009

6 wheel chassis

Bulldog chassis on jigYou'll get a pretty good idea how well any kits is likely to go together from assembling the chassis. On that bassis this model locomotive won't be sophisticated but it will work.

Jigging the model up, the frame spacers fitted very nicely with none of the fiddling to enlarge the slots that I've found elsewhere. The bearing holes needed just a touch of reaming out. In fact the worst job involved the bearing themselves which had to be opened to accept the axles. Holding these was a pain - I resorted to the chuck on an electric screwdriver as the metal spun around when held any other was and reamed.

The locating pins on the jig (A Hobby Holidays model) were set using a digital vernier as the end pins are too fat for the holes in the con rods. Chatting to the makers last weekend, it seems that my tool has the pins for Gibson or Sharman cranks pins whereas I use Romford versions which are thinner.

Monday, September 14, 2009

3F Bulldog

Bulldog kitAfter a couple of weeks messing around on various little jobs and article work, I now get to start a new proper project. One that isn't a Garratt too.

The new kit is a 4mm scale 3F locomotive nicknamed Bulldogs to be built from the London Road Models etched brass kit. It's a lovely engine with a simple outline - pretty much your classic UK 6 wheel good engine. Of course the simple outline means I have to get things very right. No chance of hiding wonkiness under detail !

Opening the box the builder is confronted with a mass of tissue paper. The packing is as comprehensive as you could hope. Digging down once the instructions are cast aside, a small packet of casting in both white metal and brass appears. As befits such a plain engine, this isn't exactly extensive being mostly smokebox front, backhead and tender axle boxes. Further down are wrapped parcels with the etches and very nice they are too. The detail is sharp and nicely presented. Once I start assembly we'll find out if this impressive appearance is justified in the planning behind the kit.

Sunday, September 13, 2009

The Cawood, Wistow & Selby Light Railway

Wistow

This Sunday's model isn't missing in the conventional sense, I know exactly where it is. In fact it would be fairer to say it's simply resting.

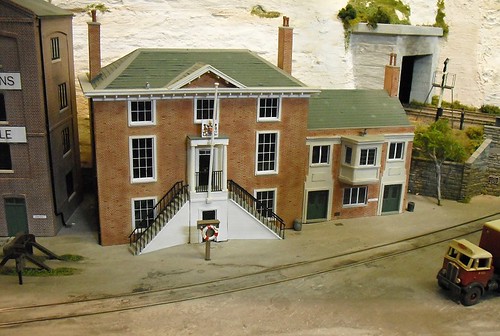
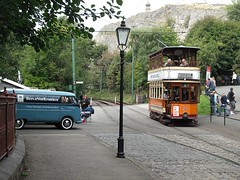
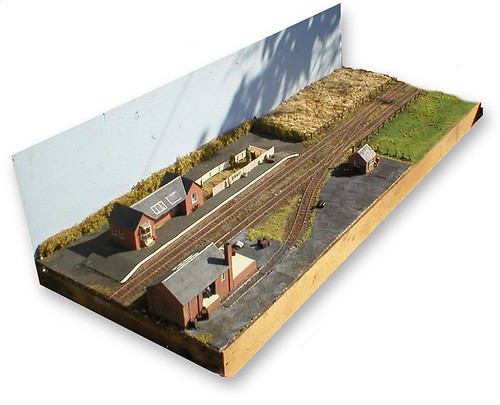
The station you see is Wistow, and formed part of my Father and I's first exhibition layout - The Cawood, Wistow & Selby Light Railway. Inspiration came from an Oakwood Press book found in a York second hand book shop. We liked the look of the buildings, of which there were 2mm:1ft plans, and the area. At the time it also seemed similar to a fiends models of the East Suffolk Light Railway which were very popular on the circuit.

As it was our first model we did a whole load of things we wouldn't do now:
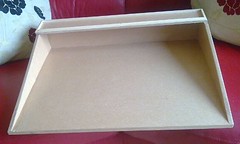
The baseboard is chipboard braced with 2X1 wood. Heavy.
Originally the scenery made extensive use of cheap flock powder which faded from luminous to beige in the daylight.
The model was too long to set up at home.
Despite being only 12 and later 15 feet long (Cawood station was extended after a while) we had two stations.
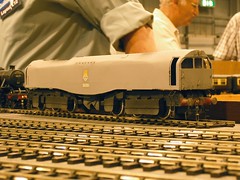
I was still learning kit building so the stock had to be largely inappropriate RTR such as a GWR railcar. This didn't bother us much as neither really appreciated the niceties and thought this could be improved.
The layout stood on trestles.
Landscape contours initially didn't exist - the area is very flat. However it was pointed out that even flat areas aren't so when the scenery was re-done, plasterwork sorted out the lumps.
It didn't fit properly in the car, at least with 3 of us in there - at that point I couldn't drive and my Dad never passed his test so Mum had to ferry us around.

On the other hand, it worked.
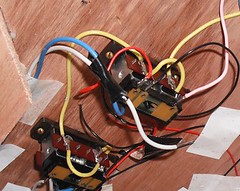
The points used Peco motors.
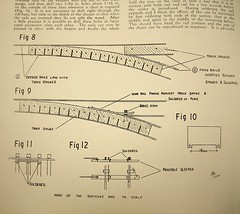
All the track was hand built SMP including the single slip on this board.
The board bolted together to form boxes.
We had lights.
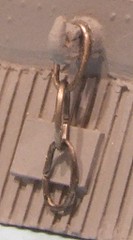
Spratt & Winkle couplings were fitted to everything.
There was quite a lot of detail.

All stuff we have repeated ever since.

In fact we were, and still are, quite proud of this model. The buildings were brick-papered cardboard and pretty scale. The station layouts (we had Cawood and Wistow) weren't too far off even if they were compressed - Wistow is over 1/4 mile long in real life. Cawood gave us a particular highlight, at it's first show one a long term friend looked at it and said, "Blimey. Cawood station". It turns out he had lived in Yorkshire years ago and used to drive by the remains every day and recognised it from this - so we much have done something right !

Over the years we made many improvements. The scenery was completely re-worked. That cornfield took 12 hours work with plumber's hemp ! Woodlands Scenics replaced dodgy cheap flock. Details were added. The stock improved a bit. Controls were re-wired at least once. This station was even shown on it's own as a static model at a hobby show held at my school.

As an exhibition model I think it only ever attended 4 shows. After that we built Melbridge Dock having learned many useful lessons. As for our first effort, well Wistow & a single Scenic board are in the shed. Cawood station survives in a box. Many of the details were rescued and appear on subsequent models so the spirit lives on. In fact the buildings were done again in 3mm scale to appear on Flockburgh. Who knows, perhaps we might be tempted to have another go at this prototype some day.
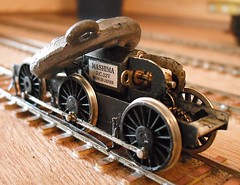
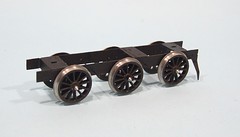
Saturday, September 12, 2009

Portable workbench


Workbench
Originally uploaded by Phil_Parker
My sister makes jewellery and to help here I built a modified version of my own workbench. When I made mine many years ago what I needed was space to build and leave stuff part built without clearing away after every sessions. If there's one thing that stymies progress for modelmakers, it getting everything out and putting it away at the end of the evening. It's just easier not to start, whereas if the project can be started immediately you have less of an excuse.

My bench is 4 feet long and was designed to be luggable between desk top and bed. Not a long distance but I needed the desk space for studying. While I was doing this, the bed was unoccupied , except by a cat occasionally, so a suitable resting place for the board.

My sisters version is smaller, about 3 feet long, and made of MDF rather than the plywood I used. The sides are an offcut strip found at the wood shop and chopped to suit. The shelf is another off cut. Everything is glued and pinned together. The nearest I got to cabinet making was the edging around the shelf which is quarter round strip cut neatly using a cheap mitre saw device.

A couple of coats of varnish later the board went off to its new owner who is very happy with it. I reckon anyone could make one of these. If you work on a table that needs to be cleared at a moments notice then it's an invaluable tool. It might even allow you to do some work in a more sociable area of the home rather than tucked away in the attic.

And yes you can buy these things in kit form but isn't it more fun to make it yourself ?

Friday, September 11, 2009

MOT shock result

That replacement pedal rubber obviously did the job. My campervan at a whopping 38 years old passed it's MOT first time. Not through a dodgy testing station either, Ashley actually went back to my favorite tester locally - a guy who is through, firm but fair.

Since he doesn't do repairs other than a little welding, he has no incentive to fail vehicles just to get a bit of work. That's a handy hint repeated by the money saving guy on the telly who suggests going to your local council MOT station for exactly the same reason.

Anyway, I didn't even get an official advisory note, just a jotted suggestion I should check the bolts on the offside CV joints. That's a nice easy job apart from the ones at the top of the wheel which are shielded by the driveshaft, but still far, far better than it could have been.
All of which is being celebrated with a strawberry fruit beer and then I shall work out what project can occupy the time I would have spent trying to get the van fixed. Time to get the Bulldog kit out I think...

Thursday, September 10, 2009

Hornby Mag - October double Phil

This month's copy of Hornby Magazine drops through the letterbox and I find that it is an especially good issue for me. Two articles - Parker's Guide on Whitemetal wagon building and a Beginner's guide to detailing up a Heljan class 37 and 47.

These last two models were what I built my little display track for a few weeks ago for. In fact the Class 37 in the article is the one posed on the display for the final blog photo. What you can't see in the mag is thanks to the power of computer fiddling I extended the grass electronically to the side for a better photo. It was either that or make the display about 3 feet wide !

I'm in good company too. The mag starts with a piece on James May's attempt to build a 10 mile long model railway. May is the good one from Top Gear, the one you could imagine going down the pub with to drink proper beer. I've enjoyed his TV stuff and his books. Even the Telepgraph column is worth a read although I'm far too much of a leftie to buy the paper but read it on-line.

Wednesday, September 09, 2009

Footbrake rubber

Did you know a worn brake pedal can be a reason to fail your MOT ?

Apparently this is the case and with my campervan's MOT looming this week, I need to give the inspector as few reasons to give me the big red sheet as I can. Not that I expect to get off this year, I'm sure there will be something, but I might as well try.

Replacement rubbers are readily available for a few quid and I'm sure I bought some over a year ago. I definitely picked some more up at Stanford Hall earlier this year and now I've got around to fitting them.

For pattern parts (i.e. not genuine VW ones but made by a third party supplier) they fitted very well pushing on with no adhesive required. The originals were well worn and simply pulled away to reside in the bin. Even the tread on the rubber was the same as the last ones. You really can tell when you use the brake too, the thicker rubber feels different.

Tuesday, September 08, 2009

Trams and bugs

Split van and Glasgow TramSorry, I'm too busy for a long post today - lots on the go but mostly stuff not for the blog.

All is not lost however, head over to my travelling blog where you'll find lots of pictures of tramcars and old Volkwagens.

Travelling Philbury - Beetle Drive

Monday, September 07, 2009

Telford O gauge 2009

7mm LeaderSaturday was Telford, the 7mm scale show to beat them all. Well, beat them all if you want to find anything manufactured in the scale anyway. Basically if it ain't at Telford, it probably doesn't exist.

Now I'm not a modeller in the scale BUT I do build locos for other people (OK, I admit there may be a loco or three lurking in my own collection. And some wagons. And some track. And a couple of baseboards for a prospective layout that probably won't get built but you know what I mean) so it's very useful to go along, pay the £12 non-members entry fee, and have a good poke around and chat to people.

As usual the show was packed, the trade seemed to be doing brisk business. I was surprised by the number of ready to go locos there were on sale, and (in my capacity as someone who tries to make a few quid building stuff for others) disappointed at the low prices they were fetching. No chance of me raising my rates for a while I think ! Mind you there is some very rough stuff out there so my prices still look like a pretty good deal, and of course you don't get to see the stuff running...

Anyway, there were a few amusing moments - One potential customer asked if the Garratt kit regular readers of this blog will be familiar with, could be made up as one of the locomotives running on the Welsh Highland Railway. Had I been on the stand I might have suggested that yes it could. All you have to do is take the kit out of the box, throw it away and go and buy the correct one from Backwoods Miniatures. I mean, the WH version has more wheels, very different shaped ends and is narrow gauge. Apart from that it's almost identical.

Railway Modeller magazine take a stand and behind it there is a portable studio, not unlike the version I use. It is there so new releases can be shot for the news section in the magazine. I trotted over there with the Garratt and half way across the hall was accosted by a gentleman who say "Oh, a Garratt. How unusual." to which I had to reply looking at the model under his arm, "Oh, a Leader. How unusual." If we are playing Top Trumps, I think he beats me as only one of those locos were ever finished. Nice model too and totally scratchbuilt.

And I did a stupid thing. Something I laugh at other people for doing. I left my wallet on Squires stand. Fortunately when I went back for it, Roger had rescued it and was about to 'phone the shop to get my home number. Now that is customer service for you.

Sunday, September 06, 2009

Dad's Ferrari


Dads racing car
Originally uploaded by Phil_Parker

This is my Dad's racing car. It has a Mongram kits body, K's motor, Supershell chassis and MRRC wheels and steering. The scale is 1/32nd. He used to race at the Luton airport social club back in the 1960's.

This is how slot racing was before the advent of all that ready to use Scalextric stuff appeared. Handcrafted models with steering that worked. Proper modelling.

This post was prompted by an entry in Iain Robinson's blog about Slot Car Racing 60's style. I looked at the picture and immediately recognised cousin Keith (he is pretty distinctive and hadn't changed when I last saw him a few years ago) second from right. It also fascinated me that they were all smartly dressed to go racing - I don't look that posh when I go to work !


What's really impressive about the whole thing is not that my Dad was an avid racer despite never learning to drive or being at all interested in cars, but that everything had to be made. The 6 lane track is scratchbuilt. Reading magazines from the era, the surface was usually hardboard and there was much debate about which way up it should go - rough side (better grip but less skill required in the corners) or smooth (faster racing once you got going but more skill needed at the start).

Nowadays these tracks were made from ready made bits I believe. Much of the racing is carried out with car shaped projectiles featuring laser cut chassis and moulded tops. A far cry from the days of buying an Airfix kit and fitting mechanical gubbins yourself. Personally I think things were better in the old days but then that's just me.

And yes, when I look at the car I do wonder if it would be fun to make and race one myself. Perhaps it's in the genes.

Hat tip: Iain Robertson - Modelmaker

Saturday, September 05, 2009

Clever track gauge

Track gaugeDigging into the old Model Railway Constructors again, I find this fascinating tool. Designed for making point work from component parts, it's quite simply a piece of wood of suitable width with slots in it so the wood can bend. Thus you have a handy track gauge for the curved bits.

Obviously getting a bit of wood the correct width is crucial. Someone who is handy with a plane ought to be able to help, or better still find a man with a thicknesing machine in his woodworking workshop and he will be able to do the job with great accuracy, albeit on a very thick lump that will then have to be cut into thin strips. Perhaps this is an opportunity for an enterprising trader to make these and sell them ? Not sure how long manufacture would take if you batch built but I bet not that long.

For making your own track using PCB or rivets in ply sleepers, this would be fantastic. It just shows, not all the good ideas are new ones.

Friday, September 04, 2009

Stake wagon

On30 stake wagonWell, I've been noodling around painting the stake wagon this week. Various dry brushings of creams, pale browns, greys and a touch of gunmetal eventually gave me a result I was happy with. On to this went a wash of dark brown. Once dry I felt this needed lighting up a bit and the dry-brushing started again. Not so much but just a bit of lightening here and there.

The result is nicely uneven I think but if I had to do it again, I couldn't !

Anyway, the last job was to fit a paint of Kadee number 5 couplings. The start of holes are moulded in the base of the wagon but these have to be drilled out and then (ideally) tapped with an 8BA thread. The couplings are assembled and the top lip taken off the box (called a pilot box I think) so everything sits flush. A pair of spare steel bolts were shortened and screwed in place. This wagon now connects with the coal tub and that couples with the loco so I think I'm doing OK.

All that is required is a load. It's been too wet to go hunting in the garden for some suitable plant clippings but when I do these will be roped in place with perhaps a little weight hidden underneath to improve running.

Thursday, September 03, 2009

Bobble hat not required


Via a friend in the biz called show:


**************************************************

DO YOU HAVE THE BEST HOBBY?

A new Sky One show is searching for hobby enthusiasts in SOUTH EAST ENGLAND to go head to head with one another for a cash prize.

ARE YOU INCREDIBLY PASSIONATE ABOUT YOUR HOBBY?
RECKON YOU COULD CONVINCE OTHERS THAT YOUR HOBBY IS BETTER THAN THEIRS?

ARE YOU WILLING TO TRY OUT NEW HOBBIES IN RETURN?

DO YOU THINK YOUR HOBBY COULD CLAIM THE WINNING PRIZE?

If you can show the nation that your hobby is worth it’s weight in gold and are prepared to try out a few more, get in touch
Drop us an email with your hobby in the subject line and then your name, contact number, age, address and a 50 -100 word outline of why your hobby is the best and what you would do to convince others that it is.

AT THE MOMENT WE ARE ONLY CONSIDERING PEOPLE FROM THE SOUTH EAST

if you are interested please contact hobbies@princesstv.com


**************************************************

Sorry about the capitals, they are from the original e-mail.
One thing. If you do apply, please do not, under any circumstances, wear a hat.
Not a bobble hat.
Not a greasetop hat.
Not a guards hat.
You are model maker, not some sort of village idiot. Our hobbies need all the help with PR that they can get and that means punching any TV producer in the face when they suggest waving flags or anything else that makes you look an idiot. Please.

Wednesday, September 02, 2009

Low energy bulb

light bulbThe BBC reports that the end is nigh for the incandescent light bulb. The usual selection of unbalanced idiots contributing to it's "Have your say" section decry this as fascist ZaNuLabour EU interference in their human rights. No surprise there.

But one commentator cannot be ignored. Apparently "It will be impossible to do any crafts" with the new bulbs fitted in you lights.

Well, my desk lamp, the one I do all my model making under, has been low energy for about 18 months. The light is pleasant, well balanced and comes on as soon as I want it. It's a slightly softer light than the old bulb but nicer to work under, especially for long periods.

If there is a downside, it's that the bulb produces no heat at all and so you can't dry paint under it or soften plasticard. Aside from that, it's perfect. The world will no more end due to the change in light bulbs than it did with the reduction in availability of lead based solder.

Tuesday, September 01, 2009

Outdoor ballast

Frog crossing
A sunny bank holiday has allowed us to finish ballasting the garden railway. I'm not really sure how you are supposed to do this, but we have done exactly the same thing as we'd do with indoor layouts - fine grit is brushed over the LGB track and once we're happy with the position, watered down PVA is poured over it from a little yellow watering can.

The logic behind this is simple - I hate ballasting so the stones need to be stuck down and stay down. Glued in ballast makes keeping the line tidy a lot easier too. Any leaves that fall can be blown away with a garden vacuum cleaner rather than laboriously being picked off. The vac can be used at a distance too which will save trampling around the flower bed. I think it was David Jenkinson who's technique we are pinching. He was of the same opinion, if you want the model to look presentable, loose ballast is a bad idea. He had much more line to worry about too !

I test ballasted a section of track a couple of months ago and it seems have withstood everything nature has thrown at it. I know PVA isn't waterproof, even the builders stuff we bought, but it hasn't washed away either. OK so there is winter to come but I'll find out then how well we fare. Handy hint: Check the price of the PVA when you buy it. 5 litres was only 5p more than 2.5 of the same stuff thanks to a special offer at the builders merchants. Bargain.

In the meantime, trains were run over the last section to get stones just to make sure everything worked OK. A couple of areas needed to be re-levelled by levering up the track a touch and re-gluing it but otherwise all seems fine. The frogs like it too !