Tuesday, March 31, 2015

Railcar motion problems

Railcar Motion 1

Regular readers will have noticed a distinct lack of action on the GWR Railmotor over the last few months. This is partly because I have been very busy with other jobs but mostly because it's time to look at the waggly bits and I've had to summon up some courage.

Deciding I couldn't put it off any longer, I dug out the kit and had a look.

First off, the motion bracket is supposed to be held to the chassis with a self-tapping screw. I didn't like that idea much. For a start it will be fuggly. Then, unless the pilot hole is drilled very close to the size of the screw, I reckon the whitemetal will distort.

No, I have soldered it using 100 degree solder and some no-clean-up flux I have for testing. Time will see if this goes green. It smells nice when heated but I'm not sure if that's a good sign.

Next, the crosshead. Made of spindly whitemetal, I have a number of problems with it. For a start, the fit is terrible. After cleaning the slots and refining the slide bars, I made it move acceptably freely. Then I looked at how it should be attached to the connecting rod and find this information missing from the instructions and diagrams. I think you put the spigot on the back through the hole in the rod and then solder a washer on the back. It's an interesting idea but when this gives up the ghost, I'm going to be trying to solder in some confined spaces to fix it.

On the front, there is a link to be attached with glue. Of this hangs the union link and this is attached with brass pins soldered with normal temp solder. Hmmm.

I think the best idea is a lost wax cast crosshead. The channels that run along the slide bars are 4mm apart. Any suggestions for a supplier?

Monday, March 30, 2015

Making card kits

Card Kit buildingHere's a good example of the sort of "free stuff" I was rambling about yesterday that lands on my workbench. Juston from Modelrailwayscenery.com sent me over his latest kit for a roadside cafe. Inside the packet are several laser-cut cardboard sheets and a couple of full colour printed pages.

The idea is that you wrap the card with the paper and end up with a lovely, atmospheric building. The concept has been around for a few years now with downloadable kits available from several t'Internet sources. Now, its possible to buy them printed out and with the supporting card pre-cut, saving a fiddly job that requires a modicum of precision.

Put a kit like this together properly and they produce lovely models. The thing its, doing that takes a lot of time. I reckon this thing will take about half a day to finish. After that it will fill no more than a quarter page in BRMs review section.

That's a lot of time for little result, partly why I've used it for a blog post too.

Truth is though, that the excellent instructions and large numbers of these kits now on sale mean that you simply don't need, or want, a detailed blow-by-blow built. Not every month anyway.

Once trick to speed up construction is ignore all the stuff about Pritt Stick or even UHU for laminating layers of card and paper. Spray glue gives a nice even coverage and is a heck of a lot quicker. It's a bit smelly, I used to work in a marketing department that had a massive spray booth for it's use, but work in a well ventilated area and you'll be OK. You really don't need very much after all.

OK, it's bit more expensive than Pritt, but the results are a bit better and these kits are hardly expensive.

Sunday, March 29, 2015

Free stuff = work

free stuff now

The news that Hornby had decided to stop sending out review sample models provoked a somewhat heated debate on RMweb.

Among the people trotting out their favourite hobby horses - all mags are in collusion with the manufacturers, no review is vicious enough, everything in print is rubbish etc. etc. I felt that there was another undercurrent driving the bad tempers.

Jealousy.

Many commentators, both there and on the far more civilised (IMHO) MREmag.com, were surprised that review models weren't sent straight back to the manufacturer. This seemed to excise them an awful lot as though Hornby were going to be in trouble for the lack of 6 locos that had been sent out, poked around and dismantled, photographed and written up.

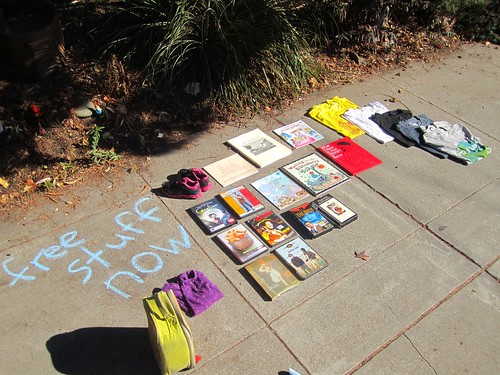
The feeling among a tiny number is that we evil magazine types are living it up on the items sent in for review. Attempts to explain that may of these are re-cycled into competition prizes or raw material for "how to" projects fell largely on deaf ears.

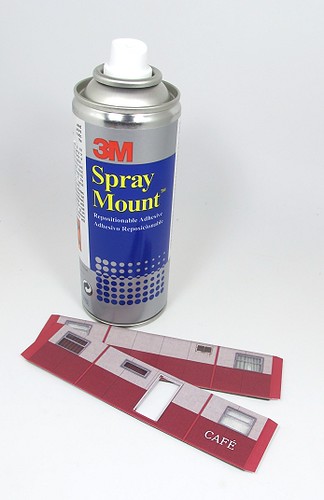
Behind me, there is a pile of stuff. Some of it is model railway items that have been sent to me. For free.

Except they aren't. Every single one comes with an implied requirement that I take extremely seriously for me to do something with it and put the results in a magazine. That way the sender gets some publicity and hopefully, some orders.

This, you see, is my job. Well, one of them anyway.

No manufacturer sends items out for fun. They do it as a simple business transaction. An item reviewed will garner more page space than the cost of that item, even at full RRP, would get anyone in advertising. Arguably, less reviews would mean manufacturers would have no choice to take more paid for advertising space. That might be true, but it wouldn't make for as much interesting editorial content, which is what we hope magazines are bought for.

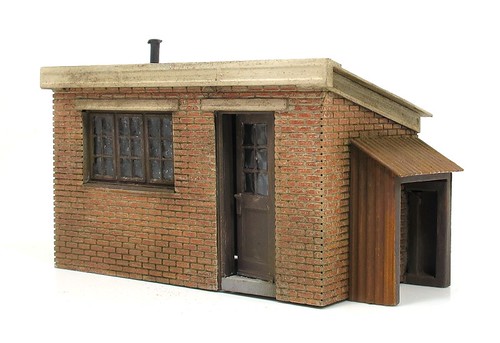
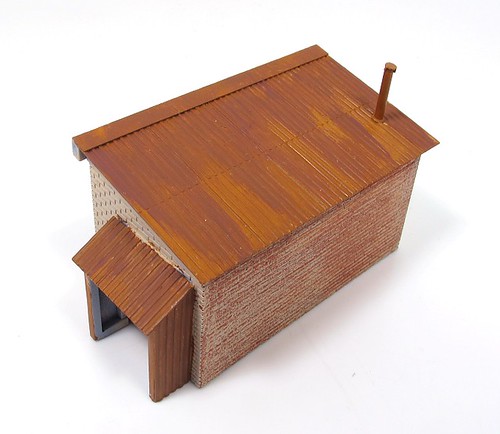
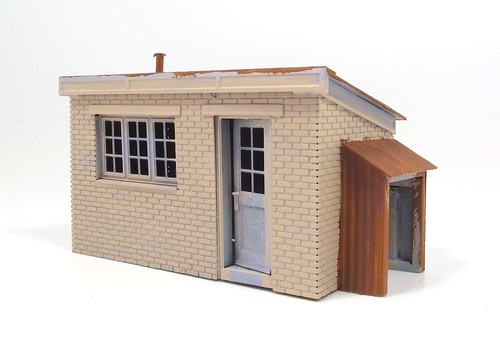
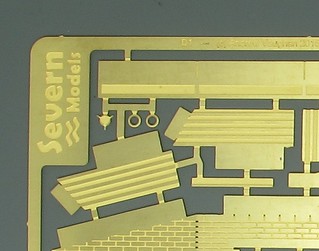
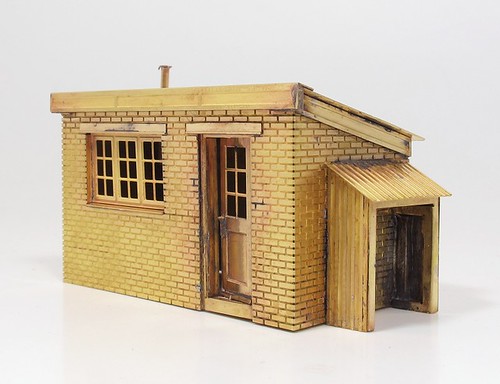
I don't get much choice over the stuff that us sent to me. If I find myself with a laser cut bridge, I'm expected to built it, write it up and sometimes even film it. What do I do with it after that? For the forum fan, the assumption is that I use it on some mahoosive layout. Truth is, I stick it in storage (that I have to pay for) and wonder what to do with it next.

Sometimes projects get two appearances. This is to my mind, excellent, especially for cottage industries. Mind you, for them, we might well have bought and paid for the product anyway. Not everything is free, far from it.

I know I'm is some ways, very lucky. I do something for work that others do as a hobby. But, that's no different from Wayne Rooney. He plays football and gets paid a lot of money to do so (there IS a difference actually). Lots of people play football for fun and are also happy to pay good money to watch Wayne do their hobby.

If we adopt the model railway approach, people would be moaning he gets free boots.

I know that in many ways I'm lucky. But then I worked to get lucky. For years I contributed to magazines while working in a "proper" job. I wrote this blog and not just with the occasional post. Eventually, and without any planning, I ended up doing what I now do.

It's not well paid but there are other benefits. Generally, it's very interesting. I meet nice people. Sometimes these people tell me that I persuaded them to have a go at some modelling, they did and enjoyed it. That's my favourite moment.

I also get to work irregular hours. As long as deliver the projects I'm down to do then no one cares if I take the morning off and work until midnight. I quite like that. And it's generally a creative job. I don't have any qualifications to allow me to do a creative job but that doesn't seem to matter.

So the free stuff isn't free at all. It's just raw material for my work. In the same way that if you work in an office, you get a free computer and telephone and desk and chair - which is more than I do. Sometimes I find myself looking at  project that doesn't interest me at all, but it's still my job to do it and been happy. I've endured entire jobs like that, so I know how lucky I am. No sympathy required by me I assure you.

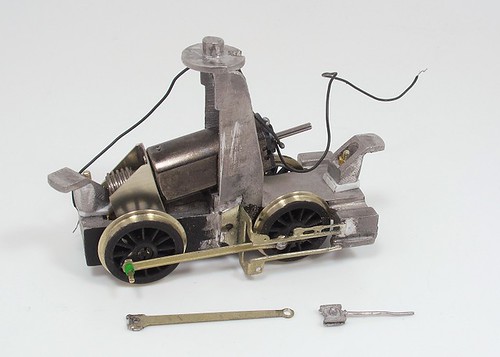
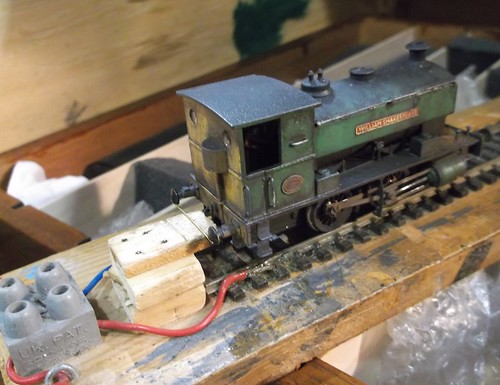
And as you know, I don't have a mahoosive layout but then I don't get sent any trains. All the "free" stuff arrives in pieces and needs assembly.

But that's how I like it.

Saturday, March 28, 2015

L&WMRS Open Day 2015

Cakes on the teabarCakes, cakes everywhere. That's what I had last Saturday.

Tradition has it that 2 weeks after the exhibition, the Leamington & Warwick Model Railway Society holds an open day at the clubrooms. All the layouts are up and working and the members are asked to supply cakes to feed the visitors.

Quite a lot of them did as they were told and I found myself manning the kitchen surrounded by cake. That might sound like heaven but even I can only eat so much. Mind you, we had so much - the ones in the photo are just the tip of a large cakeberg - that even I couldn't have made much of a dent.

Everyone gets to come in for free and it's always nice to see that plenty of people. The idea is that we attract some local modellers who might be persuaded to give club membership a try. All clubs need to attract new people as there's always a little bit of churn with some moving away and other, sadly, dropping off the twig.

Anyway, I learnt not to open the top of the tea urn and immediately turn the tap above it on. And that it's difficult to keep the tea pot topped up when you keep having to stop and stick a steamed thumb under the cold tap.

Other than that, the layouts ran, people enjoyed themselves and we got through pretty much all of the home made cake. This left about ten bought in ones with longer shelf lives for the following weeks club meeting.

If you are based in the Midlands and fancy finding out more about the club, visit our website.

For the rest, well, there are some photos on Flickr and I shot a bit of video showing our O gauge layout.

Friday, March 27, 2015

Peeking out from under a cover

Peeking cover

A little scene on Melbridge Dock that I've always been pleased with. Some building materials have been stored under a tarpaulin. This has blown back so they can peak out from underneath it.

The siding is affectionately known as the "crane siding" because we used to have a Wills crane where the concrete hut is on the left. Eventually I worked out that this was useless ans replaced it with a whitemetal Roxey Models kit.

The brick hut is scratchbuilt from card and Slaters embossed plasticard. Around its base, the weeds have been placed in clumps by hand. Nowadays I'd use electrostatic grass and get a less clumpy and more natural effect.

Thursday, March 26, 2015

More wiggly tin


Every time I drive by this rusting garage, I think, "That looks fabulous, I must post a photo on my blog." In the last couple of weeks, I've driven past it three times. This post is simply to allow me to stop marvelling at this ramshackle structure and pay attention to the complex junction I'm about to negotiate.
 
I've developed a bit of a fascination with corrugated iron. It seems like a material very much of its time and that time being about 40 years ago. I know you can still buy the stuff, but around here, you see very little in use nowadays.
 
I'm fascinated by the way the metal has weathered. Roof panels exposed to the weather are coated in surface rust. The front still has a lot of paint but with the rust breaking through.
 
If anyone wants to visit this shed, you can find it here on Google maps.

Wednesday, March 25, 2015

My Golden Virginia tins?

Plastic tubs

In our garage you can find a shelf full of Golden Virginia tobacco tins. The contents were smoked many years ago by my grandad and then replaced with random nails, screws and bolts. Many other people can make the same claim and if they can't you can even buy empty tins on eBay.

Not being a smoker, I'm not going to add to the collection. However, kicking around my computer are several Wriggly's Extra tubs. 7cm tall and 5cm in diameter with snap close lids, they seem too useful to throw away. Add to that my own collection of random hardware and I really need to work out a way to use them properly for storage. Some sort of rack with big holes cut in it I think.

Much better to use them this way than send them for landfill anyway. Wonder if they will last as long as grandads tins though?

Tuesday, March 24, 2015

3D printed model boats


George wrote: I know you like your model boats and thought this article would be of interest to you
http://www.3ders.org/articles/20150321-3d-printed-boats-become-a-hit-for-both-adults-and-kids-in-japan.html

Fascinating stuff. The boats have a cartoony element about that that really appeals to me. The article is a bit light on construction details but if you head over the modellers blog (In Japanese but this is the Google translate version) there is more information.

Close up, the models show all the crudeness of modestly priced 3D printing but on the water, you can live with this. There is some clever work with home-printed impellers and miniature outboard motors.

The boats are made up of several components, each printed in the required colour. In this respect the method follows traditional injection moulding, but of course 3D print allows people to try things out without thousands of pounds of tooling costs.

If you want to know more, it's well worth digging through the blog and there is a "warts'n'all" approach with bad prints being shown. I have a feeling that this would be ideal for home based printing kit. If only I had the time/space/money....

Monday, March 23, 2015

Black & Decker Mouse sander

Here's a handy hint - if you own rechargeable power tools. Try not to lose the charging device.

I have a very nice detail sander tool. Paid a whole 2 quid for it at a car boot sale and then used the thing for several year on all sorts of woodwork.

For those who don't know the terminology, a detail sander is an electric sanding device that has a pointed sanding head and can get into all sorts of nooks and crannies. It's also ideal for small sanding jobs in confined spaces.

Sadly, no charger means one of my favourite tools is no more than a paperweight. I'll keep it in the hope that the charger will turn up again one day but in the meantime, it has been replaced with a modern version - the Black & Decker Mouse.

I'm quite impressed.

For a start, the thing hardly vibrates in the hand. I assume this involves some sort of magic as the sanding pad is thrashing away underneath.

Pads are attached with Velcro and each comes with three diamond nose sections. Someone has realised that you tend to wear the front part of the pad faster than the rest. Better still, an extended nose is included in the box so you can really poke it into confines spaces. Various grades of sandpaper are included as well as Scotchguard pads.

The only control is an on/off switch hidden under a rubber cover on the front. This is a rocker switch rather than push button which is a bit confusing as you push one end of the cover for on and the other for off. While this is moulded in to the rubber, it's not obvious when poking around with your finger.

The only other issue is the dust extractor pipe doesn't fit a Henry vacuum cleaner. I don't think you can buy an adaptor either, nor does lashing things up with gaffer tape appeal.

Apart from that, it's a tool I would recommend. 


Sunday, March 22, 2015

No red boxes for me :-(

Back in January, I received an interesting e-mail from a marketing company:

I’ve just come across your blog, http://philsworkbench.blogspot.co.uk/, and am contacting you to see if you’d be interested in working with our client, Hornby, on a product review?

We’d love to send you one of their products for you to try. All we ask for in return is a post on your blog featuring the product and a link to the Hornby site.

How does that sound?

If you’re interested in collaborating with them on this, please have a quick browse on their site and let me know what kind of product you’d like us to send you.
 
This all sounded interesting. After a little asking around, it turned out that I wasn't alone, a couple of other bloggers had received the same offer. It seemed that Hornby had decided to dip a toe into more unusual forms of marketing - bypassing the traditional magazines and trying for some traction in social media.
 
I replied that I'd be delighted to join in. While I don't really need any more toy train stuff, it seemed a cheap way to bag a few specific blog projects.
 
After a little discussion, I put my request in for:

  • R9643 - Derelict Cottage No. 1 (Unpainted) £11.85
  • R9755 - Utility Warehouse - Low Relief £14.99
  • R8991 - Water Works Building £21.99
  • R8952 - SkaleLighting Bulbs x 4 £6.15
  • R8947 - SkaleLighting Power Strip £7.75
  • R6631 - RailRoad Breakdown Crane £19.99
  • R3283 - RailRoad Bagnall Shunter Locomotive £29.99
Total cost at RRP £112.71
 
This wasn't quite what they were expecting. I think that most people asked for a big loco, but I decided that this selection would fit in more with the ethos of this blog. Also, I really fancy one of those Bagnalls to play with.
 
Anyway, all was agreed and I waited. In the meantime, over on Albion Yard there was a very detailed K1 review so I knew models were being dished out.
 
 
Chasing up the offer, it seems that having been agreed, the pause button had been hit on the whole project.
 
To quote the marketing company handling the whole thing, "I can confirm that they do want to put this on hold for now, however, I will hopefully be in touch in the near future to pick this up with you."
 
So, no new toys for me then. I should have asked for a big chuff-chuff.
 
Seriously though, I'm not worried about the lack of goodies. There is more than enough stuff sitting around awaiting my attention and if I get bored of that, then I have several boxes of kits and projects for my own entertainment.
 
Maybe if I was a newbie blogger then I'd be a lot more disappointed. After all, it's exciting to be given things for review - I remember the excitement when it first happened to me.
 
It's a shame that the project wasn't carried though too as it would be interesting to see what the results were. Obviously if you can't afford to send models to magazines where they will garner many thousands of readers the it makes sense that you can't send it to bloggers who might only give you a few hundred.
 
Mind you, perhaps it's better for mainstream model railway companies to leave the blogasphere alone. Long term readers may remember the projects sent my way by Idealo - who no longer have a model railways category!

Saturday, March 21, 2015

Monarch loading

Vintage picture

Back in the days we were building Melbridge Dock, if you wanted road vehicles (and we did) then your options were very limited. Most people plundered old Matchbox toys for something about the right size, or shelled out for whitemetal kits of varying quality. The more adventurous would modify Airfix vehicles from the recovery or emergency sets.

Coopercraft's AEC Monarch made a huge impact when it arrived. A plastic kit of a civilian lorry. The sort of thing seen in large numbers in railway yards. Not expensive and reasonably easy to put together. Layouts quickly sprouted Monarchs everywhere and even in the era of readily available diecasts, there are still plenty to be seen.

With my limited funds, I quickly decided the William Berry's would have a fleet of the things - or at least 2 since that was the space available. Painted in green and cream, I've always thought they looked nice and suitably vintage to my untutored eye.

The photo above has been doctored using some filters on my Asus tablet computer. It's a bit of fun but makes a change from all the perfectly reproduced colour shots we can so easily take nowadays. While messing around though, I found the "Drawing" filter to be surprisingly effective:

Sketch
 
I wish I could draw that well. 

Friday, March 20, 2015

Hut ready to plant

Finished hut

Just a few finishing touches and the hut is ready plant on a layout. I haven't actually built the layout yet, but when I do, there is a ready hut for it.

My brick colouring with pencils worked very well on the etched surface, probably thanks to the primer and matt paint giving a slightly rough finish. After this, dirt from Humbrol weathering powders toned down the colours. The whole model was treated to a dusting. I've always been pleased with powders on buildings and am surprised more people don't use them.

Glazing is Micro Krystal Klear wiped across the back of the windows and doors. This gives a thinner "pane" and is quicker than doing each one individually.

The cruel enlargement (the model is 5.5cm long so you are probably looking at it twice life size) shows up the holes in the mortar on the corners but you can't see them in real life. Were I to do this again, perhaps I'd run a fillet of solder up the inside.

Anyway, nice building. Enjoyable build. Check out the rest of the Severn Models range.

Thursday, March 19, 2015

Wrong roof

Roof - Rusty

At first, I thought I'd done quite a good job on the hut roof. A base coat of Humbrol leather streaked with rust while still wet. In my mind, once liberally dusted with weathering powders and perhaps a little plastic solvent for extra texture (it attacks the paint, making it wrinkle) the results would be lovely.

However, while painting, I wondered what the panel at the front of the hut was supposed to be. After pondering for a while, I realised it should be asbestos.

Roof - Asbestos
 
So, back to the paint pot for a basic asbestos mix. More 121 with loads of talcum powder flicked on to it from a wide brush. Then, when a bit dry, even more talk worked in from the brush directly. If the paint peels off in places, recoat and add more talc.
 
Asbestos does need the texture. At the moment it's too clean but the final weathering will sort this out. 

Wednesday, March 18, 2015

Quick coat of primer

Etched hut primed

Since this is an etched kit, before painting it needs a quick spray with Halfords etch primer before painting.

An overall coat of grey shows up the nice, sharp etchings and of course, my superb model building with no blobs of solder showing up anywhere. If you want to learn to solder, this kit has a lot commend it - all the joins are made inside and hidden away. The only exception to this being the lean-to but this could be built separately and glued in place.

Primer on, a coat of Humbrol 121 for the brickwork and some leather/rust streaks on the corrugated iron. I got a bit carried away with this actually...

Etched hut painting start

Tuesday, March 17, 2015

Etched brass hut

Etched hut kitOn a brief foray around the Leamington show, I spotted a new trader to me - Severn Models.

The firm produces a range of building kits in etched brass. Cost usually precludes employing this material for anything as large as a building, although several people have done it. It's certainly unusual to see a complete range produced for commercial reasons as opposed to being something the designer wanted and then decided to sell afterwards.

Most of the range is 2mm scale but they are now offering some models in 4mm.

One of these, the brick line side hut, really appealed to me. Firstly, it looks good - nicely atmospheric. Second, the idea of an etched building more complicated than a shed appealed to my sense of curiosity. OK, I could make the thing from card and plastic for less money but I like to try different types of kit.

Back at the workbench, a leisurely couple of hours folding with cheap square ended pliers and soldering saw the basic model assembled. According to the instructions, glue assembly is possible but I prefer solder. I can see adhesive would work though as there are generous tabs and flaps, no trying to glue the thickness of a brass sheet against another here.

One hint - be careful with the chimney. If it falls on the floor, you'll never find it. Good job I had suitable brass wire to hand.

Everything went together perfectly with no fettling required. There are complicated parts however, the door frame involves more components than you might expect but it's fiddly rather than difficult.

Etched hut


Monday, March 16, 2015

Old fashioned Moggie

Man and moggie

Back in what we call "the good old days", if you wanted a model car, you had to build the thing yourself. None of this nipping down the local model shop for something diecast. When Melbridge Dock was built, the only scale diecast cars were a set of open-top sports numbers from EFE. And you had to buy them in sets of four.

Wanting something more traditional for the corner of the layout, I picked up a Springside four door Morris Minor whitemetal kit.

It wasn't pretty.

My experience of the firms vehicle kits has never been good - part fit is often poor and they don't look quite right. Odd really, as the same people produce loco kits that in my (and others) opinion are superb.

The Moggie kit included 2 roof mouldings, which was handy as I used both of them since neither was long enough. At the time, I'd have been much happier with a diecast. As I recall, the model is soldered together. That sounds harder than glue but when making two roof parts become one (to paraphrase the famous Spice Girls song on the subject of kitbuilding) it's easier as the "glue" is also a filler.

None of this explains why, when searching through my stash of old kits, I found another example. Must be a glutton for punishment...

Springside Moggie kit box

Sunday, March 15, 2015

Leamington 2015

Micro layout

An even more narcissistic post than normal today I'm afraid. At Leamington I had taken both Melbridge Dock and Owen's Bridge to display which meant very little time to look around the show. To be fair, Owen's bridge made life a bit easier by being a static exhibit all weekend now the loco has given up the ghost.

You've already heard that Melbridge ran extremely well so I'll not go on about it. We weren't half glad we brought a rug to stand on behind it, that concrete floor is super hard.

Saturday started as any show - people out the front but no-one talking or even smiling. This changed through the weekend though and Sunday, which thanks to a real push on family tickets was as busy as Saturday, was a blast with loads of chat and several visitors questions answered.

Bus peeking

Outside the barriers, the layouts that caught my eye were Sidmouth by Richard Harper - P4 on it's first trip out. Beautifully modelled with some excellent structures.

I also loved Hobbs Row Halt at the top of this post, but then I love a micro layout and this one might be a bit of a gimmick but isn't it full of character?

Trade was better than ever with a new supplier to me, Severn Models, enticing me to hand over money that I hadn't expected to spend. Elsewhere I picked up big sheets of plastic, many half reels of wire from the second hand stall and a few other small bits.

Sausage Bap

Food, well I didn't get any cake but the cafes sausage baps at £2.75 each were a filling bargain and kept me going all Sunday even though one of the whopping bangers rolled off on to the floor and had to be discarded.

Excellent show - possibly the best the club has ever put on.

Photos on Flickr.

Saturday, March 14, 2015

It's not an automatic railway...

Controller

So there I am, operating Melbridge Dock quite happily and someone asks, "Is it automatic?"

No it's not, I reply and show them the hand held controller.

"Oh, I could see you changing the points but didn't see anything else so I assumed it was some clever automatic system. "

This happened 5 times over the last weekend.

I'm obviously too casual about all this. Leaning on the backscene making the layout work with the controller in my paw. Maybe I need to look like I'm dragging cast iron levers around and sweating like a pig. They might think I'm doing some work then...

Friday, March 13, 2015

Last half hour motive power

If you want to see some interesting motive power at a model railway exhibition, you need to hang on until the end of the day. While we might be oh so sensible most of the time, the last half hour is when decide we don't really care so much.

On Melbridge Dock, the rule is that all wagons are shunted off the layout with a loco. No picking up things by hand. Sometimes it's nice to run stuff that's been sat in the cabinet all weekend.

Garratt on passenger train

For a three coach passenger train, you don't really need a Garratt. But we have one and I like to run it.

Titch and tarpaulin wagons

Titch, the petrol powered shunter isn't particularly powerful thanks to only being driven on a single axle. Rev it up a bit though and it can still haul a few wagons around.

Ruston Shunting vans

Thanks to a bonnet full of lead, our Ruston 48DS is rather more capable than the prototype was and can easily handle a siding full of vans.

Thursday, March 12, 2015

Clockwork Tamper in BRM

Deadlines were tight for my contributions for the latest issue of British Railway Modelling.

I do my best to plan projects so they are ready well ahead of the deadline days but sometimes, events conspire against me and there's a few late nights required to push everything out of the door. Chuck in an exhibition absorbing a weekend and some illness picked up at that show and it's wonder that some of this was finished at all.

Anyway, this month you'll find me taking a look at baseboards in both ready made and kit form. 

Baseboard kit

Thanks to the good people at White Rose Modelworks, I found myself with three different options to examine on the DVD and in print. Buying in baseboards is something I've never considered so it was fascinating to have a good look at the products.

If you are going to spend money on a layout then a good, solid and flat baseboard is an excellent way of doing it. Too many modellers mess around with terrible woodwork telling themselves they can bodge it later. It doesn't work and you are never satisfied. That's why I get the wood cut for my boards by someone else!

Once you have your boards, you'll be thinking about scenery and so I've built a fairly entry-level cardboard kit for an engine shed.

Engine shed

Me being me, I couldn't help but make a few mods to the basic model and have fitted some basic interior detail. Not a difficult job but when you look through the doors, it certainly improves the model.

Continuing the kit building theme from the last few issues, I've given a quick run-down of the different types of loco kit available along with some pros and cons of each.

Finally, the kit that caused me all the trouble. Clockwork ideas Plasser 08-16 C80RT ballast tamper.

Ballast Tamper

This is a truly astounding kit, The most multi-media model I've ever built. The largest (84 page) instruction manual I've ever followed. Possibly the best designed kit I've encountered.

You'll need to buy the mag to see the whole journey through this project. Looking at the box I'd thought "A couple of days will have it ready for paint.". In the end, I reckon I spent at least 50 hours on the model, plus painting.

And I enjoyed every one of them.

I only wish I'd allowed more time for the build as it was easily one of the most enjoyable I've had for years. There are a lot of steps but most are easy and all seem to advance the project. It's a bit like reading a really good novel - you just want to keep turning the pages.

The plan was for me to hand the completed model back to the supplier for sale. By the time I'd finished it I couldn't bear to let it go and handed over my own cash to keep it. While I have no need for a modern tamper, some models are just a joy to build and to own. If you can justify a vehicle like this, head over to DC Kits and give your credit card a hammering. It's worth it.

Full details of the April BRM.

Wednesday, March 11, 2015

Wooden doofer

Wooden Doofer

One consequence of not having taken the dock out for a few years is that it's easy to forget important bits of exhibition kit. One of these was the cable connecting a transformer to the point power. I'd taken some orange cables I didn't think we needed from the exhibition box and removed one too many. Good job the show was 10 miles from home or I'd have been improvising with bits of wire.

The other big omission was the "doofer" from the tool box. This is a sort of scriber with a point at one end and a paddle terminating in a slightly concave curve at the other. You could buy them off every tool stall at a show 10 years ago but I haven't seen one for ages.

We employ the dofer to prod down sticky couplings Sprat & Winkles might be 95% reliable but every so often you need to give them a hand, especially when you won't treat them like fragile china.

No problem - I cut the end from a coffee stirrer with some wire cutters and then filed a concave end.

Perfect. Another use for these ever handy refuges from a coffee shop.

Tuesday, March 10, 2015

DJH Barclay at work

Barclay Shunting

The Barclay was one of my Hornby Magazine projects years ago and while it looked great, I'd never actually tested it other than a couple of trips up and down a straight test track to prove that everything worked. Now fitted with new couplings, this could change.

I was genuinely interested in how this would work. There is an old thread on RMWeb where several people decide before building the model that DJH don't know what they are doing and re-work the chassis with a new drive system. That rather defeats the point of an easy-build kit aimed at beginners to my mind - if all you want is a Barclay kit then there are plenty of etched alternatives that are cheaper and possibly more detailed.

Not that this is unusual on t'Internet. For years I've been a member of a VW camper forum where various readers have removed heating control bellows and disconnected cooling fans to replace with electric versions. Others then point out that they are assuming their engineering skills are better than those on offer to Volkswagen. If they could have left bits out, they would have done (changing the boot lock button from chrome to plastic saved millions) so it might be a good idea to undo the "improvements" forthwith.

Anyway, my "vanilla" Barclay was lightly lubricated and set up on one of the fiddle yard roads. It spent Saturday shunting away happily, never missing a beat. There is a slight squeak in reverse but I have a feeling that some grease on the gears will sort that. It's not bad enough for me to have fixed it immediately.

Conclusion: This is a good kit that works well if you build it following the instructions. Ignore the people who tell you you must rip out the innards. Keep it simple and enjoy the loco trundling around. You can make your second build complicated if you must. Just finish the first one - it's more than most do.

Monday, March 09, 2015

Updating couplings

Coupling fitting

When I build rolling stock for a magazine feature, it generally has to be fitted with a traditional tension-lock coupling. However, on my layout, I use Sprat & Winkles.

With Melbridge Dock out last weekend, I decided it was time to retrofit S&W coupling bars. After all, the items of rolling stock had long since appeared in print and it seemed a shame not to be able to run them.

As you can see, the process is pretty simple. Pull off old tension-locks with pliers. Then place the model on my coupling height gauge. Balance a bit of wire or thin dressmaking pin sans head and point on the gauge. Pop some superglue on the bufferheads and roll the loco up to the wire/pin.

Leave to dry and then paint the buffers and coupling wire with some weathered black paint. Then place the loco on the layout and enjoy!

Sunday, March 08, 2015

BEN JONES ATE MY TEACAKE

Tunnocks Van

You see above, a delightful limited edition Peco N gauge wagon. Only available from ModelRail Scotland last weekend, it celebrates the countries greatest contribution to culinary matters, and their most delicious export - the Tunnocks Teacake.

As I wasn't attending the exhibition, I arranged for Ben Jones to collect it for me. As the editor of this countries premier model railway magazine, I felt he could be trusted with this task.

I was wrong.

You see, each wagon was supplied with a delicious Tunnock's teacake. Yet, when the wagon was handed over, no teacake was present. I had been robbed.

The crime scene
After reporting the crime to the local Polis, an Inspector Tagart took my details and ably assisted by PC Hamish McBeth proceeded to look for suspects. 

Obviously there is and obvious perpetrator of this heinous crime, the man tasked with collecting the wagon and teacake in the first place - Ben "Le Train Spotter" Jones. A man who plainly cannot be trusted with chocolate based marshmallow snacks.

Tagart was quickly on the case, "Help ma Boab! It's a braw, bricht, moonlicht teacake" he said which according to Goggle translate means "Don't worry sir, I'll not rest until I crack this case. We take teackake rustling very seriously in Scotland."

It is believed that the suspect is hiding out in Glebe Street, Kintore, possibly disguised as Horace Broon. If you spot him, Polis advise that you hide your chocolate.

Saturday, March 07, 2015

Shunting

01 shunting

On Melbridge dock, a Class 01 diesel, built from a Judith Edge etched brass kit propels a shunters truck made from a long forgotten whitemetal kits. In the background is a vanwide from Parkside Dundas.

The boxes and barrels are from Kibri (now available from Knightwing), the people from Langley. The warehouse is scratchbuilt from Dalerboard and plastic sheet.

Track is SMP code 75 rail soldered to PCB sleepers. Cobbles from Slaters Plasticard. Point lever, a whitemetal item from Springside.

Nothing in this picture is RTR, even though it is all OO.

If you want to see this in the flesh, head over to the Leamington & Warwick MRC exhibition this weekend.

Friday, March 06, 2015

Exhibiting at Leamington this weekend


As you might  have worked out from this weeks posts, I'll be spending this weekend behind Melbridge Dock and Owen's Bridge at the Leamington & Warwick MRS exhibition this weekend. 

There will be loads of good stuff to see so why not download the programme and have a look. Then get in the car, or catch the shuttle bus from the station, and join us on Saturday or Sunday.
 
Do say hello when you arrive - as I always say, it's nice to know people read this stuff.

Thursday, March 05, 2015

Two 03s

03s

For various reasons, I'm in possession of the latest incarnation of the Bachmann Class 03 diesel. I've owned the Mainline version almost since it came out so it's interesting to compare the two.

My model (on the right) is always the first loco on to Melbridge Dock at the start of each day. It's a tradition that is so old I can't remember how it started, however w stick with it. The loco works one train and then isn't seen until the next morning. I reckon people prefer to see kit-built models, or at least I prefer that they do. I didn't go to all that trouble to run RTR!

Anyway, how do they compare?

Not that badly actually. OK, my model has been worked over with a little detail and flush glazing but the Bachy one is factory weathered and two decades newer.

Old loco has moulded lumps for bonnet door handles but those along the top of the bonnet might be chunky but at least they aren't wobbly in spite of several repairs. The old green looks better to my eye too.

Fuel filers are more prominent on the new model and the rivets a bit more subtle. Old loco is missing handrails around the front steps but I prefer the treatment of the front grille.

The older bonnet itself is a little chubby and you don't get any cab detail but then I'm not seeing that much inside the new version either.

My hand weathering is much better than the factory stuff - I think I see clean bits on the wheels where the con rods shaded then from the spray paint.

Overall, my loco retains its space in the stock box. No heading down the model shop for me this time.

Wednesday, March 04, 2015

Barge boards and seagulls

Barge Board fix

After 25 years, even when stored on the dark, plastic sheet can become brittle. At least that's my excuse for the damaged barge board on the stone warehouse. If the plastic had been fresh, then when I whacked it while moving the baseboard around, it wouldn't have broken would it?

After pondering filling the hole, I decided replacement would be quicker. Partly this is because the sheet is very thin but mostly due to the Deluxe Materials filler being dried up in the tube.

Carefully carving the old bargeboard away with a knife, I was surprised to find we'd not continued the stone effect to the edge. No idea why, but it was a long time ago. Anyway, holding the sheet against the roof allowed me to work out the replacement size and this was glued on with solvent free UHU.

A coat of track colour followed by a wash of Humbrol 66 and you'd never notice the repair.

Seagulls

On the back of the layout there are the words "7 seagulls" written in permanent marker. Shortly after we started exhibiting the model, people in the crowd started counting the sea birds and asking if they had seen them all. Since we couldn't remember how many there were supposed to be, we wrote it on the backscene.

It's a good job I counted them again as one had gone AWOL while in storage. The birds are Springside castings so I've painted a replacement and a spare for the weekend. I'm not going to tell you where it will land, that would spoil the spotting fun...

Tuesday, March 03, 2015

Mouldy

Spotty Dock

While electric woes might have been minor on the Dock, across the cobbled areas, there were little spots of what looked like mould.

At first, I was tempted to pretend they were some sort of weathering effect but I don't think anyone would be convinced. They had to go.

Rubbing with a dry finger removed the muck from the tops of the Slaters cobbles but not from the valleys below. A wet finger worked better but still didn't remove all trace. I had a feeling that the remaining residue, even though microscopic, would have been back anyway.

A bottle of Coop anti-bacterial spray was acquired and some of the liquid poured in to a plastic cap. Dipping a cotton bud in and then rubbing it on the mould removed the mark straight away. Left to dry, the clean cobbles stood out a bit but only because they were clean of dust. At least the paint stayed put, something I'd been worried about with more vicious chemicals.

Cotton buds are fine for ears but not for model railway layouts so a softish bristle brush was tried next. This worked perfectly and within half an hour, the cobbles were clean, even in to the nooks and crannies around barrels and boxes.

Only time will tell if this is a permanent fix but at least it's a quick one if I have to repeat it.


Cobble Cleaning

Monday, March 02, 2015

Fixing a dry joint

Fixing a dry joint

Amazingly, despite the layout's long storage, I plugged it in and every point motor tested worked straight away. Maybe the one into the front siding is a bit lazy but then it always had been - a shot of WD40 usually cures this if it becomes a problem.

This just shows how good Peco point motors - even ones over 30 years old (not all were new when we built the layout) can be. I can't have done too badly with my soldering either. The technique of making a joint, letting it cool and then giving the wire a tug presumably showed up anything dodgy at the time.

Better still, the text loco happily trundled around the track showing this works. Only one problem showed up - a dry joint in one rail on the front siding.

Spotting this was easy - the loco stopped as it made its way along the siding but when a screwdriver blade was jammed into the joint, it started up again.

Our track is home made using SMP code 75 nickel silver rail soldered to copper clad sleepers. No fishplates are used and I've always been too lazy to bond rail ends with little wire jumpers. That always seems to be too much work for a very limited improvement in reliability. Perhaps this is only fine for small layouts, but I've yet to be convinced otherwise.

Anyway, the joint had obviously failed in the past at a show and I'd just heated up some solder to a big blob to the bridge the rail gap. The resulting silver lump on the sleeper end wasn't pretty so it was time to do something about it.

First up, the solder was heated and removed with a sprung solder sucker.

Then the rail side was cleaned with a small screwdriver and then a round file. I wanted shiny metal to solder too.

A small length of brass wire was tinned, cut to length and then held in place to bridge the joint with tweezers.

Using lashings of flux and a tiny amount of solder, the wire was fixed in place. Result - a nice neat joint with good electrical conductivity. A touch of Railmatch underframe dirt was applied after the join had been cleaned with turps to remove left over flux.

Hopefully, I won't be doing an unscheduled soldering demonstration at the show this weekend!

Note: If you think I sound smug because there were so few electical problems, you are correct. My smugness glow can be seen from space.

Sunday, March 01, 2015

Return of the Dock

Sandwich man with ring

The reason we were in the storage container yesterday is that it's time to unearth Melbridge Dock for testing as the layout is due to appear at the Leamington & Warwick MRS exhibition next weekend.

The club is celebrating it's 40th exhibition and the Dock will be marking it's quarter century since first appearing at the Town & Country Festival back in 1990. This is one old layout. A well travelled one too - at best guess the number of shows attended is around 100. Far too many for our badge board for a start!

I can't remember the last time we took the layout out  on the road but it's at least 3 years ago. Since then it's been stored in an unheated ISO shipping container. We do wrap the model up in plastic and an insulated bag bought from a furniture storage supplier.

Will it work? Watch this space for updates.