Wednesday, February 29, 2012

Lots of little people

People

I have a box of model people. When I need a person, I tip the box out and dig through. Most of the time I find something suitable.

What I don't know, is where all these people come from. There's all sorts in there.

  • The yellow fronted airman - he came from an Airfix Sunderland Flying boat my Dad made me many years ago. The model got battered and was eventually binned but I kept the people. One day I will build the kit again and re-fit them.
  • Some ancient Egyptians were from a random interesting box bought over 20 years ago. They are an odd scale but then since I'm unlikely to build much old Egypt, it probably doesn't matter.
  • There are several packs of Airfix civilians. Some are soft and flashy, others harder and cleaner  from the days when the mould was young.
  • The bowler hatted man is from a Lledo "Day's Gone" vehicle set. When these first came out, they included some very nicely modelled people. Usually the the wrong scale but it didn't matter.
  • A pink guardsman is probably from a Christmas Cracker.
  • There's a Merit cow and the clear, plastic base of a pre-painted figure. I've never bought any of these as they were far to pricey for my pocket money so it much have been in a box of bits.
  • The HO scale population on sprues surely arrived the same way. Some of them really are an odd shape.
  • Some of the better whitemetal people come from Linka. The rather less detailed ones come from road vehicle kits where their deficiencies won't be noticed.  
  • And the Astronaut - pure Airfix bought back in the 1970's when all things space were exciting to a young boy.

Tuesday, February 28, 2012

Grease the footplate

Footplate part 1The 01 diesel kit is a bit different from the norm in its design. With most diesels, you solder the body to the footplate. Here, the design allows you to unbolt the two parts to make painting easier. It's the sort of thing that serious modellers talk about doing, and to the rest of us sounds good but is too much work.

Not this time - a sub base is provided which is bolted to the footplate and then the cab/bonnet parts are built around.

The instructions suggest greasing the two parts before bolting them together. Then the brass nuts are soldered in place yet hopefully the two parts can still be separated. Supplying steel bolts is an excellent assistance to this too. Soldering steel is a pig of a job requiring flux as corrosive as the blood in the creature from the film "Alien". I've done it but it's horrible. And you have to travel across the galaxy and kill a vicious extra-terrestrial.

Anyway, I started by colouring in the two parts with a CD marker. Solder hates dirt so let's give it some where we don't want it to go. Then some Vaseline lip balm was smeared all over sub-base. Finally, the bolts were oiled and the two parts bolted together.

With some trepidation, I fluxed each nut and soldered it with the minimum of solder. After this cooled I gingerly tried the bolts and was pleased to find every single one turned ! OK, so this whole procedure took a bit of time, but it's a heck of a lot easier than trying to free a soldered up fixing. Ask me how I know !

Footplate part 2

Monday, February 27, 2012

Brighton Modelworld 2012

TerrierWith last years Modelworld being so good, and my Dad having a significant birthday on yesterday, we decided to give the show another go. A quick check showed that a train trip would cost more than buying an aeroplane, but it's only a couple of hours drive.

Travelling on a Sunday seemed a good idea. The M25 would be quiet and there probably wouldn't be a queue to get in. Most serious modellers go to shows on the Saturday so they can enjoy being shoved around in crowds and struggling to see things. The second day will always see only 40% of total attendance with consequently quieter gangways.

Well, the M25 bit worked OK. After a stroll along a sunny sea front, we still had to queue up for a few minutes to get in. I'm not moaning - this is the sign of a good and popular show. They had even provided us with a Terrier locomotive to look at while waiting ! Anyway, the show was crowded but getting around wasn't a big problem.

At this point I expect you are thinking I'm going to ramble on about the model railways. You'd be wrong. There were layouts and plenty of them but to be honest nothing jumped out at me as much as previous years. Those I liked I'd seen before, but then I have attended a lot of shows recently. No, there are trains but we don't go for those, we go for the mix of hobbies under one roof. If you take the toy-train blinkers off, then there is good stuff to be found.

Lego Westminster AbbeyFirst up, Lego. Yes, it's for kids but they don't build a huge model of Westminster Abbey. How this thing is moved I don't know but it must be a challenge. On one side the building is complete and very recognisable. On the other it's open and you can see the interior detail and congregation. To top it all off (pun intended) the attendant looking after it was wearing a hat that looked like a brick, made out of bricks. I think I might have plans for fashion range...

There were also a couple of Lego railway layouts featuring trains that looked very much like real British ones. A 0-4-4 tank was running well as well as a tube train and couple of pannier. OK, it's possibly not "real" model making, it is impressive and looks much more fun than trying to make a P4 layout work. For the older plastic brickie, there was a big display of Betta-builda from the 1960's. Their centrepiece was a 5 foot tall Leaning Tower of Pisa.

Moving on, I had a go at a radio control car simulator which saw me trying to pilot a model stock car around a carpet circuit and failing miserably. The demonstrator made it look so easy too. A bit later on we watched the real (model) things trying the same tricks and doing not much better than I was. Well, apart from clocking up a lap every 3.5 seconds that is.

Lizze Class LifeboatDown at the boat pool there were lots of vessels on display including possibly the largest number of lifeboats I've seen under one roof. Several were of types I'd not seen before including the Lizzie class - from the books by Dora Thatcher. Lizzie is the RNLI version of "Thomas the Tank" and very nice she looks too. I'll keep an eye out for the book - the model looked lovely.

With the 100 year anniversary of the Titanic sinking, there were lots of examples on display from tiny Lego ones to radio control versions. Lots of memorabilia was on show too. The only downside was that while the model was shown off in the pool, that dreadful Celine Dion song was being played. The one that makes you wish the thing had sunk faster and with one more person on board...

Tiny working railwayI suppose I should mention one railway layout, which was in the dolls house section of the show. It was minuscule and yet appeared to work rather better than many larger versions. Sitting on top of a lunch box, the train moved around the oval of track as smoothly as you might wish. Closer investigation leads me to think that a toothed belt is involved but I can't be sure. I would like to have a go at making one myself though.

If there is an indicator of a shows interestingness, it's probably the number of photos I took. Despite ignoring most of the layouts, I still managed over 80. There's no rhyme or reason to my choices, just that I found the models interesting. You get plastic cars, boats, trains, Daleks, buildings, and a toy atmoic power plant. Some of these have been uploaded to Flickr and others will join them in a few days time as I concoct blog posts around them.

See the photos on Flickr

Sunday, February 26, 2012

Longer life through hobbies

KMBC crowd

The government has been issuing reports that people who stay in touch with other, avoid loneliness and live for longer. Their suggestion is that we should all stay in work until we die.

That sounds rubbish to me. If you want to encourage people to stay social and live longer, promote access to hobbies. Look at the picture above. That is a Thursday morning at our boat club. 22 people have chosen to come down to the lakeside in February. Some have travelled many miles to do this. All will have to build models to sail and when they get to the club, they chat away and enjoy each others company.

What support does the club get from the government for this useful social service ? Nothing.

Indeed if we shout about our hobby, the media treat us worse than terrorists and yet it's sitting in front of the telly vegetating that is the cause of many early deaths as the viewers switch their brains off. If I were a cynical person, I might suggest that this is exactly what the government wants. They say they want you to live longer but in reality our MPs want you to peg out quickly so they can spend your pension on duck houses or speeding fines.

Look at this way. If the budget doesn't include the removal of VAT from model railway and boat products then George Osboure hates you. Just remember Ossyborne, us modellers are a bad bunch to upset. We're more tooled up than a branch of Halfords. You might want to rethink your plans once you find yourself at the business end of an Olfa Plasticard cutter.

Saturday, February 25, 2012

Animation experiment


My first animated film was produced at the age of 9 using my Dad's Standard 8 camera and a set up with loads of lights in the corner of my bedroom. The subsequent film was shown to the local cine club to great (probably polite) applause.

I learnt a lot from the experience - mostly that it's a good idea to come up with a plot before you are half way through the expensive roll of film. Needless to say, the cost put me off a second epic.

Nowadays things are a lot easier. Da kidz can do what I did with digital cameras and computers. The lucky gits can even buy Lego Film Studios where you get the sets and camera ! They have it far too easy. In my day mutter, mutter....

Anyway, I've always wanted to do one of those films where a Lego model builds itself and finally had a go a few days ago. Thinking I'd buy a nice, new set, I searched central Birmingham. This drew a blank - how ? - but the Pound Shop supplied me with one of those knock-off versions that have appeared since the good people of Denmark lost a copyright case a few years ago. Best-Lock brick are sort of like Lego but cheaper, shiny and don't fit quite as well. I disapprove. They do Army stuff too, which is distinctly un Lego. Booo.

Shot on a stills camera and then thrown through Microsoft Movie Maker, the film above is a bit of an experiment. This time I learnt that you have to put a lot of effort into marking the position of the model and lining up the camera. On the other hand, the thing only cost a quid and I enjoyed making it, so who cares ?

On the other hand, perhaps time-lapse is the way to go...

Friday, February 24, 2012

The Footplate

Footplate built

I'm not sure about this motor - it's too big to go through the hole provided in the footplate without a bit of wiggling. I've offset the thing to the side a bit and so it's only the electric connections that are in the way. More of an issue is that thanks to the back of the under-bonnet hole being in the way, it can't lean back as far as it should.

A little modification might be in order soon.

On the other hand the rest of the footplate is a joy to build. The buffer beams were fitted in the half-etched lines provided. I did this with the footplate off the chassis in contravention of the instructions, soldering around the frames doesn't seem that clever to me. Or maybe I'm just not clever enough to do it successfully. Two sets of beams are provided in case you are building an industrial loco with deeper requirements.

The front steps are brilliant. A quick fold makes the basic box and then the treads slot in to holes in the back, to be soldered from the rear. No cleaning up ! At the back, the treads fold to right angles and have to be laminated in place. I managed this with heat and flux as I couldn't be bothered to set up the RSU, although this would have made it easier. On the other hand, a half-etch locating line under the footplate is so much nicer than trying to position steps by eye under a cab doorway.

One change I made was to use bigger bolts to join footplate and chassis. 10BA rather than 14BA. Can't be bothered fiddling around with tiny fixings if I need to do anything during a show. My only regret was fitting the nuts too early and not having a flat top to the footplate while I was attaching all the other stuff.

Thursday, February 23, 2012

A great big motor

Chassis on wheels

When I bought the 01 kit, I must have asked which motor and gearbox was recommended and bought them at the same time. I know this was Railex so supply wouldn't have been too big a problem unlike many shows.

The instruction say you use a bit of a whopper for such a tiny model locomotive. Specifically a MH1024 motor in a Markits MM210 gear mount. That motor is better know in the klitbuilding fraternity as the DS10. It's been around for at least 30 years and it's brothers have powered many a kit-built engine around layouts across the world. It might be old technology, but it works.

The gear mount is the usual fold-up jobbie and as seems the case every time I get one, the motor mounting holes were in the wrong place. Yes, they held the motor but the 40:1 gears weren't even in the same postcode, never mind in mesh.

My usual trick is to file the screw holes into ovals so the motor can be tweaked up and down. The central holes for the shaft to poke through was also wrong but instead of altering it, I just hacked away a chunk of the massive plastic boss that the shaft emerges through. Heaven knows what it's there for (go on, someone tell me I've done a bad thing) but the motor still works after my surgery. It might have been prudent to test it before I did this though.

The unit drops in nicely between the frames. Even in OO there's loads of room. With some leads attached the chassis was soon scooting around the modelling board. The mesh isn't perfect, it rattles in reverse which means I need to tighten it up a smidgen, but it works well enough for now.

One point, the motor has a shaft coming out of each end. To remove the excess from the top you are "supposed" to file it away or use a min drill. I can't be bothered and suspect both methods would generate bearing melting heat. I find my decade and a bit pair of Zebra wire cutters works just as well. I just have to keep my face out of the way of the waste shaft as it tends to fire off at supersonic speeds !

Wednesday, February 22, 2012

01 Chassis

Jigged Chassis

Starting at the bottom of the loco as usual, I made up the coupling rods, the shorter of which you can see in the photo.

Next, the sideframes were joined with the two main end spacers. Everything checked out as nice, square and flat. Handy hint at this point - don't used a spare wing mirror glass to check, they are slightly curved. Guess how I know.

The rods were then used to align the axle bearings, it's important that the centres of these are the same distance apart as the holes in the rods if the loco is ever to run properly. I jigged the front axle to crank axle set as well but couldn't be bothered to take a photo of this. And yes, the rod does run from the front to the crank, not the back. That's the class 06 that does that. Yes the two locos do look very similar. Being a Scottish company, Barclay didn't waste money of design if they could help it. Or stuck to a "brand image", you decide.

Once happy, I added a third spacer in the middle at the bottom because it will be used to support the pick-ups. Then the two outer strip ones because I'd paid for the bits and wasn't going to waste them even though I can't see what they are supposed to add to anything..

Tuesday, February 21, 2012

A fresh pot of flux and some nice shiny etches

Fresh kit and flux

My old pot of Copalux flux has run out. The dregs in the bottom are more detritus than soldering aid. Time to bury it in the bin and break out a new pot.

Opening the lid reveals a fresh opalescent cream. Were the outer printing different, I could imagine it being sold as a repair for the twenty signs of aging (women) or the 5 signs of fatigue (men - although it's the same stuff in the pot). It almost looks good enough to eat.

The compliment the fresh flux, I need a fresh kit and so out of the pile comes a Judith Edge models Class 01 diesel. Bought over a year ago, I had intended to put this model together fast and try to lodge it in a magazine. Another idea that got away from me.

Never mind, the box has now been opened and a start will be made. Those brass etchings look lovely, all the bits are in the box including motor, gears and wheels. Actually, not only are all the bits for this model in the box, so are all the bits for a 4-wheel railcar that I'd completely forgotten about...

For those not familiar with the prototype, the 01 is a short wheelbase 0-4-0 shunter produced by Barclay. I need one to fill in my 01 to 10 set. Once upon a time there was a version built on a Dapol Pug chassis in my collection but it was in the stock box that was stolen. Now, at least, I'll replace it. The original was pretty good (correct wheelbase and size) with a scratchbuilt body that I was pretty proud of at the time.

Wikipedia on the Class 01

01 kit

Monday, February 20, 2012

Tie bar repair

Tie BarPaul asks: Have you come across Peco points where the switch rail comes adrift from the tiebar? If so, any thoughts on how to repair whilst at the same time preserving the overlock spring action ?

The simple answer is no I haven't. Apart from a single barely used 009 example, it is at least 15 years since I used a Peco point in anger. All our trackwork is nickel silver rail soldered to PCB sleepers.

Switch rails do come adrift from tiebars with this system, especially since we use Peco point motors with a nice healthy thwack to change the route. It's a pain but a few seconds with a soldering iron usually fixes things with added bonus of giving a suitable weapon to stuff up the nose of the idiot who decides to display his "expertise" on why you've done it wrong.

On a plastic tiebar, this isn't going to work. Well, not unless you consider reducing the point to a melted lump that smells like the sinuses of the aforementioned "expert".

You could consider replacing the tiebar with a PCB sleeper. It will need the copper-cladding scraping away to insulate one side from the other. The soldering will need to be a bit nifty too unless you want melty sleepers.

Another issue is that this will remove the locking mechanism but here, all is not lost. Use a Peco point motor and the adaptor base to mount it under the baseboard and locking is restored. The adaptor base has an over-centre spring in it too. Sometimes this has to be removed if the solenoid isn't strong enough to move two springs.

Apart from this, I think you are in for some point replacement. Unless an reader knows better. Please suggest away in the comments box and lets see if we can find a solution.

Sunday, February 19, 2012

Nuclear Train

I pick up all sorts of rubbish sometimes. Last weekend, among the goodies for sale was the booklet "Facts and Figures about British Railways  1957 edition"

It's a bit of a dry read, what with being all facts'n'figures and all, but there is a little gem on page 31 where they talk about the (then) new-fangled diesel traction:

The possibilities of the use of atomic power have not been overlooked. The expert, however, advise that the supply of electricity from atomic power station is the likeliest development and not engines carrying their own power units.

At this point I'm thinking "Wow, someone thought it would be a good idea to have trains with nuclear power plants running around ? I wonder what such a loco would look like.

Anyway, that was where this post was going to end. Perhaps a little speculation or comment on the lack of futurist model railways, but that was it. I've been spending all hours at work this week and any time normally devoted to model making has been used instead to show "Happy Feet 2", a film whose only plus point is that it isn't "War Horse" which I've seen three times and will probably be watching again while you read these words.

Google changed all that. Searching for "Nuclear powered train" out of curiosity, I find this article on BarentsObserver.com entitled Russia designs nuclear train. Fascinating.

Better still, they link within it to another piece which has pictures. The text is Cyrillic and thus a bit impenetrable (I know, Google translate but it's not great with technical stuff). Who cares. I want to build me one of these - what a locomotive !

Saturday, February 18, 2012

A bit of vintage Ian Allan

Sea Lion on a book cover

Rooting through a pile of pamphlets on sale at a show, I found this little gem.

Published by Ian Allan, it lists the locomotives of minor railways up and down Britain. My interest was in the Isle of Man stock list along with one or two other lines - the sort of things I aspire to model even though I know they would make terrible exhibition displays.

There's all sorts of stuff in there: Eaton Hall Railway, Snowdon Mountain, Snailbeach, Wantage Tramway, Corringham Light Railway and many others. For weird railway anoraks, it's the spotting book we'd like to go back in time to fill in.

The one fly in the ointment is the front cover. I didn't spot the problem initially but once I did, it's a horror.

That locomotive is Sea Lion from the Groudle Glen Railway. My favourite loco. Had the artist ever seen the real thing ?

Sea Lion on train

Friday, February 17, 2012

I don't know what this tells me...

Wrapped kitI've been building a few plaster kits for model railway buildings recently.

One thing I spotted was that both the kits from Ten Commandments and Townstreet Models arrive wrapped in newspaper. The same newspaper. Specifically the Daily Mail.

I'm not really sure what I can conclude from this. Perhaps producing model railway items in plaster makes you believe the world is going to hell in a handcart ?

Or maybe exposure to the writings of Richard Littlejohn throws a switch in your head that sends you toward the plaster section of B&Q ?

Whatever, checking this out did remind me of my schooldays. When we had art classes, the tables were always covered in newspaper for protection. Sometimes, the teacher even managed to remove Page 3.

Thursday, February 16, 2012

Lego Lorry

Lego 257 Beford Delivery Truck

Actually a HO scale Bedford Delivery lorry dating from 1957. It really is made by the famous brick maker Lego though.

Anyway, many years ago they produced a range of plastic vehicles that could be "driven" into garages of Lego brick built houses. The range included quite a lot of very covatable Volkswagens which fetch premium prices on eBay. Get one with its showroom or garage and it's worth the price of a good RTR model locomotive.

While I can't comment how accurate the mouldings are, the model looks pretty good. If you replaced the wheels with something finer and gave it a coat of paint then you'd have a pretty good model for your layout. Those wheels are metal by the way and surprisingly heavy. This accounts for the excellent rollability of the otherwise lightweight model.

I picked this up because I love Lego. Most of my youth was spent playing with the stuff and I still have a sneaking regard for grown-ups who won't let convention stop them enjoying it.

More on this model here.

Wednesday, February 15, 2012

Quiz question

At the Doncaster "Festival of Railway Modelling", there was a Children's Layout Competition. An excellent idea, kids have to answer quiz questions about several layouts. This encourages them to look at the detail rather than just the trains. Presumably there was even some sort of prize on offer.

Question 10. Flockburgh - What colour tie is the man on the platform wearing ?

Hmmm, difficult. Do they mean:

Flockburgh Figure 1

This one ? In which case red. Or:

Flockburgh Figure 2

This one standing next to a 1950's issue Queen Elizabeth ? Still red though.

Flockburgh Figure 3

He's been waiting for a long while for that train and his tie is black. I must glue that wall down properly too...

Flockburgh Figure 4

More black tie and an orange one that I probably did in Precision paints lining orange.

Flockburgh Figure 5

More red ties on these two chaps. On balance, most people went for red although some tried for a more complex answer listing the men and their tie colours. It just shows though that you can never be too careful when setting something like this. Sadly, no-one took up my offer to paint the ties a weird colour in exchange for 50 quid in cash !

Modellers note: The figures are 1:100 scale models from Preisler. They are supplied unpainted and look a lot better in real life than these photos might suggest. The famous figures include the Queen, President De Gaul and Teddy Roosevelt plus some others I've forgotten.

Tuesday, February 14, 2012

Doncaster 2012

Big Banoffee PieWe watched the weather reports on Thursday with some trepidation but Friday dawned clear of the apocalyptic snow that had been forecast. Even the side roads near Wellesbourne Airport, my venue for Lunch, were clear so the motorways weren't expected to give any problem, and so it turned out.

The show was a decent size and had a surprisingly good mix of trade. Some of the BRM events are are "box-shifter" heavy but here you got a real range of RTR and specialist trader. Layouts were less varied but then they are based on those that have appeared in the magazine so it's more important that you get to see things you've read about rather than an esoteric selection.

Talking about reading, the one thing you must do before taking part in a Warners organised show is read all the paperwork. Not just the first paragraph but every page. If you don't then you'll turn up at the front of the building and not around the back where you can unload the layout.

FlockburghLikewise, you'll know to bring a receipt for fuel along so you get your expenses and not have to wait for a cheque. You might even have the right sort of extension lead (not a wind up one) although no-one noticed and I didn't shout about it.

To be fair, this is all on the paperwork and the efficiency of organisation is exactly what you would expect from a professional outfit. OK, you don't get the sort of assistance with loading and unloading that a club might offer but then the floor is marked out and people know where you have to go when you arrive. The show looked more like a trade show too. For example, the TV monitors were showing photos and videos of the layouts on display. It was a little disconcerting seeing your train set on half-a-dozen screens at once but quite nice too.

Accommodation was in a Holiday Inn Express a couple of miles away. Clean an efficient with working showers in the rooms - I was perfectly happy with this. The breakfasts were a bit so-so but there was loads of food and we were able to eat at a time to suit rather than at the whim of a proprietor who doesn't understand that I want to be at the show by 8:15 on Saturday.

Food provided the most unusual aspect of the show. Having checked in on the Friday night, we headed off to the pub next to the hotel. I ordered a couple of burgers and then spied the cake counter. It seems that they specialise in massive cakes. Each was the 5 inches high. Now that IS a cheesecake !

In the interests of science and research, I had to have a go. After much deliberation I went for the Banoffee cake you see in the top picture. On ordered, I was a little surprised to asked if I wanted cream or ice cream with it - like more calories would have been a good idea !

Flockburgh on Telly !The pudding duly arrived in a bowl, swimming in single cream and I started out a the thin end of the wedge. After 20 minutes I gave up with a third of the desert left. That's a third in length and more in volume. Now I'm a fat bloke who likes a pudding but this wasn't a desert, it was a trial by chewing. Mind you, looking around the place, there did seems to be a few people who might have considered it no more than a light snack...

Anyway, the layout worked OK. One tiebar needs replacement as my quick tweak resulted in the copper clad coming free from the paxolin base. Our buckjumper developed a limp after sterling service all Saturday and the Class 26 needs it's pickups fiddling with. No one seemed to notice and we fielded a lot of "Why don't they make TT any more ?"comments. Mind you, one guy did ask if the stuff was easily commerically available and on being told it was as long as you liked making kits, had an attack of the vapours at the very idea that model railways should involve making things yourself. I probably didn't help by pointing out that the appearance of RTR 3mm stuff would see me departing for S gauge...

My pictures from the show on Flickr. Yes there are some trains.

Monday, February 13, 2012

Quick question on badges

Which badge is most embarrasing ?
Trollybus Museum
Bachmann Collectors Club
Star Trek Next Generation insignia/communicator

  
pollcode.com free polls 
I ask, because all three were seen in front of my layout at Doncaster show this weekend. Different people but each within an hour of the others.

My feeling - Star Trek. I mean it's not going to work you know. No matter how many times you hit the thing, you don't get to talk to anyone and if you keep talking to a plastic thing on your lapel, people are going to start edging away from you. At least the wearer wasn't in full Starfleet uniform I suppose.

On the other hand, a collectors club for modern toy trains doesn't seem groovy to me either.

Honourable mention: Red beard with 2 inches of growth below the chin bound with a couple of elastic bands like some sort of hair-based corn dolly. Bet there's a Lord of the Rings 8-disk DVD set at home waiting for another quick viewing.

Sunday, February 12, 2012

Peugeot 206 - replacing a headlight bulb

Headlight0Step 1 - Pull up to the garage door, or behind another car in a traffic jam, anywhere you can see the reflection of the your headlights. Realise that one of them isn't working. Swear a bit, turn the lights off and take the key out of the ignition.

Step 2 - Go to your local motor store and buy a replacement bulb. The photo shows the one I got from Halfords for just under 14 quid. Buying a pair makes sense and there is little difference in cost between 1 and 2. More to the point, once one bulb has gone, the other can't be far behind and having a spare is never a bad thing.
Headlight1
Step 3 - I'm doing the driver side (UK car) bulb. Which is behind the filler pipe for the washer bottle.

At first sight, this is really going to restrict access, but for a change, someone at the car plant realised this and did something very helpful although if you have filled the washer bottle right to the top of the pipe, you might not think so.

Headlight2
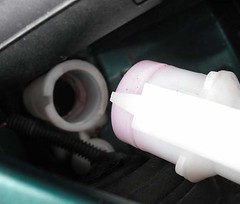
Step 4 - The pipe unclips, you can see the bulge in the photo, from the bottle. I slid my hand down it and tugged at the clip, then wiggled the pipe and it came away.

Get your feet out of the way before doing this if you filled up to the brim.

Step 5 - Locate the wire to the back of the bulb.

To help, I've arrived it in the picture above. You might find a small torch handy as it's quite dark down there.

Headlight3Step 6 - Unplug the wire. This will come away with fingers and a bit of wiggling. The bulb is held in with a spring clip so it will wobble as you do this.

Step 7 - Peel away the rubber weather protector. It will probably grip the bulb but tug and you'll get it away.

Before you do, note how it sits over a rim at the back of the light fitting. It's an important parts as without it, the headlights will fill with muck off the road. If the rubber has split, give the thing a wash and try to glue the split. Let it dry before putting it back in place.

Headlight4
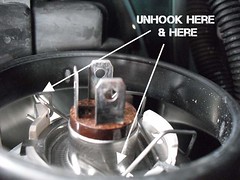
Step 8 - Unclip the spring clip holding the bulb in. To do this, unhook the wire either side of the bulb. Carefully, those clips are plastic. Mind you, the spring is pretty stiff.

Step 9 - Take the old bulb out and replace it with a new one. DO NOT touch the glass of the new bulb. Halogen blulbs don't like finger grease on them and it can shorten thier life.

Step 10 - Clip the bulb back, plug it in and check the lights now work. If they don't, make sure the plug is properly seated. If that still doesn't work, you are into checking for power in the contacts. It might be worth checking the isn't any muck in the plug first.

Step 11 - Assuming all is well, unplug the bulb, put the rubber seal back pushing it home firmly to keep the weather out, plug the bulb in again and pop the washer bottle tube back in place.

Step 12 - Try the lights again. If all is well, have a cup of tea. If not, check the plug again. Then have a cup of tea and a biscuit.

Legal note: This is an accurate description of what I did. I am not a professional mechanic and these notes are offered for entertainment only. If you chose to follow them and things don't work, it's not my fault. Sorry. If you are at all unsure then get a professional to do the job. The car used was a 1996 206, other models may be different.

Saturday, February 11, 2012

A whale of a time in Hornby Magazine

The March issue of Hornby Magazine has a step-by-step build of the Cambrian Whale Wagon kit. It's an impressive model although the build was a bit more involved than I expected. For the very reasonable price, you end up with a serious addition to your fleet. I'd love to see a block train of these things.

Elsewhere, I've a long review of the RT Models chaldron wagon. This is very different from the Whale, it's tiny and yet being whitemetal, just as heavy as the unweighted plastic kit. The prototype is very interesting looking like it belongs in Beamish yet survived in service (admittedly internal service) until the 1970's.

Finally, you see how I solved the problem of a dodgy baseboard edge with a big chimney in staff projects. I can't resist sneaking that 3mm stuff into the magazine !

Whale Wagon

Friday, February 10, 2012

Doncaster, here we come !


Today, I'll hopefully be packing up Flockburgh and heading north to sunny Doncaster. We've got the paperwork and photos of the layout appear inside the brochure no less than three times and on the cover too - I suppose we better try to turn up then ! Mind you, the threat of snow is causing us concern so we'll be watching the weather forecast closely first.

You'll not be surprised to learn that very few of the jobs I had planned to do before the show have been done. Not to worry, I'll be happy to give you my pathetic excuses if you ask.

Assuming all goes OK, we'll look forward to seeing you there. Please come by and say hello - I love putting faces to readers of this blog. It's nice to know that someone out there appreciates my ramblings.

Doncaster show details

Thursday, February 09, 2012

You never know when you need to drill an Emu egg

Emu egg drillingThe great thing about having loads of model making tools lying around, is that there are all sorts of unexpected jobs they can be put to that aren't about building tiny little things.

Take this one - my Dad's first job was in a zoo. From here he acquired Ostrich and Rea's eggs. He never got around to getting the emu one, but for 50 years has wanted to complete the set. Thanks to a chance meeting with the people at Puckpitts Farm, he has finally managed it.

Emu eggs are dark green. He knew this but it was a real surprise to me. Think BR (or if you must, GWR) green and you're not far off. Perhaps more bluey than yellow, it's not bird egg colour.

The problem was, the egg arrived full of emu yolk. You can't put that on display for very long so we had to make holes in it to empty the shell. That shell is tough and we had to drill through it in the same way we deal with holes in metal. Starting with a new 2mm drill in a pin vice, the holes was enlarged to 4mm and finally 6mm. No power tools were used, just finger power.

At the opposite end, a 2mm hole gave us a way to blow the contents out into a bowl. These were then whipped up and turned into omelette's for 3. One emu egg = 10 chicken eggs so these were decent size meals. They tasted just like chicken egg omelette's too. Yummy.

Puckpitts farm website

Wednesday, February 08, 2012

Sailing Triang in Model Boats

March's issue of Model Boats magazine features 3 pages by me on a project a couple of the KMBC members have been working on - the restoration of a Triang model boat and most importantly its Radioslave control system.

Ed and Dave not only returned the vessel to its original shape, Triang boats tend to warp but this can be reversed with gentle heat from a hairdryer, but restored the early (1957) RC system to working order. This is a skilled job but Dave is an engineer who is used to this sort of thing and knows what a quench coils is without having to look it up.

Dave sailing the Triang BoatOf course a write up of something most people are never going to do isn't that exciting a read so half the piece describes the sailing of a single channel boat.

Modern modellers are used to switching on the transmitter and waggling sticks to make the model change direction. Back in the old days you had a button. Just the one too. Each press made the model do something different (straight, turn left, straight, turn left) so you have to remember what is going to happen next time you press it !

The icing on the cake this time was that the two heroes of the story made the front cover of the magazine, something that will doubtless lead to a good deal of leg pulling once it hits the news stands !

Model Boats Magazine Website

Tuesday, February 07, 2012

Ruston-Bacyrus face shovel

Bacyrus

The Corgi die-cast model of a Ruston-Bacyrus face shovel (as in digging at the face of a quarry, not stuffing food into your cakehole) has been knocking around my workbench for some time while I work out what to do with it. However, a project has popped up which can make use of the model so I dug it out of the packaging and took a proper look.

In days gone by, if you wanted something like this for your layout you would be scratchbuilding or digging into the Langley Models range. Now you can head off to the model shop, hand over 16 quid and get something that approaches the quality that the kit built version can provide. I say approaches because quite a lot of compromises have had to be made to the complex prototype in order to produce a model that people can afford but it is still stupidly good for the money.

Of course I can't just take such a model out of the box and use it. There are parts I really don't like such as the tracks which while a really excellent casting, have been coated with the same stuff that novelty pencil sharpeners are supplied in. A sort of bronzey colour that I suppose is to emulate the oily steel of the real thing but looks (to my eye) rubbish. Not to worry, a quick coat of primer and then some paint sorts this out.

The body would probably benefit from stripping and then a repaint but I couldn't be bothered. Instead it's been weathered heavily and the window glazing replaced with Krystal Klear. At the front, the bucket set-up is really nice and just a wash of dirt followed by a shot from the airbush and some weathering powders did the business. Actually, this is a job idea for powders. Plant like this pretty quickly takes on a gritty look that is hard to do with any other method.

Once in position, I'll be tightening up those cables and the model will be ready for use. Not bad for a few hours titivating.

Monday, February 06, 2012

Trompe-l'œil

Arches

Supervising a fine art lecture last week, I became a bit of a expert on Trompe-l'œil. For those not as well educated in the fine arts as myself, this is a French term that means "'deceive the eye'". In other words, 2D paintings that are intended to fool the eye into thinking it is looking at a 3 dimensional subject.

Trompe l'oeilThe most famous example in the UK is at Chatsworth House, where a violin appears to hang on the back of a door in the music room.

The instrument is in fact simply paint and as flat as the door. Odd really, since you could have probably bought a real violin for less money than having an artist paint the fake version. On the other hand the pleasure of watching people being fooled by it must have made it worth it !

I'm not going off on a fine art kick in this post though, the point is that we modellers employ Trompe-l'œil techniques in our work. The most common of these is shading surfaces to increase the apparent surface detail - I dry-brush everything to highlight rivets and seams. Many also underpaint grooves or run dark colours into creases to accentuate shadows.

At the extreme end you have examples such as the one at the top of this post. These arches are on a printed sheet from Trutexture and look surprisingly effective. The firm use the same technique to even greater effect in windows and doors. On a model railway layout, from a distance, they will look the business. Perhaps not for the models on the very front of the baseboard if you are a detail nut, but perfectly acceptable for most of us from normal viewing distances. After all, it's unlikely that the buildings are the main focus of the layout, people tend to look at the choo-choo's.

There is one sphere where they will look perfect of course - the model railway magazine. Trompe-l'œil never look better than when seen in photos. Thus you could build your layout with the intention of it appearing in print or on the web knowing full well that it will look fab on the page but less good in the flesh.

Maybe that doesn't matter. I know of at least one layout that was lauded in the finescale press for its buildings produced from computer printouts and with no more relief that the Graham Farish N gauge buildings that were made from stickers on plastic boxes. According to the editorial this was a revolution as the pictures looked lovely. In real life though, it's a bit of a disappointment, to me anyway, as the technique has been over-used for every structure and not just the background ones it works best on.

How do you feel ? I'm happy to accept Trompe-l'œil techniques have their uses. Making arches is a grim job and this makes it easy. On the other hand I see it as one technique in the tool-box, to be used with discretion.


Wikipedia's take on the subject.

Sunday, February 05, 2012

Dunalastair for sale

HO Dunalistair

Sometimes you have to admit defeat. The Dunalastair project has been hanging around since 2008 and I'm finally giving up on it. The locomotive nearly works but not nearly enough for me. Truth is though that the long build time is more to do with the frustration I feel with the model than any particularly unsolvable issues with the kit. OK, it's not perfect but most of the problems are in my head. If you aren't ever in the mood to build something, it's time to stop.

However, there's too much effort gone in to this model to chuck it in the bin. Also, I bought the guy I was building this for a new kit to replace the one I've been working on so there is the little matter of trying to claw back a bit of the lost cash. Hence, the model is on eBay. I don't know if it will sell, but it's got to be worth a go.

You can see the auction here.

If, at the end of the week, no-one is interested then I can always strip out the wheels and gears but I hope it doesn't come to this. It would be nice to think that someone with more commitment and skill can finish the engine.

Saturday, February 04, 2012

Railway modellers think track cleaning is a pain...

Dog on LakeWell, how about this ?

Thursday morning, the Knightcote Model Boat club sailors were met with this sight - frozen water.

Very frozen in fact, thick enough to support the weight of an average size dog. This enough to resist the efforts of a pick axe.

After a lot of work, some members managed to break enough of the surface to get their models launched, including Ed who took this photo for me.

It makes gently rubbing some rails look pretty easy...

Friday, February 03, 2012

Isle of Man Test track Mk 2

Test Track V2After the embarrassment of my Isle of Man Test track Mk1 turning into something more akin to a roller coaster, we've made a second version which is currently with the sanding and finishing department.

The materials remain the same - plywood top with softwood framing - but without the fancy corners from the first attempt that I feel might have caused some of the problems.  The corner blocks that keep the boars apart in transit have been fixed to the ply tops with thin ply slabs on the side to brace them. Easier to do and just as effective as my joinery attempts. We've varnished the wood very early on in the process too. If there is any moisture in there, it's staying put this time.

So far, things are looking fine. After the next coat of varnish dries I'll be screwing the metalwork in place. Then it goes off for the track to be laid followed by some wires and perhaps even a bit of scenery.

Thursday, February 02, 2012

One man's rubbish...

Railcar frontWhen you look at this picture, some of you will be saying "That's a Waggon & Maschinenbau railcar".

Others will be saying "That's that railcar that Heljan are doing isn't it ?"

Both would be right. Well sort of.

What it is, is the Silver Fox models resin bodied version of the Waggon & Maschinenbau railcar. It's been on the market for a few years and is about to have its sales torpedoed by Heljan's offering.

I picked this model up for a tenner at a show recently. It comes complete with motor, wheels, gears and the metal unit they fit in. Basically, all I have to do is put the bits together, glaze it and I have a nice little model.

The quality of the resin moulding is excellent. I doubt that the plastic version will be any better. Detail courtesy of brass horns and wire handrails will guild the lilly. As a companion to my Dapol based Park Royal railbus, it will be lovely.

Now, most people wouldn't look twice at the box of bits I bought, which is why I picked it up for a tenner. That's a good thing. For me anyway !

Silver Fox website.

Wednesday, February 01, 2012

I'm getting the wrong breakfast cereal

Whilst my bowl of Fruit & Fibre or porridge might be good for me, it isn't nurishing my model-making sensibilities.

Over on his blog, Akihiro Morohoshi is showing some pictures of a little plastic kit that reminds me very much of the "good old days" when the box came with both food AND a little plastic kit for a car. Sadly, my non-existant Japanese means I can't be certain that this is what it is, or identify the breakfast food that I need to be shopping for.

So it's over to you dear reader. Can you translate for me ? Where can I go and start my morning with a filling meal and a little model tram car and trailer ?

The original post from Akihiro Morohoshi's blog can be found here.