Showing posts with label Brede Lifeboat. Show all posts

Sunday, May 17, 2026

Lifeboat day 2026

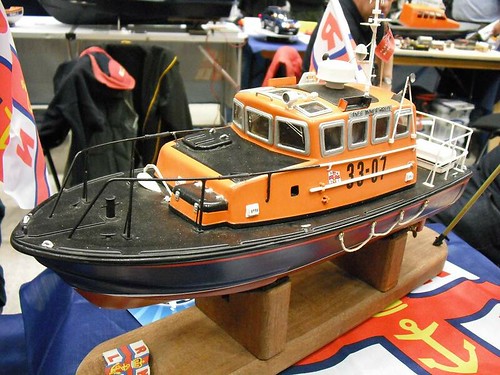
Phils Brede lifeboat

Lifeboat day dawned grey and cloudy, but when I arrived at the lakeside, everything was set up, and looking good. I'd even got there early to help, but I think that despite the emails during the week, much of this work had been carried out the night before. 

Good news as it turned out, because people had travelled to the event from quite some distance, including a group from the Blackpool MBC.  

Atlantic

There were all sorts of orange boats, plus a few blue and white earlier vessels to be seen. I'd taken my Brede, and launched it early in the day - at that point when everyone seems unwilling to get their hulls wet. It performed well, but ran out of electricity before the main parade. Never mind, we struggled around a bit, and at least stayed on top of the wet stuff. 

Not everyone did. 

Lifeboat rescue

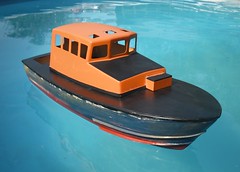
Speeding off, and then slamming the brakes on, saw this superstructure jump off the hull, and need resucue by someone in a wetsuit!

Incidentally, the funny colour of the water is a fish-safe chemical that keeps the weed down. 

By lunchtime, the sun had come out, and I was enjoying a sausage in a bun, followed by some cake.  

Brede and cake

All in all, a really pleasant day by the water. I even made a profit on the Bring'n'Buy stand!

You can see more photos over on Flickr. 

Monday, May 23, 2022

Best of Brede?

Brede at speed

If you read back through my Brede build thread, you'll know that while this might be my favourite lifeboat design, building a model of it has proved very tricky. A failed kit, failed scratchbuild in wood and only with a magazine deadline threatening, did I manage to finish a model. 

Well, nearly, it still needs some detail. 

It's only the magazine publication that saw the model finished in the first place instead of becoming more bin filler. At the time I knew the hull still wasn't the right shape - it should be more bulbous at the front - but I couldn't give up this time and just had to press on no matter what. (Welcome to the joys of modelling commercially). 

Because of this, the boat hasn't really seen much use. The last time I planned to take it out was back in 2015, and I'm pretty sure it never left the box on that lifeboat day. 

Now though, I've given it a good sail. For the best part of an hour, it's pootled around our lake in the company of other orange brothers. When the "best boat on the water" judging was taking place, the Brede was my choice for a sail. OK, I didn't build the Trent (the other option) so it would have been wrong to put it out there then, but I wanted to show off the Brede. 

Somehow, I've become accustomed to the faults. They don't shout at me as much as they used to. Time appears to have mellowed me. 

It helps that the boat performed perfectly all day, but I think on the water, from several feet away, I can just enjoy it. From most angles it looks pretty good. 

Real modellers would say it should be destroyed and another built in an attempt to attain perfection, but they can get stuffed. It's my boat, and I've decided (finally) that I like it. 

Has anyone else had something like this happen? Putting a model away and returning with fresh eyes, to decide that there aren't as many faults as you thought? Or does this make me a bad/lazy person?

Saturday, May 23, 2015

Preparing the Brede

 
Last week, in preparation for the boat club lifeboat day, I hastily dug out my scratchbuilt Brede Lifeboat planning to give it a sail.
 
While I built the boat a couple of years ago, it's never really sailed in anger. A little messing around on the water for some magazine photos, but a proper sail? I've never had the time.
 

This became obvious when I took the top of it to work out which battery should be fitted. There wasn't one fitted and no obvious place to stick one. A quick look at the magazine article or those photos I've managed to recover on my hard drive didn't help.

Eventually, I decided that something 6V and jelly would do the job. By leaning it on a hull former with some Blu-tack and wedging the top end against the motors, it didn't seem to be going anywhere in a hurry.

Best of all, once charged up, everything worked, so the next day it was off to the water...

Monday, July 08, 2013

Brede in World of Model Boating

Time for the Brede Lifeboat to make its appearance in print. The full story of the build appears in the Bookazine "World of Model Boating", a spin-off from Model Boats magazine.

It's odd to see the article in print. This was at times, a hugely frustrating build. When I say the windows held me up to for a couple of days, I really mean it. With a deadline looming, this was more stressful than modelmaking should be.

Now, I see the piece on the page and it's like it never happened. The photos look good so the pain is forgotten. I suspect childbirth is a bit like this otherwise you'd never have two children...

There are loads of interesting articles between the covers but the one that fascinates me is the selection of Model Boat magazine covers from the 60s. While we now enjoy full-colour photos every time, then the reader would see a dynamic image produced by the in-house graphic artist. I can't help feeling we've lost something somehow...

Tuesday, April 30, 2013

Plastic fun with a radar reflector

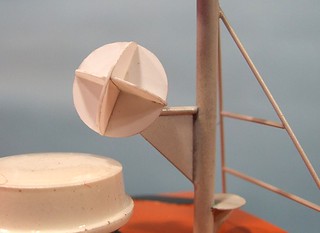
Radar reflectorSome things are so much fun to make that it's sad when they go together properly first time as I'd like to do them again. Such it is that the radar reflector on the Brede is attempt number 1 but I might do another one anyway.

"Corner reflectors" work by reflecting the radar signal back at the source but "shifted" because the signal has bounced off three surfaces - or by magic/witchcraft if you are a Daily Mail reader.

The real devices are fitted to boats too small to generate a good radar signature so other vessels and the coastguard can spot them. Should you feel the need, you can can buy one from Amazon. Probably not a good thing to dangle from the rear view mirror on your stealth fighter.

Anyway, my version is made from 3 plasticard disks cut by running a pair of dividers around on the sheet surface and then finishing off with a sharp knife. Slots are cut into two of the disks and they slide together. The final disk is split into quarters and fixed in place with liquid glue. Overall diameter for the Brede is 20mm.

Monday, April 29, 2013

Scratchbuilt Brede Lifeboat

Brede

Producing a model of a Brede Lifeboat has been on my agenda for a few years now. Regular readers will also know that I've been trying and trying again, to very little effect. Until now.

Thanks to several late nights and a looming deadline, the 1:20 scale Brede took to the water for a few photos on Saturday evening. The sun was out (lucky, there had been hail earlier in the day) and shining at a nice low angle just right to bring out the best from the Volkswagen orange paint.

Completely scratchbuilt apart from the radar dome on top and mechanical bits inside, I know it's not perfect, any hopes I had to making a mark on the Model Engineering competition later in the year are long gone, but even though I know the faults I'm still very happy with it.

A fuller description of the build will appear in a future Model Boats so watch the magazine rack at Smiths to find out more. For now, I'm going to bask in the smugness that of actually producing a model and look forward to the first post of the new year when I finally won't have to mention the Brede in the uncompleted section of my annual report.

Tuesday, April 23, 2013

Lifeboat window development

Window Development

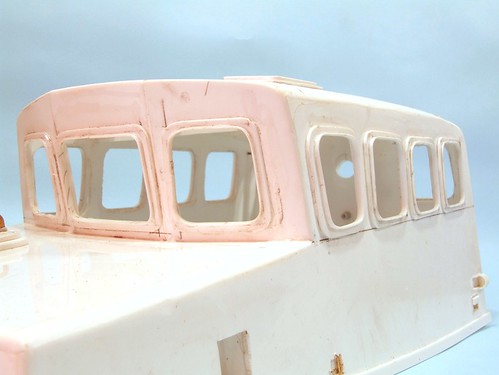
Over at the Brede build, the "joy" of scratchbuilding has been allayed by hitting a bit of a challenge. Lifeboats have quite complicated looking windows with two layers of metal and a thick inner rim. To make matters even more interesting, the corners aren't sharp but very obviously curved. To add to the pleasure, the Brede has 16 windows, only 6 of which are identical and square. Several of the other are sloped along one edge.

Oh, and there are half a million flush, but visible, fixing bolts on each frame.

Obviously this sort of challenge is the sort of thing that gladdens the heart of your true scratchbuilder. The looming deadline for this build only served to increase my joy once I realised just how much fun I was going to have.

To cut a (very) long story short, I developed a method for making windows that would satisfy me without going completely mad. The finished products might be lacking in detail but on the water anyone peering over to see will be sufficiently unbalanced enough that a quick shove will provide them with enough problems without worrying about my boat.

The final version of window making will appear in the article to accompany the build but I though I'd run through the thought process and development here. Because it's my blog and I can do that.

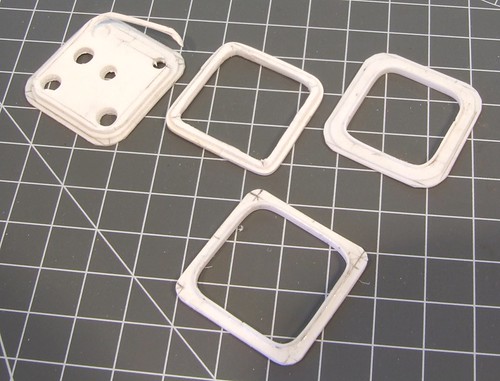
Starting top left you see a window made of three plasticard layers. Producing the outside edges is a simple matter of filing the corners by eye - plasticard cutters don't seem happy making reliable 10mm diameter curves but you can usually mark them and do the rest with knife and file. The inside corners were the big problem. Efforts cutting them with a leather punch didn't work and drill bits just tear the plastic apart.

Moving right we find a 2 layer frame drilled and cut inside. It sort of works but consistency isn't good and the job takes forever.

Far right and we are nearly there. The thick frame is made by lining the inside of the punched and filed hole. This neatens the job up as the plastic solvent pulls things into line and fills tiny gaps.

Finally, at the bottom we're gone for a single layer of 1mm plastic, the prototype layers are almost flush with each other anyway, it's cut with a plasticard cutter and then lined with a 2mm wide strip of 1mm thick plastic.

OK, there are limitations, it's still touch to make consistent windows. There is no fixing screw detail - again, if you can see if from the bank you'll be swimming with the carp. However the method doesn't allows modellers to make windows that look OK (IMHO - and it's my blog remember) with hand tools. Obviously if everyone had milling machines or laser cutters then we could do it all differently but they don't. A better option would be to work in 1:12 rather than 1:20 where perfectly acceptable windows can be bought as resin castings.

But that would take the fun out of it.

Windows in


Sunday, April 14, 2013

Brede Bathtime

Brede first sail

The Brede Lifeboat has sailed!

OK, so it's the traditional test in the bath, or as it is invariably reported in model boat mags, "place in the domestic test tank".

Basically, you have to put a model boat on the water sometime and where better than in a handy bath? The water is clean, it's easy to get at and there are towels to hand for drying the hull.

Best of all, when the hull leaks like this one did, it can't sink into the murky depths. If you've filled it with clean water it can't anyway.

Leakage was initially tackled by dripping Zap green into anywhere I thought a micro hole could possibly be found. Seams along the chine line and keel were filled both inside and out. Eventually though I spotted that the Araldite blobbed around the exit holes for the propshafts hadn't sealed the hole properly. Spotting the problem required holding the hull at an odd angle then peering at the suspect area.

A few more epoxy blobs and the job was done. No water inside the hull and we are ready for test sailing on the pool. Just in time for the better weather.

Monday, April 01, 2013

Shaving plastic

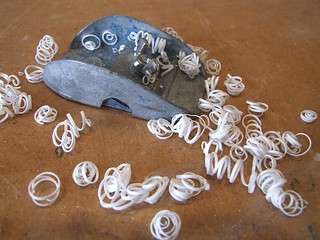
Plane with plasticWorking on the plastic fantastic Brede, I've been trimming the sheet along joins.

Rather than cut everything to size perfectly, where two parts met, I left one of them oversize and planed it down with this handy little device called "Zip".

Dating back to the 1960's or even earlier, the blade is a single edged razorblade held in place with the wingnut you can see in the photo.

Sadly, the fixing isn't sophisticated enough to allow for depth adjustment, unlike slightly better block planes. Who cares, with practise, the pressure can be adjusted to carve more or less plastic away.

Those little curls mounted up as I worked my way around the boat. I did find that the best way of working was to get nearly to the join and perform the final trimming with a file and sandpaper as it is all too easy to cut too far. However, the speed at which the plane cuts away excess plastic encouraged generous overhangs which made marking out a lot easier.

Top tool.

Sunday, March 31, 2013

Brede lifeboat progress

Brede With Superstructure

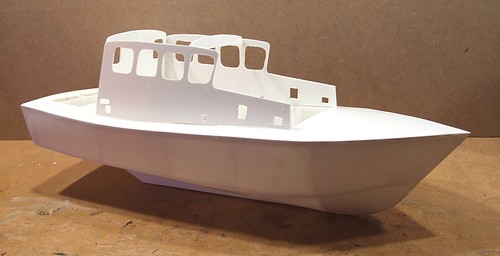
Progress has been made with the Brede lifeboat project. I've got a deadline and this model is taking longer than I expected.

The hull is clad in sheets of plastic over the formers. These have been reduced in height and a deck fitted. Checking with a ruler shows that everything is as accurate as eyeballing along the sides makes it appear. I am much relieved by this as I really didn't want to make another hull.

Above the deck line, a superstructure is appearing. It might look a bit rough but I think I know what I'm doing. Those window holes will be tidyed up with overlays for the frames. The bottom edge is hidden behind another strip which the prototype handily has.

I'm very proud of the fact that everything you see has been scratchbuilt. It was all sheet plastic a few weeks ago and now looks a lot like the boat it is intended to represent. There is something incredibly satisfying about the process even if it is frustrating at times. Maybe it's overcoming the problems that provides the pleasure, or maybe it's just that I've created a reasonable size model and it's looking OK. Maybe a man in China with an injection moulding machine could do better but I'm pretty sure he isn't interested so I'll have to live without him.

Friday, March 22, 2013

Brede Building - 3rd time lucky (I hope)

Brede Building

Long time readers of this blog will know that I've had a couple of goes at building a model of the Brede Class lifeboat.

Attempt 1 involved a not very good vac-formed kit which got me interested in the prototype but proved just how difficult it would be to make a descent model.

Attempt 2 got as far as a scratchbuilt hull that looked good until I put the deck on and realised that the back end on one side was all wonky.

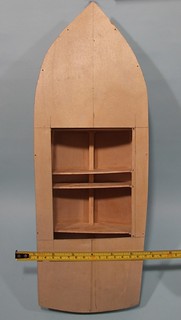
Attempt 3 uses a similar assembly method to Attempt 2 except that in that case I used wood, this time it's plastic sheet.

My theory is that I'm more comfortable with plastic. It's a material I use a lot and I get on well with it. Unlike wood for example, if you cut too much off, the missing material can be replaced as long as yo use plenty of solvent. The good people at Humbrol have sent me some tubes of glue and a big bottle of liquid glue. My stocks include plenty of Mek-pak too.

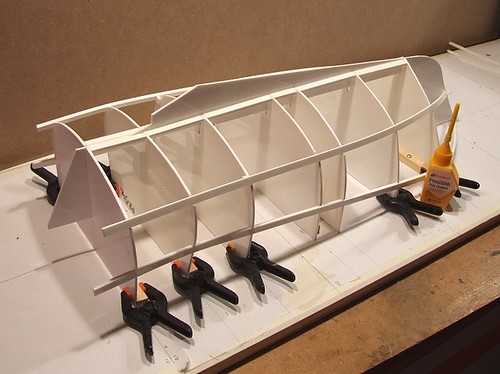
Anyway, I made up a building board - a flat surface with screwed down laths at right angles to the edge. To these slices of the hull are clipped. These slices are taken from a copy of the RNLI plan, stuck to the sheet with spray glue and then slightly modified to take the keel and stringers. Both of these are plastic, the later being long strips of sawn 4mm stuff bought from a model boat supplier.

So far, things are looking good. Hopefully at the end of all this, I'll be writing up the model properly for Model Boats magazine, but I thought you might like a sneak preview.

Saturday, November 10, 2012

Another boat for the dustbin

Tomorrow, I will be manning a stand at the International Model Boat show. On the same stand, the plan was that my Brede lifeboat would be sitting there as a demonstration of work in progress.

I'd not done any work on it for over a year so I thought I'd dig the model out and see if I could advance the project a little. A desk would be nice and perhaps the start of some superstructure.
 
Deck Fitting

Fitting the desk was fairly painless. Using thin liteply I fixed the top to the hull using waterproof PVA. Because of the undulations exhibited by the prototype, while the glue dried, the deck was held in place with screw-in planking clamps. After a couple of hours, things were well fixed.

I left the deck over-large rather than try to make it precisely right. Cutting back the excess back was achieved with the piercing saw and then a small power sander. A bit of filler and all looked good.

Hull Error
Well, it did until I looked properly. With the deck fitted, it was obvious that something was seriously wrong with the back end of the boat. One side was half a centimetre nearer the centre line than the other. Somewhere along the line, I had really screwed up my measurements and it has taken until now to find out.

For a little while I pondered on ways of fixing this cock-up, but in the end it was obvious that any repair would take monger than starting again and still not be as good as doing the job properly. Sadly, this meant that all my hard work had to go in the bin and not on the stand.

Must try harder.

Saturday, March 03, 2012

Every kit CAN be built

Model Brede

From Brighton, a little ray of hope. It really IS possible to build any kit if you try hard enough. Back in 2008, I abandoned a kit I'd bought for a Brede Class lifeboat. The think seemed impossible to build as the vac-formed parts were unsymmetrical along the keel line. Marking out the desk also looked impossible. Scratchbuilding seemed like a better idea to me, or at least more likley to produce a good model.
It seems I was wrong. This lovely looking boat was on a display and the description of the kit is exactly the same as the one I gave up on. It seems there is at least one modeller out there with more commitment and skill than I have.

In my defence, I don't think the deck line is quite correct, on a Brede it lifts more to the front. That's one of the problems I couldn't see past in my version. Those window frames are a bit heavy too but they aren't in the kit. At the end of the day though, it is a a pretty good model of a Brede. Better than my attempt anyway. I hope to replicate it one day when time allows me to get back to my version.

I'll try to remember this next time I'm looking at a kit and thinking it's impossible.

Wednesday, April 27, 2011

Back of an envelope calculations

Brede RuddersI have a plan of the Brede lifeboat. I have photos. I needed rudders.

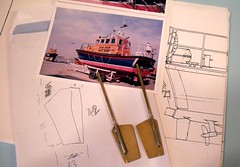
The plan is 1:20th scale and the boat I need rudders for is 1:12th. My plan was to make the blades up from some brass sheet I had for model railway work. The shape is odd with not a right angle to be found, but by sketching it out on literally the back of an envelope, I was able to calculate the new dimensions by multiplying those on the plan by 1.6.

The results looked like they would be OK. I tweaked a few numbers for a slightly larger rudder to improve turning on smaller pools and started hacking away.

First lesson learned - 1mm thick brass might seem like a good idea but it's bloody difficult to cut compare to the thinner stuff. My Olfa Plasticard cutter scored it but I still needed the attention of a piercing saw (2 blades broken) and tin snips to get the basic shape. Then there was some filing to smooth up the edges and round the corner a-la the prototype.

The pivots are 3mm brass rod. I'd hoped to cut a slot up the middle with a junior hacksaw and slide the metal in. It quickly transpired I don't the skill for this and so I just filed half the rod away and soldered it to the blade. That seems to be nice and strong. This is topped with a little collar made from tube. This rubs on the tube set into the hull and should help keep water out.

These turned out quite nicely. Proper scratchbuilt jobbies and not too bad for a couple of hours work.

Lesson 2 - all that metal holds heat. So I type with burn fingers because I tried to pick the newly soldered parts too early. Twice. I think that probably says something about me.

Tuesday, April 26, 2011

The Big Brede

Big BredeIf you've been reading this blog for a very long time then you might just remember that I started building a Brede Class lifeboat. The model currently has a scratchbuilt hull, which I'm very proud of, some electric gubbins and a few castings. Apart from that there's not been much progress for a longer than I care to think of.

It seems I can't escape the class though, because a few weeks ago, I was offered a 1/12th scale kit for the same class. Actually, someone tried to place an advert in our boat club newsletter and as the editor (read: bloke who does all the work on the thing) I learned about it before anyone else. The boat was described as part started which is always a cause for concern, but the price looked promising so in a car park at one of our boat club meetings, a deal was done.

The model turned out to a good 'um. It's a Models By Design kit, well set of assembled mouldings. The propshafts and rudder tubes are fitted. Some painting has been carried out and the windows holes are started. My Dad took one look and decided he'd like to have a go at this one, which suits me as it means I have to do less work to finish it off.

Checking the work so far, it all looks OK. The prop tubes are nicely parallel. as are the rudders. The later aren't in line with the centre of the propellers by an amount that would indicate this is a deliberate step rather than accident. Rectifying this would be an awful lot of work so I'll see how the model handles before deciding.

Despite being a small prototype, this is still a chucky model. My 1:20th size version is a lot easier to handle. Still, it is on the upper limit of being easy to move even if it does take up a lot of space on the workbench.

Tuesday, March 10, 2009

Spray Rails


sprayrail1
Originally uploaded by Phil_Parker
Regular readers will have noticed a lack of updates on the Brede Lifeboat project. My excuse is that I've been busy doing other things but to be honest a seemingly insolvable problem hasn't helped.

The spray rails at the front of the prototype boat are very prominent. To replicate them I hoped to pick up some triangular section plastic, stick this to the hull and then sand it to the final profile. Trouble is, you can't buy triangular plastic or wood of sufficient size. The largest I could get was from the Plastistuct range, but at 3.2mm high it was too small. This problem stumped me. I tried sanding some square section wood to shape but couldn't do this with sufficient accuracy to satisfy my critical eye. Holding such a small bit of tree is nearly impossible while manipulating a sanding tool.

In desperation I decided to try forming the rails on the hull itself. The Proxon sander gave me confidence that this might work and all that messing around with the hull last month proved that it could take a little bit of attack without damage.

The start and end points of the rails were carefully marked on the hull with pencil and then strips of obechi were soaked in the sink to maker them pliable enough to deal with the required curves. After about 20 minutes each was dried off and then stuck in place with superglue and clamps. This dried off really quickly and despite the undulations the wood appeared to be firmly fixed.

The wood was too large but gentle work with the detail sander soon fixed this. All work was carried out by eye. Looking along the hull it was quickly apparent when one side was fatter or less tapered than the other. To achieve the final shape I carved the bottom corners off with a sharp knife and then finished off with the mini sander.

sprayrail2Looking at photos I have probably under-represented the rails which look pretty chunky but they are close to those on the plan and if you aren't sure about a part making it under scale isn't a bad idea. More importantly they look right on the model.

A couple of coats of sanding sealer later the wood is nice and smooth just needing a coat of primer to check everything is OK and hide the shiny bits. then I can breath a sigh of relief and move on to fitting the mechanical bits.

Friday, February 20, 2009

Maiden voyage (sort of)


Brede Hull sailing
Originally uploaded by Phil_Parker

I know this isn't how you are supposed to do things. Years of tradition tells that a new model boat hull is meant to see water for the first time in the domestic bath (which will be refered to as the "domestic test tank"), but I was down at the lake having a sail so I thought, "why not" and stuck the Brede Lifeboat in the car.

Once the water had quietened down a bit and I'd taken Tomsk out for a run with our towing barge, I launched the hull complete with a bit of lead to see how things were looking.

Since the last post on this project I've filled and sanded the surface a couple more times and am the proud owner of an old jacket that has been bulletproofed with filler dust. I've reached a "good enough" point where any improvements will be tiny and quite frankly I need to move on. An imperfect finished model is always better (IMHO) to a perfect model that never quite emerges from the workshop.

Anyway the main thing is the hull didn't sink. In fact it floated very well with the small amount if lead ballast. I think we're a bit high still so pushed down which confirmed that there is plenty of buoyancy to handle batteries, radio, motors and superstructure.

Sadly, no one could help much with idea for the spray rails. Plastic was suggested but I know I can't get anything triangular 5mm tall so it looks like time to go back to the garage and make some dust with a sander and some wood.

Wednesday, February 11, 2009

Cracking filler

Cracking fillerIn an effort to get the hull of my Brede lifeboat as smooth as errr, a lifeboats' bum, I'm using a combination of model filler and spray filler. The former is cellulose based while the later is acrylic I suspect. They don't seem to like each other much.

Cellulose fillers such as knifing stopper are notorious for shrinking as they dry and I suspect that is what's happening here. The filler drys and cracks the spray filler on top. Stupid stuff. How the car repair industry gets on with it I don't know.

Anyway, as it's been too cold to spray I've been power sanding the hull and then recoating it with filler. Again and again and again. Each time duff sections are taken down to the fibreglass leaving only vestigial traces of filler and every time I do this things look a little better. Each time I think I'm there and then decide there is just a little more work to do. The hull is now in grey non-filling primer with Isopon P38 filling tiny marks (not as fine as cellulose filler but non-shrinking) and once I've sprayed I'll have another sand.

Friday, February 06, 2009

Scabby Hull

Scabby hullThat hull looked better than it was. Once I started examining it closely all sort of tiny lumps and bumps and pinholes hoved into view. Plenty of skimming with tube model filler gives me a hull that looks like the surface of the moon.

I just hope that the magic sander can sort all this out. tomorrow.

Thursday, February 05, 2009

Glass bottom boat


Grey boat hull
Originally uploaded by Phil_Parker.

The Brede hull has been fibreglassed with the finest fibreglassing cloth that Halfords do sell. Even though I remembered to add hardener to the resin the drying took a couple of days. It's cold but surely the stuff is supposed to go off faster than this ?

After this I ended up with a waterproof and strong but lumpy hull. Attacking it with an electric sander helped, once the resin had dried. Until then all I achieved was to clog sandpaper up. Eventually I managed to get one side very smooth. It's opposite didn't look great and a spray of high build primer showed the true horror. Think unrolled pastry and you'll know the texture.

With more sanding and a skin with Isopon filler, things looked a little more promising but I was wondering if this had been a good idea.

My problem is the prototype. Lifeboats are finished to an incredibly high standard so I can't hide anything by weathering. After an hour working the model over again with a couple of big sanding tools (handy hint - charge the battery on the detail sander before you want to use it !), a coat covered in dust and relief that I'd found a mask to keep the stuff out of my lungs, this is the result. Still not perfect but a whole lot closer. The primer has shown up a few areas of concern which will be dealt with using model filler.

And more sanding. Maybe I should have just carved it from solid ?