A daily updated blog typed by someone with painty hands, oil under his fingernails and the smell of solder in his nostrils who likes making all sort of models and miniatures. And fixing things.
Tuesday, April 23, 2013
Lifeboat window development
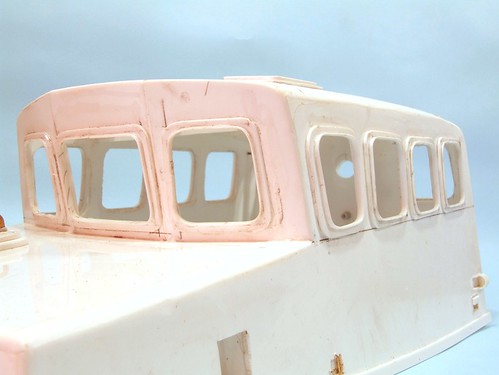
Over at the Brede build, the "joy" of scratchbuilding has been allayed by hitting a bit of a challenge. Lifeboats have quite complicated looking windows with two layers of metal and a thick inner rim. To make matters even more interesting, the corners aren't sharp but very obviously curved. To add to the pleasure, the Brede has 16 windows, only 6 of which are identical and square. Several of the other are sloped along one edge.
Oh, and there are half a million flush, but visible, fixing bolts on each frame.
Obviously this sort of challenge is the sort of thing that gladdens the heart of your true scratchbuilder. The looming deadline for this build only served to increase my joy once I realised just how much fun I was going to have.
To cut a (very) long story short, I developed a method for making windows that would satisfy me without going completely mad. The finished products might be lacking in detail but on the water anyone peering over to see will be sufficiently unbalanced enough that a quick shove will provide them with enough problems without worrying about my boat.
The final version of window making will appear in the article to accompany the build but I though I'd run through the thought process and development here. Because it's my blog and I can do that.
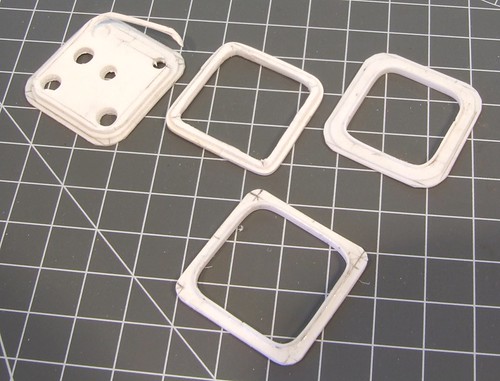
Starting top left you see a window made of three plasticard layers. Producing the outside edges is a simple matter of filing the corners by eye - plasticard cutters don't seem happy making reliable 10mm diameter curves but you can usually mark them and do the rest with knife and file. The inside corners were the big problem. Efforts cutting them with a leather punch didn't work and drill bits just tear the plastic apart.
Moving right we find a 2 layer frame drilled and cut inside. It sort of works but consistency isn't good and the job takes forever.
Far right and we are nearly there. The thick frame is made by lining the inside of the punched and filed hole. This neatens the job up as the plastic solvent pulls things into line and fills tiny gaps.
Finally, at the bottom we're gone for a single layer of 1mm plastic, the prototype layers are almost flush with each other anyway, it's cut with a plasticard cutter and then lined with a 2mm wide strip of 1mm thick plastic.
OK, there are limitations, it's still touch to make consistent windows. There is no fixing screw detail - again, if you can see if from the bank you'll be swimming with the carp. However the method doesn't allows modellers to make windows that look OK (IMHO - and it's my blog remember) with hand tools. Obviously if everyone had milling machines or laser cutters then we could do it all differently but they don't. A better option would be to work in 1:12 rather than 1:20 where perfectly acceptable windows can be bought as resin castings.
But that would take the fun out of it.
Labels:
Brede Lifeboat,
model boat
Subscribe to:
Post Comments (Atom)


No comments:
Post a Comment