A daily updated blog typed by someone with painty hands, oil under his fingernails and the smell of solder in his nostrils who likes making all sort of models and miniatures. And fixing things.
Picked up from the Arts & Craft section of my local branch of The Works for a miserly 3 quid, a pack of 12 pastels all in different shades of grey. I'm going to be modelling a large area of tarmac and think that rubbed against some emery paper, the dust should be perfect to add a variety of colours to the base grey paint.
I particularly like the green-grey, brown-grey and blue-grey versions. Turned to dust, they will be ideal as weathering powders.
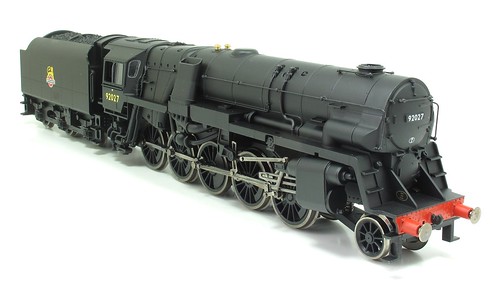
I remember when I first became aware of the Crosti 9F. It was in an issue of Scale Trains back in the 1980s. There was a double page spread of photos showing the supremely ugly sister of Evening Star followed by a conversion to the Hornby model using a Crownline kit.
I was smitten. Big locos don't normally do anything for me unless they are ugly. And the Crosti is really ugly, partly because of the design with all the bit hanging on the side but mostly thanks to the complete lack of cleaning any of them seemed to received after construction.
I never found the Crownline conversion kit on sale at a price I could afford. When it was readily available, I was too broke and by the time I had money, the firm had vanished.
To be fair, my experience of Crownline kits wasn't great. The 4F detailing pack seemed to contain many whitemetal lumps that bore only a passing resemblance to the thing they were supposed to represent. Even as a youth, I knew that the blind side chimney on the Crosti was going to be interesting to open out.
Anyway, years later, Golden Arrow produced a resin kit for the beast, but I couldn't justify buying one as I didn't really have anywhere to run it. Then Hornby announced they would be producing the loco in their Railroad range.
The pre-production model appeared after a few years and looked very nice. I had a feeling that I'd be buying one when it came out and that's what happened this week. My local model shop relieved me of £110 (RRP is £119) after I made sure it worked on the counter top layout and I returned home feeling a little guilty for my extravagance. After all, I still don't have a layout for the thing to run on.
First impressions are good. Despite being in the Railroad range, home to older or less detailed mouldings, I'm impressed with this brand new model. There's nothing of the old 9F in here, this has been designed from the ground up. The model isn't perfect but it's a darn sight better than anything I'd have built years ago.
To my eye, they have caught the look of the loco. I can't claim to be an expert but the side chimney looks pretty right. The front end is good. Maybe the pipework on the firebox and under the cab is a bit basic but the latter can be improved by rounding off the pipes with a file.
I'd expect to see a detailing kit appear for these soon with new pipe and possibly an etched smoke deflector as fitted part way through the locos lives.
Cab detail is basic but adequate for the model as you can't really see inside. Windows are glazed nicely though.
I'm told that some of the locos only had a single handrail up by the conventional chimney which was used for lighting up and the model has two. This is easily rectified. A nice touch there is that there is a representation of the hatch that closed it off while running.
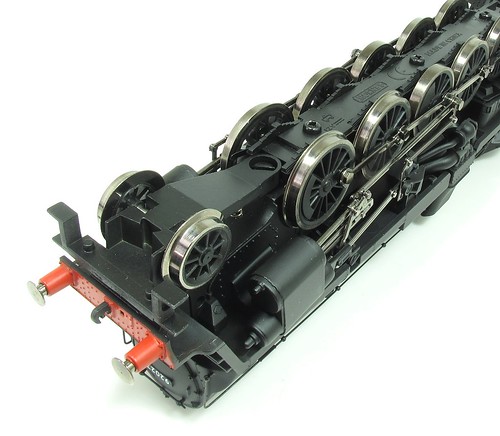
At the back the tender is permanently fitted with a non-adjustable bar. Well, unless you can undo a cross headed screw anyway. It's light and empty so probably the location of choice for DCC chips and a honking great speaker. In the top is the most plastic looking coal ever seen, they might as well have sprayed it at the same time as the body.
For me the biggest fault is at the font, the pony truck has issues.
The 1980s called - they would like their "Silver Seal" wheels back please!
Quite why the flanges are twice the size of those on the drivers is a mystery. A coupling is supplied to slot into that triangular fitting so trains can be hauled in reverse and I wonder if this explains the wheels. Perhaps it's felt that when pulling a long train from this end, the wheels need all the help they can get to stay on the rails. The pony is sprung though so I can't see a problem. Changing to something prettier shouldn't be hard.
While I'm fiddling with the pony, the steps can come off and be fitted under the buffer beam. This compromise it to get the model around 2nd radius curves but it looks crude. Again, a detail kit will probably include some etched steps which will look a lot better.
Wider gaugers might chose to retain the waggly bits as they are in the right place - a fat boss arrangement on the middle (correctly unflanged) drivers sorts things out for us narrow gaugers.
Running is good. I tested the model on the L&WMRS Duxbury layout and I leave you with a little film of it trundling around.
With a couple of hours to kill before a meeting, I took the opportunity to have a look around the pretty town of Stamford rather than just driving through it. A couple of circuits of the centre later, I finally found somewhere to park and as it happens, I was just over the road from a model shop.
GrA's is a diecast models specialist. The shop is full of cabinets stocked with boxed cars and other models. Disconcertingly, most seemed to be Matchbox toys that I remember as a child. I'm sure I'm not that old.
The shop is untidy but in a good way. You can dig around and will find gems.
Besides all the diecast, there's a rack of Revell paints and tiny range of plastic kits.
Sadly, I didn't buy anything.
This was mostly because nothing appeared to have a price on it. Nothing at all.
I could have asked but the owner was staring at me from behind the counter, apparently annoyed because I'd interrupted Bargain Hunt on the TV in the back. I'm sure once you get to know the shop it's lovely but I felt a bit uncomfortable and so scurried off to find cake.
However, if I was a serious diecast collector, I'd make the trip as the stock is huge and varied. If you are looking for a rare piece, it would be worth a go.
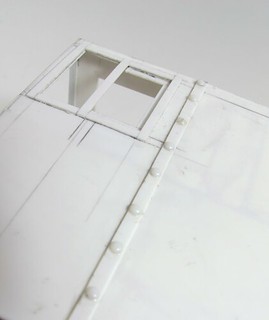
On the tug cabin side are strips of metal riveted in place. In 4mm scale, bodgers like me will use cubes of plastic well washed with solvent to take the edges of. In this scale something rather better is called for.
I can't remember where I picked this up from but making fake rivets is pretty easy. All you need is some plastic rod and a soldering iron.
Simply hold the end of the rod near the hot tip and it will melt slowly to form a dome.
Let this cool for a few seconds and chop from the end with a knife - snips squash the rod I found and it's easier to fit into round holes if cut with the knife.
Drill a series of holes, fill with plastic cement, fit the rivets and wash with solvent.
Skillful people will be able to gauge the size of the domed heads but working by eye give acceptable (to me) results.
Filling in the back of the Bantam cabin shouldn't have been much more than a scribed rectangle of 2mm thick plastic. Then I looked at the photos and realised below the doors is a towing eye.
I suppose this makes sense, there's nothing else around to use when pulling a barge so I'm glad I took the photo. Oddly, there doesn't seem to be a gap under the raised rear deck for the rope to pass through, but then my photos of this are sketchy 'cos I forgot to hang off the back with the camera. Mind you, the freeboard is so low that if you tie to a barge front, the rope will go up, not down.
Of course, you'll be working with the doors open so it doesn't bear thinking about what happens if the rope snaps...
Anyway, a bit more plastic noodling and a bit of filler to blend the sides together and it's looking fine. Brass wire handles are a guess as I can't remember what should be there but I do recall there was a bar placed across the back to secure the cabin so with my hooks, the arrangement will work well.
Over on RMweb, in the discussion about Ruston Quays, someone mentioned the Formcraft building system launched in the 1980s.
Long out of production, the concept is reminiscent of Bayko. Blocks were joined together, not with Lego style studs, but with vertical rods. Formcraft rods were made of ABS unlike the Bayko steel ones. Most importantly, the Formcraft blocks were scale 4mm bricks, or at least small groups of bricks.
Assembly was incredibly time-consuming and if you weren't very careful, resulted in wobbly walls. Flexible rods might have tied the walls together but they didn't always help with perfect brickwork. for that, the modeller had to take the same care as a real brick layer.
The system included windows, doors and kerbstones. These were available separately and still turn up from time to time. I had a feeling they ended up in the C&L range but can't see them on the website.
Not long after production commenced, the makers realised that spending a lifetime putting together a single structure wasn't appealing and introduced some larger modules for plain brickwork. These stopped people going mad at the cost of making the system less flexible.
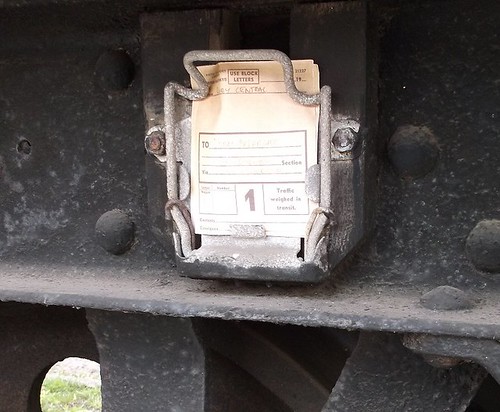
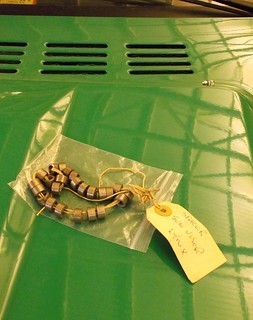
I've seen wagon labels before, sold fresh as daisies on railwayana stands. I've seen the clips on the side of wagons they fit in to, but never the two together. Until last week at Quorn on the GCR.
This would have been common enough in the days of 4 wheel wagon freight trains but I don't really remember these and I suspect neither will many readers.
Modelling in 4mm scale would just be a splodge of paint, something I'll be doing more of in future. Colour is a pale fawn rather than white. Finescale nerds will shrink real labels down and then criticise each other if the destination is wrong...
One of the benefits of visiting a farm to sail boats or play trains is that you see some fascinating machinery.
I was in a barn marvelling at the size and complexity of a combine harvester (sons of the soil will think this odd, but to me they are fascinating) when I found this little machine getting dusty beside it.
But what is it?
I'm assuming some sort of engine should hang on the back, driving the wheels via some bands around those pulleys. The seat looks a bit basic but the foot pedals are pretty sophisticated. At first I though it was a toy of some sort being about the sized of a large pedal car, but not with these.
So, tractor fans, what is this? Answers in the comments please.
Youngsters compete in practical skills such as bricklaying, plastering, plumbing, helicopter maintenance and err, beauty therapy. All good stuff and jobs that need to be done for a functioning country.
Needless to say that while the American team met the President, ours went to a reception hosted by the minister for apprenticeships. No, I've no idea who that is either. I expect that had to wear a big badge so anyone knew who they were.
It's a British problem apparently. Other countries train people in practical stuff. We prefer to produce lawyers and media studies graduates. In the Guardian, Deborah Orr can describe "the deep, dark, scary abyss that is life without a degree" without thinking this is odd. After all, in the meeja, practical skills are to be laughed at aren't they? Fans of Top Gear will have noticed James May being the butt of jokes for understanding how things work while the target audience want to be Clarkson who tries to mend things with a hammer.
You have to wonder who these people call when the tap stops working. And how badly they treat the person who turns up to fix it - after all they are mere rubbish who didn't have a proper education. Good job most of these are so well paid, they can afford the rightly massive bill presented at the end, even if it will be met with, "How much? It takes me nearly 500 words in my column to earn that!".
Which brings me to model railways. The hobby is gradually de-skilling. In the same way that most of the Top Gear audience only open a bonnet to admire the engine without knowing what any of it does, the move for modellers is towards buying in services.
Want your model chipped? Buy it in. Light and sound fitted? Buy it in. Weathered? Buy it in. Coal in the tender? You can pay someone to do that.
I worry about this. The only consolation is that when the oil runs out, the people who have skills will be king. If you remember the Golgafrincham's in The Hitchhikers Guide to the Galaxy, they disposed of the useless chunk of the population who "landed" on Earth and started making documentaries about themselves and worrying more about the colour the wheel should be rather than its shape.
Douglas Adams had a point.
To prove it, despite what the idiot Farrage tries to say, evil foreign bricklayers aren't stealing good, honest, British jobs. If you are a brickie, you've more work than you can handle. We have to import evil foreign workers because we don't train enough ourselves.
Mind you, when careers advice is given by people who never left school, mine was, do A levels, go to Uni and then become a teacher from someone who couldn't understand why anyone wouldn't want exactly the same career trajectory she had, who is going to sell the idea of practical work?
Maybe repairing a Dolphin Pools pipe fitting isn't the most common reason to be reading this blog, but I think the fix is a bit nifty.
The problem was that the vacuum suction cleaner pipe for the pool was breaking up along the bottom edge where it plugs into the outlet to the pump. Gaffer tape had kept it going for a while but eventually the cracks became too large.
A trip to the pool bits shop revealed that the paart is no longer available - indeed the guy in there is trying to find replacements as several customers are looking for one. The mix of chemicals and UV light aren't good for the plastic obviously.
Anyway, a few minutes with some calipers established that the outside diameter of the connection was about 1/2mm larger than the inside diameter of plastic waste pipe. Grabbing an offcut from the garage, with a bit of shoving it slid perfectly over the broken section. A splodge of pipe adhesive solvent and the section is braced with a sheath of pipe.
It still clips into place but should last another few years.
Or at least he shouldn't if he's visiting a prototype he plans to model!
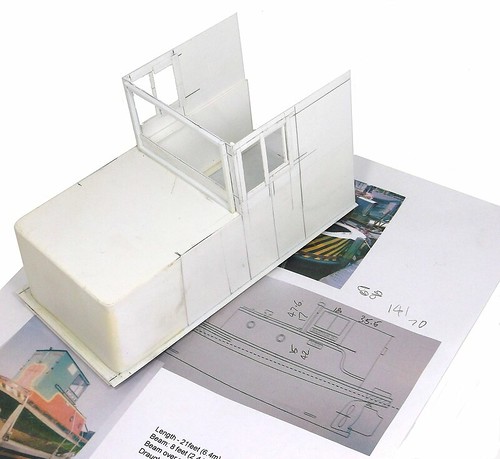
Working on the Bantam superstructure, I've cursed myself for not taking a few measurements to act as a guide. The plan I have is basic and I'm not convinced, completely accurate.
While this won't be a perfect model, I'd like it to look right and so spent quite a while trying to work out how large the windows should be. The plan makes them square but the photos oblong. Worse, they appear different from different angles.
Some areas are worked out by measuring along a vertical on a photo and then re-scaling the proportions on the plasticard - a bit like an artist holding his thumb up to a view and gauging the proportions for a painting from this.
Once I'd nailed it though, the job was addictive. Sat working with a Bond film (Casino Royale, the good one) on the telly, I knocked off at midnight because I thought I ought to get some sleep. Time flies when doing this sort of job and it's satisfying to look at the model and see progress.
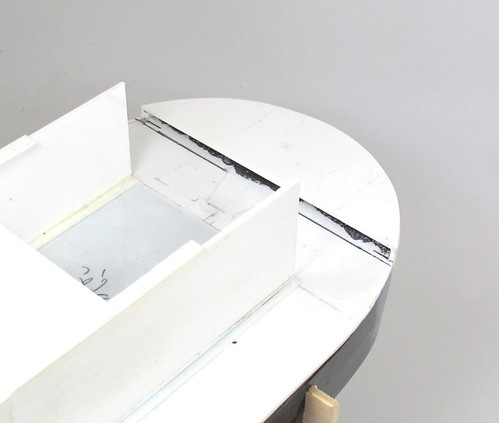
The back of the Bantam is the area where the compromised hull shape shows more than anywhere. It's too wide so working by eye is proving difficult. However, I've pressed on and produced the raised area at the stern.
Basically, we have a metal plate space away from the deck to clear the steering gear underneath. There's another access panel in front of it - don't know what this is but it's now on the model thanks to some 20 thou plastic.
The rear section is beefier sheet and with rare presence of mind, I remembered to paint inside the parts (Railmatch Weathered Black) before putting them together. Poking a brush inside afterwards wouldn't be fun!
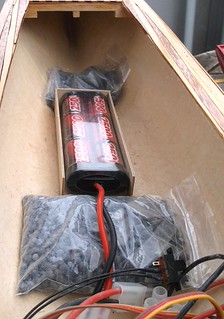
My Dad is at the stage of launching his model launch. I need to sort out the rudder linkage before sailing but first, we needed to put some weight in the hull.
The model was launched on the garden pool and the first thing we spotted was that it was filling with water. This is a bad thing.
The water appeared to be coming in around the prop shaft so tilting the boat on its end and pouring epoxy glue around this solved the problem.
On the second voyage, the hull stayed dry inside.
We gradually added small plastic bags of large lead shot rescued from my Mum's old diving equipment. To bring the model down to a sensible level, defined as when the prop was fully immersed took 1400g.
A little tidying up by condensing the multiple bags into a couple of larger ones later and it's looking good in there. The plan is to sail the model on Thursday so I better crack on with that linkage!
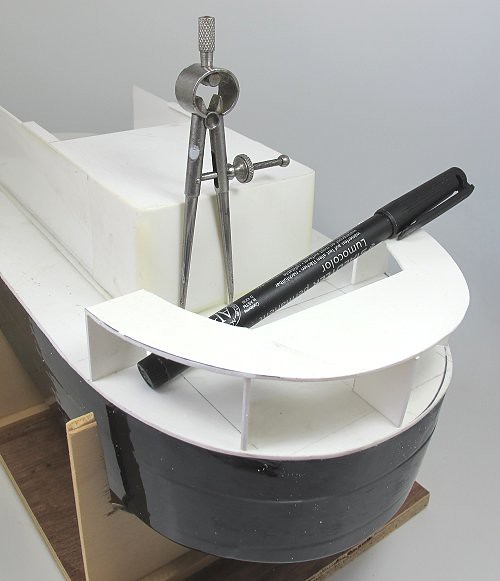
Wrapping the Bantam bumper was easy enough. A sheet of 20 thou plasticard was cut down and fixed around the edge of the support. I've deviated from the prototype in that it overlaps the top of the hull, however, looking at the photos, this will be easy to hide under some rubbing strip and rubber bumper moulding.
Hole for ropes were drilled small and then reamed out until slivers of plastic tube were a perfect fit. These were attached with solvent and once this had dried, sanded back until only a tiny amount sticks out.
The prototype bumper is pretty battered but not enough to make it worth trying to replicate on the model. Heating the plastic and pushing it around with a bit of wood should do the job if I change my mind. To be honest, anything that makes applying the wasp stripe decoration later can be forgotten.
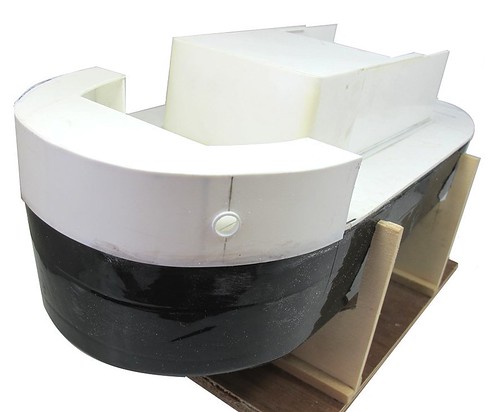
Work has involved a bit of plasticard noodling recently and since I enjoy this, I thought a little work on the Bantum Tug was in order.
The front features an enormous metal "bumper" gaudily painted with wasp stripes.
I started by copying the front curve onto some 2mm plasticard using the finest permanent marker pen WH Smiths do sell. As an aside, what happened to cheap packs of CD marker pens that used to be available?
Anyway, with the curve cut out, I then ran around the edge with a pair of dividers to give a consistent width. All this is being done by eye as I didn't take measurements. Even if I had, the front of the hull is missing the flat area it should have so I'm past caring about perfection.
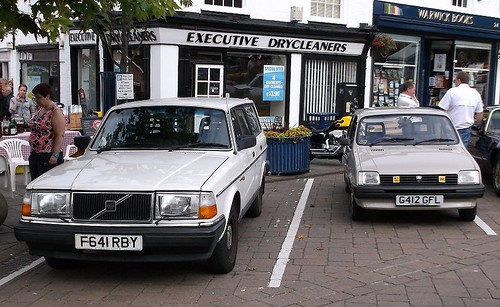
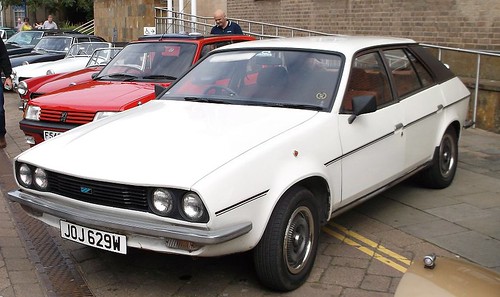
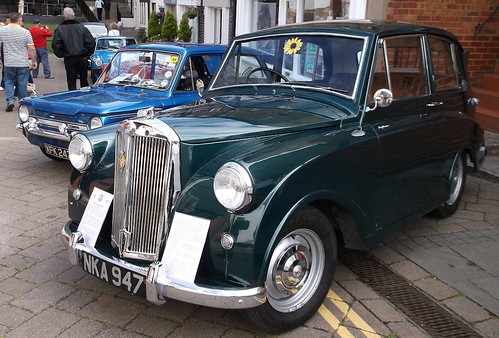
I love a classic car. So last weekend, I nipped over to the centre of Warwick to spend a couple of hours wandering around and looking at some lovely examples.
They say that you can tell you are getting old when the policemen start to look younger. I think it's when cars you remember being common when you walked to school (WALKED to school, how ancient an idea is that?) become classed as classics. How about this boxy Volvo and an early shape Metro?
Or a Princess or Peugeot 205?
The E-Type Jaguar and MG owners must have hated it. Normally, they are driving the rare stuff but here they were actually quite common cars. On the other hand, when did you last see a Triumph Mayflower?
All good stuff. Nice to see so many people who care about something old. Chatting to a man who had bought a car with trim held in place with copious amounts of wood screws was fun. Give it a few years though, and they will be gone and the car restored to better than it came out of the factory.
One of the "joys" of my mix of jobs is that I get to deal with people by e-mail who are best described as knob-heads.
Their number are very tiny but their effect is disproportional. A few days spent dealing with them leaves you deflated and thinking it's time to give up on the hobby entirely. Which, if I'm honest, they would consider a success.
The solution, at least recently, has been to go and do something practical. In this case, sanding things and painting them brown.
Some were brown with java bean coloured emulsion, some with frame dirt spray.
Brown. Lots of brown.
And you know what, I felt a lot better for walking away from the computer actually making something. Perhaps if my pain in the backside corespondents did the same, they would be rather more interesting people.
One feature of Ruston Quays is a large roadway area. In real life this would once have been cobbled but aside from being a long job to lay, cobbles say "nice olde worlde" to me.
I've decided that the cobbles have been tarmaced over in the pursuit of modernisation. Worn tarmac says "run down cheap and scruffy" to me, which is the atmosphere I want the layout to convey.
Anyway, I thought it would be fun to show just how rubbish a job the tarmac gang did by having a few cobbles visible. Daler board is the same thickness as Wills cobble sheet so I laid the two together (Daler board, suitably painted and weathered makes excellent 4mm scale tarmac) and smeared some old ready-mix filler over them.
After it had dried, there was some sanding action and eventually I got a smooth surface with some cobbles showing.
Handy hint: If ready mix filler has gone off, throw it away. Do not mix it up and use. Horrible, lumpy mess will result.
Painting is still a work in progress. Precision Paints tarmac shades were streaked together but I'm not happy with the result, when I did it on raw card it looked superb but I think the less than porous filler hasn't helped.
The wiggly edges look nice though. I might re-try with fresh plaster.
Today's edition of BRM sees the first appearance in print of Ruston Quays. In the article, I explain how we came up with the plan, or at least how I came up with an idea and then Paul Lunn made it much better.
The rest of the issue concentrates on layouts with no less than 16 in a single issue - surely some sort of a record? Just the thing to read on holiday leaving you fired up to get cracking with some modelling back home.
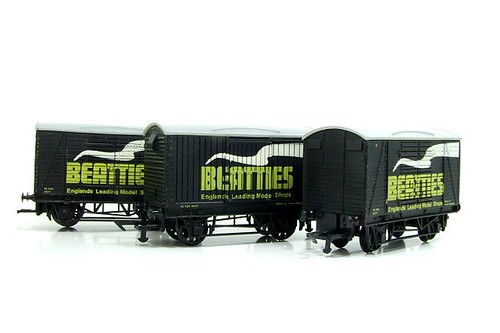
I love flogging stuff on eBay but once the initial joy of selling your item has paaseder, the hassle of packing the thing up to survive the ravages of the postal service rears it's head.
Yesterday, I received 3 Beatties vans in nifty packing. Opening the big jiffy bag up, I found a plastic tub. In this were the three wagons wrapped in bubbles.
Now, I suspect this tub once held rice from a takeaway. I've number of smaller ones for mixing mucky scenic materials. It's perfect packing through, light and strong and didn't cost anything in the first place. Top marks!
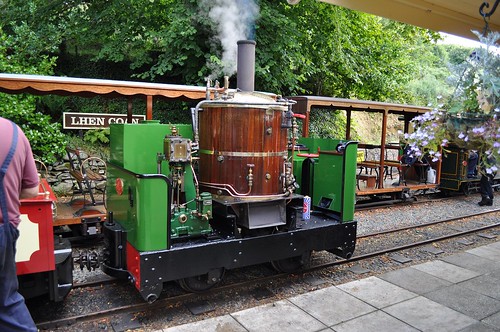
Facebook tells me that a year ago, I was on the Isle of Man looking at steam trains. That seems a good enough reason to post this picture from the visit of the fabulous SteamPlex to be found on the Groudle Glen Railway.
Part Simplex (the chassis), part steam lunch (the steamy bits), this loco runs a bit like some sort of mad professor designed machine with lots of fuss and spitting and smoke. It's brilliant.
If you wonder what it sounds like, enjoy the video below:
Last year, I met Dark Star Miniatures at the IPMS show in Telford. At the time I was impressed with their Molten Metal paint and a couple of months later, received a selection for review in BRM.
Since then, I've used the paint on a couple of other projects but last week my Dad reached the point on his latest model boat where he needed to make the whitemetal castings look like brass. Since the prototype is a posh river launch, we can assume the metal would be well polished and from the selection of paint, he picked one of the 8 shades of gold.
The whitemetal was primed with Humbrol acrylic primer applied with a brush. Then two coats of Molten Metal, again with a brush.
The result looks great, very shiny. Best of all the painter reports that the paint worked very well, was easy to apply and after an initial shake, didn't separate like metal enamels are wont to do.
In discussions about model railway magazines, one title that is often held as an exemplar is "Model Railways", at least in the days before it was sold to an evil publisher who dragged it downmarket.
Curious to see what was so great about it, I've been flicking through old copies at my model railway club.
I'll admit I've been enjoying it. Some of the content is very much like the early MRJs and includes people like Iain Rice bashing metal and producing some nice scratch built locos. When I say nice, I mean of a quality I think I could achieve but not so perfect they are off-putting.
In other words, stuff that I like but would be castigated on forums by people who never lift a modelling tool in anger.
There's interesting prototype articles and rather more drawings than you see today - people willing to spend hours drawing up a prototype for no money presumably being thicker on the ground, or perhaps there were just more draughtsmen around then?
My best spot was in the 1983 review section, coverage of the new Hornby HST set and the same firms Class 25 diesel. To help you see them on the poor quality mobile phone photo above, I've added some blue arrows.
As you can see, despite these being major RTR releases, the only pictures on the page are wagon kits from Cambrian, Ratio and Maj models. That and a tin of thinners.
Can you imagine the howls if anyone tried this nowadays?
Regular readers will know I've been sorting out the late John Webb's bits and pieces. In amongst all the tools and kits, we found a collection of steel rings threaded on a bit of string.
The British Leyland paper label claimed that they are spacers for the sun visors on a Lynx.
Now this makes them rare. After all, the Lynx was a prototype fastback version of the popular TR7. Scheduled for launch in 1978, the project died when the Speke factory was shut down. John worked in the right department to have been involved with this and I assume he picked up the parts as model railway wagon weights when they were being chucked out.
I've always liked the TR7. As a kid I wanted a Beetle and then a TR7. A bit of me still does but fortunately a more sensible bit tells me that I've too many cars already and another old banger probably isn't a wise investment. I'd still like a plastic kit though, Airfix of Monagram, I'm not fussy.
Anyway, because of my interest, I knew of the Lynx in Gaydon museum so when I found the spacers, I got in touch to see if they were after some spare parts. After a chat with curator Stephen Lang, I hopped in the car and dropped them off.
The photo shows the spacers carefully placed on the Lynx bonnet. We couldn't immediately see where they should go but then the car is in pretty good shape. At least if the sun visors fall off, they now have some spare bits.
After this, I signed some paperwork to pass ownership over to the museum. I suspect that this is vital when someone donates an E-Type Jag, less so for a few random bits of metal, but better safe then sorry. If anyone decides that these are worth millions (they aren't) then at least the museum can prove that they really do own them.
After this I was free to have a quick wander around the museum and ogle some of the other prototype vehicles on display. I wonder how many of these my friend had a hand in building?
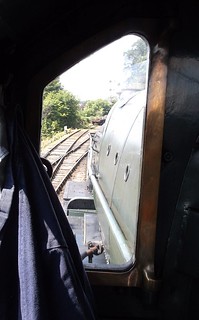
This time last week, I enjoyed an interesting day on the Severn Valley Railway. BRM had arranged for a couple of people to take part in a loco driving experience for one of our monthly DVDs. Thus, Howard Smith and myself found ourselves waiting on Bewdly station platform for Earlstoke Manor and the rest of the people taking part in the day.
We were up first and along with two crew, our cameraman and a nice lady called Barbara who had asked for the trip as a birthday present, we left the station with Howard driving. This is only the second time I've ridden on the footplate of a moving steam engine so that in itself is an experience.
Instruction for the simplest course that we were on is of the "pull that, push this" variety. No previous knowledge is assumed or required.
My role was to swing the shovel and keep the boiler topped up with water. Freelances get to be firemen!
Anyway, look out for the October issue of BRM (out next month) to see how we got on. All I can tell you is that hole you throw coal in is pretty small!
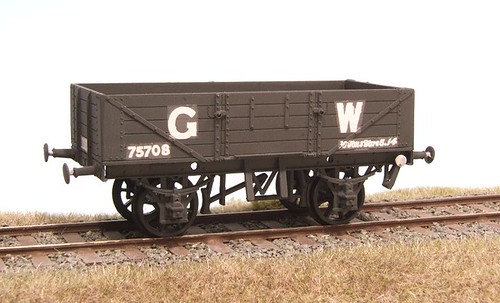
I've built a few Great Western wagons over the years and the weirdo brake gear has always confused me. Normal brake gear I understand, push the lever down and the brakes come on. If there is a clever cam arrangement then the brakes come on on both sides.
Dean-Churchwood brake gear seems a lot more complicated and drawings didn't really explain it to me. My solution has been to build normal wagons with normal brakes. Even the GWR eventually saw sense after all.
Last week however, I had the chance to photograph a DC fitted wagon at the Severn Valley Railway. The vehicle is mostly missing a floor which makes the light a lot better for taking snaps. Best of all, I remembered how to use the panorama function on my compact camera to capture all the action.You might want to click on the image to see the details.
It still looks over-complicated to me. If anyone can explain the benefits, I'm all ears.
Picked up for £1.50 from a charity shop, this is a book that show the past (1982) really is a different country. Back in those days I like trains but hadn't even discovered the joy of a Platform 5 pocket book. They were blue boxes on wheels and I wished I'd seen steam trains like my Triang 3F or Hornby Jinty running.
How we miss those blue boxes now!
In his editorial, LA Nixon gets sentimental for the end of steam but points out that many of the early diesel classes had also disappeared from our rails. At the time though, we could still enjoy lots of locomotive hauled trains and plenty of freight, much of which travelled in 4 wheel wagons. It seemed like we had lost a lot but this was the way things were to be.
Flicking through the pages, so much is different now. OK, a few venerable diesel classes soldier on but in those days a Class 37 on the front of a train was a regular occurrence. 56s on MGR wagons were new and exciting. Class 58 was a year away and now they are obsolete and in preservation!
The book captures the later days of the traditional railway. A Class 27 hauls 10 wagons including a VGA, 7 opens covered with tarpaulins and a solitary oil tank over the section between Bridge or Orchy and Crainlarich. 44004 hauls a great long train of bauxite 16 ton minerals past York South shed. On 08 hauls parcels stock out of St Pancras where now only Eurostars fear to tread.
One of my favourite shots shows a pair of 104 DMUs sat in Buxton - the scene looks so vintage. I know they were rattly ways to travel but the nostalgia kicks in...
Years ago I could never understand why anyone would want to model boring "modern image" but now it's not so modern, the scene looks a lot more appealing.
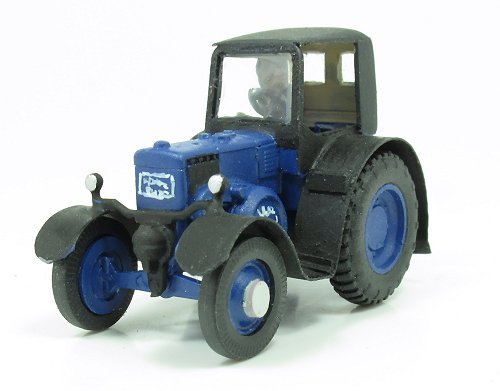
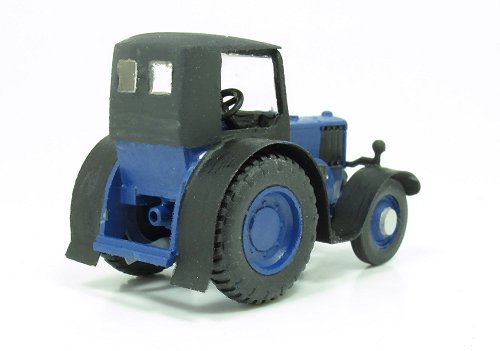
Blue paint found, the Lanz Express Bulldog tractor is ready for the farm layout. Some Humbrol Oxford blue paint is a pretty good match for the colour of the prototype. Matt black mudguards contrast with a Railmatch weathered black hood - in real like the tractor is shinny but I don't do gloss paint so the different blacks highlight the metal vs material differences.
Lettering, horribly crude in the photo but will be fine in the context of a larger model, is white ink drawn on with a mapping pen. I picked the technique up from Geoff Kent's book and it works fine, were I a better calligrapher, the rests would be better still. The kit does come with a rub-down transfer sheet which has the Bulldog plate on it but it's the wrong colour and very thick.
In the novel, I've fitted a front lifting device. Not sure if this would have appeared on the prototype, at least one with mudguards, but we'll worry about that when Hollywood comes a'calling to make the film. Something for the special effects guys to worry about.
Before priming, the last job was to add some cab footsteps, a bit fiddly - I ended up making an angle out of microstrip as a single tread wouldn't stick out at the right angle when glued in place.
After this, it was down to the spray booth, out with the Halfords primer and the model was given a quick shot. Not perfect but good enough for what I'm doing. Now, where's my blue paint?
Sometimes I like to browse eBay. Let's be honest, we all do. I try to avoid the toy train stuff though and usually end up in Other Classic Cars. There I can look at oddball motor vehicles while not straining to stop myself bidding.
Created by Gilles Poncin in the 1970s and based around a Citroen 2CV engine, this was the first in a line of rugged, off-road, vehicles.
Now, I have a garage full of broken Beetle so I don't need a real one, no matter how much fun it looks, but how about a model version? One that worked on the water?
The worst thing is that the listing even included a plan.
Being angular, the build shouldn't be too hard? The challenge would be to find suitable wheels and tyres. They aren't ornamental, there is no propshaft, as far as I can see on YouTube, the treads provide drive in the same way paddle wheels do. Or even the Nikko Vaporizer.
But no. I have too much on the go. In fact I really must stop looking at websites showing this car. I leave all this to someone else.