Saturday, December 31, 2011

Global Van Lines Truck

Ford Truck

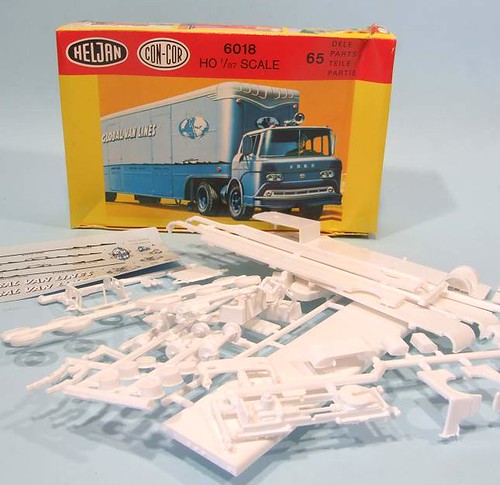
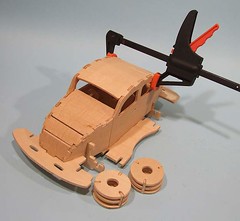
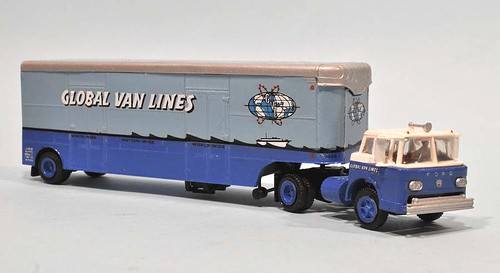
How's this for timing. We reach the last day of 2011 and I put the finishing touches to the Ford Truck.

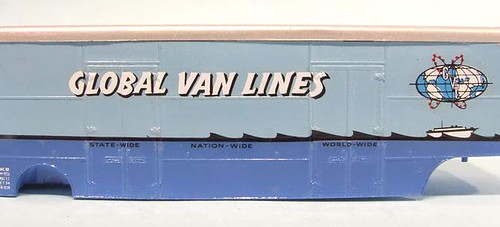
After letting decals dry, the model was given a blast of satin varnish to seal them in and tone down the sheen of the sides. I know the real thing would have been gloss painted, although the paint probably wouldn't have held its shine like modern ones do, but in my opinion, satin looks far more realistic for a miniature.

Sheen was a problem with the black paint that followed. Brushing Humbrol is normally simple but for some reason the stuff insisted in drying with an eggshell finish. A good stir and second coat sorted this out which was a relief. Mind you, the first go looked annoyingly good with not a brush stroke to be seen !

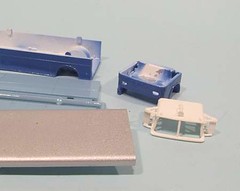
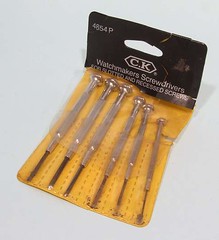
Finally, the cab glazing was put in with Krystal Klear. Not perfect, but adequate for this model. I'm really surprised that the kit didn't come with clear plastic parts for this, it would certainly have been easier. The windscreen was too large and curved for the glazing liquid to be placed in with a cocktail stick or small screwdriver - the paddle end of the Tamiya paint stirrer did the job though. Mind you, even that took a couple of attempts.

Were I to build this model again, the biggest change I'd make to the process would be spraying in matt rather than gloss paint. I think the finish would be better (no dust or paint collection around detail) and I could go over it with acrylic gloss varnish to give the transfers somewhere nice to sit. Even though there would be a subsequent satin coat, the final paint thickness wouldn't be any greater as I had to put plenty of base colour on with the poor coverage of the gloss.

Anyway, that's the last project of the year. Time to get back to something serious now. In the meantime, Happy New Year everyone.

Friday, December 30, 2011

Decaling

Van side

Decals (or transfers as we, in more civilised countries call them) can make or break a model. On the Ford truck they make a big difference to the look of the thing so I wanted to do a good job here.

The ones supplied are waterslide but at around 30 years old, I wasn't confident that they wouldn't disintegrate on contact with moisture. I needn't have worried. The transfer film is pretty thick and so I was able to float them in my little dish of water and slide the film from the backing paper easily. Admittedly I did do my best to slide the decal straight from the backing to the side of the model. Having had a few nightmares carrying released transfers around in the past, I've learned my lesson !

The black "sea" neatly covers the gap between the upper and lower halves of the trailer. The two parts don't mate perfectly, or at least didn't for me.

Thick film causes problems with it has to sit over the various hinges and panel lines on the side but a coat of Micro Sol and Micro Set (still can't work out which one does what) did help a bit. If I were aiming for a perfect model then perhaps I'd have been more concerned but as long as I keep reminding myself that this is just for fun, then all is well.

Thursday, December 29, 2011

Phil's Grotto

Phils Grotto

Ahh, the joys of a Pantomime. Men dressed as women. Women dressed as men. Audiences full of children with tiny bladders. Buckets of popcorn mixed with ice cream all over the floor. It's what Christmas is all about.

As if the sugar-rich food wasn't enough, our theatre also stocks a fine range of flashing spinning things for the kids to wave around. These arrive in big boxes from China and when unpacked, quite a few of them fail to work. How this happens is a mystery since they must cost a whole 50p to make !

Anyway, our options are to throw the duff ones away or do something about them. Since the world has all the pink landfill it needs right now, I get to do the later.

I set up a workbench in the cupboard under the seating that is acting as a grotto. A big box of goodies on one side, a smaller box of goodies that are beyond saving on the other. My toolkit is pretty basic, just a small Phillips screwdriver, battery tester, some emery paper, a length of brass wire with a hook on the end and I'm ready for work.

The main problem quickly shows itself. In transit a lot of the batteries have tarnished on the end metal contacts. Once checked to see if there isn't any electric in the cell, a rub of emery or even the leg of my jeans is enough to remove the tarnish and see the windmills lit up and whirling. Light sabres and stars take a bit more effort as they are powered by button batteries accessed via a small panel held in place with a screw but that's the only problem.

Sometimes spring contacts need pulling up a bit to give a bit more pressure - that's the job for a wire hook that can be poked down battery holders.

All of this is basic stuff but not something we have time for when there is a show on. After a couple of hours though, the pile of very dead items was still tiny whereas the stock of repaired goodies will be enough to keep us going until the end of the run and delight small children. Even the dead items will be passed on the boat club where they will be stripped for LEDs and useful bits of tube.

Hows that for doing our bit for the environment ?

Wednesday, December 28, 2011

Clever design saves on masking tape

Sprayed partsThe biggest challenge I could see from looking at the box artwork for the Ford Truck, was painting. The thing that initially attracted me to the model was the pretty picture but I suspected that replicating the design was going to stretch my masking abilities.

But no, the designer has made things easy. All the major parts are split along the colour lines. Thus, the cab makes up into two sub-assemblies. One is painted dark blue, the other, white.

Better still, the trailer splits the same. This is more impressive as it would be much easier to mould, and simpler to build, if the sides were in single slabs of plastic. However, we get a tub for the bottom, sides, and roof. Each is dark blue, light blue and silver respectively. I wish many model locomotive kits were as well designed.

Spraying was fun. My stock of blues isn't large so I had to use gloss colours for these. In theory, this is A Good Thing as the smooth surface should be more decal-friendly than a matt one is. Trouble is, I'm not very good at spraying gloss. Coverage always seems very poor and the only way to hide the white plastic is lots and lots of very thin coats, each given a shot of hair drier before the next one is laid down. Tedious and prone to attracting dust.

In the end, I have mostly got away with it. However, there and hour and a half of work to produce a finish that in truth isn't as good in some ways (I win on paint thickness, they win on finish) as you will find on a 4 quid diecast lorry.

Tuesday, December 27, 2011

Global Van Lines Ford Truck

Ford Truck

It's Christmas time and for most people, this means a break from work. I don't get one of those, in fact in theatreland it means lots of panto hours, weird days and long shifts. Nothing conducive to serious modelling. So, I've dug out a nice little plastic kit to stick together.

To make things simple, the model is a Heljan/Con-Cor HO scale kit for a Ford Truck. Something I have absolutely no need of, so if it goes wrong, I don't have to care.

The model was picked up at a show a few months ago for a couple of quid second hand, although still wrapped in cellophane. The picture on the box looked nice and it was cheap.

Inside, the kit is white plastic and dates from 1980. There is a little visible flash on some of the parts but generally looks OK. Nice decals (transfers to UK modellers, but this is an American kit so I suppose I ought to speak in the vernacular. I'm wearing a ten gallon hat while I work too.) are included but oddly, no clear plastic bits for glazing.

As well as the truck, there are some bits of furniture included on the sprue. They will be stashed away on the spares box as you never know when you might need a 1/87 scale grand piano !

Monday, December 26, 2011

Better a Yule log

Wooden BugChristmas Day isn't a time for hiding away at the workbench, One should steel oneself to spend time sitting beside a roaring log fire with the family and watching the "top quality" entertainment provided for us all by the big television companies.

If you get bored with StictlyComeXFactorOldFilmOverSentimentalDrWho and find yourself with itchy fingers, it's nice if earlier in the day, someone thought to get you a model to put together. Lego is ideal (for all ages - really, I mean you can't solder or glue or anything) but I didn't get any of that. What I got, for fun, was a Quay Imports VW Beetle kit.

You'll have seen these in shops - slot together plywood models that sort of resemble whatever they are supposed to be of. Entertaining to build, much like a 3D jigsaw.

Or at least that's the idea.

The Beetle exposes a number of flaws in the plan. First, the die-cutting machine that produces the parts needs a new blade as the one used on my kit is blunt. Hence, easing out many of the bits is a bit fraught. I used a knife to cut some out of the sheet.

Next, the part fit is in many places, terrible. Tab and slot construction should make this a joy. Instead, I was hacking away to ease many of the Part A's into Part B.

Apparently, you need no glue for assembly, which is probably true for some kits in the range, but here the designer got clever and tries to bend the plywood to produce an appropriately curvy shape. The roof needed glue. And a clamp.

Finally, the instructions. I know these things are done to a price but the back of the photo shows a plan of the bits in the sheet with numbers. In theory you match the numbers up and the model goes together. There are well over 100 of them. I suppose you can treat the model as a puzzle but an exploded plan would be nicer.

On the plus side, the wood smells lovely as you take it out of the packet. And it will add warmth to the room if it ends up on the fire. Maybe I was unlucky and got a duff kit but just in case, next year, instead of an exercise in frustration, can I have a lump of wood and a pocket knife so I can sit and whittle instead ?

Update: After another hour and a bit, I finished the model. If I sand down the tabs a bit then the little wooden car will look OK. I'll still ask for Lego next time though.

Wooden Bug

Sunday, December 25, 2011

Merry Christmas !

Christmas Card

Merry Christmas to all readers of Phil's Workbench. And a happy new year to you as well, what the heck, 'tis the season to be generous.

I hope you find good things under the tree and have remembered to buy the batteries for those that require them. If not, well you'd be surprised what you can power from the outputs on an old H&M Duette if you have a couple of long wires handy...

Saturday, December 24, 2011

Cleaning silver chain

ChainChristmas time approaches and the wallets are getting thin.

Like many people, I struggle to find the right present for some relatives. My mother mentioned some antique centre with jewelery in she liked but that still leaves me with a pretty wide range of options, especially if I discount anything that would cost more than a decent locomotive or boat kit ! (Note: I'm happy to spend the money, but by this point I don't want to be taking a risk, I want to be certain I'm getting the right thing)

I did find a rather nice carved shell pendant on a silver chain. It was sensibly priced because the chain was mucky. Not a problem I thought, I must have something that can fix that. If everyone else is too lazy to do a bit of cleaning, their loss is my gain. Anyway, I rather like the idea of restoring something rather than just buying it. It's a bit more personal that way and you aren't likely to see another example any time soon.

Talking to the man in the shop, he mentioned something called "Silver Dip". A trip to a hardware shop and 4 quid furnished me with a tub of the stuff - Goddards Silver Dip, Cleans Silver Fast. Apparently.

It does too. I dipped the chain in the liquid and swooshed it around gently for a minute and the dirt fell off. You can see the difference in the photo comparing the chain to the tarnished jump ring. All I've done is dip it a couple of times and then rub the chain with some kitchen towel to remove excess dip and polish the metal slightly.

Time required, less than 5 minutes. It's a heck of a lot easier to clean chain this way than doing it with elbow grease. My mind now wonders what is in this stuff and whether it has any model making applications !

Friday, December 23, 2011

The best presents are quality tools

CK ScrewdriversSome days I struggle for things to write about on this blog. On others, I find inspiration somewhere and know what I want to say. As I write, serendipity has happened. There was I struggling with lack of project progress thanks to work and illness. Then I read the Toolmonger.com blog where someone is talking about presents for those of us with practical minds.

The gimmicky stuff can be useful, but getting someone a quality set of drivers or the like will always trump the gimmick.

Which is so true, as illustrated by this set of screwdrivers.

I was presented with these as a little gift by someone while I worked for the Ministry of Cows over 15 years ago. You might think "nice set of jewelers screwdrivers" but they are more than that. I can get a "nice" set for a couple of quid. For that money they will be used and abused - picking up superglue or oil (don't mix those up !) to drop in little spaces for example. Or maybe as punches when removing stubborn gears from shafts. When the blades get to battered to use on screw heads, I restore them with a file.

These screwdrivers are kept for best. Precision work. Those moments when I fancy myself as a bit of an engineer rather than a bodger. They also travel to exhibitions in my toolkit, in fact they have probably clocked up many thousands of miles this way. At no point do they get hit with a hammer or dipped in superglue.

So, as the man says, if you are looking for presents, a single high quality tool might look unimpressive under the tree, but it will be in use for many years to come and every time the owner picks it up, they will remember the person who gave it to them.

Thursday, December 22, 2011

Super D Chassis video


One for the gearbox pervs among you today - and yes I know there are some out there !

Powering the Super D will be a Cannon motor working through an ABC Models gearbox. The whole unit came from ABC ready assembled. All I had to do was file a flat on the axle, slide it in place, tighten the grub screw with an Allen key then apply power.

This is literally the first test. No lubrication yet, no running in and electric from my trusty H&M Duettee. Compensated chassis aren't at their best when not on the track either. Considering all this, the running is superb as you'd expect from a Rolls-Royce power unit. Mind you, at approaching 100 quid, it's not cheap but definitely worth it for the beautiful quality of the engineering. It goes to show, that in the UK we can do something other than make c**p telly and pizza after all !

Best of all, the body slips over the top of this lot with the motor in the firebox. I could fill the boiler with lead for some serious traction...

Wednesday, December 21, 2011

Compensating an 0-8-0 chassis

0-8-0 Chassis

The Super D box of bits contains really lovely item - the chassis. It's scratchbuilt and fully compensated. I post a picture, not because I want to claim any input (It was built when I got it) but for those who fancy doing the same thing and want to know which wheels should move up and down.

Now I've actually seen the beast, it's simple. The front pair use a normal compensation beam. A fixed third axle is then followed by one able to tilt. The pivot is cleverly a bolt so the ride height can be adjusted.

On a 7mm scale loco, this is a serious level of sophistication. Most people just fill the boiler with lead and let the weight bend the world, or at least the layout, around the loco. Some may whinge about the lack of inside cylinders but then they probably don't build their own toy trains. This thing might be lacking in this department but, by golly, it will be able to pull the side off a house.

Monday, December 19, 2011

Builders Yards

Do to lots of work (Panto time in theatreland) and some nasty sickness (clearing a hall after 600 kids isn't a pleasant job), I've not done enough model making recently. Therefore, for todays' post I'm taking the opportunity to point out that Iain Robinson is posting picture of his new project - wonderfully atmospheric model building work building garage.

His post that I loved most recently was one showing a builders yard he created back in 1980.


I'm sure I remember reading the article that went with it and being impressed and inspired. It's certainly the kind of modelling I aspire to rather than the clinical perfection showing in the finescale magazines.

The entrance intrigued me though. When I made my yard from Hornby Skaledale structures, I had envisaged just such a feature. In the end I chickened out and went for a simple gate but I wonder if I was influenced by the memory of what I read in an old magazine ?

Builders Yard

Who knows ?

Anyway, I've run out of interesting things to say, so please pop over to the Iain Robinson - Modelmaking blog, I'm sure you'll find something of interest.

Sunday, December 18, 2011

Mike Cook - RIP


It is always sad to hear the news that a friend in the hobby has died, but in the case of Mike Cook, it is especially bad.

For those who didn't know him, Mike Cook was York Model Railway Exhibition. He had been the lynch-pin of the organisation for 49 years and 2012 would have been his 50th exhibition. A record no one would have beaten. Sadly, he will only be with us in spirit.

My Dad and I have taken many layouts to York. We've been attending as exhibitors on and off since the show was in the centre of the city. Those days you could finish your operating session and nip out to watch the buskers performing in the streets whilst munching Yum-Yums. In the evening there would be social events to entertain you if you wanted. I always avoided the barn dance but loved the sing-song in the Brown Cow pub.

With one man the driving force behind the show, the quality could vary slightly from year to year. Mike admitted as much in his book "The Show That Never Ends". However over the last decade or so, you'd have been hard pressed to have found such a consistently good show anywhere.

More than that, and I think this is where Mike scored, the show has an undefinable atmosphere. It's friendly and pleasant. You want to be part of the gang inside the barriers but if you can't be, it's worth being outside and wandering around.

We'll still be taking Flockburgh to York next year. It's a shame Mike didn't make the half century but he had a damn good try. We'll all be doing our best to honour his memory and look to carry forward his legacy, a superb show, for many years to come.

Saturday, December 17, 2011

Turning Turtle

Turtle Boat

When you pick up a glossy magazine, you might well assume that its production was a simple process with very little in the way of problems. You would be wrong. Readers of this blog know I screw stuff up sometimes but today I'll document a bigger Oooops than normal.

The picture shows a Korean Turtle Boat, an early type of warship. It's built from an Academy plastic kit intended for schoolkids. When I saw it, I thought "That looks fun and I could do a review of it." so I purchased one and eventually got around to building it.

As a model, it's pretty accurate. OK, so there is a solar cell to power the oars rather than little people and a couple of sails, but then the kit is as much science project as model. I spent a fair amount of time painting the thing based on some photos I found on the web.

The rowing works well, but needs a decent amount of light, not something on offer during the cold winters morning I had for the on water photography. Not to worry, I got some good shots (the best are saved for the mag) including the one above.

Then I tried to retrieve the model with a hook and turned it over. Water got in the top and the thing sank. Efforts to drag the bottom with a net were not successful so it looks like I've lost this boat. Needless to say, the piece was submitted with me pointing out that I couldn't do much if he didn't like the pictures !

Friday, December 16, 2011

Class 25 bodyshell

Class 25 bodyshell

Normal service on other projects was interrupted for an evening so I could test the Class 25 model kit to see if I could assemble it. I'm not getting a couple of BullAnts in if there are fundamental problems that I wouldn't be able to solve.

As you can see, there aren't. In a couple of hours I had what you see in the photo.

The first stage happened while the model was in the flat - under the bodyside there are some odd lumps and bumps etched in. These were removed with a pair of scissors and a file. I think the designer was trying to replicate the lumps under the body of the prototype but didn't spot that these are set back underneath. No matter, I can make those myself.

Next the corners on the top edge were formed in bending bars. The metal is thick and I didn't anneal it so they didn't come out sharp, but slightly radiused, just like the real thing. I'd like to claim I knew this would work as well, but there was a lot of luck involved. The main roof curve was formed with finger pressure around a aluminium round bar. This sort of job people assume is cleverly done in one hit by us "experts" but I just prod and poke away until it looks right.

The doors go on with normal solder, the ends fitted with 100 degree solder and gaps between cab top and roof front filled with low melt. That's three different types in one little model. Finally the cab front detail was filed off in preparation for some new nose work.

Which gets me to the stage I was with the Class 26 by picking the resin body out of the box. I know how the rest should work out now so at least I have one kit underway that I can be confident about !

Thursday, December 15, 2011

3mm scale Class 25 diesel kit

Class 25 kitAfter the Warley show, I decided that our Class 26 diesel had been so successful, it should be joined by a Class 25 as well. I knew there was a kit advertised on the 3SMR website and it looked decent enough with etched sides and cast details. In my head this meant a quick build using the same motorising techniques as the earlier model.

The problems started when I rang the company to be told that the kit wasn't available any more and had been replaced with a resin body intended for a RTR chassis. The cost had risen to - my original plan would have come in at around 100 quid. Not cheap but then I'm working in an odd-ball scale and using read to run motor unit. The new version was half as much again. I want a loco but did I want it that much ?

I also didn't fancy the resin shell much. It was OK, but the etch version would be better, or at least I hoped it would.

Anyway, in desperation I stuck a plea on the 3mm scale mailing list to see if anyone had one of the kits in their stash of bits. 3 offers came in and I quickly secured a deal for the one you see in the photo.

One other reply pointed out something I hadn't spotted by fans of the class will see immediately. The model is unbuildable.

Class 25 locos were built by several builders. The early ones has doors in the nose and grilles dotted around the bodyside in a slightly random fashion. The later versions moved the grilles up into the roof and removed the nose doors allowing a bigger window. On the kit we have the early grilles and later nose. Putting the grilles in the top would be a nightmare, so it's a good job that I wanted the earlier version isn't it ?

Wikipedia article on the Class 25

Wednesday, December 14, 2011

Tiny Fairey Huntress in Model Boats

Another first for me in the January issue of Model Boats magazine - an article by me about a model built by someone else. Perfect really, all the fun of the writing (and the fee) but none of the tiresome model making stuff to do first.

The model is a fully radio controlled model of a Fairey Huntsman built by David Pledge, Chairman of Knightcote Model Boat club. It's an amazing little model which unlike a lot of miniature boats, works properly on the water. He has sailed it alongside other much larger models with the little scamp nipping in an out between them and it doesn't get swamped or do anything daft.

I've learnt quite a bit writing the piece. 1/2 and 1/4 size AA batteries exist for example. I didn't know that. I've also picked up the importance of weight for tiny models. at 60.5g, this is a real featherweight, which it needs to be to work of course. The batteries make up 1/4 of the total weight.

Tiny boat

Model Boats Website

Tuesday, December 13, 2011

Making the footplate flat

Footplate Jig

Wary of my experiences trying to rescue the old kit bits, I took a critical look at my Plan B Super D.

In the main, it was very good but I still wasn't happy with the footplate. What should have been a long flat thing was slightly twisted. It's an easy thing to do and the wonkiness was very slight, but still (IMHO) not good enough. However, I reckoned if I could rotate the boiler very slightly around its mounting at the firebox end, all would be well.

A little work with a gas torch released the 100 degree solder but this don't entirely do the job so I cut down with a fine blade along the front face of the 'box and by the time I was 3 or 4mm down, the tube would move.

Before fixing it back in place, I made a jig to hold the footplate perfectly flat. Basically this is a bit of wood with holes drilled in to match the body fixing bolts. The body is fixed to this and construction can continue. And yes, I did check the wood was flat against a mirror first.

I just wish I'd done this a couple of days ago. Never mind, maybe I'll learn for next time.

Monday, December 12, 2011

Realism and a plan B

WonkeynessLast week, the Super D was looking good. Then I went to sleep and had a good look at it again in the morning. Overnight the model railway gremlins had struck and ruined it.

The front plan view was the worst problem. Despite marking and (I though) soldering the smokebox in the right place, adding the boiler had twisted it horribly. To be fair, the photo exaggerates the error but it was till there and bad enough I couldn't ignore it.

Running rulers and dividers over the model, I found other "issues":

Wobbly FootplateThe footplate was quite badly distorted. On one side it was was spot on, the other could be pushed up to a flat edge but refused to stay there. I suspect this happened when the boiler got dinged. The metal hadn't just bent, it had stretched and distorted.

At the back, the cab and side tanks (?) were pretty good but the front of the firebox wasn't perpendicular to the footplate edge. This gave the boiler an natural path diagonally along the loco. Fixing this probably contributed to the wonky smokebox issues.

This, ladies and gentlemen, is why taking on kits someone has already had a go at is harder than starting with a fresh set of parts. I need a plan B.

Those with sharp eyes will have noticed that the tags at the bottom of this post include one marked "G2". You might even have clicked on it and realised that this isn't the first such loco I've constructed in 7mm. The last go became a still-born project that has been gathering dust for a couple of years.

Unearthing it made me realise I had another option. If I nicked the body from this loco, I could marry it up to the parts I already had. My construction didn't look too bad and it sat on the chassis OK. I've ordered a replacement body kit to go in the box I'm robbing stuff from, but for the moment, it looks like this will keep the project on track.

G2 Plan B

Sunday, December 11, 2011

Cheap toy trains

Cheap Locos

I’m not really sure why I own these model locomotives. Each was bought from the Hornby Railways stand at a show for the princely sum of 5 pounds. Yep, a fiver for a real, working, toy train. If anyone is making money with this deal, I’ll be amazed.

Their appearance in my collection is probably just because of the price. When I was a lad, buying a new toy chuff-chuff was a rare experience. Nowadays it seems like many modellers pick up every single item from the major manufacturers as it arrives at their favourite on-line retailer. If you read the forums, there are always howls of protest when something comes out at a price beyond what they want to spend along the lines of “How can the evil manufacturers expect us to buy everything if they insist on charging so much for it ?”. For me though, as mentioned last week, a new loco is a significant event – I know Hornby, Bachmann etc. Don’t expect me to buy everything they make and I for one, am happy with that situation.

If I can have a pretty loco simply by handing over the smallest denomination note you get from an English bank though, it seems difficult to resist. The problem is, what next ?

Both models are based on Hornby’s basic 0-4-0 chassis. The one with gears from the Scalextric range and performance to match. As shunters, they are useless unless you want to go down the route of replacing the gubbins with something more sophisticated (as you can read about in my book), The wheels have to go too.

The bodies are either the corpulent 06 diesel or a freelance steam engine. The first is so distorted as to be unsaveable in scale terms, the other is quite pretty though. I fancy that with new underpinnings including outside cylinders, it might be quite attractive. OK, so British Rail never had anything that looked like this, but it doesn’t matter. Well, not on my train set anyway.

One oddity – the diesel chassis has been reversed so that the cylinders, a hang over from its origins on various steam engines, are tucked out of sight under the steps. On the steam loco, they are missing entirely. Presumably someone altered the mould when it was decided to add to the pretty locos range.

Anyway, that’s two locos. Maybe there will be more to come – I fancy the old GWR 101 will be next in Network Southeast livery. And if it’s a fiver, I’ll add it to my collection.

Saturday, December 10, 2011

Miniature V12 engine


I worry about the economy. If we don't all do some work then our politicians won't be able to siphon off the cash to pay for expensive suits and champagne baths. Bankers children will have to go without their Louboutins. Thus I have saved this post for a Saturday. That way, when you watch the video, you won't be doing it in the firms time.

The film shows a man building a miniature V12 engine. It's the sort of project I'd love to do but don't have the skills or the patience. He produces over 200 perfectly engineered components and then assembles them into an engine on the kitchen table. I particularly enjoyed seeing the crankshaft being machined on the lathe - I wondered how that sort of thing was done and now I know.

Best of all - the music. A soaring orchestral score. The sort of sound that makes you realise this isn't a bloke in a shed but a hero fighting the metal to achieve a great goal.

Friday, December 09, 2011

Signal Box and more Handyman Hall in Hornby Magazine

Remember when the Yellow Pages used to arrive on the doorstep ? A big, fat , paper publication that hit the mat with a thump ? Well the January Hornby mag is a bit like that. As well as the magazine (154 pages), there is a Hornby calendar featuring photos of some of the layouts that appeared in the last year and a Hattons catalogue. Those of us with subscriptions also got a CD with the Trackmaster software on it since they only went out to the news trade last month.

My contributions are a Parkers Guide on building a Ratio signal box and a Coopercraft platelayers hut. You also get part 2 of the Handyman Hall railway feature where we take the layout from bare plaster to a finished model.

The signal box is a particularly interesting kit. I really enjoyed building it and think that despite its age, it would be a really good basis for a very high quality model. That's not to say there is anything wrong with what you get, just that there is loads of potential as well. Detail the inside, perhaps replace the locking room windows, add some telegraph wires and somewhere for the point roding to exit, that sort of thing.

Elsewhere, you get loads of reviews including LMS 10000, Derby Lightweight DMU, Baby Deltic and Class 22. I only have a kit stashed away for one of those...

Hornby Magazine Website

Thursday, December 08, 2011

Replacing the dented boiler

Boiler In

Blimey, this was a job that took longer than expected, but the end result was worth it. A Super D doesn't actually have a lot of bodywork to worry about so the stuff there is needs to be right.

When we left the story, the dented boiler had been removed. I'd also taken off the smokebox. I had a replacement bent bit of nickel silver that just needed to drop in. First up I soldered the tube to be the right size. On the front of the firebox there was a nice whitemetal stub to guide me. A couple of tack solder joints to ascertain the basic position and then working away from the whitemetal, seam soldered the bottom along its length.

With the smokebox loose, I could see that it had only been tacked together. Not brilliantly either but after a few burnt fingers and a bit of poking with wooden lolly stick, this was sorted out. I even remembered to clean this part up before fixing it to the footplate. I must have been on a roll at this point because I also realised that it had been in the wrong place earlier. 6mm from the front of the buffer beam is correct, not 8. And to carry on with the theme, the body retaining nut went in before I blocked access with the tube. Mind you, I did bung it up with solder so I suppose normal service was being resumed.

To fill the gap between boiler and smokebox wrapper, a quick wrap spare etch part bent around a small metal torch was made up. Lots more tack soldering and fiddling until everything lined up properly. The footplate, the one part I'd planned to keep because it was right, was wonky. Strapping a steel rule to this sorted it out and now the whole thing is locked together solid.

Wednesday, December 07, 2011

Tightly bent track


Norm asks: Do you know what type of flex track allows for the tight radius shown Akihiro Morohoshi’s micro sized layouts ?

I've always been a fan of Akihiro's work and aspire to build something simialr to his wonderful novel creations. On many of his layouts, as far as I can tell, the track is scratchbuilt with pre-bent rail sodlered to a base. The rail bending tool is ingenious, being made of old railway wheels and plasticard. Clever but if you want to use commercial track, not that helpful.

All is not lost though, you can take comercial flexi-track (I'm using Peco 009 track in the photo) and bend it very tightly. The key is the webs between the sleepers under the rail. To make flexi-track flexible, some of these are supplied partly missing. This allow user to bend the track because the sleepers can close up on one side.

Flexi track

On the smaller gauges, these probably allow sufficient bending for most people. Peco used to demo the track by bending it into the shape of a traditional carpet beater with far tighter curves than normal locomotives could traverse.

If you want tighter bends, just remove some more webs with a sharp knife. Take enough out and you will be able to get the radius down to that of a tin can. The biggest problem then will be finding a chassis with a short enough wheelbase to power around the curves. Mind you, if the trains are short then most RTR units will be man enough for the task.

If this inspires you then please let us all see the results of your labours.

Akihiro Morohoshi layout gallery

Tuesday, December 06, 2011

Boiler chopping

The process of building a Super D starts with some destruction. The steps sticking out below the footplate. They get in the way when I'm working on the model locomotive - I like it to sit down on the workbench and so they are more of an inconvenience at this stage of the project. A quick blast from the gas torch melted the solder so they fell off and were dropped in the bits box for possible re-use later.

Next, the biggie, the boiler. I reckoned that some heat would be required but first, I wanted to separate the front and back parts. A couple of fine blades in the piercing saw later, it was chopped in half. The firebox end turned out not to be attached at all so it was easily removed. At the front, the boiler pokes into the smokebox so I'll need to dismantle this to remove the offending metal and replace it with a nice round item. This probably means the whole smokebox will fall apart but that's not a huge issue. After all, it's no worse than building a kit.

Monday, December 05, 2011

Super D

Super D

I seem to be the target for "unusual" projects. The ones that aren't straight "Take the kit out of the box and stick it together without deviating from the nice simple instructions". This is one of those.

My task is to build a Super D. To aid me, I have been supplied with a loco that looks almost exactly right - apart from the almighty dent in the boiler. In addition there are loads of slightly random bits in the box. Some of these duplicate bits already on the model and other don't. I just have to pick the best of the bunch, and make a complete loco out of them.

I also get some information including a Model Railways Magazine from July 1973 with the "Bazzing Around" feature on the class. For those who don't remember him, Baz was a bloodhound who used to write a very informative column covering details of individual classes. I have read his words and still don't understand the history. It's a good job that the pictures are excellent.

So, I have a dented loco, loads of bits and a magazine article written by a dog. What could go wrong ?

Sunday, December 04, 2011

G1 Assoc. AGM

B4I love the smell of methylated spirits in the morning.

Which is handy because I spent Saturday getting right good nostril full. We had been asked to cover the Mercian Model stand at the G1 Association AGM thanks to a clash with the O gauge show at Reading. Being just up the road and a veteran of 3 G1 kits, I was the right man for the job.

Our pitch was opposite the text track which was handy as we could watch live steam chuff-chuffs (and the odd diesel) powering around all day. I've always liked the way that owners have to book a slot on the timetable to run and this is displayed on a big board for the crowd to see. Some well disciplined work means that there are no times when something isn't chonking around the track.

The first crowds pretty quickly headed for any potential bargains but they soon worked their way around all of us. As well as a selection of kits we had a few ready made items to sell and during the day, most of these found new owners. Despite the recession, there was plenty of money about. Ready to run coaches from the stand next door were selling well despite being around 500 quid each. Mind you, they were very nice indeed and even I could have taken away a rake of Mk 1's in blood & custard livery had I not been short of both cash, space and excuses !

I hadn't expected quite so much trade. In fact what I thought we'd find would be half a dozen stands and several layouts. The reverse was true, with a large hall full of sales and only one track in the middle. For a minority scale, this is pretty impressive.

Discipline was the order of the day for me and apart from a couple of books, our car went home emptier than it arrived. This doesn't mean I can't spend money in my head and I've seen a project I really want to start next year. Barratt Engineering produce some rather nice live steam Gauge 1 locos that are supplied fully machined in installments. Think of those part-work magazines that appear after Christmas every year and you get the idea. Their J38 tender engine always looked pretty good but next year they are also releasing a couple of tanks. The B4 looks nice but the one for me would be a J65. 6 wheels, nice and simple, not too big and if I say £750 quickly enough, not too expensive. Maybe. I mean, I've never really wanted a live steam loco. Well not much anyway, but this does look soooo tempting.

Barratt Engineering J65

Or maybe it's the effect of the meths !

More photos on Flickr

Saturday, December 03, 2011

Bachmann 3F

Bachmann 3F

As regular readers will have spotted, I don't buy many ready to run model locomotives. Occasionally though, one comes along that even I can't resist and so a couple of days ago, I blew my latest cheque from Google (Those adverts on the right. Click on them and the money is invested in toy trains. Eventually - they aren't making me rich !) on a new 3F from my ever reliable local model shop Classic Train and Motor Bus in Leamington Spa.

Before I handed over the plastic, Mark ran the loco up and down the test track to make sure it was all right (try that over t'internet) and suitably satisfied I lodged it in my bag and wandered home.

3F top view

First impressions are good. The body and chassis look really fine. The shape appears to my eye to be about right. Inside the cab there is a wooden floor and most amazing of all, a working fall plate !

Of course, there are a few things that will need to be fixed. The coal for a start. Have you ever seen such plasticy looking stuff ? The rest of the model is a lovely satin shine, ripe for a bit of weathering but an excellent start. The fake dead dinosaurs in the water cart, well at the very least will need covering with real ones.

My other gripe is the loco-tender gap. Yes there is a clever springy bar joining the two but it's default position is too far away. I reckon that this can be adjusted with a screwdriver but even them I'm not sure how close I can bring the two. The fall plate is supposed to bridge the gap, not provide a take-off ramp for the fireman !

You might wonder quite what attracted me to the model. It's not like I have any layouts to use it on after all. The thing is that my very first model engine was a Triang 3F and so there has always been a soft spot in my heart for the class. Somewhere my loco sits with weathered black paint and home make vac pipes. With this latest model I can restore it back to Triang-ness and sit the two together.

Of course, there is the little matter of the Gibson  (I think) kit I have stashed away as well. Maybe 3 3F's ?

Friday, December 02, 2011

Le train français des biens

Finished Loco 1

Weathering the Y51100 started with a quick dirty wash to get some grime into those crevices. Then out came the airbrush to shoot an earth colour over the underframe. Next a dark grey over the top part and then some rush everywhere.

Exhaust muck appeared courtesy of some weathered black followed up by a bit of matt black. I went to town on this as I'd not been able to match the green paint on the horn as well as might have liked. No sweat though, where it is the normal colour with be filth after a couple of days away from the paint shop.

Finally, a nice mist of underframe dirt (dark brown - the colour we used to call "track colour") everywhere.

While I was mucking up the loco, I also worked over some wagons I'd been sent in the same package:

Finished Long Van

Doing an entire train makes the job a lot quicker. I filled a paint cup and then used it for each vehicle in turn.

Finished Medium Van

The tank wagons are much improved by a bit of dirt. As supplied, the looked a bit toy like - the underframe could really do with some brakes to my eyes. Not being familiar with the prototype I can't be certain but at least the paint isn't as shiny now. Except where I put a bit of Johnsons Klear floor polish on to shine up the spillages anyway.

Steakyness is achieved by brushing the dirt vertically with an old brush and a bit of thinners, then re-spraying like that nice Mr Shackleton wrote in his book.

Finished tank wagons

Thursday, December 01, 2011

Horn and hole

Chimney and hornModel locomotive chinmeys used to be supplied "blind", or blanked off at the top. The exceptions were those with a screw in the bottom to hold the body to the chassis. You still see this in some whitemetal castings but not often.

This might be a diesel but it still has something that looks a bit chimneyish for the exhuast fumes to escape. Quite a chunky pipe this, I don't know if it needs to be or is just the whim of the designers. Whatever, the top was solid and since we see model railway from above most of the time, I didn't feel this was satisfactory.

With some trepidation, I started to drill the metal. To my surprise it was quite soft. My scriber could be pushed into the centre of the soon-to-be hole and this guided a 1mm drill. Following up with a wider bit took some time but was still accomplished with hand power rather than electricity.

Emboldened, I thought I'd drill out the front of the blank airhorn. That wasn't so clever as the plastic body twisted as soon as the drill bit. I pondered the problem and then made it worse by snapping the thing in two.

Luckily I have a box of spare bits and this included a packet of rather nice brass airhorns. Drilling the the bracket I quickly put one in place with a touch of superglue. To be honest, I should have done this in the first place as it looks a lot better.