Wednesday, December 31, 2014

G-ACSS

Comet

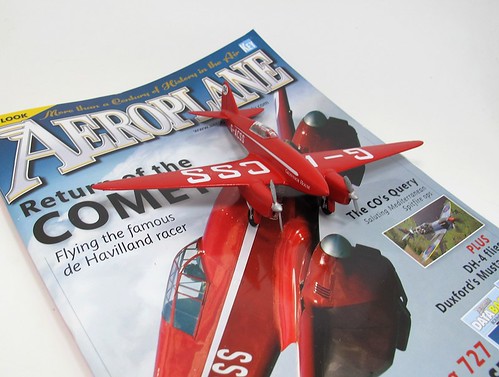
How's this for coincidence. Just as I'm messing around with the Comet paintwork, in Smiffs is a magazine with the very aeroplane on the front cover. Of course I had to buy a copy - not something toy train buffs normally do (Buy a non-model railway magazine, are you mad? There is no world beyond the train set.) but I like to look beyond the hobby occasionally. Beside, my Dad likes to have a read and he's to stingy to buy a copy for himself. I was tempted to wrap it up fro Christmas.

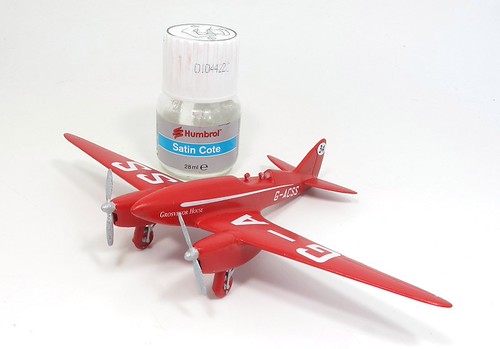
Finishing touches include some glazing bars drawn the on the canopy using a Bob Moore lining pen. They aren't perfect but then the clear plastic part is a bit wobbly itself. The horizontals are straight thanks to my trusty ruler, even if not in the perfect position. Verticals are short and done by eye as I couldn't be bothered to wait for the other lines to dry.

Having said this, the pen worked perfectly, showing how good it is with gloss paint.

Finally, the canopy was stuck in place with canopy glue and the model pronounced finished. Were the panel lines more pronounced, I'd liked to have had a go at a little weathering, although the prototype always looked pretty clean.

Talking of the prototype, after success in the 1934 MacRobertson Air Race, the aeroplane enjoyed a slightly chequered career mostly involving the undercarriage several times. Fortunately, it can now be seen as part of the Shuttleworth Collection.

One interesting story is that in 1938, the owner was contacted by a Jewish group with a well thought out plan to use the plane to bomb Hitler during a ceremonial parade in Berlin. A £1million price was agreed but then pilot Coulson decided against it for fear of what the British Secret service would have done once they worked out who had carried out the deed. One owners how history would have changed if he hadn't.

Tuesday, December 30, 2014

Satin varnish near disaster

Varnished

I'm pleased to report that the transfers were quickly applied to the aircraft and sat on the gloss paint with hardly any trace of "silvering" caused by air being trapped under the sheet. In fact, the tiny amount that did didn't show itself until I started blasting the model with a hair drier while varnishing. The heat presumably expanded the miniscure spots of trapped air making them visible.

One entertaining feature was the registration number. This is G-ACSS and so the transfers have it, except the one for the bottom, which if used as supplied, will produce G-CASS. A little scissor work sorted that out but you do wonder how it made it through proof reading.

Transfers on, I sprayed the model with Satin Cote varnish to tone down the sheen. I don't like gloss models, they look too toy-like to my eye. All went well initially but then I spotted, horror of horrors, a run.

I know from experience that dabbing a cloth in this to remove the excess varnish will ruin the finish. The cloth tears at the surface of the paint and the only solution is a strip and re-paint. With all the transfers, this wasn't an option and quite frankly, for the price of the kit, it would just be easier to chuck it away.

Thinking back to a trick George Dent has suggested in his airbrushing book, I tried a waft more varnish hoping the thinner would mix with the run and spread it out. This didn't work but then it occurred to me to try wiping it with more thinner.

Dipping the corner of my kitchen towel in the turps, I gently stoked the run several times and it gradually disappeared. Another quick waft of varnish and you can't see anything bad has happened at all.

I'm doing this to learn more about painting, and that last trick is one that makes all the effort worthwhile. I can see myself saving a future project this way.

Monday, December 29, 2014

Too much of a buffer

Buffing timeMy red enamel paint job looked very nice but close up, the finish wasn't perfect. Not to worry, my understanding is that those flawless finished on both model and real cars don't arrive straight from the spray gun - there is a load of hand finishing, or "buffing" to bring up the deep gloss.

Anyway, I had a "4 Way Miracle Polisher" on my bench that I'd bought at the IPMS show out of curiosity. It's a foam block with 8000 and 12000 grit surfaces.

Starting with the 8000, I polished the paint. It quickly became noticeably smoother to the touch but also dull. Assuming that the finer grit would restore lustre, I tried this but while the paint felt ever smoother, the shine was gone.

Next, I tried a little Brasso wadding, this cleans up clear plastic so was worth a try. Result, plastic showing through paint.

Finally, some Turtle Wax Safe Cut - their version of T-Cut paint restorer. I've used this on car paint with excellent results so felt it was worth a go on the model.

Some shine returned but not much. In the polished areas, every raised panel line was back to primer so this obviously wasn't going to work.

Mind you, the next spray of red enamel did come out a lot smoother than the previous one...

I suspect that I didn't allow enough time for the paint to harden. 24 hours is OK for acrylic and cellulose, but gloss enamel is a slow-drying substance and perhaps a couple of warm days drying time would produce better results.

Sunday, December 28, 2014

Rail King

Rail King

If yesterday's model was nearly described as a "Terrible train set", how about todays effort? Surely this thing has got to be beyond the pale?

It's true, the "Rail King Intelligent Classical Train" doesn't have some pretty important limitations. Even it's greatest advocates will be hard put to pin down a prototype, no matter how much the box describes it as a "finely detailed realistic toy train".

Let's be honest, it cost me £4.99 in one of Leamington Spa's less salubrious Christmas shops. I have a feeling that even this price might have dropped a bit by now. In the box is a loco, two bogie open wagons, a tanker and oval of plastic OO track with what looks like about code 200 rail.

"So why did you buy it?", I hear you cry.

Simple, I'm always advising people to practise painting and weathering on old models or those acquired from the deepest recesses of the boxes found under second hand stalls. If you don't have access to one of these or simply can't bear to damage some 1970s Hornby Silver Seal collectibles, then here's the alternative.

Weathered EndIgnore the loco and the wagons are pretty well detailed. Not authentic in any way but there's some lumps for detail and they are vaguely train like. At this price, there's loads of scope to b****r the whole lot up and yet not to care. After all, when the paint and powder costs more than the base model, it's hard to worry too much.

So, modellers of the world, get yourself down to shops selling tat and purchase one or more test models for practise. Extra kudos for anyone who slips some P4 wheels in...

Saturday, December 27, 2014

Flying Scotsman in Z

Flying Scotsman

I was tempted to entitle this post "Terrible Train Sets Part 1" but on balance, this seemed very unfair. Maybe Top Gear can get away with reviews that always conclude the opposite way they appear to be heading initially but this is an erudite blog read by well brought up and intelligent people so I'll not bother trying to fool you that way, you're all far too smart to fall for it.

What you see above, is an Atlas Editions 1/220 scale model of Flying Scotsman. The one that is advertised on leaflets that fall out of your favourite model railway periodical and costs (according to the invoice that I am instructed in large letters to keep for my records) a whole £1.99.

I'm not really qualified to provide a full review of this model (if you fancy it, please comment away, I'm very interested and so would other readers be). To me it looks like a steam train. Perhaps the detail isn't very refined but then the loco and tender are 11cm long so it is tiny. A 1970s Hornby model in OO wasn't that much better in places! The Valve gear and cylinders look a bit hopeless but then full Walschaerts in this scale would be a watchmakers job.

The coaches have something very odd going on with the toplights but the main windows are see-trough and glazed. A little black paint might help along with some flush glazing.

All the wheels rotate, including the loco wheels with con rods attached, but the bogies don't swivel so I'm not sure what the point is. Obviously the thing isn't motorised. If it was, for that money they would be selling faster than warmed up cake.

I bought this for two reasons: Cheapness and Curiosity.

The set comes nicely packaged in a card box about the size of a CD and not much thicker. The mock velvet inside gives an air of quality. There's some information, a replica poster and the invoice that must be kept.

This is part of a series. When I rang up to buy, the salesperson tried to persuade me that I wanted an A4 as well for a bargain price of £7.99 the two. I declined. I'm not that curious.

To be fair, other than sending me regular e-mails offering other products from the range. Atlas haven't hassled me at all, just as promised on the paperwork. Presumably this is a loss-leader and they make their money when you start buying the more expensive follow-up items. Maybe I wasn't convinced by this one, but the trams and diecast vehicles look interesting.

Anyway, what to do with this? I have a feeling that there is potential for a rather nice nighttime diorama here. Darkness and nifty modelling would hide the worst bits of the model and the resulting piece would be less than a foot long.

Friday, December 26, 2014

Build your own camper van

"I saw this and thought of you.", so said my writing friend Candice as she handed over the festive parcel to me.

I opened it up and you know, she was right. A kit to build a VW campervan. This couldn't be more me if there was a picture of my mugshot on the box.

Camper kit

Inside the kit, or 3D Puzzle Toy as the box refers to it, is made up of parts you press out of small sheets of thin plasticised foamboard. I'm not exactly sure what it is but thin and strong pretty much describes it.

Camper chassis

Assembly starts with the chassis containing the clockwork motor to power the model. Everything slots together simply enough by following the instruction diagrams. You'll notice the front wheels are thin foam while the back are plastic. In this respect it's just like a drag racer.

Campervan

The body folds over the chassis. Locating it on the tabs sticking out the side is a little fiddly but thanks to the strength of the material, not too bad if you have reasonably nimble fingers.

"Does it work?", I hear you cry.

Of course. The steering is a bit vague, much like the real thing. Don't take my word for it though, check out my lo-fi video complete with rockin' soundtrack:


Thursday, December 25, 2014

Merry Christmas!

Christmas Card
 
Merry Christmas and a Happy New Year to all the readers of Phil's Workbench.

Wednesday, December 24, 2014

Red paint - Part 2

OK, so the acrylic paint isn't working for me. Not wanting to be defeated by a plastic pot of pigment, it's time to stop messing around and use proper style paint - enamel.
 
 
First step, strip off the blobby mess. A wash with Precision Paints Superstrip sorted this out. The acrylic hadn't stuck to the primer at all and came off in sheets. The stripper works well and after straining, has been returned to the bottle for use again.


After a wash down and an overnight dry, the gloss red was sprayed on. Thinned with white spirit, it worked as well as enamel does, the result being a nice shiny aircraft. OK, it took many hours to dry and needed to be covered up while doing this to dodge dust but at least it covered easily.
 
 Life would have been even easier if the airbrush hadn't still been suffering the effects of the old paint. How the stuff can be so useless but dry to the consistency of steel inside the tiny bits of spraygun I don't know.
 
Anyway, now I have a gloss red 'plane. It's not perfectly smooth, but after Christmas, when the paint is properly hard, I'll try out that new buffer block I bought for this sort of job.

Tuesday, December 23, 2014

Red paint - Part 1

While the kit hasn't gone together perfectly, I'm not too fussed about this. After all, it cost very little and is primarily a painting challenge for me. I've no idea what to do with the finished model, if it gets that far, but for the moment I press on.

 
First up, a coat of white primer sprayed on and left to dry. This shows up a few niggles but the model actually looks better than I thought it might. The paint handle - a clip gripping the pilots necks - seems to work well as long as I hold it with a gloved hand.
 
My plan is to spray the 'plane with red Humbrol acrylic. I've recently completed a magazine project using the companies rail colours and was very pleased with the results and ease of use. They dried incredibly matt but with a nice finish. Having never used gloss acrylic before, I reckon it's worth a punt. At the very least, the fast drying times should reduce the amount of muck that will find its way in to the surface.

 
My first attempt with acrylic saw me thin the paint with normal water. There it worked fine but with gloss - hopeless. Either the paint won't sit on the surface or the stuff is too thick to come out of the airbrush for more than few seconds. Building up any sort of depth of colour isn't going to happen so it's time for a re-think.  
 
 
Luckily, I have the proper thinners so I clean everything up and try again. The results are a tiny amount better but still absolutely rubbish. The paint bobbles on the surface or runs around like water. When I stop, it sets in the airbrush meaning I spend as long cleaning the thing out as I do spraying.
 
By the time I give up, my spraybooth looks like an abattoir. The airbrush is solid with paint (all the bits now resting in a bath of cellulose thinners) and the model looks hopeless. Where the red has a bit of depth, it's IS shiny but I'm pretty certain no matter how much paint I put on, it isn't going to get any better.
 
I'm sure this is a lack of skill on my part, but I wonder how I can spray matt colours perfectly and gloss so badly. More pressingly, I now have to work out how to get the paint off the model and have another go with some proper enamel paint. Or just chuck it in the bin and do something else.


Monday, December 22, 2014

De Havilland Comet paint test


So, I'm browsing the Airfix "Black Friday" sale and spot this rather nice looking aircraft for under 3 quid in the selection. Well, I'm buying one or two other bits so I add it to the basket.
 
While I have a million other "proper" projects to finish, I fancy this as a bit of a quickie and a useful test. You see, this 'plane needs to be painted properly. Gloss red. With perfectly applied transfers. I'm not sure if I can do this but I would like to try. Anyway, it's a break from the soldering.
 
First up, stick the kit together. If I'm honest, I though this would be a quick job. I hadn't counted on an old kit with terrible part fit and hardly any locating tabs. Nothing between the two halves of the fuselage anyway.
 
Lashings of liquid plastic glue later (apply, push the joint hard together so a little plastic oozes out) and I've done it. The wing tabs had to be trimmed to move the leading edge somewhere near where it should be. One tail fin was a lot higher than the other but making the locating slot deeper sorted this with filler covering up the badness. Air intakes on the front of the engine nacelles are little more than ragged holes but I tidy these up a bit and will live with them.


Annoyingly (to me) you can only build the model with the landing gear down. I quite fancied an in-flight version like the box top shows but then I suppose there isn't a stand supplied so that wouldn't work either.

Sunday, December 21, 2014

I want poor quality RTR models

 
This week saw Hornby announce their 2015 range of models. As usual it's been a cause of much frothing on-line with modellers busy reviewing each and every model, even if they haven't progressed much beyond a set of CAD drawings.
 
The men from Margate aren't alone - all the manufacturers like to warn us about future products so we can start saving our pennies. The announcements are also reviewed by the hordes every time a prototype or early test shot appears. Over at Albion Yard, Paul has commented on some issues with DJModels 02 test shots (Calmly and sensibly, there's plenty of loony tunes out there but I'm not linking to that. Besides, he's bought me beer in the past). Even I've spotted problems with the same firms J94 and it's injector attached to a fictitious paving slab.
 
Now, the idea behind a lot of the more measured criticism is that the manufacturers will take notice and refine the finished product. Personally, I rather they didn't because a lot of these are easy fixes for modellers.
 
As an example, look at the Hornby J50 prototype above. It will have nice wire handrails and a separately fitted smokebox dart. I think this is a great pity.
 
For my money, how about a body that is scale, a good quality chassis and then some moulded on bits.
 
This way the cost will be kept down (not enough for the Internet loonies but still down a bit), the loco would fit in the "Railroad" range and even some train sets.
 
Oh there would be cries of anguish. Everyone knows it a HUMAN RIGHT to have separately fitted handrails on a toy train after all.
 
But - if you want to upgrade, you could. Nothing very difficult here and at the end of the day, your model would look better than one untouched.
 
I'll suggest (and yes, I am being deliberately controversial) that high quality RTR is robbing modellers of the chance to do some modelling. The top end stuff is so good that only the best modellers can hope to match it. So, people don't fiddle with it and since there is no easy way to get started with modifying a model they don't take that first step.
 
We've even reached the stage where people are paying to have real coal added to the bunkers or tenders. The simplest improvement you can possibly make to a model steam engine and yet it's a service bought in "In case I make a mess of it. It's just easier this way."
 
Still, the genie is out of the bottle. It's too late to go back and I guess we'll have to work out other ways to persuade people to get modelling. In the meantime, I don't need a J50 and if I did, there is a 3mm scale one on the shelf. And I'll always think it is better than the Hornby one 'cos I made it myself.
 
J50

Saturday, December 20, 2014

Lifeboat toy ahoy!

Lifeboat ToyI'll admit I'm a bit of a sucker for RNLI stuff. When it comes to supporting a charity, one that involves volunteers heading out on dangerous seas in all weather to try and save lives gets my vote every time.

That and I like orange things, especially orange boats.

All this means that if I find an RNLI shop, I'm going to be spending money and probably buying all sorts of stuff that I don't really have a need for.

Which is how I ended up with a clockwork lifeboat. It's a funny looking thing. You rotate the little man to wind up the motor and he spins gently as the model sails along.

If water is not available, the toy has wheels so can be run around the floor like a car.

I know my lifeboats well enough to know that the RNLI don't have any amphibious vehicles, but perhaps they should consider one based on this.

Of course I can't just sail my boat in the bath. It needs a try out on the model boat club lake. Despite sitting very low in the water, the model performs but the clockwork motor isn't really man enough for these conditions. The run time is pretty hopeless too - although to be fair I don't think the designers we thinking of me when they were chewing the ends of their pencils.

Lifeboat toy afloat
I did ponder fitting a motor, possibly a servo converted to drive the model, but that looks like a lot of work. For a start, how would I get at the insides?
Back to the bathtub with this one I think.

Friday, December 19, 2014

Railcar body

Coach body

A couple of hours work with the soldering iron and here we go. Not a bad looking railcar body, but a pretty heavy one!

First, the sides and floor were made up using a ruler to ensure everything is in a straight line. This left tiny gaps around the centre doors. I'll live with these as a humped body is more of a problem. Running low-melt in from the back pretty much eradicates them anyway.

The floor slots in place and with a couple of partitions in place, all seemed to be going well so I added the second side followed by the rest of the partitions. The great thing about low-melt soldering is that you can tack bits together very quickly and undo the join if it need adjustment.

The ends take a little care as they aren't identical. The panelling under the windows is deeper at one end than the other. These castings took a little massaging with fingers to straighten them up but after this, the champhered corners fitted pretty well although I did need to cut away a little bit of casting below the floor.

Once happy, all the joins were seam soldered. It's still very flexible at this point, etched sides would be better in this respect, but I can certainly see how the model is going to come together.

Thursday, December 18, 2014

Body beginnings

Body BitsPresumably due to the limitations of the moulding machines used by Nu Cast, the railcar body is supplied in twice and many bits are you might hope. Each side, roof and floor is a pair of parts to be joined by the builder.

First though, there is some light flash to clean from within the windows. When mentioning cleaning up, most people think of files but I prefer a sharp knife for this job.

OK, carving metal seems a bit off but lead alloy is soft and Swann Morton blades aren't, so it cuts like butter. More to the point, the flash is incredibly thin so carving it away is a quick and easy job.

For a really nice finish, the same blade can then be scarped along the edge to finesse and polish any hint of mould lines away.

Cleaning thw windows

Wednesday, December 17, 2014

Railcar chassis

John asks: Have you ever thought of making a GWR railmotor? This is something that I I always wanted. I'm not looking for a lot of detail just an overall look and was wondering whether something could be made with the Hornby auto coach.

This isn't the first time I've been asked about railcars recently.

To start with John's question. Possibly BUT the body isn't the difficult part of such a conversion. Finding a suitable chassis with all the waggly valve gear bits is pretty much impossible. Maybe there is something from a continental range that could form a basis but it's going to be a lot of work.

Far better, if I'm honest, to await the RTR version from Kernow Model Centre. For £150 and a bit of a wait, I don't think you'll beat it.

However, this isn't a blog where I sit and wait for someone in China to be told by the bloke who used to run Banbury model railway exhibition what to do. No, I still have a Nu Cast whitemetal kit to build.

Motor fittedWhen I left the model, I'd put the powered end chassis together and was about to fit the mechanical bits. Easy, or so you might think.

Well, persuading the motor to fit in the casting that appeared to be the mount took me over an hour. Lots of filing and scraping at the whitemetal to make the distance between the sides wide enough to slip the DS10 in place.

Eventually, there was success. With a couple of plasticard wedges, the motor turned under power and didn't rattle the sides.

Then I had a look at the gears. And there was a problem. Oh, yes, a good 'un.

Gear won't fit
The worm gears is too fat for the chassis and even if I fix that, it's nowhere near the gear on the axle.
Re-reading the instructions, I spot a tiny note on the drawing showing the motor doesn't fit where I thought. It should be on the back of the casting. Arghhhh!
However, this isn't the solution you might hope for there are some issues.
First, it appears to be held in place with willpower and possibly fairy dust. Certainly no screw attachment points or castings are shown to do the job and nor are they evident on the model.
Second, the gears are still in different time zones and the worm isn't going to fit any better between the frames.
I'm sure there is a fix for this, probably a different motor/gearbox combo (no I won't use a SPUD at the other end, I want the waggly bits powered) but I need to know how much space is available. Therefore the next job is to build the body and see how all this lot hangs in there.


Tuesday, December 16, 2014

Test pieces

Test piecesOne of the great myths that I spend time trying to persuade newer modellers to stop believing in is that those of us who have been at it a while approach a task and simply get it right.

First time.

No messing.

It's not true. The main difference is that we know we're going to mess up so don't launch in to the final project without a little bit of preparation.

A little test piece can be a great way to try out a new material or technique. If it goes wrong, the piece heads to the bin and we try again.

I'm clearing up my work area at the moment and here are a couple of pieces that are now in the bin. As you can see, I've been testing different track weathering ideas. Not all have been successful, in fact my favourite is Wico brown emulsion. It's worth using doing the test just to find that out...

Monday, December 15, 2014

Towpath Tractor


So I'm browsing through The Wickham Works list, available from Mainline & Maritime, and spot an interesting section:

Works number 8398 covering a prototype "Barge Towing Tractor" which was a narrow rubber tyred road vehicle designed especially for running on the towpath towing barges along the River Lea Navigation. Considered a success, around 14 more were ordered and they are said to have been a direct replacement for horses and were supplied around 1960.

"I wonder what one of those looks like?", I ponder. A quick search on t'internet later and I've found photos of one owned by the London Canal Museum. Sadly, not currently on display, it looks brilliant and not just 'cos it's bright orange.

Building a model would be a bit of a challenge, although a bit of fudging might produce an acceptable version to tuck in the corner of a model railway.


The full set of photos can be found on Pinintrest here.


Sunday, December 14, 2014

Clarendon

Clarendon 2

Recently, I was loitering around the excellent L&WMRS layout "Clarendon" with my compact camera and snapped a couple of views that appealed to me. By no means professional quality, I thought they might look better converted roughly to sepia tone - appropriate for the period modelled.

You'll notice a lack of locos but then I've always been more interested in the scenery and buildings.

Clarendon1

Saturday, December 13, 2014

Bogroll bodging

 
I don't know how this happens, but the pillar drill stand we have for a Minicraft drill seems to be slightly too big for the power drill we have.

Needing to pop a (sort of) perfectly vertical hole in some wood for a rudder, I quickly sorted this out with the inner tube from a toilet roll. Slit down the side and slid in the drill stand, it gripped the drill perfectly and we made quick work of the hole making.

Someone with an engineering bent will tell me this is A Bad Thing but as the cardboard is rough, there seems enough friction to grip the thing.

Friday, December 12, 2014

Spot the signal box


Some of you will recognise this - it's a Triang R145 Modern Signal box.
 
Question: Is it based on a prototype?
 
I ask, because it's a nice looking model and pretty well detailed. A quick re-paint might be an interesting project but if there is a full-size version then this makes the work even more appealing. I'm not much of a signalling expert as you can tell so I thought I'd throw the topic open to see if any of you dear readers are. Thanks

Thursday, December 11, 2014

Lots of resin action in BRM

January's issue of British Railway Modelling sees me messing with several lumps of polyester resin both on the page in also the DVD.

DVD first, I've been modifying 7mm scale Skytrex GWR hut to add some extra windows.

This is one of the great things about resin models, the material is soft enough for each chopping and changing. In this case I've added some extra windows from a Peco spares pack. Whilst from a smaller scale than the main building, they actually look very close to the windows already moulded into the walls.

You've actually seen the model on this blog already - for the camera I didn't need to finish the model. This took place later away from the studio. Now the hut has made its way to the NRM, hopefully to find a home in the corner of the model railway in the great hall.

On paper I'm building a resin loco kit - the J70 from the Silver Fox range. Quite how this popular prototype has escaped the attentions of the Ready to Run manufacturers amazes me, but for now, if you want a good one, you have to build a kit.

J70

As far as building goes, there isn't a huge amount of work. The main body is a single part casting and the chassis is a Black Beetle ready to use unit. A little detailing and fettling rewards the builder with a rather nice loco. Best of all, it's a simple induction in to the loco builders club.

Owens Bridge

Finally, we have part 3 of the Owen's Bridge layout building. I'm putting together the farm using Airfix ruined buildings cast in resin and providing the troops with transport by building a W^D Models resin lorry kit.

Resin - Good stuff, isn't it.

Wednesday, December 10, 2014

Radial

Finished radial_web

There we have it. Some transfers, a bit of red paint (Humbrol acrylic as I had a pot handy for another job) and a spray of Satincote varnish. Finish up with a matt black smokebox and some screw couplings that are probably contemporary to the kit.

OK, it's not the most hi-fi of models but the prototype's elegant design shines through and I think the ancient K's kit captures it very nicely. This is such a pretty loco that for the moment I can't bear to weather the model so it sits in the cabinet looking pretty.

Tuesday, December 09, 2014

Rattlecan paint job

Rattlecan paint job

The loco is going to be black. Do I break out the airbrush for a fine finish to the paintwork?

Nope. Halfords satin black aerosol. Warm it up in some water, give it a good shake and spray.

Result - pretty good. No clean up either. Can't think why I'd do anything else.

The brass strip by thee way is Mr Hobby metallic paint.

I'm not the only one who thinks like this - Muz duz too.

Monday, December 08, 2014

Soldering beats glue...

Splasher fillingI don't understand why, but one of the K's Adams Radial splashers is too small. Quite a bit too small. Small enough to leave a great big gap around it's top edge when fitted in to the side that has a gap for it.

My suspicion is that the wrong part was in the kit and the previous builder just fitted it and bodged with filler.

That doesn't work as the riveted strip looks odd, it should be along a nice clean right angle.

Never mind. First I pushed low melt solder into the gap from inside the loco. You can use this stuff as both joiner and filler.

Then a bit of microstrip over the top of the splasher bulked it up enough. Files back to provide a flat face and all is now good.

Sunday, December 07, 2014

Dream winter layout?

 
One of the benefits of belonging to a model railway club is that the library contains books you'd probably never buy yourself. One such is "Ideenreiche Modellbahn-Anlagen" by Ivo Cordes.

Basically, this is a German plans book for model railways. As well as a trackplan, most layouts are illustrated with a drawing showing the finished model. Most of these are superb and simply flicking through the pages is a joy - good thing really as I don't read German.

My favourite is this winter scene. You just don't see this sort of thing in British plan books - it's completely mad. Rack railways, viaducts and a cable car in space 1.5m by 1.15.

I wonder if anyone has built this for real?

If your club doesn't have this book, you can buy Ideenreiche Modellbahn-Anlagen at Amazon

Saturday, December 06, 2014

Foam underlay

John asks: I occasionally see mention of railway modellers using foam over their base boards before laying track on top.
To me foam is soft and bendy and stuffed into cushions and not very hard wearing so I guess this must be some other form of it.
Can you enlarge please on exactly what it is and how to use it. Can you hide wires underneath or through it to avoid having to pin them under the base board ?


I suspect the foam you are referring too is track underlay. This is a foam strip, usually moulded with an impression of track in the top surface.

Track is laid on to this and then pinned through to the baseboard and gives a representation of ballast as well as providing some cushioning. The foam is medium density so reasonably stiff but will compress if you push it or nail the track down too heavily.

If pinned lightly, the foam will reduce the sound given off by trains but if I'm honest, with modern RTR, it's hardly an issue. The idea you need to reduce the noise is a hangover from a few decades ago when gears ground away until locos were run in.

Underlay has fallen out of favour over the years. I can't recall anyone who has used it and I know I haven't. Granite ballast is cheap and more realistic, but applying it can be messy and if you get it wrong, gumming up an expensive point isn't difficult. Underlay solves this.

If realism is key, it's perfectly possible to use underlay and then cover it with fine ballast. Although I've not done it, I have seen photos and the results can be really effective.

I'm not sure it helps much with wiring although you could easily run fine wires underneath it and let the foam adjust itself around them.

Friday, December 05, 2014

What is a bow pen?

Bow PenJohn asks: Reading with great interest your article on painting the Speedline Pilot Boat. Sounds very much like me to a tee! The part that intrigued me was your reference to using a "bow pen" to outline the silver wheelhouse window-frames. I have not heard of this before, could you enlighten me?

I am restoring an elderly Caldercraft model of the Clyde Pilot Boat, and feel the pen would be a boon for high-lighting the port-holes in brass.

Bow pens aren't the common instrument they were in those black & white days. Then, every draughtsman would wield one with aplomb and all schoolchildren found one in their geometry sets. Now it's all Computer Aided Design and kids don't know they're born and wagons wheels have got smaller etc.

A bow, or ruling, pen is an instrument for drawing lines with ink or in the case of modelmaking, paint.

The pair of steel jaws are set a tiny distance apart using the knurled nut on top. The wider they are apart, the wider the line you draw. Skilled users can produce neat lines a fraction of a millimetre wide.

To use the tool, place a drop of paint between the jaws using the end of a tiny screwdriver. You don't want paint anywhere but in between then so wipe off excess with the paper towel. Next, try drawing a line on some paper or (in my case) the edge of your modelling board. If it's right, proceed to the model if you are feeling confident. If not, adjust the width and try again.

Neat enamel works well as does Humbrol acrylic. You don't want to thin the paint if possible as it tends to come out on a blobby rush.

Cleaning the pen depends on the design. The one shown, which I inherited from a proper old-school draughtsman allows me to swing the bottom jaw out of the way without adjusting the gap. My old school set doesn't have this so you dunk it in thinners and then fiddle around wiping the ink/paint out.

Whilst very useful, this is a tool that demands practise to get the best from it. I'm not very good but was able to run a line around the edges of the windows of the boat mentioned so I could them paint up to them with a brush. It's quite useful for locomotive "wasp stripes" too. With practise and luck, a straight line is reasonably easy to draw for neat edges.

A quick search will normally throw up bow pen suppliers - Golden Arrow do some useful looking sets. You are often advised to buy the best you can afford but for the beginner, a stationery set version will allow you to play and decide if it's worth upgrading. Try eBay too as there's always some in the Finescale Model railways section and this is a tool it can be worth buying second hand as you might get a top-notch model on the cheap.

Thursday, December 04, 2014

How green is my hut on wheels?

Shepherds hut painted

As far as final colours for the Duncan Models shepherds hut, the box shows a green body, black roof and undercarriage, which all seems pretty reasonable. It also shows a white window, which is considerably less likely since white gloss paint is a relatively recent innovation.

In my mind there is a municipal green that the your towns Corporation painted everything in between about 1920 and 1970. Lawnmowers, railings, lamp posts, road rollers, and engineering equipment etc. it was all painted green. I'm sure there is a proper paint code but Railmatch 307 Early Multiple Unit Green looks pretty close and more importantly, I had a spare bottle slowly going off on the shelf.

The body was brush painted. Railmatch paints are much better sprayed than brushed in my opinion as there isn't enough pigment in them to cover in a single hit so you need to build up thin layers - ideal for spray and I've had really excellent results when applied from the airbrush. Here though, the brushing left the primer showing through slightly, which is exactly the look I was after. This isn't a new hut after all. It's been painted with whatever came to hand, in this case a couple of pots "acquired" from the local council.

The same companies (Railmatch, not the council) weathered black did for the underpinnings. This does have loads of pigment so brushes very nicely.

On the roof I wanted it to look like a pitch had been applied so I painted a thick coat of Humbrol matt black and then dusted some talcum powder in it. The talc soaked in so I gave it more until the paint was all absorbed and finished off with black weathering powder. It's odd, but when you want something to look like it's been painted with a tar brush, this proves harder than when you don't.

After all was dry, a wash of thinned track colour, a little dry-brushing with rush and metalcote steel followed by a dusting of mucky brown weathering powders and we are ready to go.

Wednesday, December 03, 2014

A floor in the kit

Shepherds Hut 2Duncan's hut on wheels is lovely but while the box picture shows a chimney, I couldn't find one inside.

No matter, a brass tube off cut soldered to the roof and then fiddled to be upright soon sorted this out. It's probably better than a whitemetal one anyway as you can see it's hollow.

Looking from a normal elevated viewpoint, the lack of a floor inside is a big problem. While I appreciate that these things weren't kept in the best condition, you shouldn't be able to see the ground!

Sliding some pre-cut Daler board in was fiddly and if you look closely the sheets overlap in the middle, but at least looking in through the top of the door shows darkness now.

Inside, I'm just painting it black. An interior would be lovely but you won't see it on the layout so I'll skip the scratchbuilding.

Tuesday, December 02, 2014

Shepherds Hut

Shepherds Hut 1

A little queue jumping now. While the Adams Radial awaits a little finishing and then paint, I'm reminded that I promised to build a Duncan Models shepherds 7mm scale hut for the NRM. A start has been made for a little video work but it was no way finished.

A couple of hours low-temperature soldering later and things look a lot more complete. The kit isn't too tough. The sides are big slaps of whitemetal and once you work out which way the undercarriage goes (Hint: arms for pulling at the opposite end to the door) it tacks in to place.

The roof is made up of metal sheets (Ambis Engineering?) that have to be bent and then trimmed to length. These were soldered with C&L 100 degree solder. Not sure what they are made of so I was pleasantly surprised when the solder took to them. I ran a bead along the outside of the sides under the eaves as the framing for the undercarriage gets in the way inside. Sheets are overlapped but as you only just get enough material, it would be better to but joint them as I only just reached the ends of the body.

Cleaning was with a spray of Cillit Bang rather than Shiny Sinks. It's easier to get into the inside corners with this and in theory, the degreasing performance should be excellent. To paraphrase Barry Scott - "Bang! and the flux residue is gone!"

Monday, December 01, 2014

Coasters for model railways

Duncan asks: I intend to build a wharf (Medway based) with either a small part of a copper cable works OO9 served and a cement/lime dock OO served. I would like come guidance on building/kit building/kit bashing a suitable coaster. I do not want to lay out a king's ransom for the tiddley Langley models puffer!

PufferBack
Langley Puffer
 
This is a difficult one as model boats in this scale aren't that common. Have a look here:

http://www.modelslipway.com/complete1.shtml

and here:

http://www.deansmarine.co.uk/shop/index.php/cPath/10_11

Deans Marine Puffer bow
Deans Marine Puffer

Both do Puffers cheaper than Langley BUT you have to do a lot more modelling. The Langley kit falls together and is highly detailed which is why it costs more.

After this, you are looking at foreign kits which aren't a bad option as boats vary so much in size.

Scratchbuilding is an option as plans are available:

http://www.myhobbystore.co.uk/group/2571/plans

You can carve hulls from balsa wood or build up former and plank the outside. Either is a lot of work but worth it for the effect. I'd suggest buying a couple of copies of Model Boats magazine if you fancy this as you'll soon get the idea. I'd also recommend a copy of this: http://philsworkbench.blogspot.co.uk/2012/10/book-review-tiffys-workshop-marine.html as it's a fantastic one-stop guide.

Deans Marine Puffer stern
The Deans Puffer is fitted with radio control for sailing on calm water.