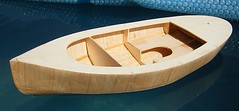
With the hull waterproofed and the weather kind I couldn't resist popping it on the pool to see the boat on the water.
It floated well. In fact I think I'll need to add ballast to get it down to the waterline. Even the steam plant isn't likely to do the job on its own as the broad beamed hull is very buoyant.
Thursday, July 31, 2008
Sanding sealer
Maaaaaaaaan you gotta love sanding sealer.
Since this is a working model, all the wood needs to be protected from water. The best way (IMHO) to do this is with several coats of sanding sealer. As I understand it, this is a cellulose dope with some sort of thickener mixed in. Whatever the recipe, you brush it on and it seals the wood. Do this in a confined space and you are so happy you simply don't care how it works...
4 coats with a sanding between each were enough to transform the feel of the balsa wood. I love the way it becomes a hard and smooth surface instead of the soft and slightly rough one. Drying time is measured in minutes, sometimes seconds, on a hot day so the process doesn't take long.
To tidy up the joints I used plastic wood between coats. This is horrible as the filler is much harder than the wood so sanding is harder as you wear away the surrounding surface before tidying the joint. In the end I used a coarse file as it was possible to localise the sanding to just the filler.
Solid nose
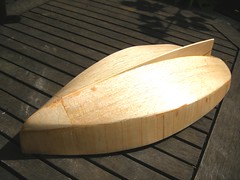
There's not much to say about filling in the bow of the launch. All I had to do was glue some wood in place and carve it to shape - model boaters have done this for years.
Getting the right wood needed a bit of experimentation - the first choice, basswood, was too hard to carve in block form. Balsa worked very well.
To shape it I first shopped the block with a saw to get a rough shape. The wood was then stuck in place. Once dry, the first shaping came from a surform which quickly removed big chunks of wood. Then a coarse sandpaper and finally a polish with the fine stuff. With lots of guides from the 3 fixed sides this was a whole lot easier than I'd expected it to be.
Wednesday, July 30, 2008
Tracklaying on the Welsh Highland
Blimey, this looks like a lot of work. The workers in the photos are track laying on the Porthmadog end of the Welsh Highland Railway. Apparently Austrian engineers had to be brought in for this as no-one in the UK could build the tramway section of the line being worked on here.
For modellers there are two good points:
First, our track is a whole lot easier to lay.
Second, there will soon for a prototype for running Garratts on a tramway. (Incidentally, I have a hankering to build at least one of the Backwoods kits so if you want one, let me know !) Hooray !
For more on my trip around Wales, go here.
Planked bottom
Once the sides of the launch are planked the much curvier bottom has to be covered. In theory you simply affix the die-cut balsa wood parts. The instructions advise using tape to hold the box part in place, spraying the outside with "Windex" if required.
In the UK, Windex isn't available but at a guess it will be a window cleaning solution which contains ammonia - a chemical known for softening wood although I think alcohol will work as well. I can't stand the spell of ammonia and didn't have anything similar handy so I soaked the wood in water. This made no difference, just wet wood.
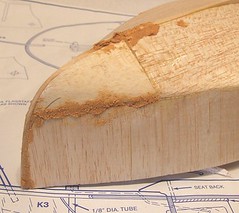
Most of the part fitted very well. I fixed it along the keel line and down the sides, holding the springy balsa with planking clamps screwed into the basswood parts. The front would have fitted except that when I bent it, the wood split along the grain.
Repairing the split was out of the questions, a glue joint wouldn't hold and a braced part wouldn't bend, so I had two options, re-make the part in another sheet of wood or cut off the bow part and replace it with a solid block carved to shape. Well without a suitable sized sheet of wood handy I went for the second option. The die cut part on both sides now finishes at the end of the keel strip.
Other than that this went well. The sheet overlaps the sides but will be easy to trim back. At the stern I need to do a bit of filling but can use offcuts of balsa for this. The clamps worked well, in fact I don't know how you could do this operation without them as conventional clips won't hold and the wood is being bent in lots of directions at once. Perhaps using superglue you could tack it in place a bit at a time but I prefer alphatic resin - there's something wrong to me about using superglue on wood.
In the UK, Windex isn't available but at a guess it will be a window cleaning solution which contains ammonia - a chemical known for softening wood although I think alcohol will work as well. I can't stand the spell of ammonia and didn't have anything similar handy so I soaked the wood in water. This made no difference, just wet wood.
Most of the part fitted very well. I fixed it along the keel line and down the sides, holding the springy balsa with planking clamps screwed into the basswood parts. The front would have fitted except that when I bent it, the wood split along the grain.
Repairing the split was out of the questions, a glue joint wouldn't hold and a braced part wouldn't bend, so I had two options, re-make the part in another sheet of wood or cut off the bow part and replace it with a solid block carved to shape. Well without a suitable sized sheet of wood handy I went for the second option. The die cut part on both sides now finishes at the end of the keel strip.
Other than that this went well. The sheet overlaps the sides but will be easy to trim back. At the stern I need to do a bit of filling but can use offcuts of balsa for this. The clamps worked well, in fact I don't know how you could do this operation without them as conventional clips won't hold and the wood is being bent in lots of directions at once. Perhaps using superglue you could tack it in place a bit at a time but I prefer alphatic resin - there's something wrong to me about using superglue on wood.
Tuesday, July 29, 2008
Planking the launch
This bit's nice. Cut up some balsa and stick it to the edge of the deck and rail. Big bits for the front and sides, little bits around the back where the curve is tighter - as you can see in the photo. This is proper traditional model boat construction as practised through the centuries. I can almost feel the hand of history on my shoulder...

Fantail launches
A quick "Google" for Fantail launch throws up some useful results. I'm unsurprisingly not the only person to have built this kit, nor the only one to have posted stuff on the web about it.
Roly Williams model has had some changes made to the boiler.
Mooseman made a video of his first launch launch.
Roly Williams model has had some changes made to the boiler.
Mooseman made a video of his first launch launch.
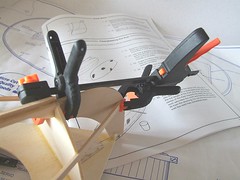
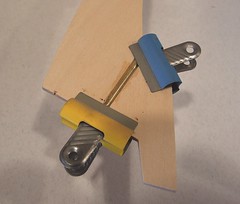
3 clamps
I'm sure there is a batter way of doing this but I don't know what it is. Perhaps other boat modellers can advise me.
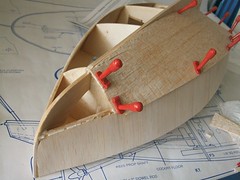
To get the chine rail stuck to the bow I had to use one clamp to bring the rails on each side. This kept springing off so a sash clamp on the back hooked over a former stops this happening. But this clamp keeps falling over and twisting the first one off so a third clamp holds the sash in place.
Looks unwieldy but worked surprisingly well !
Monday, July 28, 2008
Chine rail
The chine rail is a piece of basswood that simply glues into the slots left in the frames. The front end has to be champfered and you get to hang on to 6 inches or so of excess material. Other than that, with plenty of clamps it's a easy job.
Once in place the rail section has to be sanded to remove the outside corner. With basswood (UK=Lime I think) this is really easy to do as the wood works so well. Bit dustier than I expected but otherwise fine.

Once in place the rail section has to be sanded to remove the outside corner. With basswood (UK=Lime I think) this is really easy to do as the wood works so well. Bit dustier than I expected but otherwise fine.
Sunday, July 27, 2008
Harbour Masters Launch
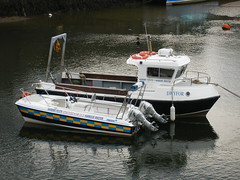 Looking at these pictures I took of the harbormasters launch (the boat at the back of the pair) at Porthmadoc, I wondered if a model could be built from the same George Turner kit I used for Tomsk ?
 You might need to buy two kits and splice them together for some extra length but at a tenner a kit this wouldn't be too painful. The back needs removing to allow the winch to swing but none of this should be beyond the average modellers ability.
I don't have the time for this project but if anyone does have a go then let me know.
Friday, July 25, 2008
Deck fitted
 I was sceptical about this bit. The deck didn't seemed very flexible yet was going to have to take quite a bend if it was to fit on the framework. I dry-ran this several times before being happy - the back end needs to hang over the rudder tube, then the bow is held against the keel. Finally the deck is pushes down in place and seems to fit.
Then the joints are glued and the process carried out all over again. This time with stickiness.
Eshewing superglue for PVA I needed to clamp the main parts together. The shape of the model at this stage makes this tricky but some trigger clamps achieved it eventually. I've no idea why I own so many - but this time I'm glad I do !
Thursday, July 24, 2008
Porthmadog Model shops
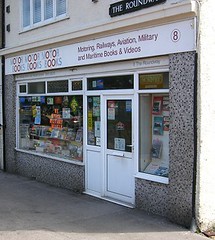
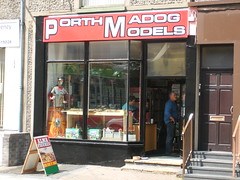 An embarrassment of riches here - first up is Porthmadog Models in Bank Place. Deceptively large, the shop specialises in plastic kits. Most are military models with a smattering of cars and boats. To assemble them, a full range of paints and glues are tucked at the back of the premises.
Along the sides are cabinets full of painted military diecasts. Above these are groundworks for those who engage in role playing games.
Update: Porthmadog Models have moved. More details here.
 Railway modellers are advised to try both of the stations belonging to the preserved railways. At one end of town the Welsh Highland Railway is home to one of the best bookshops in the country. Nearly 40 feet of wall is devoted to a breathtaking range covering UK and foreign lines. Special sections exist for narrow gauge fans too.
Should this tempt you to some modelling then most of the Parkside Dundas range, both standard and narrow gauge can be found on another wall.
 For larger scales the Ffestiniog station has a small selection of kits. Dig deep though as we are talking about the 16mm scale Slaters range along with 016.5 and 009 whitemetal kits. They even have the chassis required for these, something a lot of traders can't always manage !
 Finally for the RTR fan, Craft Cymru, an otherwise unremarkable souvenir shop aimed at the passing tourist, stocks a good range of Hornby items. Rolling stock and track are there along with Scaledale buildings and vehicles. You need to work your way to the back of the shop past ceramic dragons and mass-produced loving spoons but they are there.
Four shops in one town - not bad !
More trimming
 Before the deck can be fitted, some dry runs are advised in the instruction. A very sensible move.
The cross pieces need to be trimmed a bit as the deck won't sit on them without it. Around 4mm extra width needs to be allowed for - easily accomplished with a razor saw and sandpaper. As always "Measure twice. Cut once" applies, or at least it did for me. The first attempt at marking the cuts required, I was all over the place. Some days you begin to think the markings on the steel rule are actually moving between uses...
Wednesday, July 23, 2008
Why didn't they use one bit of wood ?
 Sometimes you wish a kit cost more. If the Fantail launch price had been a bit higher, perhaps the deck could have been made out of one bit of wood instead of two halves that have to be joined ?
Or at least the die cutter for the straight edges along the join could have been straight ? As it is these are convex and have to be sanded flat to get any sort of glue to hold it. Fortunately I plan on planking the top so any iffy work will disappear eventually.
I used Alphatic resin to stick the two bits of wood together. Then, because the next stage puts quite a lot of strain on it, braced the join with a couple of very thin bits of balsa super-glued in place.
Tuesday, July 22, 2008
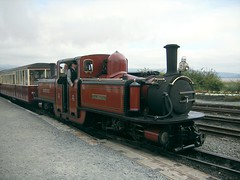
Double Fairlie
I'm in sunny Wales for a few days. Hopefully I'm going to catch myself a Garratt. But first I found a Double Fairlie while sitting on the station writing a postcard. Since I'm not going to be doing any modelling for the next few days (don't worry there will still be updates on the blog for the Fantail Launch) I thought you might like a picture of a steam engine.
Bending wood
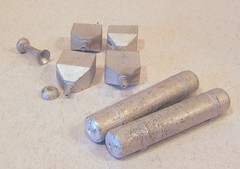
 The keel was to have a "keel strip" run along it following the curve of the bottom of the boat. This meant a new technique for me - soaking wood to make it more flexible.
The wood to be bent was 1/8th inch square basswood. Bendy but not bendy enough in its natural state. The instructions just said to soak it but gave no more details. As the strip was 2 feet long the only place it was going to get soaked was in the bath. A couple of centimetres of water gave enough of a puddle so I chucked the first stick in.
Ten minutes later and the wood colour had darkened which I assumed ment it was wet enough. Taking it out I was shocked how flexible it was - you really could put a significant bend in it, much more than I needed for this job. I know I shouldn't have been surprised, this is a well established technique in use for thousands of years - but I'm a literal sort of person and need to see results with my own eyes.
Anyway, the first few cm of the strip was stuck in place with superglue. Once this held, a matter of moments, the rest went in with a combination of alphatic resin and Zap. Clamps held it in place while the glue grabbed. I waited for the wood to return to it's pre-wetted colour before removing them. Again I was surprised not to see the strip uncurl from the keel but it all worked. The excess was chopped off and kept as it had returned to its original shape.
Then I did the whole lot again on the other side.
Monday, July 21, 2008
Building the keel
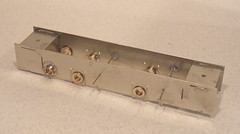
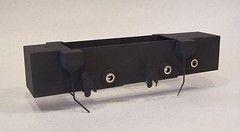
The Fantail launches keel is a complicated component made up of 3 wooden parts sandwiched around a couple of brass tubes for rudder and drive shaft.
The instructions say you should cover the full size plan with plastic on a board and pin the parts to this while gluing. To me that's a recipe for bits stuck to a plan. I decided to clamp the bits with bulldog clips while the glue dried. This worked well - the keel is straight and not stuck to anything it shouldn't be. OK the process might take longer as you have to work a tube at a time but with quick set Araldite this isn't a big problem.
The instructions say you should cover the full size plan with plastic on a board and pin the parts to this while gluing. To me that's a recipe for bits stuck to a plan. I decided to clamp the bits with bulldog clips while the glue dried. This worked well - the keel is straight and not stuck to anything it shouldn't be. OK the process might take longer as you have to work a tube at a time but with quick set Araldite this isn't a big problem.
Sunday, July 20, 2008
Barclay Crank
The 7mm scale crank axle owes a lot to the design of the same part in the 4mm locomotive. Rather than try to get a casting that is accurate enough to do the job, it's made up of a series of laminated etched bits and fitted to a Romford axle.
In the smaller scale this works very well. In 7mm it is nigh on perfect. Lots of parts are provided on the etch to allow for different wheels. I'm using Slaters so 4 of the common etches plus the three detail parts for the face are enough. The result is amazing, and I've build several OO & HO versions. The grub screw ends up flush with the face of the crank and there is no wobble.
Assembly is easy, just fit the first four lamination's to the axle to keep them in line. Run solder around the edge. Then add the three detail layers and run more solder. A quick clean up does the job. Holes are marked for the crank pin which have to be drilled out. The bolt is then screwed in from the back in the same way as it is on the wheels.
Saturday, July 19, 2008
7mm WD Barclay
Ever since the Barclay diesel locomotive came out in 4mm scale, people have said that it would make an excellent O gauge model. Well, Trevor is bowing to customer demand and I'm now hard at work test building the 7mm scale version.
So far, so good. The chassis, which is etched in thickish nickel silver, has been assembled. Bearings needed a touch of the reamer in the holes to allow them to slot in - exactly as they should. I fitted the crank axle bearing inside out as I've done on the OO and HO versions. Not sure if this will be necessary here but this IS a test build, so that's what I need to find out.
So far, so good. The chassis, which is etched in thickish nickel silver, has been assembled. Bearings needed a touch of the reamer in the holes to allow them to slot in - exactly as they should. I fitted the crank axle bearing inside out as I've done on the OO and HO versions. Not sure if this will be necessary here but this IS a test build, so that's what I need to find out.
Fantail kit
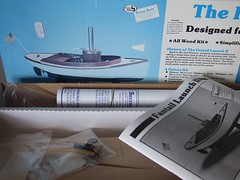
That steam launch kit bought in Oxford is calling to me. The chorus is joined by the Pocket Yacht box yesterday which has plans for just this sort of boat. I know I have other projects ahead of these in the queue but today I couldn't resist. The box has been opened and a start made.
For the moment the steam engine stays untouched. I'll do the floating bit first, at least to get it to stage when a power plant can be fitted.
Still, I like to have several simultaneous models on the go so here goes...
For the moment the steam engine stays untouched. I'll do the floating bit first, at least to get it to stage when a power plant can be fitted.
Still, I like to have several simultaneous models on the go so here goes...
Friday, July 18, 2008
Pocket Cruisers & Tabloid Yachts
The funny thing about writing a blog is that you never know who is going to get in touch with you. After reading about my tugboat, Mog e-mailed me with a link to a photo showing a fantastic little boat.
Some digging revealed that the boat hailed from the Benford Design group and that they published a book of the plans for this and other similar vessels. This looked like just my sort of thing. A quick check on Amazon and I had ordered the book from the USA.
It's just arrived and is fantastic. Plans good enough to build full sized boats from. You get more than just the hull lines too, for many full interior details are provided. I now have my eye on a 20 foot long cruiser that will look lovely in model form. Not bad in full size either but I think I might leave that one for another day.
Find Pocket Cruisers & Tabloid Yachts on Amazon
Thursday, July 17, 2008
Gauge 1 Ruston
 To get the Ruston locomotive finished there were just a few little tasks.
Varnish - A coat of Humbrol Satin Coat wafted over the entire model. I was wearing a spray mask but it wasn't necessary because I held my breath until I was confident that the transfers weren't going to lift like they did on the Y7.
Weathering - Just a light blast of very thinned brown to add some colour. The finish was so good I hadn't the heart to really go for it.
Glazing - Clear plastic from the window of a box I think. Cut to size and stuck in with Zap general purpose glue. This model will get handled and I hope the combination of flexible glazing and slightly rubbery glue will allow it to survive. Those frames are too big for even me to consider using Krystal Klear !
Stick the roof on - More Zap all purpose for the same reason. It should allow removal if we need to get inside the cab for repairs.
Buffers - The heads are too small but they fill the shanks and look OK. All but one went straight in and even this just needed the hole cleaning out with a reamer.
 Pickups - I'd fitted one set but thought that even though the model isn't going to be used on a layout very often all 4 wheels ought to collect electricity.
Final photos - Which you can see here.
And now a quick trip to Stourbridge to hand the model over to Trevor. Look out for it next time you see the Mercian stand. I warn you though, it's a good looking model and could tempt you to move over to the larger scale !
Wednesday, July 16, 2008
Oxford model shops
 I've stretched a point with this posting. For the first you need to catch the 210 bus out to Headington roundabout (stay on the bus for a few minutes past Headington) and you'll find Motor Books.
This shop specialises in railway modelling items with a reasonable range of bits including kits and specialist parts. Despite the name, the books selection is no better than many large model empouria. The range covers railways, motors vehicles, some boats and lots of military. Hornby, Bachmann, Parkside, Wills and Woodland Scenics ranges are stocked plus lots of bits fill the shelves.
I've been a visitor to this shop for many, many years. Traditionally my Dad and I used to take a pre-Christmas trip to Oxford and used to use this as our first port of call. The quantity of stock has gradually decreased. There is much more room to walk around nowadays. Being generous I'd suggest that the stock has been run down for the summer period when sales are likely to be lower and will build up again towards the winter season.
 On the edge of the city, you find Oxford Models. This shop has been around for at least 35 years and sells mainly to the model fliers. Some boat kits find their way in along with a few buggy bits. The inside of the shop is a gem - stock everywhere and a good chance of picking up odd bits including second hand plane engines. The owner loves to chat and really knows his stuff having been involved in the hobby as both retailer and enthusiast for so long. My visit last nearly 3 hours and I didn't go in for anything in particular.
Big transfers
I'm not normally a gauge one modeller. So I don't have a huge stock of suitably sized bits to delve into when finishing a model locomotive in this scale.
Which means the Ruston was never going to get the right sized transfers. I simply don't have anything big enough. It's not helped by the prototype having stupidly oversized numbers. The paint shop probably just used what they had in stock.
But, by using the biggest 4mm ones I had - those not used by the express locos I don't build - the result isn't bad. If you don't know the prototype or want it to look nice. What this shows is that a step up into the G1 world is available to everyone. And that you can ignore the notes on the side of a packet telling you which scales parts are for. Make your own mind up.
Tuesday, July 15, 2008
Black paint
One benefit of sprayed paint over brushed is that the thinner coat hardens a lot quicker. That makes it able to withstand masking tape more quickly, which in turn makes the project progress faster.
After around 10 hours I managed to mask the bufferbeams and in a late-night painting session get a coat of Precision black paint over the body. Again, the model's size made me alter my methods - the paint was mixed up into a bottle for the airbrush rather than a spray cup 'cos I knew I'd need a lot of it.

After around 10 hours I managed to mask the bufferbeams and in a late-night painting session get a coat of Precision black paint over the body. Again, the model's size made me alter my methods - the paint was mixed up into a bottle for the airbrush rather than a spray cup 'cos I knew I'd need a lot of it.
Red bufferbeams
Size matters they say. It does when painting. Normally I'm too lazy to spray buffer beams. A quick swish with a brush does the job much faster.
On a gauge 1 model locomotive, especially an industrial one, the red bits are big. Very big. So it's worth spraying as building up depth of colour on such an area is quicker this way than any other.
On a gauge 1 model locomotive, especially an industrial one, the red bits are big. Very big. So it's worth spraying as building up depth of colour on such an area is quicker this way than any other.
Monday, July 14, 2008
Primed ruston

One coat of primer and the loco still looks OK. Time to break out the airbursh.
Also time to order some more primer from Frosts, my can gave out just as I finished. Good job I don't need to give it another coat !
Sunday, July 13, 2008
Nearly done Ruston
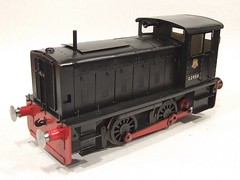
A flurry of activity now the castings have arrived and the Ruston locomotive is looking very complete and very good.
All the whitemetal bits have been attached with C&L Magic 100 degree solder so they are good and solid. The chimney is a scrap bit of brass tube (it's a test build so I get a hole but no tube. In the kit you get the lot) which took 5 goes to get attached and upright.
A quick clean with the Hob Brite and a blast from the hair drier and I re-united body and chassis. With everything looking so good I couldn't resist taking a photo.
My new favourite shade of black
...is weathered black from Precision Paints. It's like normal black but with a hint of dark grey. Pedants will say it is actually a dark grey but then they would also say you don't get pure black in nature so any black is a dark grey or perhaps dark blue.
Anyway, now the sandbox castings have arrived I've drilled them for the pipes (fat brass wire) and glued them to the chassis. I know solder is the "proper" way but I wasn't convinced I'd get enough heat in the join and not disturb something else so I scraped the primer off and used a smear of Araldite to fix them. The primer was well stuck as it took a fair bit of scraping to remove.
Once dry a spray of the aforementioned weathered black added colour. I blew over some thinned brown as well - might as well get the dirt on early and behind the wheels too.
With the bearings cleaned up this chassis looks really nice. And yes I will bend the sand pipes but not until the wheels are in, OK ?
G1 Castings
The Gauge 1 Ruston locomotive is back on track - the whitemetal castings have arrived. All are fresh from the mould and ready for me to attached to the brass body. I can see the light at the end of the tunnel !
Saturday, July 12, 2008
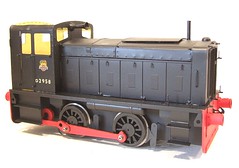
Critter - Done !
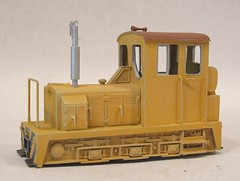
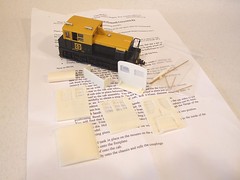
The Critter (is that disrespectful, should I say "Diesel shunting locomotive" ?) is done. A light blast from the airbrush with some very thin brown paint toned the whole body down. My intention was to model a working loco with the sort of muck you find on any industrial plant. Nothing too decrepit - just grubby.
Once the paint was dry, the window glazing was carried out with Krystal Klear. It takes a bit of practise to do windows as big as these but the results are better than I'd manage with bits of plastic, Confidence is the key - you end up working a big blob of the goo around the opening on the end of a screwdriver and if you don't work reasonably quickly it will drop off the end.
I'm very pleased with this model - for a freelance locomotive it really looks the part. To my eyes anyway, but perhaps I'm not exactly a neutral judge !
Friday, July 11, 2008
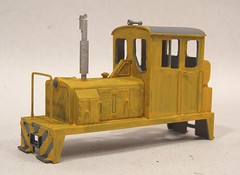
Yellow paint
 The yellow Humbrol I had handy for painting my "Critter" locomotive was obviously well past its prime. Keener to carry on with the model than I was to wait for the shops to open I decided to see if it would spray adequately. The plan was to get an OK finish rather than perfection as the weathering would cover a lot of sins.
As usual, I thinned the paint with cellulose thinners but this didn't seem to work as well as normally does - the mixture had to be constantly mixed to keep the pigment in suspension. However I did manage to get it out of the front of the airbrush and spread over the model. A few coats and a reasonable body of colour had built up. Enough for me to be happy anyway.
Once dry the roof went bauxite, exhaust and window frames matt aluminium, and wasp stripes black - all brush painted. I can't be bothered to mask this sort of thing up. It's a hobby after all so we don't want too much effort !
 After a few hours drying the weathering process started. I wanted it to appear that the paint had bleached in the sun so the yellowist cream colour I had was dry brushed over the model to highlight all the corners and give some variation to the colours on the sides - the paint finish was rough enough to pick up a little paint from the brush. Once happy the model was dusted with talcum powder to dry the paint and give a bit more texture.
Again things were left to dry and rust colour paint, well thinned, was washed on and encouraged to sit in the corners. This highlights the detail further especially the edges of bonnet doors. Thinned Precision weathered black brought the grilles to life.
Thursday, July 10, 2008
First coat of Critter paint
Most of my model locos are dull colours - to be honest most of them are painted black. I wanted to do something different this time so the Critter is yellow. When I saw the kit for sales my mind conjured up a picture of the finished article and that picture was dirty yellow and apart from some dalliances with the idea of going grey, this has stuck.
Of course since I don't use yellow that often, the pot of Humbrol isn't in the best condition and I was too impatient to wait for the shops to open so I could replace it. I couldn't be bothered to set the airbrush up either so the first coat was hand painted. This isn't as lazy as it seems. A high quality finish isn't required as the weathering will be pretty fierce.
Of course since I don't use yellow that often, the pot of Humbrol isn't in the best condition and I was too impatient to wait for the shops to open so I could replace it. I couldn't be bothered to set the airbrush up either so the first coat was hand painted. This isn't as lazy as it seems. A high quality finish isn't required as the weathering will be pretty fierce.
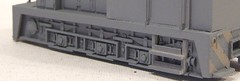
Critter underframe
As part of my efforts to remove all traces of the models HO origins I spent quite a lot of time hacking away at the steps moulded into the underframe. With all the detail present this wasn't a fun job.
Fortunately the sides are moulded from a very soapy plastic which carves well and reasonably cleanly. What I should have done is sharpened a screwdriver to make a small chisel but my scalpel did an OK job (an X-acto chisel is too large for this work).
New steps were fabricated from 1mm plastic. The verticals sit in slots cut in the detail with a hacksaw and are fixed with superglue - the only stuff that will get close to sticking to this plastic.
Wednesday, July 09, 2008
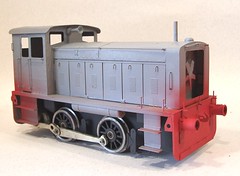
Critter in primer
Not being 100% confident of the joins at the cab corners I whacked a coat of primer on the locomotive rather earlier than normal. This highlighted a few very minor areas to be re-filled but generally things were OK.
Happy with this I added the chimney - a nice single part that I think is turned from solid plastic rod. A bit of fiddling with plastic strip and it had one of those sprung caps that exhausts are fitted with to stop the rain going down them. Some may think I've used the part the wrong way up but I prefer the long bit of the pipe to be at the top - and it's my model.
I also spotted some moulded handrails I missed on the lockers which have been scraped off. Finally a new handrail is added at the front from 0.7mm wire. The height was set to match the cab not the bonnet as shown in the kit instructions as the later is too low.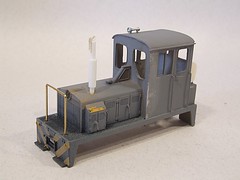
Slingshot damage
We seem to have gained a "Gentleman's Racing Series" in addition to the normal Slingshot series this year. Apparently the Thursday morning crowd at the model boat club fancy have a go at racing with the big boys.
All of which means I had to sort out the damage to my boat from the last races. To date I've always been fairly lucky and come through unscathed. A flip last time lead to water getting into the controls through a hole chewed in the hull by someones propeller.
The water damage has dried out and controls are working again. Physical damage required a patch to be stuck on the inside of the cover with superglue and the a bit of smoothing. This reduces the covers flexibility a bit but not in any way that will affect the boat - I hope.
We'll find out tomorrow if the rain stops long enough for a sail.
Critter cab part 2
After a little tweaking the cab is finished. In the end very little filler was needed, just a bit around the front of the roof and tiny bits in the leading edges of the sides.
Handrails and door handle are from 0.7mm brass wire. While I was at it I removed the moulded handles from the bonnet sides and replaced them with wire too. This is all part of my plan to remove any signs that the body is based on an HO scale model locomotive.
Handrails and door handle are from 0.7mm brass wire. While I was at it I removed the moulded handles from the bonnet sides and replaced them with wire too. This is all part of my plan to remove any signs that the body is based on an HO scale model locomotive.
Tuesday, July 08, 2008
Critter cab
The Unit Models cab is made of resin. To be honest the fit is a bit average. Unlike plastic, resin has a tendency to warp a bit over time if it's not supported. This isn't going to be a problem on the finished locomotive but several sides had to be massaged a bit to get them properly flat. A little heat from the bulb of my desk lamp helped too.
Sticking duties were handled by superglue. As it's a gap-filling variant the corners are looking pretty good.
Sticking duties were handled by superglue. As it's a gap-filling variant the corners are looking pretty good.
Sunday, July 06, 2008
Little Critter
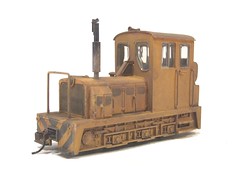
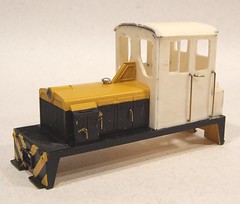
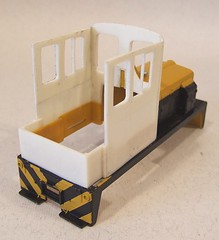
Having completed one On30 project I was so enamoured with the result I've decided to start on a second one. This time it's a diesel locomotive, what the Americans call a "Little Critter". Basically a freelance (but hopefully plausible) model loco based on a standard gauge model from a smaller scale.
The kit is a Unit Models Plymouth conversion kit. I liked it when I saw it because the result doesn't have the look of a standard gauge model with a giant cab - a very common problem with conversions of this type. The kit is based on a Bachmann HO scale shunter and consists of a new resin cab plus bits for the exhaust stack and front handrail.
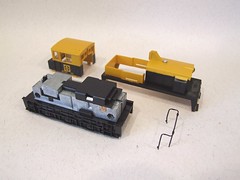 First job is to strip down the Bachmann model to remove the cab. A bit of wiggling of the tabs that hold it to the footplate and some light force did the job. Since the cab is thrown away it's not the end of the world if it gets broken but pride wanted me to get it off in one piece. The problem is it means I have a nice, well painted HO scale locomotive cab that is too good to throw away...
The kit is a Unit Models Plymouth conversion kit. I liked it when I saw it because the result doesn't have the look of a standard gauge model with a giant cab - a very common problem with conversions of this type. The kit is based on a Bachmann HO scale shunter and consists of a new resin cab plus bits for the exhaust stack and front handrail.
First job is to strip down the Bachmann model to remove the cab. A bit of wiggling of the tabs that hold it to the footplate and some light force did the job. Since the cab is thrown away it's not the end of the world if it gets broken but pride wanted me to get it off in one piece. The problem is it means I have a nice, well painted HO scale locomotive cab that is too good to throw away...Painted Porter
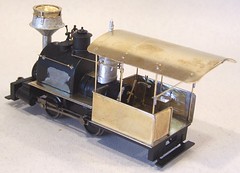
Job done and very nice it looks too.
As this was to be a clean loco, I needed to find a reasonable colour match for the original paint. After a bit of experimentation, Precision Black (not weathered or coal, just black) fitted the bill as it gives a nicely clean finish with just the right amount of sheen when applied with an airbrush.
The problem with this sort of model is you can't take it to pieces in the normal way. American locomotives don't have a sensible chassis/body break line like European ones. I dropped the wheels out and masked the cross heads as best I could. A few areas needed a little touch with a paintbrush but nothing highly visible. The paint brushes well but I still prefer to spray.
Once dry, the bufferbeams were treated to a couple of coats of Humbrol matt red to brighten up the livery. That's not an original idea - the pictures that come with the Backwoods kit show this colour !
Further colour comes from the bell, whistle, toolbox, oil cans, bucket and badges on the side of the smokebox.. This is the exciting bit - when the model starts to come alive.
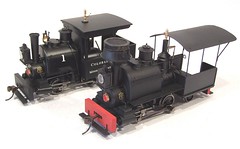 The result is a very nice looking model locomotive. It's certainly different from the standard item. As you can see, the reworked item is stretched and much more open. If you didn't know where to look you might not realise that they are based on the same model. The 0-4-2 version is, in my opinion, much better looking than an 0-4-0 version would be. The bogie fills in the otherwise empty back end.
This hasn't been a difficult it. Care attention and some modelling skills (especially soldering) are required. You have to make a lot of decisions along the way as the pack is so flexible but that's no bad thing as you get a model unique to the builder at the end.

As this was to be a clean loco, I needed to find a reasonable colour match for the original paint. After a bit of experimentation, Precision Black (not weathered or coal, just black) fitted the bill as it gives a nicely clean finish with just the right amount of sheen when applied with an airbrush.
The problem with this sort of model is you can't take it to pieces in the normal way. American locomotives don't have a sensible chassis/body break line like European ones. I dropped the wheels out and masked the cross heads as best I could. A few areas needed a little touch with a paintbrush but nothing highly visible. The paint brushes well but I still prefer to spray.
Once dry, the bufferbeams were treated to a couple of coats of Humbrol matt red to brighten up the livery. That's not an original idea - the pictures that come with the Backwoods kit show this colour !
Further colour comes from the bell, whistle, toolbox, oil cans, bucket and badges on the side of the smokebox.. This is the exciting bit - when the model starts to come alive.
The result is a very nice looking model locomotive. It's certainly different from the standard item. As you can see, the reworked item is stretched and much more open. If you didn't know where to look you might not realise that they are based on the same model. The 0-4-2 version is, in my opinion, much better looking than an 0-4-0 version would be. The bogie fills in the otherwise empty back end.This hasn't been a difficult it. Care attention and some modelling skills (especially soldering) are required. You have to make a lot of decisions along the way as the pack is so flexible but that's no bad thing as you get a model unique to the builder at the end.
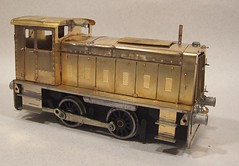
Porter in brass
This model locomotive is now ready for primer. All the construction is finished. There will be quite a few fiddly bits to add later but now I get to see what it's going to look like in a single colour.
Backwoods have produced quite an unconventional kit. While there are some standard construction jobs such as the cab, most has been more akin to scratchbuilding but with help. The builder has to make a lot of decisions - the cab back for instance has to be altered from another part. Handles are formed from wire - except for the regulator which is a nice etching.
There isn't a huge amount of the original Bachmann model left this time. I could have left the chimney but that would mean not using the nice whitemetal replacement. The footplate is cut back quite dramatically which alters the look of the loco quite a lot around the wheels.
Subscribe to:
Posts (Atom)