Friday, November 30, 2012

Sealing and painting

SandingSealer

As well as doing it's best to be the wrong shape (as mentioned yesterday), wood has another sneaky trick up its trunk.

Paint it without preperation and the surface turns as hairy as a 70's film stars chest. This is fine if you are building a miniature Burt Reynolds in Smokey and the Bandit, but a bit hopeless for anyone contemplating a coach from the Groudle Glen Railway.

So, step one in painting is to seal the wood. This simply involves giving it a coat of "Sanding sealer" - the name being a bit of a clue to its purpose. According to the tin, it's also a paint for the perfectionist which means I've got it under flase pretenses.

Anyway, in the can is a mix of ceulllose dope and talculm powder. This makes for an interesting smell best experienced in a well-ventilated area. Once painted on bare wood, the dope seeps into the surface and the talc acts as a filler. Given a few minutes drying time, the surface hardens and can be sanded perfectly smooth. Used on blasa, the effect is quite amazing. A couple more coats and a glass-like finish can be obtained.

Since I'm modelling a wooden vehicle, a single coat followed by a light sand was sufficient.

The Groudle bogie coaches are maroon but not (as far as I know) a standard one. Despite this, I reckoned that they were about the same colour as a Hornby ex-GWR railcar in BR blood & custard livery. I know that Humbrols acrylic crimson is a perfect match for this and more importantly, I had half a pot handy. Thinned with car windscreen wash, I sprayed this over the coach body.

Around 3 coats later, I think the result is looking good. Crimson is a colour that needs a coat of varnish to come alive but that will have to wait until I've done the black bits and cream roof interior.

PaintyCoach

Thursday, November 29, 2012

You can't have too many clamps

RoofandClamps

Most modelmakers own a few clamps. Those cheapo plastic ones sold in pound stores and every cheap tool stall at an exhibition are popular. More traditional types will prefer the Bulldog clip, preferably in a size that once gripped memos on a civil servants desk and painted black, trendier types opting for smaller colourful versions.

Me, I've got the lot and sometimes I need them all.

You see, when clamping bits of wood together you often have to fight the material. When I usually want it to form a curve, it wishes to stay a flat plank. Except when it wants to warp but that's usually the point I wish it to remain flat. Stupid stuff.

Anyway, the photo illustrates a typical situation. Bending the roof over the formers on the Groudle coach involved me working along clamping the two bits together. During the process, I grabbed clamps as I worked and at no point did I wish to run out.

Today's lesson therefore: when you see clamps, clips or anything else that grips two parts of a model together, buy them and keep them to hand near the workbench. If you don't, one day you'll be wishing you had.

Wednesday, November 28, 2012

Dry faster !

Diorama Base

Deadlines concentrate the mind but they also expose over-confident plans. In the run up to Warley my lack of progress with a small diorama started to come back to bit me.

The landform is built up using ready mixed Polyfilla on a plywood base. I an effort to get the stuff to set, I stuck it in a warm oven for 15 minutes. While the gas was off, this was as long as I dared. In the back of my mind, the idea of the whole lot catching fire kept flaring up. Irrational I know, but there you go.

With the filla sort of set, a quick coat of Wilko emulsion was slapped all over it. This does dry quickly and doesn't seem to mind the soft surface.

The finished article was at the NEC exhibition. Phew!

Tuesday, November 27, 2012

GGR coach body assembly

Frames

The benefits of accurate laser-cutting are apparent when assembling the body. The seats slot into the door-free side (The GGR bogie coaches have doors on on side only), this is then slotted into the floor and finally the open side fits to this. All parts come together with no fiddling, trimming or any other fettling. A bit of PVA glue and all is well.

Except. I put the seats in upside down. Consistently upside down. That's why the end seats are higher than the rest. How I managed this, I don't know.

There's nothing I can do about it now. The glue has dried so dis-assembly would destroy the parts. I'll just have to live with it. How I deal with putting passengers in, I'm not sure at the moment. Any suggestions would be welcomed.

Monday, November 26, 2012

GGR Coach seats.

Cutting Parts

Most of the Groudle coach is seating. This is released from the fret with a sharp knife cutting through the nibs holding the parts in place. I had to go through both sides for a neat cut. A little tidying up with sandpaper finished the job.

One thing I do notice, is just how filthy the sandpaper gets working in the laser-singed edge of the woodwork. Great black lines appear on the grit almost instantly.

Wooden SeatsAssembly is simple enough - all the parts slot together and are fixed with a little PVA glue. Although the bits look pretty basic, I wouldn't fancy cutting the curved tops for the ends out manually.

Sunday, November 25, 2012

Chocolate Model Train


All being well, I'm having a second day inside the tin shed that is the NEC for the Warley Model Railway Exhibition, thus, a bit busy for blogging.
 
Instead of my ramblings today, enjoy this video of a large scale chocolate train. I think it's basically a good thing and wonder if Hornby are looking for ideas for Christmas ?


Saturday, November 24, 2012

Warley setup

Warley TeaFriday afternoon and a short drive through a deep puddle saw us at the Warley show. Early arrival meant we could dump our stuff on stand E34. I even managed to squeeze the car between a couple of trailers in the car park opposite the hall.

Once the table was filled and RCD tested, we strolled around the hall. Actually, we grabbed a cup of tea for a very reasonable £1.09 and then strolled around the hall.

Obviously there wasn't that much to see, you need to be there in the evening for the chaos that happens when the majority arrive, but the Port of Par engines, Bill and Ben (or Alfred and Judy if you don't live on Sodor) were there and looking very nice. For narrow gauge fans there was the replica Lyd from the Lynton & Barnstaple railway. I liked that this is a centrepiece of an L&B display full of trade and layouts.

Outside the hall there is a replica of the Vigin Galactic SpaceShipTwo. I think that the plan is for Hornby Magazine to use this for transport in future to fit in with owner Key Publishing's aircraft interests...

Anyway, photos on Flickr. More over the weekend.

Friday, November 23, 2012

Warley preperation


Today is about getting ready for the trip to Warley this weekend. The workbench is being packed up into the back of a car.

I will be found in the demonstrations area - Stand E34 - with Parker's Guide. There will be a pile of models I've made for my column in Hornby Magazine (Stand A18) and perhaps even a couple that are yet to appear. I, or if I'm not around my Dad (he looks like me but with less hair) will be happy to chat about model making. We'll even try and offer helpful advice and answer your questions.

Warley NEC Website

Thursday, November 22, 2012

GCR coach bogies

GCR Coach bogiesConstruction of the Groudle coach kicks off with the bogies. These are simple enough components - just remove the parts from the sheet (I suppose "fret" is still appropriate even though it's laser cut) , insert the bearings and glue together with PVA.

The nylon bearings are friction fitted although I ran some superglue around them just to be on the safe side. Being a tight fit in the holes, they need a good firm shove. I used parallel jaw pliers as normal ones would tend to impart a wonky angle. A small vice would have worked just as well.

The wheels & axles must be trapped as part of construction which at least means they won't fall out!

One point - the wheel sets are uninsulated so you can't run them with 2-rail electric stock or there will be an almighty band when the power goes on. Steam and battery electric will be fine though.

Detail on the sideframes is minimal. I'll have to find a decent photo and make something up in plastic I think. Although they aren't that visible under the coach, I'll know. Needless to say, all my photos are unclear in this area.

Wednesday, November 21, 2012

Book Review: The Long Haul by Bryan Holden

Did you know that the last shunting horse (as in a horse used to shunt railway wagons) retired from railway service on 21st February 1967?

Charlie worked at Newmarket station moving, appropriately enough, horse boxes around. His retirement brought to an end the relationship between horses and railways that began as soon as we began moving good on rails. So important was this motive power that the standard 16 ton mineral wagon came about because this was the largest load a single animal could move on the flat.

Bryan Holden's book doesn't just cover shunting horses of course. Most of the volume is devoted to railway cartage, what we would call "last mile" deliveries today. It's a pretty comprehensive history which explains how the yards were organised, the type of animals preferred and how they were looked after. I didn't realise that horse shoes were so different, or so technical.

If pure horse power is your (nose)bag, then a short chapter shows the horse at work on and in mines as well as peat railways. By the time of writing, this was pretty much all over with - the last horse drawn tramway was Nantle which finished in 1959 - but the photos give some idea.

Talking of photos, this is an area here the book excels. Lots and lots of well reproduced pictures showing yards and some goods operation. The text is well-written and informative. There is feeling but it never becomes maudlin. Even though I've read a bit in this area before, I still learnt a bit. More importantly, I enjoyed the read.

Published in 1985, The Long Haul, The Life and Time of the Railway Horse, can still be obtained from Amazon.

Tuesday, November 20, 2012

Groudle Glen Coach kit

Walrus and train

It pays to help people out sometimes. A couple of years ago, I made up a CD of photos taken at the Groudle Glen Railway for Peter Lane, purveyor of beautiful wooden kits for garden railway narrow gauge rolling stock through Yatton engineering.

Recently, he sent me an e-mail to say that kits were on the market and since I'd helped him, would I like a coach?

Of course I would!

GCR Coach bitsA few days later, a large parcel turned up in the post containing a kit for one of the bogie coaches. These don't get the coverage they deserve in my opinion despite being the mainstay of services, indeed the onlystay before the replica original vehicles are produced.

The kit is supplied in laser-cut plywood to 16mm:1foot scale, 32mm gauge. It includes wheels, bearings and couplings. Normally sold for £55, this sounds like a pretty good deal to me. that's a a relief as I can see I'll be buying a second model. And a locomotive. And some of the original versions.

Worse, the whole set is being produced in 7/8th scale for 45mm track too. Complete with the loveliest steam engine in the world, Sea Lion. I need to earn more money. Fast.

Groudle Glen stock from Yatton Engineering.

Monday, November 19, 2012

Hornby Magazine Yearbook 2012

The 2012 Hornby Magazine yearbook has hit the shelves. This year most of the articles revolve around the creation of a new layout - Topley Dale.

Fitting into a small domestic dinning room, the Dale is a roundy-roundy set in Derbyshire. There's a lot of cream coloured stone going on and the station paintwork is maroon. Despite fitting in a small space, which includes dodging a 'fridge full of Coca Cola and the odd beer, there is a decent sized station with goods facilities. The fiddle yard hold full length trains too such as a Blue Pullman or long coal train hauled by a Garratt (well, it would have been if we'd been able to make the pre-production model work at the time).

Time was tight for this so I've contributed several structures. For the yearbook, you'll find a road bridge and signal box. The later is an Airfix kit with it's proportions sorted out (as supplied, the windows are far too wide) and fitted with interior detail. I've also re-named a loco using Modelmaster bits.

If this isn't enough, the footbridge in the current issue lives here as does the viaduct in the excellent, and still available, Parker's Guide Bookazine.

But, back to the yearbook, apart from my bits, there is lots of other good stuff. It makes the perfect answer to the question, "What would you like for Christmas".

Buy the Hornby Yearbook 2012 from Amazon.

Topley Dale Signal box

Sunday, November 18, 2012

More Beatties Bags

Plastic Carrier Bags From Beatties Toy Store Glasgow Scotland 1990s - 2 Of 22Plastic Carrier Bags From Beatties Toy Store Glasgow Scotland 1990s - 7 Of 22

I can't beat this. Spotted on Flickr, Kelvin has 22 Beatties carrier bags phtographed for posterity.

That is serious collecting as these are probably rarer than some of the "collectables" that would have been brough home in them. It also shows the affection that a model shop can create.

Kelvin's collection of Beatties bags.

Saturday, November 17, 2012

Scale ModelWorld 2012

AFV Mag SplittieThe last time I visited an IPMS (International Plastic Modellers Society) show was 20 years ago. Then it took place at the NAC - a decent size for it's time.

Now it occurs at the Telford International Centre and is HUGE.

When I say huge, I mean huge on a European model show style. For railway modellers, think twice the size of Warley's NEC event. I walked around in a slight daze for half an hour just trying to get my head around the sheer scale of the event. By the time I'd reached the end of hall 3, I'd worked out it was big and had some sort of plan to take it all in.

Like all model shows there are displays and traders. Displays involve tables full of (mostly) beautifully made miniatures. The modellers don't just shake the box the kit came in and splodge it together with a tube of glue. Most models have been carefully upgraded thanks to the efforts of the cottage industry suppliers who support the main kitmakers.

It's not all plastic either - lots and lots of resin and photo etched bits and even complete kits are available. Plastic predominates though and there were people pushing things out of injection moulding machines that I'd never heard of. That's a surprise as I'd always assumed  that the tooling costs would be too great for short run, limited edition products. Presumably when you have a world-wide audience then the economics change massively. Certainly one of the people on the Tamiya stand was making this case. Wheat we consider a big seller in the UK is insignificant in the US - something railway modellers need to remember when moaning about the cost of the latest RTR compared to that across the pond.

Airfix Hurricane Plan
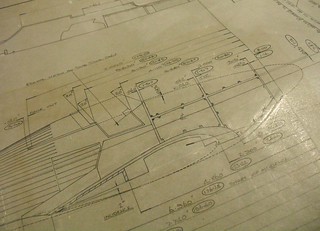
To have a rest, I took in a couple of lectures after lunch. The first by Trevor Snowden covered how Airfix picks prototypes and goes about tooling up for the kits they produce. We were shown different kits parts mastered using pantograph and then various spark erosion technologies so we could understand the difference between the methods of mould making. There were plans to see, a full-sized Nimrod intake and the real Airfix drawing for a Hurricane. Plastic modelling history being passed around for us to handle. There were a few behind the scenes snippets as well. The 1:72nd TSR2 was a limited edition but not quite as limited as everyone thinks - but it lead on the the 1:48 version. Also, the 1:24 Mosquito has made the company a decent return. It seems that bigger kits are more profitable than the small ones.

Mustang
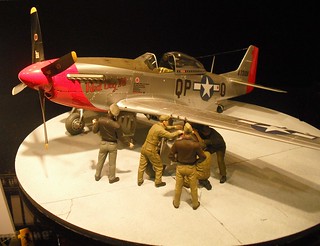
Next up was Hideyuki Shigeta, President of Zoukei Mura, a plastic kit manufacturer I had read about on-line but never seen in the styrene. His presentation, in Japanese with translation by one of his sons, told the story from his rise from owning a model shop to manufacturing superb quality kits. Always an aircraft enthusiast, he had always dreamed of producing kits that were assembled in the same way as the real 'plane. Looking at the results, he's certainly done this with internal detail that has to be seen to be believed. Doubtless there will be people moaning at the cost, around £130 for a Mustang for example, but if you want the best and wish to enjoy many hours assembly then I can see why you'd be happy to dip a hand in the pocket. This isn't a five minute job, more like building a very good model locomotive. I thoroughly enjoyed the talk and am very tempted by a kit now, and I'm not interested in aircraft.

The Q&A session at the end with prizes of t-shirts or books. I bagged the book on the 
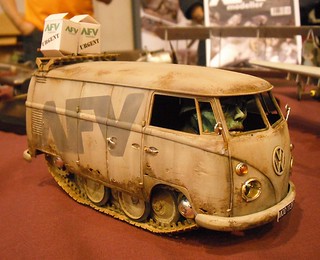
Shinden pusher plane, an experimental Japanese aircraft invented at the end of the war, too late to make any difference. This was great as it looks terrific and I love unusual and experimental machines. I asked why his shop was called "Volks". Apparently after the Volkswagen he and his wife drove around in. I then suggested that would make a fantastic subject for a kit. I'd buy one.

Sadly, the prize aspect provided an embarrassment. During the Airfix talk, a husband and wife were sat in the row behind me. During the break, he moved forward and sat one seat away. She joined him, flopping between us. Fortunately the bag of kits I had stored under the empty chair survived her kick. During the lecture she read some trashy "reality" magazine with articles like "I woke up on the operating table during my boob job" and generally ignored the speaker. Until the end, then she spotted the t-shirts emblazoned with the Mura logo. 3 times her hand went up to ask a question and every time one of the other 40 people in the room were picked, she grumbled loudly to her husband. Eventually, persistence won and some question was asked - I can't remember what it was, something about Mrs Shigeta I think - and once answered there was then negotiation over the t-shirt size and colour. I think the thing went back 3 times before she was happy. I wanted to shout, "For God's sake, it's free. Just take it and let the man carry on!". I just felt that the guy had flown over from Japan, ended up in Telfrod of all places and was then confronted by someone more interested in a freebie than listening to the entertaining talk. Good job everyone else was rather more interested in the subject...

Tradewise, I was looking for interesting modelling tools and materials. Despite this, I came away with a couple of kits. Prices were very reasonable and the range incredible. Yes there were expensive models, I'd have come away with a Zero-X kit for a 3-figure sum but there was loads at a fiver too. I can see that as a shopping trip, Telford could supply the keen plastic modeller with a years worth of projects. You get all the big manufacturers showing such as Airfix, Tamiya, Humbrol and Revell and a host of smaller names. Too many to list here!

Caravanning by air
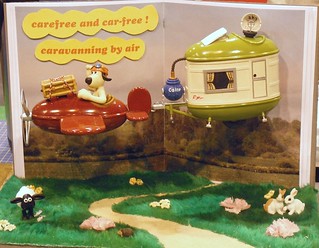
The displays were great and some had really travelled. I'm not going to try and describe them. I took photos for that and even then they don't really do the models justice. One highlight was a set of converted Airfix Wallace & Gromits & Shaun the sheep models.

A tenner entry fee resulted in 6 hours happy browsing. Not bad value for money. I think I'll go back next year.

My IPMS photos on Flickr.

Friday, November 16, 2012

Dirty little tank engine

Dirty P Class

Parker's rule of painting railway engines says that plain black chuffers lack character. It's only when they show a bit of dirt that the engine comes alive. Arty types would probably go on about pure black not being a natural colour or that to see an engine that small, we'd be separated from it by some distance and this would impart all the colours a bluey tinge thanks to atmospheric stuff.

Personally, I don't care why, all I know is that weathered locos look better than clean ones. Especially if they are black.

My usual methods applied for the P - airbrush fired up, a coat of Humbrol earth colour and a bit of rust under the footplate, Railmatch underframe (in leiu of track colour, come on Humbrol, get a move on with it) dirt all over and then some dark grey and black over the top bits where the soot lands. A bit of weathering powder (the ones you get free with a Hornby mag subscription) on the footplate and smokebox door to add texture and finish with a little gunmetal dry-brushed on the handrails and step treads.

Clean the wheels, glaze the windows with Krystal Klear, add a crew from the people box, coal with real Welsh steam stuff and the job is done.

Thursday, November 15, 2012

Freshly painted P

Clean P Class

Fresh out of the paint shops, the little P Class is looking rather lovely. The contrast between a satin finished body and matt painted smokebox is particularly pleasing.

The satin is Humbrol satin black, varnished once the transfers have been applied. Looking at my stock of the later, I dug out some old Pressfix which looked about right and for a change, were free of annoying transfer film.

31325 was chosen as the number simply because I found this picture on the web:

Photograph: Mike Morant collection from the Southern e-Group website.
 
It looked about as dirty as I wanted my model to be and while the idea of painting a full pre-grouping livery had crossed my mind, in my hands that was just the path to a world of pain. Anyway, I have far more use for a BR engine. Except if I want to run it on Hellingly anyway but I can live with that.
 
One important point to note is that 31325 received its BR crests early and so got the version where the lion (or ferret) faced the front of the engine on both sides. At some point the international heraldry overlords pointed out to BR that if they wanted to do this, they had to register two different heraldic devices. BR couldn't be bothered to fill in the forms twice for this and anyway, it halved the numbers of transfer designs required so they decided that the beasts head would always face left.

Wednesday, November 14, 2012

Antics Coventry's new home

Antics - Coventry Branch

Antics model shop in Coventry has moved to new premises from it's old home near Pool Meadow bus station.

The now location is 1A City Arcade, 2 minutes walk from Ikea and the indoor market. The former is worth knowing if you are looking for car parking or somewhere to lose the family for half an hour or so...

Although the new shop is slightly smaller, I prefer it. Walking in, the feel is friendly and you are in the middle of the goodies. I always felt that you'd walk half way down the old place before getting to the stuff you want.

Manager Dave and assistant (and top plastic kit modeller) Andy are as friendly as ever. The move might prove bad for their waistlines though as it seems that the local cafes are keeping them well supplied with cake. Some German friendship cake was delivered while I was there, although I foolishly turned down the offer of a slice. Maybe next time.

Tuesday, November 13, 2012

P Class ready for paint

Nearly ready for paint

The chassis runs under its own steam. All the bits have been glued to the body. well, apart from the cab roof which is seperate 'cos I'll need to poke a paintbrush around in there.

Those buffers coulds do with a few stokes of the file too. Hadn't spotted that until I looked at the photo. I should get points for fitting the correct set though.

Then it's time to break out the Humbrol.

Monday, November 12, 2012

A OO chassis problem

OOchassisAt the back of the P, there should be a couple of cylinders tucked under the bunker. Casting are supplied for these but I've hit a problem.

A OO guage chassis is quite a bit narrower than scale. The two cyclinders are scale width. Something has to give. Either they breathing in a lot or one of them goes in the spares box.

Sadly, the long horizontal cyclinder will be left for the P4 modellers. It's width is about the same as my chassis narrowness. I don't think anyone will notice.

Sunday, November 11, 2012

Model Boat Show 2012

Marine Modelling BoatsIt's the time of year to set sail for the Warwickshire Exhibition Centre for the International Model Boat show 2012. Several thousand square feet of ship and boat modelling.

Wandering around the display, there were the usual mix of vessels in various scales of a variety of prototypes. Some of the models were familiar to me but most were their builders latest pride and joy.

If there was one thing I had to remember this year, it was the mantra "No New Kits". There are plenty of boats in my pending pile. I've even got all the bits to finish them, I just need the time. Maybe my lottery ticket will come up one day...

It sort of worked. The Vintage Model Boat Company managed to extract some cash, or at least a temporary loan of my credit card, but those kits were Christmas presents so that doesn't count. Apart from the fact one of them needs to be given as a finished model, so I've got my work cut out sticking the laser-cut bits together. Interestingly, this company is an offshoot of IP Engineering, purveyors of excellent garden railway kits.

I did have to acquire some sizable bits of plasticard for Brede MK III and Models By Design flogged me a hefty bags of huge sheets in various sizes for £25. More than enough for three or four boats. Even allowing for the amount of plastic sheet I can work through in a year, this will last a while.

One of the more unusual sets of kits are those shown at the top of this post. Card kits in 4mm scale courtesy of Marine Modelling Magazine. Chatting to the editor, the models appearance in the mag hasn't gone down too well with the (very) few people who bothered to feed back to him. Chatting at shows though, the response has been far more positive. The RNLI hovercraft towards the back will be appearing in the February issue of the mag because of this and I for one look forward to picking up a copy. While the models aren't exactly sophisticated, they can be assembled by nearly anyone and offer a starting point for something more details. The little ferry at the front appeals to me, as does the green work boat in the middle. I've bought a back-number to get that one.

Manning the KMBC stand, I didn't find this a chatty show. Attempting to start a conversation with visitors was usually met with a look of horror. The only area of the display that generated conversation was the "Cobweb Corner" display of old RC equipment and models. Dave was chatting away all day.

See more photos from the show.

Saturday, November 10, 2012

Another boat for the dustbin

Tomorrow, I will be manning a stand at the International Model Boat show. On the same stand, the plan was that my Brede lifeboat would be sitting there as a demonstration of work in progress.

I'd not done any work on it for over a year so I thought I'd dig the model out and see if I could advance the project a little. A desk would be nice and perhaps the start of some superstructure.
 
Deck Fitting

Fitting the desk was fairly painless. Using thin liteply I fixed the top to the hull using waterproof PVA. Because of the undulations exhibited by the prototype, while the glue dried, the deck was held in place with screw-in planking clamps. After a couple of hours, things were well fixed.

I left the deck over-large rather than try to make it precisely right. Cutting back the excess back was achieved with the piercing saw and then a small power sander. A bit of filler and all looked good.

Hull Error
Well, it did until I looked properly. With the deck fitted, it was obvious that something was seriously wrong with the back end of the boat. One side was half a centimetre nearer the centre line than the other. Somewhere along the line, I had really screwed up my measurements and it has taken until now to find out.

For a little while I pondered on ways of fixing this cock-up, but in the end it was obvious that any repair would take monger than starting again and still not be as good as doing the job properly. Sadly, this meant that all my hard work had to go in the bin and not on the stand.

Must try harder.

Friday, November 09, 2012

Skytrex factory and vintage footbridge in Hornby Magazine

Some projects are small and some are big. This months' Hornby Magazine showcases one of the later.

Looking at the range of resin factory parts produced by Skytrex, I found myself wondering if the walls designed to be used as low-relief items could be turned into a complete model building. Since they are pretty cheap in unpainted form, I had a go. The resulting building is over a foot long and 6 inches wide. About as big as I go on my modelling board.

It's not a difficult project and even if you go for the full-fat version as I did, produces a striking structure for not too much money compared with ready to plan resin buildings. If you can only see one side then money could be saved by replacing the resin bits with cardboard.

Elsewhere, I have a crack at a Hornby footbridge kit that dates from the 1980's but is still in the catalogue. I don't know why more people haven't used it as the results are as good as many etched models, the cost considerably less and the skills required to achieve a top model virtually nil. Mind you, if you insist on a pretty paint job like wot I did, you'll need to allow for around 5 hours with the brush, a stiff back and mild headache. Pour something nice to drink, put on some soothing music and enjoy...

Oh, and there are some reviews'n'stuff but you'll probably be too excited by the news about a diesel brake tender. Have a look in the back and you'll see some news about one of my future projects too.

Hornby Magazine

Skytrex Factory

Thursday, November 08, 2012

Making a barge sit flat on the water

 
Patrick asks: Can you suggest any way of making this barge sit flat in the water, and not curve up at the front and back. I am currently putting on layers of varnish, should I put the boat on and then varnish round it? The model comes from Sarik Vacform (www.sarik-vacform.com) and it is a canal butty boat. It is vacuum formed, so it is probably thermosetting plastic, hollow and fairly light.
 
I have heard of Sarik Vacform although I've not seen any of their products in the flesh. A couple of years ago they advertised in the model boat press and I took a look at the website then. Presumably this is from the railway range which isn't listed on the site. I wonder what else they do.

To get the boat sitting flat in the water, you are going to need to sand the bottom flat. This might mean sanding the base away depending on how curved it is.

The method is pretty simple. Get a large sheet of emery paper, something around 180 grit would be ideal, and fix it to a bit of wood with glue, pins or double-sided tape. Then rub the boat on this. Using a the wood will keep the sanding flat but just watch the bottom is level.

This applies to an unpowered butty boat. If you have a powered barge, then hold the boat where the engine is. This part is heavier than the rest and sits lower in the water when the boat is empty. Holding that end will replicate this.

Finally, set the model into wet varnish. Then add another coat or two to the "water" so a little meniscus forms around the hull.


Wednesday, November 07, 2012

Book Review: The Toy Story by Anthony McReavy

No, not the Pixar film, this is subtitled "The Life and Times of Inventor Frank Hornby". The man who invented Meccano, Dinky Toys and of course, Hornby model railways.

McReavy has writen an odd book - part biography, part social history and part business history. Hornby's life is covered from humble beginnings as a meat importers clerk through the creation of the business we know him so well for to the years spent as an MP.

The text covering Meccano and later model railways is contrast against the changing world of childrens' toys. There is an awful lot of "big picture" stuff explaining how the concept of a toy is relatively recent. Late in the 19th century, there may have been playthings but little in the way of a national or international market. The idea of playing with a toy on a Sunday was even frowned upon.

This isn't the earliest reference, we kick of in 1571 with the first children's book and pass by the publication with the wonderful title "A Token for Children: Being an Exact Account of the Conversion, Holy and Exemplary Lives, and Joyful Deaths of Several Young Children"by the end of the first chapter.

Happily things gain a bit of focus and we get to know exactly how Meccano was invented. The trials and tribulations of it becoming the greatest toy in the world between the wars and then then eventual decline in the 1950s and 60s.

All this might sound a bit weird but it works. Not only do I know Frank Hornby's history, have an idea how he created his empire, but I have a grasp of the background and times in which he did it. The man was at the forefront of marketing and selling the product. A regular visitor to America and the continent, he revolutionised distribution methods and was copied by many. The legal battles that accompanied this copying also get a mention as do many who had similar ideas before him.

If you are interested in the man to whom railway modellers owe a debt of gratitude, then this is a good read.

Buy The Toy Story from Amazon

Tuesday, November 06, 2012

Making clock hands for steam engine noses

Helping clock handsIf there is an area of disappointment with the P Class kit, it's the face. A set of moulded clock hand on the smokebox door don't do the model any favours at all.

You've probably guessed that I'm not much of a perfectionist if you've been reading for a while. I'd rather finish a project than have it stall forever waiting for perfection. I'm too impatient to be a great model maker and this loco is being built faster than most as I just want to finish something quickly.

I can't let the cast lump stay though. Normally I'd shell out 4 quid for some smokebox door adornment from Eileen's Emporium. It's not much of an other on it's own though and I won't see them at a show for a few weeks so I'll bodge something nearly as good up myself.

Finescale modelers will tell you different but for most of us, clock hands (Look, I know it's not the right term but it's what everyone calls them) made of the three bits of 0.45mm brass wire will look fine. I know they should taper to a ball at the top of each hand but in 4mm scale this is a tiny matter and if you are looking closely enough at a model to spot this then I'm telling you to get your greasy gricer nose off my train set.

Construction is eased by holding two of the three bits of wire in a set of "Helping hands". One of those tools we all have but rarely find a use for. A dash of solder and flux completes the job. Then the wire is cut roughly to length and glued in a hole drilled where the cast lump was. Finally trimming happens on the loco.

Result - a much nice face. Both on the little engine and on mine as I grin with the pleasure of saving some money.

Clock Hands

Monday, November 05, 2012

Boiler fitings

Boiler fittings onA few minutes with the Zap-a-gap glue and my P Class loco is looking far more like a steam engine.

The castings are pretty good quality. There aren't any serious moulding lines to be dealt with. Nothing more than a quick scrape up both dome and chimney and then a polish. I drilled the later out a bit as although it's not supplied blind, I like some depth there. Perfectionists would probably replace it with a turned brass example but I'm too stingy and not that bothered. It looks all right to me.

At the cab end a little more work is required. The safety valve lever (not the right term but the bit on top) should poke though the front and a hole has to be drilled for this. A square hole would be preferred but I don't have that sort of drill bit to hand.

Either side there are some things with valve wheels on the top - or at least there should be on one side and not on the other. I didn't spot this to start with which is why I have an excess hole in the cab front. I've found the right casting now and fixed this.

Either side of the smokebox, the instructions show some oilers (I think, castings that I can't identify) but photos of both the preserved P on the Bluebell and a Southern example don't show them so I assume this was an early change. A drop of superglue to fill the holes and that's that job done.

Sunday, November 04, 2012

What do you get from a show organiser?

Les asks: I hope to exhibit  next year and am interested in knowing what is involved. Are tables provided for example? Table coverings? Or does one bring everything oneself.

A lot depends on the sort of display you are taking. Normally this is arranged when you complete the invitation to exhibit sent by the organisers. Facilities very from show to show but here's a rough guide:

Layouts will be provided with sufficient space for the stand and a power point. I normally request a couple of chairs. Others will also want a table for rolling stock.

The assumption is that your display is self-supporting. If it isn't then you can ask for tables but will have to accept what you get. Some tables have a rim around the edge which is a problem if you assume they will be flat. Even tables of the same height aren't always a given so packing materials will be required. Tables are often hired in and so the show will want to keep the numbers to a minimum. If you need them, ask for just the ones you need and don't expect that there will be spares available when you get there.

Lights are important, you can't ask to move because the area of the hall you are in is dark. Bring your own, it's part of building a layout for show, or look like an amateur I'm afraid.

You'll certainly need to take an extension lead and probably and RCD. Curtains are also your own problem. Basically, be as self-contained as you can possibly be. Exhibition organisers have better things to do than sort out stuff that layouts should have brought with them - including sufficient operators to run the thing for the duration of the show. Don't rely on "borrowing" someone from the club, or that the person you get if you do won't be sent to you because everyone else wants them out of the way.

Demonstrations: Tables and chairs will be supplied and normally tablecloths. Check if power is provided as shows that have to pay for every socket might try to avoid doing this if you don't need electric. This sounds silly but when each socket costs the organisers £45 then they will try to keep costs down.

Exhibition managers are very busy people. If you want to be invited back to a show, cause them the least trouble possible. Of course things go wrong, but I've seen plenty of people who turn up and expect the harrased man trying to pull the show together baby them through. Don't be that person and you'll have a good weekend.

Saturday, November 03, 2012

The Heilmann locomotive


Wikiepedia is a dangerous thing. There I was looking something up when I spotted this photo at the side of the page. A couple of clicks later, proper work has stopped while I learn more.

The locomotive is a steam-electric engine, one of two built in 1897 built for French railways. A steam engine, which was built less than 20 miles from where I sit, turns a generator which powers electric motors in the bogies. Just like a diesel-electric but powered by coal.

There are lots of things I like about this engine. The wedge shaped front for example. It obviously ran "cab forward", allowing the crew the sort of superior visibility not to be seen for many years.

I like the concept too. In my head I can even conceive of making a real version. A small proprietary steam engine turning an electric motor to act as a generator wired to motors in the bogies. That shouldn't be too difficult should it ?

I also wonder why Bulleid never considered this for the Leader? It would have avoided all the problems associated with the enclosed cylinders and leaky steam pipes.

Read the Wikipedia entry on the Heilmann Locomotive

Friday, November 02, 2012

Not a Westinghouse

PipingOn the front bunker of the P Class is a pump. The instructions point out that this is most definitely not a Westinghouse air pump, even though it looks a heck of a lot like one.

Apparently, it is a steam reverser and is accompanied by complicated pipework and linkages, none of which I have any idea about.

The exploded diagram is not help and the poorly photocopies photos showing this area on the prototype aren't that much more use. It doesn't help that the tiny white metal bits in the box are odd-shaped lumps. Nicely cast odd-shaped lumps with very little flash, but still a bit of a mystery to me.

Squinting at the photo on the box front, I can see that the pipe appears to terminate (on the model) in a handrail knob. I suspect purists won't be happy but I was able to make this work and reckon that a few strokes of the file should see it less knob-like.

The operating linkage is even more of a mystery so I've bodged it as best I can. There's quite a lot of detail going on in this area. Detail that would be easier to fit if the reverser fitted behind the steam pipes without needing to have both back and front thinned with a file. I'll be honest and say my version is fine for a layout loco but were I to build the model for anyone else, it wouldn't satisfy me.

And for those who read yesterdays post, yes I did break out the soldering iron. Those tank handrails weren't going to stay put any other way so I did my new pipework at the same time. I'm done now though.

Thursday, November 01, 2012

Soldering - Done

Soldering Done

I've reached an important point in building the P Class tank - the time to turn off my soldering iron. No more smelly, hot fumes for me. Just wafts of glue.

The sharp eyed will notice that I've not attached any of the boiler fittings, parts most people would manfully fit with hot metal. There is method in my madness. Superglue makes a decent strong joint, at least if you use good stuff like Zap and not something from the pound shop. The joint can be broken if required, or more likely, if the model is dropped or badly knocked.

Then, the part will come lose and be easily re-fixed. Normally I don't even have to repaint the affected area.

Of course, this is a bit of an excuse. Truth is, I've got fed up with soldering. This is a hobby and so if I want to glue bits on then I will. Sometimes, I'll do the whole thing with the iron, other (like this time), not.

What a rebel I am.