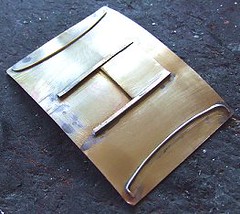
OK, it’s not exciting but I’ve cleaned up the Pannier tank’s roof. All the solder was fluxed and then heated to make it run. Then burnished away with various sizes of fibre pen. Thick bits were scraped down first with me making plenty of effort not to gouge lines in the brass like I normally do.
Those solder spots visible in the photo will disappear under the thin coat of primer. I hope.
Thursday, May 31, 2007
Wednesday, May 30, 2007
Elise's glasses
As I’ve said before, I hate seeing things that are broken. Some maternal bit of me always wants to make them better. Were I phenomenally wealthy I’m sure that my extensive house would be home to any number of poorly cars that I have “rescued”.
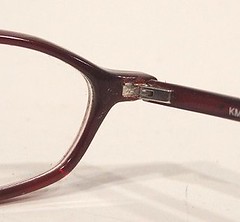
I also have an unnatural desire to help out where possible and this manifested itself when a colleague ran over her spectacles with an office chair. This bent one of the hinges, although apart from that they survived unscathed. A trip to the optician bent the hinge back so the arm pointed in the right direction but it was still loose and waggled up and down. Annoying as hell to the wearer.
Taking a close look I volunteered to try and fix the problem. When the hinge had bent it moved in the plastic frame and came loose. Ideally stuffing some glue in the hole would take up the slack. Before starting work I made sure the owner was happy for me to do that job at her own risk ! Spectacles are fiddly and expensive, as a full time wearer I know how much they cost. Anyway, if I screwed up I’d literally still have to look her in the eye in future !
On the bench I quickly abandoned the glue idea. The slack to take up was less than 1mm and I didn’t fancy my chances of keeping the glue in the hole neatly.
Instead I pushed some thin plasticard into the hole either side of the hinge and held this in with gap filling superglue. This helped but didn’t entirely cure the wobble. The remaining gap was far too small to get more plastic in though.
I hunted for some shim brass but couldn’t find any. What I did unearth in my spare bit of etch drawer was some phosphor-bronze strip. It’s thin and strong enough to push into a tiny gap. However I decided to be daring and push it in with the tip of the soldering iron. This melts the plastic of the frames enough for the metal to slide in and the molten material grabs as soon as the heat is off. Of course this can go wrong if the iron slips but fortunately it didn’t.
Result – a nice solid hinge. With a little tidying up the result was very neat too. Not bad for 20 minutes work.
Other result – a happy colleague who is relieved not to have to go glasses shopping in the immediate future.
Tuesday, May 29, 2007
G1 Pannier Tank
With Tomsk on the water it’s time for a new project – I wouldn’t want to get bored…
Actually Trevor rang me to say that the big box he had sent to me a couple of weeks ago had an owner who’d like to pick it up at a show in a fortnight if possible.
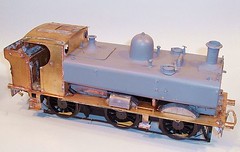
The box contained a nearly finished Gauge 1 Pannier tank. Nearly finished in the sense that there is a working chassis, footplate with cab attached and pannier unit. Most of the detail is in place. Basically all I have to do is solder the big lumps together and clean everything up. Finally a coat of primer is to be applied.
Thanks to Channel 4 showing the last Start Trek film I settled down to a couple of hours tinkering to see how far I could get. As it happens I did quite a bit. The main parts are pretty well built, although the boiler bottom was in the wrong place as the builder had moved it forward to clear the motor. I moved it back and cut a hole in it, which looks better.
Thanks to my little blowtorch I was able to fix the pannier to the footplate. I suspect this might be one reason why I got the job of finishing the project, the builder was running out of heat as the parts got bigger. This is a common problem with newbie modellers. You simply can’t have too big a soldering iron.
Anyway, I assembled the bits and then gave them a good clean in the sink. I have some more work to do and then need to start on the chassis. This bit is more complex and will require some fabricating but should be fun.
Actually Trevor rang me to say that the big box he had sent to me a couple of weeks ago had an owner who’d like to pick it up at a show in a fortnight if possible.
The box contained a nearly finished Gauge 1 Pannier tank. Nearly finished in the sense that there is a working chassis, footplate with cab attached and pannier unit. Most of the detail is in place. Basically all I have to do is solder the big lumps together and clean everything up. Finally a coat of primer is to be applied.
Thanks to Channel 4 showing the last Start Trek film I settled down to a couple of hours tinkering to see how far I could get. As it happens I did quite a bit. The main parts are pretty well built, although the boiler bottom was in the wrong place as the builder had moved it forward to clear the motor. I moved it back and cut a hole in it, which looks better.
Thanks to my little blowtorch I was able to fix the pannier to the footplate. I suspect this might be one reason why I got the job of finishing the project, the builder was running out of heat as the parts got bigger. This is a common problem with newbie modellers. You simply can’t have too big a soldering iron.
Anyway, I assembled the bits and then gave them a good clean in the sink. I have some more work to do and then need to start on the chassis. This bit is more complex and will require some fabricating but should be fun.
Sunday, May 27, 2007
Open day
With Tomsk dried out and working we went along to the boat club’s open day. Needles to say the gods didn’t smile on us and it poured with rain all day.
However the competitions and races still took place. I won my heat in the Slingshot racing – and then some water got into the speed control and the boat wouldn’t work for round two…
Tomsk behaved better in the steering challenge. I had a quick practise during lunch and everything seemed OK. During the proper run he was fine too with not a hint of sinking. The biggest problem was that I went first and didn’t know exactly how far into each bay I had to sail. Everyone else benefited from a proper understanding for the rule, which is my excuse for coming third. Of three.
Dry Tomsk
To my amazement everything has dried out. Plugging all the electric bits together gave the correct lights on the speed control. A tentative push of the control stick and the motor roared into life. The rudder worked too. Tomsk was alive !
Now I don't want to go through this again so I don't plan to tow big heavy boats any more. A bit of research on the interweb has provided some pictures of some lighters that would be much more suitable for my craft. These don't look too difficult to build.
I've also made some changes to the boat. Since the receiver is vulnerable to water I've sealed it in a plastic bag. If there is to be a future run to the bank I don't want the electrics letting me down.
I've also filled what little spare space there is in the hull with polystyrene. I doubt that this will provide sufficient buoyancy to stop Tomsk sinking but it might slow the decent, again giving me a chance to get out of trouble.
I'm not planning to test this though !
Saturday, May 26, 2007
Glug, Glug.
Thursday evening was bright and sunny. There was a slight breeze but nothing much. It was just the sort of evening that I wanted to give Tomsk his maiden voyage on the boat club water.
When we arrived at the lake there were a couple of other people sailing but they were just finishing up. Having the water to yourself is handy just in case the steering isn't too good. Other boats on hand to rescue you from the middle of the lake are also appreciated though. If these come with owners who can be relied on to shut up when you have problems unless they actually have something helpful to say, so much the better.
On arrival we were greeted with the good news that the fish had gone.
Our boating lake is infested with carp. Originally they were introduced to eat the weed. This worked fine but without a predator they have breed like aquatic rabbits. The landlord has “helped” by feeding them every evening meaning we can't even rely on a lack of food to reduce the numbers. He even feeds them from the oh so handy landing stage, so as soon as you stand on the stage to launch a boat they appear underneath you making the water appear to boil.
Last weekend there was a fishing party who pulled 200lbs of carp out and transferred them to a quarantine area somewhere before they go to another bit of water. There are still fish present and even the odd big 'un but nothing like the numbers there were before. This ought to safeguard the boats for a while – there have a been a few fish attacks and more than one Slingshot has leapt in or out of the water after clobbering a sea monster.
Anyway, I set up, put my peg on the frequency board and launched Tomsk. First we made a gentle circuit of the lake to check that radio reception worked at a distance. All seemed OK there but a tugboat isn't meant to just tootle around, it's supposed to do a job.
The club has a boat designed to be towed. An old hull has been fitted out to look boat shaped with a line fixed to the front. At about 4 feet long it's a bit of a monster compared to little Tomsk but I had checked in the past how much pressure was needed to move it and felt that my boat was up to the task.
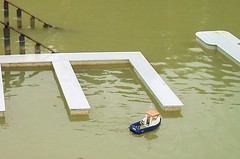
First results were good. The pair successfully negotiated the narrow passage between the overflow pipe and bank, something many boats can't do on their own, and headed for the middle of the water.
Everything looked pretty good. I was so pleased I wanted a photo of the event to post on this blog – so dear reader, what happens next is partly your fault.
I had forgotten to take a proper camera but my mobile 'phone does a decent job. All I needed to do was take it out of my pocket, open it, press the button on the side to switch the camera of and then take the photo. While fiddling around with this I stopped Tomsk. Of course the tow boats momentum kept it going and it quickly caught the tug up.
So I move forward again and stopped. The same thing happens. By this time the pair is rather nearer the bank than I would prefer so I tried to pull away. Now I'm not an experienced tugboat sailor and anyway I was messing around trying to take a picture. Tomsk isn't very heavy so attempting to pull it's load in a very different direction wasn't the cleverest thing in the world. My boat tilted enough for water to get in over the bulwarks.
I realised what was happening because the model was sitting lower in the water than normal. Reasoning that grounding on the edge was better than sinking in the middle, I made a run for the bank. That didn't work very well as I was towing a big, heavy boat.
Tomsk continued to get lower in the water. The sort of lower that means most of the boat isn't visible any more. And then the sort of lower that submarines do while working. This was Bad.
Now when this sort of thing happens to most boats you have to assume that they are lost. Our lake isn't that deep – about 5 feet I think – but visibility is nil and so you are reduced to poking around with a stick from the club dingy. However the line to the tow boat was still tight.
Derek brought out his famous boat retriever – a fishing line with a tennis ball on the end – and managed to snag the big boat. We pulled it in to the side and gentled heaved it up a slippery bank. Luck was with us and the tow line stayed tight bringing up a muddy and wet Tomsk.
Of course my boat was full of water and covered in sticky mud. This was poured out and wiped off as best we could at the waterside. Switching back on showed the speed control seemed to be OK but couldn't get a signal. I opened up the receiver and poured water out of it. The whole lot was left on the bench for half an hour to dry as the weather was still nice.
Fortunately all the people who around were helpful and simply suggested this was s job for an airing cupboard. With a bit of luck once everything dries out properly I'll be OK. At worst the receiver will need to be replaced.
Looking on the bright side, Tomsk can do the job I built him for. I'll probably give the towing competition a miss as I'm working on the limits of the boats abilities though. Besides it's another example of the jinx that seems to hit me when I try competitive boat modelling !
When we arrived at the lake there were a couple of other people sailing but they were just finishing up. Having the water to yourself is handy just in case the steering isn't too good. Other boats on hand to rescue you from the middle of the lake are also appreciated though. If these come with owners who can be relied on to shut up when you have problems unless they actually have something helpful to say, so much the better.
On arrival we were greeted with the good news that the fish had gone.
Our boating lake is infested with carp. Originally they were introduced to eat the weed. This worked fine but without a predator they have breed like aquatic rabbits. The landlord has “helped” by feeding them every evening meaning we can't even rely on a lack of food to reduce the numbers. He even feeds them from the oh so handy landing stage, so as soon as you stand on the stage to launch a boat they appear underneath you making the water appear to boil.
Last weekend there was a fishing party who pulled 200lbs of carp out and transferred them to a quarantine area somewhere before they go to another bit of water. There are still fish present and even the odd big 'un but nothing like the numbers there were before. This ought to safeguard the boats for a while – there have a been a few fish attacks and more than one Slingshot has leapt in or out of the water after clobbering a sea monster.
Anyway, I set up, put my peg on the frequency board and launched Tomsk. First we made a gentle circuit of the lake to check that radio reception worked at a distance. All seemed OK there but a tugboat isn't meant to just tootle around, it's supposed to do a job.
The club has a boat designed to be towed. An old hull has been fitted out to look boat shaped with a line fixed to the front. At about 4 feet long it's a bit of a monster compared to little Tomsk but I had checked in the past how much pressure was needed to move it and felt that my boat was up to the task.
First results were good. The pair successfully negotiated the narrow passage between the overflow pipe and bank, something many boats can't do on their own, and headed for the middle of the water.
Everything looked pretty good. I was so pleased I wanted a photo of the event to post on this blog – so dear reader, what happens next is partly your fault.
I had forgotten to take a proper camera but my mobile 'phone does a decent job. All I needed to do was take it out of my pocket, open it, press the button on the side to switch the camera of and then take the photo. While fiddling around with this I stopped Tomsk. Of course the tow boats momentum kept it going and it quickly caught the tug up.
So I move forward again and stopped. The same thing happens. By this time the pair is rather nearer the bank than I would prefer so I tried to pull away. Now I'm not an experienced tugboat sailor and anyway I was messing around trying to take a picture. Tomsk isn't very heavy so attempting to pull it's load in a very different direction wasn't the cleverest thing in the world. My boat tilted enough for water to get in over the bulwarks.
I realised what was happening because the model was sitting lower in the water than normal. Reasoning that grounding on the edge was better than sinking in the middle, I made a run for the bank. That didn't work very well as I was towing a big, heavy boat.
Tomsk continued to get lower in the water. The sort of lower that means most of the boat isn't visible any more. And then the sort of lower that submarines do while working. This was Bad.
Now when this sort of thing happens to most boats you have to assume that they are lost. Our lake isn't that deep – about 5 feet I think – but visibility is nil and so you are reduced to poking around with a stick from the club dingy. However the line to the tow boat was still tight.
Derek brought out his famous boat retriever – a fishing line with a tennis ball on the end – and managed to snag the big boat. We pulled it in to the side and gentled heaved it up a slippery bank. Luck was with us and the tow line stayed tight bringing up a muddy and wet Tomsk.
Of course my boat was full of water and covered in sticky mud. This was poured out and wiped off as best we could at the waterside. Switching back on showed the speed control seemed to be OK but couldn't get a signal. I opened up the receiver and poured water out of it. The whole lot was left on the bench for half an hour to dry as the weather was still nice.
Fortunately all the people who around were helpful and simply suggested this was s job for an airing cupboard. With a bit of luck once everything dries out properly I'll be OK. At worst the receiver will need to be replaced.
Looking on the bright side, Tomsk can do the job I built him for. I'll probably give the towing competition a miss as I'm working on the limits of the boats abilities though. Besides it's another example of the jinx that seems to hit me when I try competitive boat modelling !
Friday, May 25, 2007
Kill Bill Gates
I was typing up a nice log blog post about Tomsk's maiden voyage in Word when I nipped away from the computer for a couple of minutes. While I was away Windows update decided that it would re-boot the machine without asking, dumping my work without saving.
So I apologise for the lack of a post but I can't face typing it up again this evening. I feel the need to go and find Bill Gates and teach him to swim in the bottom of our boating pond. Or tie him to some tracks in a silent movie style. Or strap his useless remains to the front of my VW in the style of some redneck hunter from the USA.
Other suggestions welcome !
Thursday, May 24, 2007
Paint on
The basic colours are now all on. I’m particularly pleased with the orange roof – it’s from an old can of Precision paints GWR lining orange. I can’t remember why I bought this but it’s come in useful at last.
Anyway, once painted and named on the back with BEC vinyl letters, I shot some satin varnish over the model.
Finally the floor got a coat of matt greenish paint. Another pot of paint that has lain in the paint drawer for years.
Planning ahead I had cut out the glazing from plastic recovered from shirt collar packaging. This is great stuff, clear and thick and most importantly – free. Good green credentials too. After I cut it I then strengthened the top edge of the windows, so my glazing had to be chopped down. I did at least use canopy glue to stick it in place which is what proper modeller do.
Tuesday, May 22, 2007
Tow post
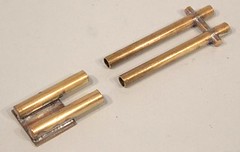
If this boat is going to tow anything I knew I was going to have the build a towing post (I think this is the right term). Obviously it had to be strong enough to take the strain of a larger boat hanging on to it by a bit of rope (OK nylon string) but be removable so I could get at the insides of the hull.
I rummaged around in the bag of spare brass tube and rod bits I keep under the desk. It’s not really my bag as I bought it from a second hand stall years ago but every modeller needs such a supply of bits and at a quid I couldn’t leave it. Anyway I found enough bits to do the job.
My plan was that if I could find some tubes that would telescope into each other and then join them with a solid bar slotted through made using the pillar drill I ought to be able solder the lot up. This is pretty much what happened too. The bottom tubes were soldered to some paxolin which will be stuck into the hull using Isopon car body filler.
With all that brass I had to use a small blowtorch rather than a soldering iron to get the metal flowing – and remember not to pick anything up for five minutes afterwards ! The iron was used initially to blob solder on and tack everything together then the joints were well fluxed before loads of heat was applied.
Monday, May 21, 2007
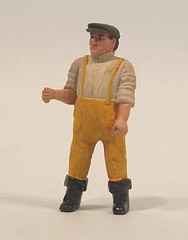
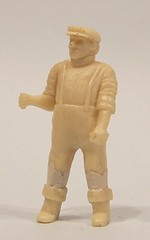
Painted skipper
The bodgery worked. With a coat of paint, Tomsk’s skipper looks the business. Colours are a bit brighter than normal with appropriately bright yellow trousers.
For the skin I used a Humbrol flesh base and then dry brushed with Revell flesh, which is quite a bit lighter. The jumper is cream dry brushed with a white/pale grey mix and dabbed with talcum powder to give a bit of texture.
Wellies are satin black. I think I might need to dirty them up a bit but for the moment they are OK.
Sunday, May 20, 2007
OK Skipper
With a week to go before Tomsk is supposed to be towing model boats in anger, he needs a skipper. I know it doesn’t really matter but to me a boat (or model railway engine for that matter) needs a driver or the whole thing looks daft. Some people prefer to avoid miniature people as it spoils the purity of the model but not me.
Tomsk’s captain comes from the George Turner 1/32nd range. I had to guess the size because the kit isn’t to a particular scale so I working things out from the heights quoted on the web site.
When I placed him in the wheelhouse he didn’t fill the space as I’d hoped. Width wise we were OK but I wanted someone taller. Running the ruler over the model I reckoned that I could add 4mm to the legs without ruining the proportions.
The model was cut off at the top of the wellington boots as these gave an obvious join line where I could hide my additions. The legs were re-joined by supergluing in some plasticard. The surface was then made good with model filler. A bit of scraping with a knife blade once this was dry and I don’t think you will be able to spot the join. I’ll only be able to tell for sure once the paint goes on.
Saturday, May 19, 2007
Ely Show
So off we went to Ely with the Hellingly Hospital Railway in the back of the car. First stop was the Castle Lodge Hotel, our lodgings for the night. The car was backed up to a wall in the car park in an effort to keep any local ner-do-wells out of it.
We found it easily enough and booked in. It’s very handy for the town centre, with the Cathedral only about 10 minutes walk away. After a stroll around taking in the waterfront, excellent model shop, station (watching the sparrows nesting in the electrical trunking was fun) and the most amazing newsagent with the largest magazine supply I’ve ever seen, we ate a good meal in a pub next to the cathedral.
Back at the hotel a drink in the bar made us long for the immanent smoking ban – 10 people in there and only us two non-smokers. I’ve been in lots of pubs but haven’t had to fight my way through the atmosphere like that for a while. Pity really as the bar itself would put many pubs to shame.
The room was spacious but the beds were hard and the metal frames made a hell of a noise every time you moved. Not conducive to a nights sleep ! Worst of all (OK, this a hobby horse of mine), there were no showers. Anywhere. A very generous en-suite with bath and even free shower caps but no actual showers.
Breakfast was pretty good. Quite why it isn’t a legal requirement to supply fried bread with a full English is beyond me, but these guys did the job. We could even have had black pudding if we’d taken leave of our senses.
We got to the show before nine and promptly bumped into old friends from Stowmarket club. Having found our space we set up quickly, dumped the car in long stay parking 2 minutes from the venue (free !!!) and wandered around the show.
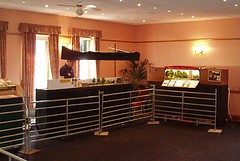
I really can’t fault the layout quality. The exhibition manager has a good eye. The biggest argument would be over the clubs own layout which was OK, and won the public vote, but didn’t meet (in my opinion) the same very high standards as the rest of the show. I’m certainly not bitter about the vote – a roundy-roundy will always win general approval and from what I saw this one ran well unlike so many other examples of the genre.
Trade wasn’t so good but I understand that at least one stand dropped out at the last minute. It was replaced a top quality 16mm scale layout – even the last minute fillers were good – but if you wanted specialist bits you might have been disappointed. My purchases totalled £2.50 for a screwdriver as I’d forgotten to bring two for setting up.
The crowds were plentiful through the day. Too good in the morning, as they had to turn people away which probably affected the overall numbers in the door. The FA Cup might have made a difference, we noticed a higher than normal percentage of mums and children after lunch.
Lots of people played the spotting game and we had enough chat (thanks to all those who stopped to say hello) to keep us amused. The layout ran well enough. The only faults were the Velcro strips that hold a couple of display panels on the fiddle yard getting lost in transit leaving the boards denuded. Even the overhead was OK despite the model getting very cold overnight in the car.
The best bit about the show was the location. The Maltings is next to the river so during the day we were able to nip out and wander around looking at boats. It really is a beautiful place – possibly the nicest place we have ever exhibited. Unfortunately this is the last year for this location due to refurbishment work at the venue. The new home will have more space, better parking and be cheaper. I’m really glad we got in before the move though.
Having closed at 5pm we were back home 104 miles down the A10 and A14 by 7:30pm
A good day.
We found it easily enough and booked in. It’s very handy for the town centre, with the Cathedral only about 10 minutes walk away. After a stroll around taking in the waterfront, excellent model shop, station (watching the sparrows nesting in the electrical trunking was fun) and the most amazing newsagent with the largest magazine supply I’ve ever seen, we ate a good meal in a pub next to the cathedral.
Back at the hotel a drink in the bar made us long for the immanent smoking ban – 10 people in there and only us two non-smokers. I’ve been in lots of pubs but haven’t had to fight my way through the atmosphere like that for a while. Pity really as the bar itself would put many pubs to shame.
The room was spacious but the beds were hard and the metal frames made a hell of a noise every time you moved. Not conducive to a nights sleep ! Worst of all (OK, this a hobby horse of mine), there were no showers. Anywhere. A very generous en-suite with bath and even free shower caps but no actual showers.
Breakfast was pretty good. Quite why it isn’t a legal requirement to supply fried bread with a full English is beyond me, but these guys did the job. We could even have had black pudding if we’d taken leave of our senses.
We got to the show before nine and promptly bumped into old friends from Stowmarket club. Having found our space we set up quickly, dumped the car in long stay parking 2 minutes from the venue (free !!!) and wandered around the show.
I really can’t fault the layout quality. The exhibition manager has a good eye. The biggest argument would be over the clubs own layout which was OK, and won the public vote, but didn’t meet (in my opinion) the same very high standards as the rest of the show. I’m certainly not bitter about the vote – a roundy-roundy will always win general approval and from what I saw this one ran well unlike so many other examples of the genre.
Trade wasn’t so good but I understand that at least one stand dropped out at the last minute. It was replaced a top quality 16mm scale layout – even the last minute fillers were good – but if you wanted specialist bits you might have been disappointed. My purchases totalled £2.50 for a screwdriver as I’d forgotten to bring two for setting up.
The crowds were plentiful through the day. Too good in the morning, as they had to turn people away which probably affected the overall numbers in the door. The FA Cup might have made a difference, we noticed a higher than normal percentage of mums and children after lunch.
Lots of people played the spotting game and we had enough chat (thanks to all those who stopped to say hello) to keep us amused. The layout ran well enough. The only faults were the Velcro strips that hold a couple of display panels on the fiddle yard getting lost in transit leaving the boards denuded. Even the overhead was OK despite the model getting very cold overnight in the car.
The best bit about the show was the location. The Maltings is next to the river so during the day we were able to nip out and wander around looking at boats. It really is a beautiful place – possibly the nicest place we have ever exhibited. Unfortunately this is the last year for this location due to refurbishment work at the venue. The new home will have more space, better parking and be cheaper. I’m really glad we got in before the move though.
Having closed at 5pm we were back home 104 miles down the A10 and A14 by 7:30pm
A good day.
Friday, May 18, 2007
Off to Ely
The Hellingly Hospital Railway is packed and ready to go. All things being equal, we’ll be appearing at Ely exhibition this Saturday.
I suspect we are in for a quiet afternoon as something called the FA Cup Final is taking place at the same time. You have to feel sorry for anyone who organises an event and then football lumbers in and pinches a chunk of your audience.
So if you are reading this, come an see us after lunch on Saturday !
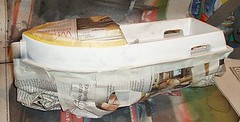
Paint your boat
After waffling on about the tugboat being more art than modelling, I have to stop faffing about and get my brushes out and do some painting.
I’m using this as airbrushing practise. If anything goes wrong fixing it won’t be too hard. Even stripping off the paint and starting again would be considerably easier than do this on any model locomotive I build.
Stage one: Paint the hull with satin black.
Stage Two: Paint the top bits white. As there is a huge separation of the colours by the bits to go blue I didn’t bother masking these colours. That worked OK. I did clean the white bits with turps to remove any overspray.
Stage Three: After leaving the paint to harden overnight I masked off everything that didn’t need to be blue. The edge between white and blue was masked with Tamya tape and then everything else was covered with cheaper masking tape and newspaper.
Result: Pretty good. The line between blue and white was really sharp. Tamya tape has a well deserved reputation it appears and I’ll certainly use it again even if it is the most expensive option.
Mind you, spraying might give the best finish, but it’s not nearly as much fun as brush painting. The process just doesn’t seem natural to me. I have to stop and change location (down to the garage), plan well ahead and spend loads of time messing around masking. The spraying itself happens quickly and then I spend nearly as long cleaning the airbrush. And I have to wear a facemask to work. Give me poking models with brushes any day.
Wednesday, May 16, 2007
Tomsk in plastic
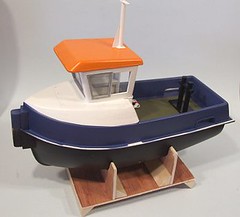
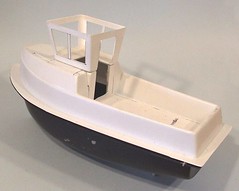
Because there are no instructions for Tomsk I keep putting it together to see what it looks like. “A model boat”, you might say but what shape model boat ?
This isn’t model making, it’s art. I have to keep stepping back from my canvas to see how the picture is progressing. At present I think the boat looks a bit front heavy. It also needs something tall on the roof as well as a towing post.
That’s what I think at the moment. As things progress I might change my mind, but then that is the fun of this project.
Squidgy plastic
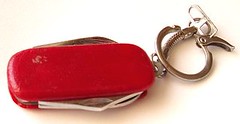
Here’s a little reminder that petrol isn’t the nicest stuff in the world. After I poured a plastic fuel can of it into the van I picked up my keys. The keyring is a knife/screwdriver set that fell out of a Christmas cracker years ago. It’s a nice item and seemed quite handy so I used it.
I like to use anonymous keyrings if possible. That way if I drop the keys and someone else find them it lowers the chances of them guessing which car to try. OK, if you know your old cars you’d guess that it was a vintage Volkswagen you need to look for but most people will only work out the make. Since there are 4 keys in the set it’s going to take a little longer to get in with them anyway !
I digress. There must have been some petrol on my hands when I picked up the keyfob. After a while I noticed that it felt slimy. Then I spotted the red stains on my palms. This isn’t good.
The red plastic had reacted to the chemical and become slightly liquid. I washed the keyfob in turps and then washing up liquid which stopped the rot. It’s not too badly damaged but I’m not sure I’ll use it again. With then camper back on the road perhaps I’ll pick something up as a souvenir of our first trip.
Monday, May 14, 2007
Tomsk floats
Now Tomsk is sort of watertight I can test him in the pool. I was told that you should be able to water-ski behind a tug not pulling a load, well that I’ve managed. Flick the control into full speed quickly and he gets up on the plane like no other boat I’ve seen. Accelerate slowly though and the bow digs in and he tries to be a submarine.
While the hull sits reasonably level on the water while stationary, the weight distribution needs sorting out properly. I’ll move the little bit of lead around inside and try to get the speed control out of the nose as well.
The best news is the power on tap. I reckon that 200g of push is needed to move the towing competition boat, Tomak has at least 250g available so I don’t think I’ll embarrass myself like it do with the model boat racing…
Engine bay sealed
Good news – the metal piece I bought from Stanford Hall turned out to in much better condition than I thought. Once cleaned with a 3M paint stripping disk in the electric drill I found only mild surface rust. The small tears remain but most disappeared under the engine bay seal anyway.
Before fitting I painted the underside with grey Hammerite and the top in gloss black. With the newly painted engine bay the effect is really pleasing. Just like one of those proper buses you see at shows.
With all the cooling stuff in place it was time to start him up. First turn of the key and the engine roared into life. OK so there was no tickover to speak of but I cured this by going out and buying a can of petrol – there being enough to start but not quite enough to keep the engine running if you didn’t rev it.
A few little jobs left and I can take him for a run. Woo hoo !
Sunday, May 13, 2007
Clips
The Tomsk story is skipping ahead a bit. I’ve fitted out the inside with mechanical bits. There are even a couple of bulkheads strengthening up the hull – it doesn’t really need it but as mentioned this boat needs grunt so I am being over cautious.
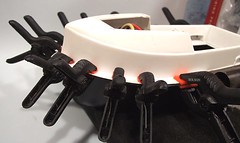
Before I can test sail the boat, the top and bottom halves of the model need bringing together. First the big lip around the edge was smeared with plastic glue from a proper tube. The sort you used to ruin Airfix Spitfires with by gobbing the stuff everywhere. Then evey little clip I could lay my hands on was pressed into service to hold the two parts together overnight. I’ll be trimming the excess plastic back quite a bit so a good join is vital with no gaps to allow water in.
What did we do before the advent of these stupidly cheap Chinese clips ? Looking back in old magazines there was talk of raiding “the wife’s” hairdressing supplies for little metal clips.
Clothes pegs were very popular – and indeed still are but many people don’t own any as the habit of hanging clothes on a line has fallen out of favour as the spin drier grabs space in every kitchen.
Sometimes elastic bands could be employed but normally this was only suitable for clamping you plastic aircraft fuselage together – even then this was the preserve of serious modellers as most of us found ordinary glue has enough grab.
Perhaps in days of yore we were more inventive but I bet we’d have used the clips if they were around. Let’s face it we don’t know what tools will appear in the future and become indispensable. Nuclear powered soldering irons perhaps ?
I’m hoping for a laser scalpel myself.
Gods and fillers
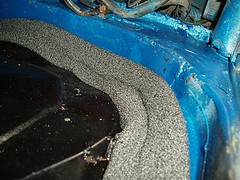
Those who drop in here to find out how my VW Type 2 tinkering is going will have concluded that I’ve still got a broken lump of metal on the drive with no progress if you believe all that you read here.
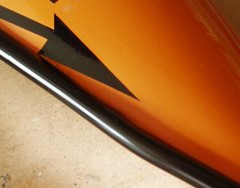
Well, it’s still not exactly working but things have moved on. The paint is now on campers hind quarters.
Most evenings, weather permitting, I’ve done a bit of work. Often little more than 20 minutes or so of sanding and then laying on another layer of filler. Eventually I was happy and hit it with nice Rover electric blue topcoat. And at a distance of a couple of feet, things are looking pretty good.
Of course this makes the Gods angry so the weather has turned and keeps raining on my work, hence the dirt show in the picture. Progress has slowed but still continues.
Worse, the stupid filler has shrunk in places. You can clearly see the panel lines in the paint here. OK, so it’s probably only me, a concours judge or a potential purchaser would spot the problem, but it’s there. Worse, this was on the side that appeared to go really well. The other side took the repeated sanding and swearing to get right.
At the moment I’m going to pretend nothing is wrong. I want to drive my van and if that means minor imperfections, I’ll live with it for the time being. Perhaps later in the year I’ll attend to the problem with some fine sanding filler but now I need progress.
Saturday, May 12, 2007
Opening the windows
Sometimes, just sometimes, I have a good idea. Today’s was one of the best.
Tomsk’s wheelhouse (it’s too small to be called a bridge) is a single vac-formed moulding. There are feint lines moulded into it to show where you ought to cut to put the windows and door in but these are on the outside. Pushing a knife straight in without support would simply crumple the part, especially once you’d done a couple of sides.
Providing support wasn’t going to be easy as the part isn’t huge and the pressure to cut the plastic would need to be reasonably high.
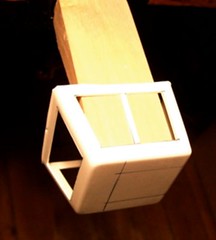
Then inspiration struck. I’d been wondering about clamping a bit of wood to the bench that would protrude enough to go into the moulding and suddenly realised that I had recently inherited a tool to do just that. I think it’s a sort of fretwork table – basically a cast metal clamp that fits to the bench and holds a wooden tongue sticking out of the front. The parts had been separated when we first found them so it wasn’t obvious that they went together to start with.
Digging it out the thing worked perfectly. I drew over the lines with may CD marker pen to make them easy to see, put a fresh blade in the knife and carefully worked away. Several cut rather than one heavy one were the order of the day with the first couple being made against a ruler to keep things straight.
The result was that most of the plastic making up the part was removed leaving a very delicate item that I’m quite proud of.
The fret table can be purchased from Squires of Bognor Regis. If you are any sort of modeller you’ll already have the excellent free catalogue (no website), if not, go and get one !
Tomsk’s wheelhouse (it’s too small to be called a bridge) is a single vac-formed moulding. There are feint lines moulded into it to show where you ought to cut to put the windows and door in but these are on the outside. Pushing a knife straight in without support would simply crumple the part, especially once you’d done a couple of sides.
Providing support wasn’t going to be easy as the part isn’t huge and the pressure to cut the plastic would need to be reasonably high.
Then inspiration struck. I’d been wondering about clamping a bit of wood to the bench that would protrude enough to go into the moulding and suddenly realised that I had recently inherited a tool to do just that. I think it’s a sort of fretwork table – basically a cast metal clamp that fits to the bench and holds a wooden tongue sticking out of the front. The parts had been separated when we first found them so it wasn’t obvious that they went together to start with.
Digging it out the thing worked perfectly. I drew over the lines with may CD marker pen to make them easy to see, put a fresh blade in the knife and carefully worked away. Several cut rather than one heavy one were the order of the day with the first couple being made against a ruler to keep things straight.
The result was that most of the plastic making up the part was removed leaving a very delicate item that I’m quite proud of.
The fret table can be purchased from Squires of Bognor Regis. If you are any sort of modeller you’ll already have the excellent free catalogue (no website), if not, go and get one !
Friday, May 11, 2007
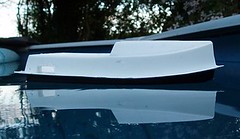
Where do I put the hole ?
George doesn’t make things easy sometimes. One of the major decisions on most kits that a builder has to make is, “How do I get into this thing once it’s built so I can fiddle with the mechanical bits ?”. Let’s face it, if you seal everything up solid you are guaranteed to have a breakdown immediately.
Most kits give various levels of hint in this direction. On many boats the break line is bleedin’ obvious – the superstructure can lift off leaving a hull and deck with a big hole in the top (if the hole is in the bottom you have other problems) allowing plenty of fiddling access. This isn’t an option with Tomsk.
So, I spent quite a long time pondering the problem. It was obvious that the top of the boat would need to be carefully cut so the middle could be lifted out. With the motor, in theory the component nearest the front of the boat, in place, I had to decide.
Ideally the join should be invisible to the observer. In practise you can run it along changes in level so it is hidden in a corner. No chance of that either as there are very few flat bits on the model and flat bits are easier to make neat tidy joins if you are as cack-handed as me.
You can see my solution marked out using a CD marker pen (ideal for this job) in the picture. On the front of the model I’ve made no attempt to hide the join – in fact I plan to emphasis it and try to convince people it’s a panel join. At the back the deck will be painted in different colours to hide the join. Beside the wheelhouse I had to do what I could. It’s not too bad and of course will easily pass the “Does it look OK from the other side of the lake” test.
All I have to do now is put a sharp blade in the scalpel and cut along the line.
Thursday, May 10, 2007
Drive
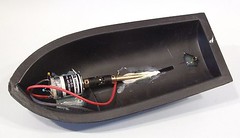
With the motor prepared I moved on to fitting it in the hull. My plan included a 35mm diameter propeller – quite large for this size of boat but I want plenty of grunt – and I struck lucky. The prop removed from the Puffer measured about the right size so I was able to fit it to the drive shaft to get this in position.
First though, the shaft had to shrink by about an inch and a half. The shortest version I could buy was 5 inches long which puts either the motor or prop beyond the end of the model. I managed to saw through the tube and pop the end bearing out reasonably easily. This was reattached with a drop of superglue to the shortened tube. The glue was probably not needed since I had to hammer the bearing back in. The drive shaft was also shortened and the end filled flat to allow the motor coupling to key onto it.
With the temporary prop in place the hull was drilled and generally messed around with until everything looked like it would line up. Milliput tacked it in place but will eventually be supplemented by car body filler. The motor sits on a bed of silicon sealer (as used in plumbing) which holds it in place but provides a bit of flexibility to dampen any vibrations.
Wednesday, May 09, 2007
Radio signals
Once upon a time we put a motor in the Blue Boat. On the water the model wouldn’t respond properly to the controls with no speed control to speak of, or at least what little there was came in bursts. That was when I learnt about motor suppression.
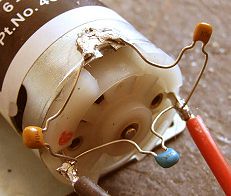
Basically all motors generate radio signals as they run. These can be strong enough to swamp the signals from the transmitter. Indeed, running a model railway locomotive near a TV aerial wire is enough to kill the weak digital signal and ruin the telly picture. This is not A Good Thing as far as the rest of the household is concerned.
Suppression is a well-documented subject. You can even buy a kit to do the job. Mine came from, Robbie and contains three capacitors. Two are soldered from the case to each terminal and a third between the two terminals. Apparently this is enough to do the job.
Easy to do, although cleaning the area of the case to be soldered is worth the effort, lets just hope it works.
Tuesday, May 08, 2007
New project - Tomsk
I’ve been looking forward to this for a couple of weeks with the sort of full-on anticipation that makes me want to really dive into a project. I’ve the sort of enthusiasm for it that means I’ll find odd minutes to progress the job or stay up stupidly late working.
Basically it’s my entry for the Knightcote Model Boat club towing competition.
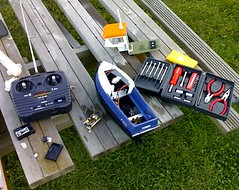
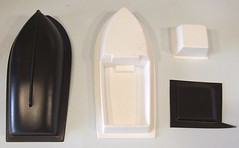
At the moment it doesn’t look much. What you see is the latest kit from George Norton – a small tugboat. Cost – £9.99
The kit contains four vac-formed bits of plastic. No castings. No instructions. Total freedom, which is what I think is so thrilling. This model will be what I chose to make it.
All I have to do is fit the motor, prop, radio gear and most importantly somewhere the anchor the rope while towing.
I’m told that the way to build an effective tugboat is to have a fast motor driving a big prop. So I have ordered a 380 motor and 35mm propeller. There’s going to be a fair amount of bodging and altering of parts to build this vessel. I don’t even know if it will ever work, but it’s going to be fun finding out.
Oh, and the name. Fans of the Wombles will know that Tomsk will understand.
Basically it’s my entry for the Knightcote Model Boat club towing competition.
At the moment it doesn’t look much. What you see is the latest kit from George Norton – a small tugboat. Cost – £9.99
The kit contains four vac-formed bits of plastic. No castings. No instructions. Total freedom, which is what I think is so thrilling. This model will be what I chose to make it.
All I have to do is fit the motor, prop, radio gear and most importantly somewhere the anchor the rope while towing.
I’m told that the way to build an effective tugboat is to have a fast motor driving a big prop. So I have ordered a 380 motor and 35mm propeller. There’s going to be a fair amount of bodging and altering of parts to build this vessel. I don’t even know if it will ever work, but it’s going to be fun finding out.
Oh, and the name. Fans of the Wombles will know that Tomsk will understand.
Monday, May 07, 2007
GWR Armstrong 4-4-0
After what seems a long time (around 6 months of work on and off), the Armstrong locomotive is finished. I think it looks very nice in the picture don't you ?

Sunday, May 06, 2007
Stanford Hall 2007

The shame of it. For the first time in 11 years as a visitor to Stanford Hall VW show I turned up in a vehicle that wasn’t a VeeDub.
In my defence this was because all my VW’s are broken, or in the case of the Type 2, would be broken if I drove it 30 miles with bits of tinware as absent as they currently are. I wore a T-shirt from the Everybus show to prove my commitment and hopefully restore some of the lost karma.
This show just gets bigger every year. Although there are acres of fields, with only a few sheep droppings, to park in there was a shortage of spaces. A high percentage of the vehicles were from the correct marquee too. You’d think this was a given but not always nowadays. A lot of people are attracted to the “VeeDub lifestyle” which they interpret as acting like hippies and being laid back. They do this by buying crap with bad pictures of cars on them - not by getting their hands dirty actually keeping some decrepit motor on the road.
Because of this I have noticed the numbers of stands selling rusty bits dropping over the years. I love a good autojumble where you rake through boxes hoping to strike gold. This year it would be particularly important, as I needed to replace the bit of tin that sits above the exhaust. I’d been forewarned that I sought a bit often to be found suffering from rot, so knew it was going to be fun tracking one down. VW Heritage will sell a repro version for 90 quid which sounds a lot for a single, albeit large and complicated, bit of metal.
By late morning it looked like my searches might be in vain. A new (to me) engine bay door had been acquired for a very reasonable 25 quid. Seals etc. were available from several vendors but no big engine tin. Then I spotted a bit. Not pretty but serviceable – OK better than the one I have which isn’t saying much – and only 20 quid. I resisted biting the vendors hand off and wandered a bit further, coming back after lunch and loading it in the back of the car, wrapped in a plastic sheet as it’s filthy. Apparently I had missed a perfect piece that had even been powder coated for 60 quid earlier from the same stand.
Shopping list complete it was time to take in the displays. The best bit was the Westafalia section sponsored by the excellent VW Camper & Commercial Magazine. I really want a splitte van with one of those awnings. My chances of affording one ever are nil though as the prices have gone through the roof and aren’t stopping.
Fortunately the weather held so I came away with a slightly sunburnt face (how ? we had cloud cover all day), a Stanford Hall tradition. The only one too, as the other is getting hopelessly lost on the way which we didn’t this year.
Bargains missed ? A couple. 5 years worth of Safer Volkswagen Driving (later VW Motoring) mags for a quid – missed by 20 seconds. Also a jump seat for 50 quid. I was amazed this didn’t sell as 70 is the normal price and they go at that. I had run out of cash and anyway my van doesn’t have the fixings to fit it any more. I took pictures and wonder if I could make one myself though.
Favourite VW ? Wedge Karman Gypsy campers with over the cab beds. Saw at least 5 including one for sale. I know the splitties are lovely and I’m a sucker for a good condition Bay, but this was different. A really practical camping machine, although pretty useless in other respects being too big to take to the supermarket and having the steering wheel on the wrong side. Two cars is plenty though, especially for someone who doesn’t like driving. Mind you my Dad can’t drive and he loves this show and has a thing for type 25’s so it shows how broad the appeal of these cars is.
Saturday, May 05, 2007
Tender pick-up
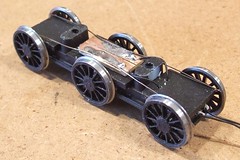
The Armstrong locomotive is nearly finished. Painting is all done and I’ve re-assembled the various parts. With pickups fitted to the chassis the loco has been trundling up and down my short test track. I wasn’t sure it was running quite as well as I’d like though.
A model locomotive picking up power on only 4 wheels isn’t a good idea if you can avoid it. Ideally the power should come from as many places as possible. On a 4-4-0 this means the front bogie or tender needs to pressed into service.
In theory the bogie could be used but I didn’t fancy it – too fiddly. This leaves the tender.
After an abortive attempt at making a tender chassis I reverted back to the K’s original for the simple reason that it worked. Mine might have potentially looked a bit better but my usual success rate with tender chassis continued and it wouldn’t stay put on the track reliably. I’ve no idea why I have a blind spot on this but I do.
Anyway, the K’s chassis is idea for the addition of pick-ups. A simple paxolin plate on top and some phosphor bronze wire rubbing on the wheels at either end is all that is required. Careful bending ensures that they don’t act too much as brakes although this isn’t a big problem with a whitemetal body.
The only issue I had with the chassis is a problem that seems to affect all 6 wheel rail vehicles. The middle axle was a tiny bit lower than the others making the model seesaw. Some quick work with a file and drill (like yesterday’s entry but horizontal) and the axle can float up and down a bit. The other two can support the body on their own.
Result, a more surefooted model that once run in should be able to deal with track breaks and dirty rail heads. I don’t suppose anyone would notice but I do and that’s what matters.
Friday, May 04, 2007
Bodgery
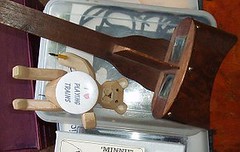
A little diversion from railway modelling saw me trying to assemble part of my Dad’s African Queen model boat. He passed it over to me because he didn’t believe the operation could be carried out. In other words it looked difficult and he didn’t fancy trying it. Besides, I’m the one with a pillar drill…
The task is to drill a hole in a little bit of wood that looks like a pyramid with the top cut off. Into this hole goes the base of the mast. Not too bad except that the mast is only a bit smaller than the base. Dad expected to be making a new part once the supplied one split.
Without any real expectation of success I set up the drill and popped a small hole down the centre of the part. My plan, such as it was, revolved around drilling the hole out with ever-larger drill bits until the mast fitted. Hopefully this wouldn’t disturb the wood and I’d get away with it.
All went fine until I hit an unexpected problem. My pillar drill only takes small (under 6mm) bits and the mast was larger than this. Not much larger though.
Anyone who has done a bit of woodwork will have waggled a drill bit in a hole while drilling to get a slightly larger aperture. That’s what I did. It wasn’t pretty and the waggling took time, but amazingly it worked !
Engineers are looking horrified. This is not how you are supposed to do things but I bet some are also thinking, “I’ve done that” or remembering some other bodge.
Anyone out there want to admit to bodges of their own ?
Wednesday, May 02, 2007
Fender fun
Before my Slingshot died I decided to run some fender material around the outside. Slingshot racing can be a bit fast’n’furious and while the rules say no touching other boats, in the thick of the action these things can happen. Just ask Micky Schumacher (or Damon Hill).
The fender came from a model shop in York as a long length rolled up in a bag. Once out it was a bit kinked and didn’t want to clip smoothly to the outside of the boat.
Years ago I used to read Model & Collectors Mart which featured articles on assembling large sci-fi figures. These are moulded in vinyl – similar to the fender material. The writers often had to adjust parts that did not fit and this was normally carried out by gently warming them with a hairdryer. Warming a long length of fender this way didn’t seem that easy but sitting it in warm water might work I though so that’s what I tried.
The result was a more flexible bit of black plastic, which de-kinked a bit. Enough to fit anyway.
Feeling that some glue might be required I pondered what to use before settling on Bostick All Purpose. A line ran along the flange on the hull and the fender was pushed on.
I didn’t anticipate the glue lifting the paint and smearing it around. Good grief this is car paint that’s been dry for months ! The smears wouldn’t come off either. No solvent seemed to want to touch it and scraping only worked intermittently.
To cap it all when the boat was in the water I realised that a fender is only required on the front few centimetres as everything from the cockpit back sits in the water while running. While I might avoid damaging other boats the drag means I won’t be near enough or fast enough to worry.
Another lesson to learn for the new boat I think.
Subscribe to:
Posts (Atom)