 I don't go to university. There are lots of reasons for this but the most important one is that I was too thick to get any A levels and you don't get to be in the papers jumping for joy if your results show that all you have to show for two years work is an E in General Studies. Well, that and you have to be a girl who attends a posh school and wears a short skirt, but mostly you have to get some results.
Still, it's not too late. I found this handy kit that claims to be from Cambridge University. I assume that this means that if I can put it together I can claim to have some sort of degree.
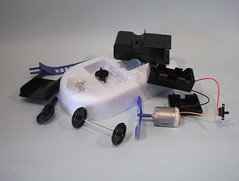
The kit is for an amphibious vehicle. From the photo on the box I took this to be a hovercraft but on opening it I see that it's more of an airboat with wheels. It's also not that similar in some other respects - the fan and protective cage are a bit less pretty than the picture. Never mind. I can't take it back as the car boot sale has closed for the day.
The main body of the vehicle is a polystyrene block into which all the plastic parts are assembled. A small packet of screws is provided along with instructions which suggest some parts should be explained by a competent adult. Not having one of those handy I decided to carry on and try not to chop my fingers off with the propeller blades.
Handily, the electrics come pre-wire. Not just soldered but with each joint covered with glue from a hot glue gun. I think this is to waterproof them but perhaps the manufacturers are worried about the joints breaking too. The motor slots into a bit of plastic, the switch screws in the side and then another cover screws over this. It makes sense to test the thing first to work out which way around the switch should go as the plastic casing is marked on and off and we wouldn't want to get these the wrong way around would we ?
Wit this done, the whole thing pushes into the polystyrene along with the battery box. The blue blade protection bends over the top to save little pinkies from damage.
Underneath the wheels are slotted in place. It's a tricycle undercarriage with some steering on the front. No screws required for this stuff just a firm shove to clip the rear axle retaining plate in place.
 And that's it. 10 minutes work and the model is ready for testing. On the land it's a bit rubbish. A vinyl floor proves too much for it but on a sheet of MDF we have reasonably good movement. Afloat (well in a basin) things look a lot better and the craft nips along. I look forward to getting it out on the lake some time. It might even get a decent set of batteries which might pep up the performance even more.
So, a successful job. This university lark isn't so hard after all. I think I might go and update my CV.
No comments:
Post a Comment