 Blimey the is more complicated than I thought. That idiot locomotive designer really didn't think about us modellers when he designed the 12inch to the foot original.
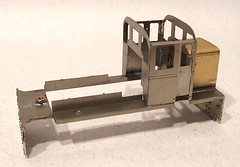
First the footplate is folded up. Then the buffer beams (3 layers) are riveted and laminated before fitting to the footplate. Next comes the valance. Not a nice simple continuous thing but something in several pieces to allow for the steps. I put off doing these as they look a bit fiddly...
The cab is easy enough as long as you check it for squareness. Being nickel fingers stay unsinged even when you hold the corners close to the iron. The rear bonnet is brass though as it's easier to form the top bends - I didn't even anneal the metal. Nickel cracks of gives you a bend with the profile of a 20p piece when trying this sort of trick. Only one end is provided so the builder needs to be careful that both ends of the bonnet are the same - a second one would be lovely but probably mean another etch to pay for.
Once pleasant feature is the access to the insides for soldering. So far even the 40W iron has reached every joint with ease.
No comments:
Post a Comment