Thursday, April 30, 2015

Rail Rider

Rail Rider

An hours gentle assembling later and here we have it - the Rail Rider.

Snapping the bits together took more brains than brawn in several places. I can see kids breaking plastic if they try it unaided. Attaching the engine block and smokebox to the chassis is particularly fiddly.

Thick chrome makes the smokebox door hard to fit, I ended up trimming the spigot it fits on quite severely. Stickers on the smoke stack could do to be more opaque. The version on the box art was obviously painted.

None of this matters much, the finished model is amazing. Whoever designed it is very clever indeed. A really nice touch is the loco wheel detail on those big shiny rear wheels complete with balance weights.

Meep Meep!

(Incidentally, if you think this is a waste of time, someone has gone through all the cartoons and detailed the books read by Wile E. Coyote and Acme gadgets employed on the Wikipedia page. How long did that take?)

Wednesday, April 29, 2015

Painting Plastic


If anyone worked out yesterdays pile of bits was an MPC Road Runner and the Rail Rider kit, well done. Except if you cheated and looked at my Flickr page, in which case you are a bad person and are sentenced to a week at Scaleforum while wearing a "OO is good enough" t-shirt.

Anyway, I never liked the Road Runner much - I was always on the side of Wile E. Coyote. When I saw this kit in Modelzone years ago though, I knew I wanted to have a go and so in their closing down sale I picked one up, stashing it away for a rainy day.

More to the point, once I had a proper look at thing, I realised there was a problem with it. While the plastic parts may be coloured as the box says, they are the wrong colours. Snap the bits together and you'll get a model but it doesn't look much like the one in the picture.

Plastic Bits raw

For a start, the smokebox and stack are black, not red. Pedants might say that this is technically more accurate, but not in the world of Hanna Barbera. The pulley belt transferring drive from the V8 to the cylinders (why did the GWR not try this?) is red as is the block and that's definitely wrong. Red connecting rods complete the picture.

This caused me to leave the kit in the pile as I knew it meant spraying and I couldn't be bothered.

That is, until a spare red spray can became available after using it on my Dad's boat project. Out came the kit, main parts were assembled (with glue) and then primed in white no matter what the colour of their plastic. Red bits were Humbrol'd and black bits coated with Halfords fines satin black.


Plastic Bits painted
 
That's more like it. Now they just need to dry properly and we move on to final assembly. 

Tuesday, April 28, 2015

Mystery kit

Mystery Kit

What crazyness is this? A pile of plastic parts watched over by the Road Runner?

All I'm going to say is that this could be the unholy offspring of Airfix, Hornby and Scalextic and possibly one of the strangest looking models I've built for a long while...

Can you guess what it is?

Sunday, April 26, 2015

Book Review: James May's Man Lab

You are thinking, "This is one of those rubbish TV series tie-in books. Why is he blogging this?"

I would reply, because I bought it very cheap in a charity shop, think James May is very sound on the subject of spanner arrangement and anyway, I've not done much bloggable modelling for the last few days.

Man Lab is indeed a TV tie in to the series of the same name. To be honest, on telly it came across as cartoony blokey and full of set-piece stunts that we are supposed to believe are spontaneous and hilarious.

The problem is that the basic premise is men can't do proper men's stuff like making and repairing things. In telly land, this is perfectly acceptable - witness the sneering dished out to anyone who knows how to do something more useful than reading an autocue for example.

On the page, this works rather better. We actually get some useful information and because it's got a picture of the bloke who used to be in Top Gear on the front, it is acceptable to read it.

Talking of pictures, for some reason there are many cartoons of May looking very much like Garth from the Daily Mirror years ago. I'm probably the only person to have spotted this.

Subjects covered include taking a penalty, fixing a toaster, mending clocks, making fish finger sandwiches, draw a portrait, tuning a guitar, escaping from prison, fixing punctures in a bike tyre, making tea, casting a concrete worktop, polishing boots, replacing a pane of glass, making a crazy golf course, wiring a plug and getting stuck items out of a vending machine.

It's all suitably jokey but hidden in there is some proper information. There's some obvious dumbing down, and the black & white format doesn't help much, but you probably could do some of these things after just reading this book.

I particularly like the tool of the week sections covering hammers, chisels, drills (nice explanation of the difference between HSS and carbon steel bits), saws and the plane. Knowing my stuff a little, it was clear that this was accurate and even helpful. OK, the plane bit was a thin but in a world where people don't know how to carry out even the most basic DIY, if they can get over the idea that it isn't all a joke, there is stuff to learn.

Surprisingly good.

James May's Man Lab Book of usefulness on Amazon

Saturday, April 25, 2015

That's 15 quid wasted then...


A few days ago, I was cleaning out my electric razor and lost one of the cutting heads inside the foil. No idea where it went, but it was gone.

Preferring to mend things rather than throw them away, I thought I'd pick up a replacement, fit it and we'd be back to normal. Sadly, both Boots stores near me have largely empty spares bins for this sort of thing (see also: electric toothbrush heads. People in Leamington don't fix things) so I bought a modestly priced replacement razor on the basis that a spare wouldn't hurt, and headed on-line.

Here I hit a problem. The device doesn't have a brand name on it, nor a model number. I vaguely recalled it is a Remington and also something about being able to clean it under a tap. I've had the thing a long while but it works well so I felt it was still worth repairing.

Unfortunately, on-line, you have to gamble that you've ordered the right bits. I thought I'd won up until I opened the package. Sadly, none of the parts fit, nor could I see a way of bodging them so they would. Can't send it back of course as it's not the suppliers fault I can't remember the model I'm after. Sadly, that means 15 quid wasted and my trusty razor ends up in the electrical recyclables bin.

I've cut out the front of the box the new razor came in and stuck it in the drawer the thing lives in. Not making that mistake again.

Friday, April 24, 2015

Vintage houses

1930s house
 
On my way to the subjects of the last two days posts, I passed through the village of Ketton. One of the highlights of this was that I finally saw the cement works that I normally only spy from a distance on a main road.
 
Beside the entrance are a row of houses that look to me like they date from the 1930s. All are boarded up, presumably for demolition, but I quite liked the look of them.
 

1930s houses

Sadly, this is all I know. Not a lot, especially as the date is a guess that hopefully someone can confirm or comments. I'm thinking that they would make terrific models, possibly even as card kits.

You can see the houses in happier time on Google Streetview.

Thursday, April 23, 2015

Seaton station for the scrapyard

 
Driving towards Harrington Viaduct, I rounded a a corner and though, "Blimey, that's an old railway station.", so on the way back I tried to get a better look.
 
Sadly, there was nowhere to stop on the country lanes so I couldn't investigate further. Back at home though, a quick look at Wikipedia showed me that what I'd found was Seaton station. Closed in 1966, the buildings and footbridge amazingly still exist.
 
Now, the site is owned by the Seaton Salvage and Recycling centre so it's become a scrapyard!
 
As a prototype, it has a lot going for it. The site is compact and out in the countryside, which should make modelling easy. Alternatively, model it as a scrapyard for a fascinating diorama.
 
Even research should be simple. I'm sure if you call ahead, visiting the site won't be too difficult. Don't try hopping over the fence though, scrapyard dogs have a fearsome reputation!
 
You can visit the site on Google Streetview or look at the overhead view in which the viaduct looks spectacular.


Wednesday, April 22, 2015

Harringworth Viaduct

Harringworth Viaduct

A trip in to the BRM offices usually take me a couple of hours. This time however, one of the main roads on the way was being dug up leading to a half-hour long scenic diversion. Along the way though, there were sights to behold, so on the way back I took even longer but spent time with my camera snapping them.

The highlight has to be Harrington Viaduct. 82 arches long, covering three quarters of a mile, it's longest masonry viaduct across a valley in Britain.

Harrington viaduct panorama

Standing underneath it, the thing is amazing. Arches stretch out into the distance. From a mile away you can appreciate the length but it's from underneath you can appreciate the scale best. At it's highest, the track is 60ft from the valley floor.

Harringworth Viaduct span 
 
Not really a practical modelling project, although ModelRail featured a fantastic long stone viaduct recently so it can be done, this ought to be a popular focus for railway enthusiasts but it's a bit remote for many I suppose. However, if you fancy the trip, there are other interesting sights in the area, as I'll show tomorrow.
 

Tuesday, April 21, 2015

Edding cutter MP9

KnifeSome traders can see me coming. Gerry Freestone knows if he points me at a quality tool, I'm probably going to buy it.

So it was that I ended up with a Edding knife.

Truth is, it's a very nice bit of kit. Snap-off blade knives have been around for a long while but the cheapo ones don't always lock the blade when you use it.

The tips can also flop side to side thanks to sloppy guides at the end.

None of this here. The lock is solid and that metal handle lets the blade move under half a mm sideways.

The handle is 12mm wide, or deep if you are holding it properly. Thin enough to replace the scalpel on my desk if I want it to. Since most of the wear on a blade occurs at the tip, this could be handy as I can have new tips every few cuts.

A tool intended for graphic designers not numpty modellers, but just as good for us.

Price, a tenner plus 6 quid for a pack of blades from Freestone Model Accessories. You might be able to bag one cheaper, but I'm happy to save postage and anyway, I like to handle tools myself before buying. Mind you, that's why I have a bulging tool chest and no money...

Monday, April 20, 2015

Microzip hand sander

Sanding a boat top

While we are talking about model boat building, a tool that has proved to be unexpectedly brilliant is the Microzip hand sander.

On the face of it, the tool appears just to be a foam handle to which various grades of sandpaper are attached with velcro fastening. It turns out to be superb though - good enough that my aged parent wants to buy another one so he has a spare.

The handle is very comfortable to hold and affords excellent control. While the foam is slightly squashy, the 9cm long sanding area stays flat unless you push it hard.

Basically, someone got the ergonomics very right indeed.

Price including sanding pads, just under 8 quid from S&M Tools. (Yes, I know that sounds dodgy but it is safe for work!)

Sunday, April 19, 2015

Olde worlde boat modelling

Water Bug Hull

Mt Dad is indulging in a bit of old style boat modelling. Using a 1950s plan (still available) for a boat called "Water Bug", he's busy with balsa wood doing some scratchbuilding.

Waterproofing the wood involves several coats of "sanding sealer". This soaks into the grain and hardens it up. A quick sand between each coat and the surface is converted from the soft and spongy balsa to a smooth and hard, almost resin like finish.

The smell (of cellulose dope) is wonderful too, best not appreciated anywhere other than in a well ventilated room though!

Saturday, April 18, 2015

An unexpectedly difficult livery

009 van

I've a 009 Society RNAD van on the workbench for review. Having built the kit, I thought it wold be nice to paint and weather it for final photos. The pictures in the instructions show a simple livery of grey woodwork with black ironwork.

Simple?

The grey is easy. Quick squirt of primer does the job. The metalwork though - it's so fine. My first efforts with a brush were horribly wobbly. The only hope of getting a reasonable result was to use a bow pen, bumping over the moulded bolt heads. Even then, as you can see, it's still far from perfect. Hopefully, a wash of dirt will improve matters.

And another handy hint. Use paint not primer for the grey. That way you can touch it up afterwards with a brush.

Friday, April 17, 2015

Waggly bit installed - on one side

Img_6051

Attaching the crossheads to the connecting rod was achieved by using a small bolt through the back. The head is large enough to stay put and the thread poking through the front can support the crosshead arm. Plenty of solder holds all this lot in place.

The larger crossheads gave me unexpected problems with space behind the radius bar but attacking the top of them with files and a saw removed enough metal to sort this.

Everything is now working. I think the fly crank arm is a it long as the expansion link is leaning back too far. For the moment, it all works on this side so I'll carry on fiddling.

(If you are thinking I'm well versed on the technical terms, the trick is to look at the diagram on Wikipedia)

Thursday, April 16, 2015

Replacement crossheads

Brass crossheads

A few weeks ago, I mentioned that the GWR Railcar project had stalled as I wasn't happy with the whitemetal crossheads. Well, the good news is that at York, I was able to pick up some nice lost-wax cast replacements from Comet Models. LS8 if you are interested.

They aren't perfect of course, the days of a major show offering dozens of varieties of bits like this are long gone. Even at a show like York with the focus on kitbuilding, my options were London Road Models (nothing suitable) or Wizard Models (who oen Comet Models). To be honest I forgot Alan Gibson as I'd already bought the Comet ones by the time I was digging through the wheels on their stand.

Anyway, with a fit of fettling, these crossheads fit the railcar. There's a challenge getting the fat conrod end in the back and I'm still to attach the link on the front but I think I know how these can be overcome.

Pedants will point out that I've opened out the slide bars by just under a millimetre and that the piston rod is a bit fat. I don't care. If this works, that's all that matters, especially if it keeps working without falling apart!

Wednesday, April 15, 2015

Book Review: How about railway modelling by John Craven

JCBookIf you are a sensible age, one of the features of your youth would be getting back home from school and watching "John Craven's Newsround". 5 minutes of real news presented in the same way the stuff for grown-ups was, albeit with some of the complicated facts being explained.

Anyway, back in 1979, he wrote this little gem for EP Publishing. I imagine they were very happy to secure his services. Back then, presenters simply didn't get thier name in the titles of TV shows and Craven's was known to pretty much every child, even those who watched ITV.

More to the point, he was the sort of celebrity that descent middle-class parents would approve of, just the sort who would encourage their offspring to build a model railway in the first place.

Anyway, you might think that John's efforts in this would extend to a couple of (ghost written) paragraphs in the front with someone else doing the work. Not true, he actually writes the first section of the book introducing the hobby. It's as good a general introduction as you are likely to read anywhere and despite its age, still works as an advert for the hobby.

I think this is due to the writers journalistic background. While he admits he isn't a railway modeller, I think this helps as he handles the concepts sympathetically but in a way that the general public will appreciate.

Starting with a couple of pages entitled, "A hobby for schoolboys, super-stars and bishops" he then carries on with meeting modellers, joining a club, exhibitions, designing a layout and several mentions of Allan Downes.

For more technical information we have to carry on to part 2 of the book written by John Cockroft. He has 60 pages to run through the basics and even not so basics of our hobby. Being the 70s, there is quite a lot in both sections about building loco kits. Cockroft even gives us stuff on compensating wagons, something considered advanced by many modellers today but in a book for kids then.

Truth is, this is a much better book than you might think. If you want some ideas on how we might present the hobby to outsiders, read and analyse the first section. For more practical stuff, enjoy the second.

The book left me wondering one thing. At the end of part one, Craven says:

As for me, I somehow escaped its attractions, until now! But, after taking a long look at the hobby and meeting some of the people who are deeply involved in it, I am ready to "have a go" at starting my own railway.

I wonder if he did?

Tuesday, April 14, 2015

Smallbrook Studio, Nellie

Nellie painted and weathered

Yesterdays photo showed Nellie painted, but looking a bit flat. The colours were there and all very pretty but I felt there was no life in them. That's not unusual, especially for matt black. There is only one solution - weathering!

First up, all the black was dry-brushed with dark grey (Humbrol 69). This works for anything black and immediately looks better.

After that, I wanted a dirty loco that had been cleaned so worked around the model using Lifecolor Rail Weathering paints and some MiG acrylics. Little squirts of brown were put on a palette (plastic lid from the swwet'n'sour sauce pot from my local Chinese takeaway) and then painted on the model.

After the paint had dried, a matter of a few minutes, it was wiped away with a paper cloth. Difficult to reach areas got the cotton bud treatment. If anything seemed to be sticking where I didn't want it, a brush with some water tackled that.

After this, there was grime around the rivets and in one or two areas where the resin surface was a little pitted. This could have been a problem but I quite liked it.

Emett's cartoons showed careworn locomotives so that's the effect I've tried to replicated. Working in a large scale (this is G gauge) is different from the smaller ones but in this case not much.

Finishing touches were to fit a jewel in the lamp and glaze the windows with Krystal Klear. Now all I need is a driver, and I have a kit for one of those...

Monday, April 13, 2015

Nellie gets painted

Nellie painted

So, there I was talking to Chris at Phoenix Precision Paints during the York show.

"I need something to paint an Emett Nellie locomotive", I said.

"Certainly sir. Something from our extensive cartoon locomotive section will meet your requirements I think.", he replied.

Actually, he didn't say this as they don't have a such a section, but I did acquire a nice can of Blackpool Green. It wasn't chosen for the name - the colour just looked nice. Not too dark but not too pale either. In general, light colours never look right, even on imaginary locomotives. I once painted a garden rail loco lime green and quickly covered it up with Brunswick.

Anyway, other colours are obvious, except the metalwork. These colours come from the Darkstar Molten Metals Range. I've got them for review so suffice to say here, that I like them very much indeed. Metallic paints can be tricky, the Humbrol enamels need constant stirring to keep the pigment in the liquid for example. Not a problem here.

Now painted, the model looks a bit flat to me, so I think some weathering is in order.

Sunday, April 12, 2015

Exhibition catering

"I felt at £1.90 for a sausage roll the catering staff should have been wearing masks"

Comments like this are common after every exhibition and are the bane of many managers lives.Hundreds of hours work put in to organising a show, booking layouts and trade, setting out the hall, negotiating advertising and dozens of other jobs and what do the punters notice?

The food.

Cakes 3Something that the poor manager probably has almost no control over.

Unless your show is very small, the chances are that simply catering for a couple of thousand people is beyond the abilities of the organising club. There's a (freshly cleaned) bucket load of food safety issues to consider (as daytime telly says in every add break - eaten something that disagreed with you, SUE!), and more and more people who are allergic to something. Nowadays you really need to be a professional to walk the tightrope of feeding little Johnny now he can't eat tomatoes when there is a Y in the month.

Even if you do fancy taking his on, many venues have sold the catering concession and won't let you do it anyway. From their point of view, it makes sense. Very few hirers will want to do it themselves and it's a good way to earn some money. The caterers then have a contract that says no-one gets to sell food apart from them. At least this stops them having to sort out any mess left by amateur cooks using the supplied kitchen.

All of which leaves the organiser stuck. If you've never dealt with these people before, you might think that the club can just walk in and demand a level of service to suit but that doesn't work either. These people are professionals and quite rightly don't appreciate being told how to do their jobs from someone whose culinary expertise runs to beans on toast and who is very likely to have any idea how different it is to try and feed hundreds of people who all want to eat within a two hour window during the day, but expect paid staff to be provided the whole time even when there aren't any customers.

Mind you, the customers can be at fault. I often wonder about railway modellers. Many seem to live in a bubble and never experience anything outside the limited boundaries of our hobby. Just look at the numbers oblivious to the price of a cinema or footballs tickets or admittance to any other type of show. Very few events will let you spend 6 or 7 hours in the hall for less than a tenner and provide you with exhibits to look at that cost money. Many events are nearly pure trade so every single person has paid to come in the door, but the prices are still higher than those for a model rail show.

LasagneLikewise, prices are measured against supermarkets rather than buying food in a cafe or pub. A good example was York this year. As always, people moaned about the cost of the meals but my experience was that they were about a quid a portion above eating in a Weatherspoons pub - about as cheap as you get for food served on a plate ready to eat. Quality, at least for lasagna, was well above par too.

I used to work with someone in a theatre who had a hobby horse moan about the price of a coke at our bar. He couldn't understand why it was more expensive than the cheapo version he could buy in Tesco. This was despite the extra cost being taken up with the glass, service, heating, lighting, cleaning up after  and everything else that came with the bar cola. It was proper Coke too, not nasty own-brand stuff. He enjoyed his model railways...

It fascinates me that in a hobby where people will happily pay a tenner or more for someone to crush a bit of coal and stick it in a loco tender, one of the simplest improvements you can make to a RTR model, they are so surprised that food costs more than you can buy it in bulk from the sort of discount supermarket that makes Lidl look classy.

I enjoy my grub at shows. You can tell from all the mentions of cake on this blog. Yes, I enjoy a home made cake but realise that this isn't always possible. If it is, the larger meals are often disappointing as these are so much harder to do.

If you insist on buying the cheapest thing on the menu, you will pay a disproportionately higher price. In this case, Greggs would sell you the same food for £1.20 less, but you won't get a plate. Personally, I think you should spend £1.60 more and enjoy the delicious sausage bap I had with most of a pig in a bun. Kept me going all day.

Sausage Bap

Saturday, April 11, 2015

York 2015

Nearly 3 hours for a toy train show?

Pulling up in the car park, it was slightly tempting to enjoy the sunshine by wandering around the city but no, there was chatting to be done so it was in to the racecourse.

10:30 on a Sunday and there was hardly any queue. Nearly as big a surprise as being served by BRM's Tony Wright doing a stint in the booth!

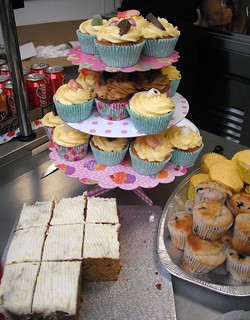
First stop of course was upstairs for a cup of tea and cake. Tea was good but the choccie cake was sadly a bit too stodgy so I only managed half a slice.

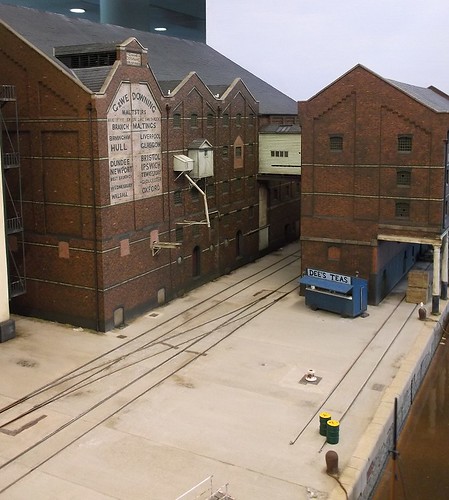
Never mind, working down the show from the top floor, we were almost immediately presented with my favourite layout of the day - Canada Street.

Dees Teas

An L-shaped dockside layout is obviously going to appeal to my industrial railway sensibilities. The quality of modelling was top notch, as was the selection of buildings. Nice to see a really large concrete structure - so common on real docks but often ignored by modellers in favour of easier to built and more traditional brick buildings.

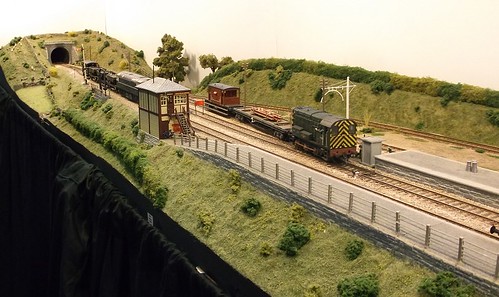
My other favourite was Troutbeck Bridge. While not exactly unusual - a passing station in OO - the clever bit is that along with the Peco track, most of the buildings are recognisable kits and resin models BUT the overall effect is superb as everything has been used to its best advantage. A case of the builder adding 2 + 2 but getting 6.

08 train

Even more clever - by replacing buildings and rolling stock, the layout can be seen in 6 different guises!

To be fair, this was one of the best York's for years. All the layout were high quality and the trade as good as ever. My shopping list was mostly completed although OO 12mm wheels seem in short supply at the moment while await another run from Markits.

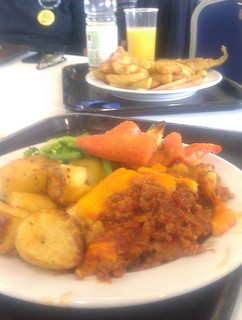
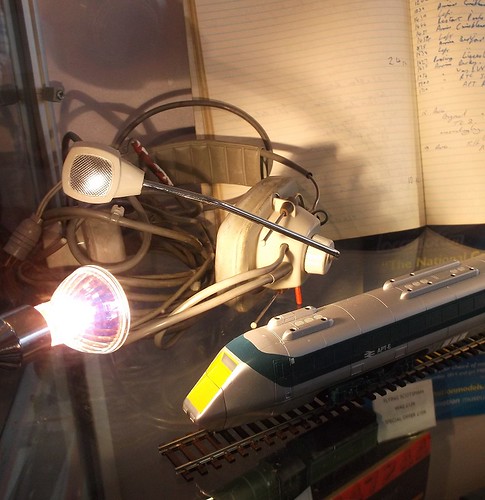
Lunch was a really delicious lasagna washed down with orange juice for heath. After this, my day involved talking to as many people as possible including the inimitable Kit "Mr Tilt" Spackman who was manning one end of the Locomotion stand where you could see the first painted shots of the APT-E along with some original headphones and log book from the real test train.

APT-E

It's still funny talking to Kit about the APT-E. For him it was just a job but to those of us who grew up looking at the set in Ladybird books, it was The Future.

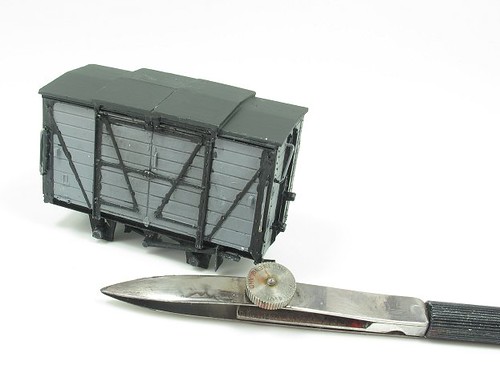
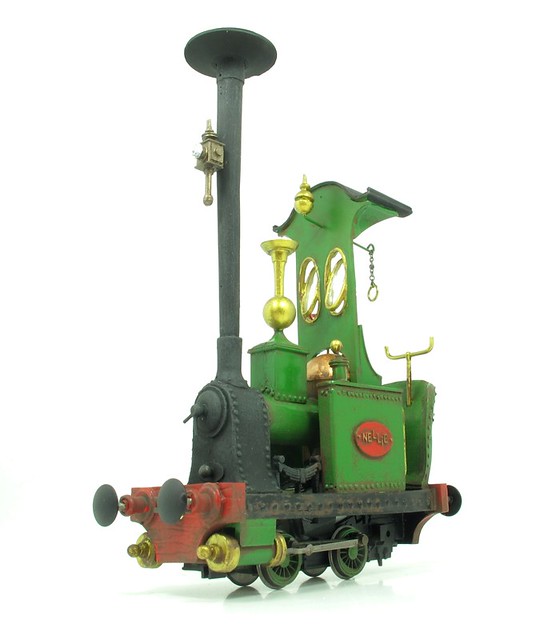
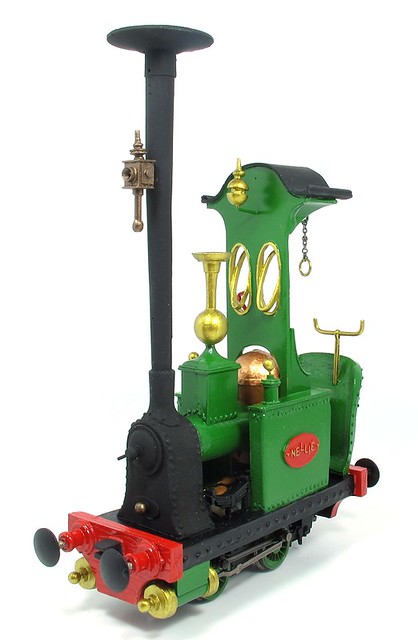
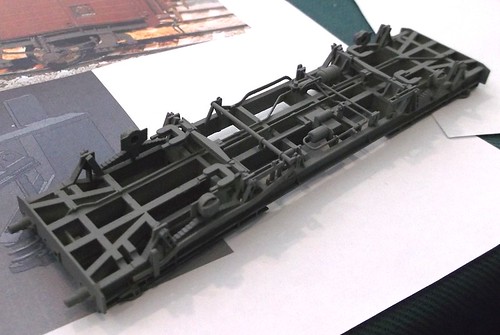
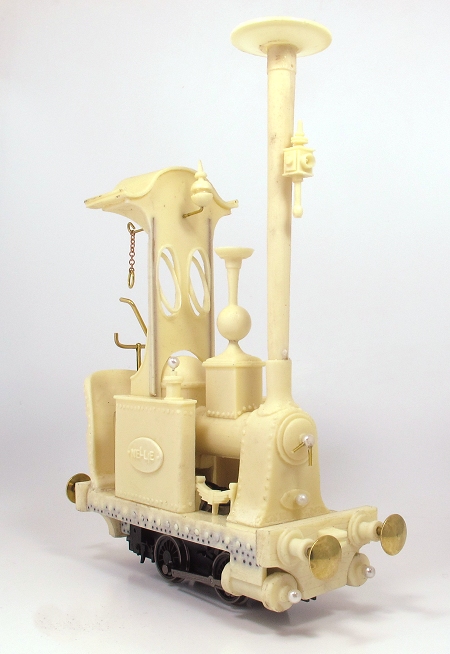
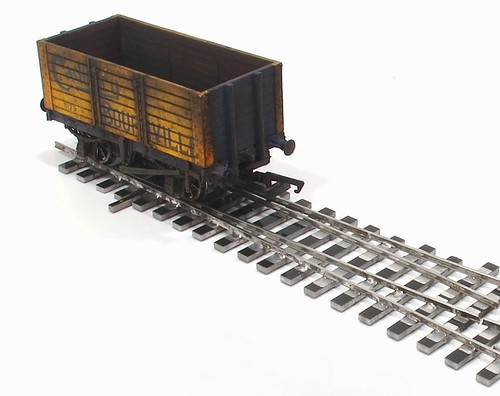
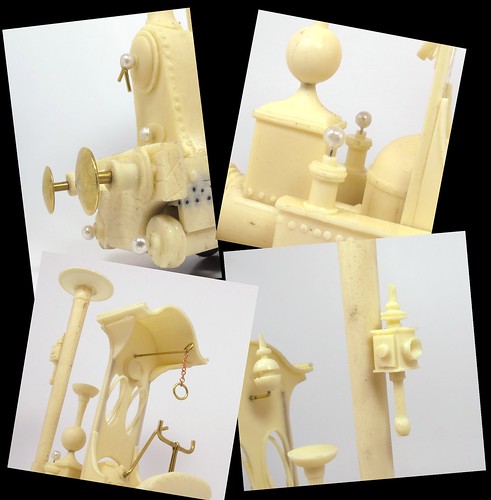
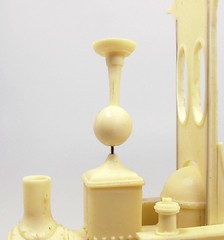
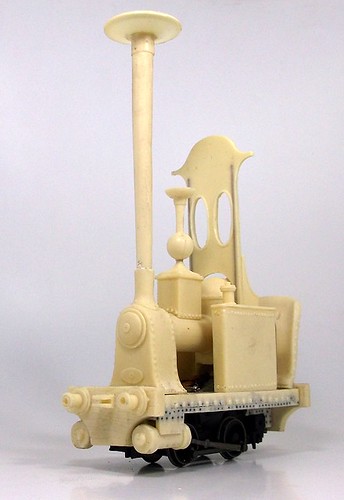
Talking of the future, on the DEMU stand there was a little slice of this with the best quality 3D print I've ever seen.

3D printed chassis

Someone else will have to score nerd points by identifying the prototype but look at the detailing. More to the point, look at the smoothness. For once a print that doesn't look like it's made from sand. To produce it, all you need is an £80,000 printer, or at least a friend with one. Oh, and a bucket load of CAD skills...

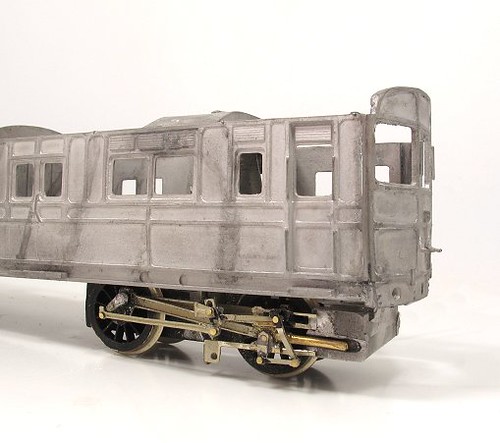
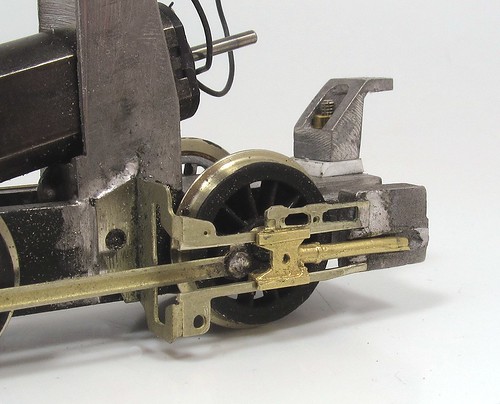
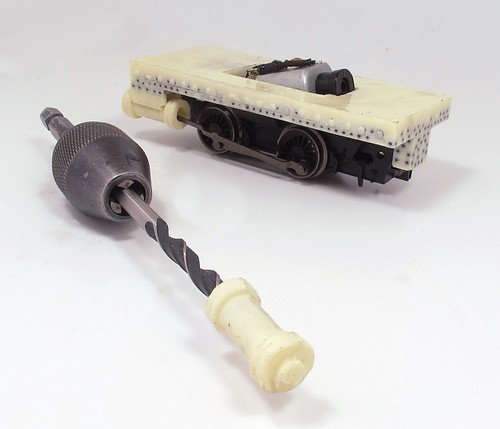
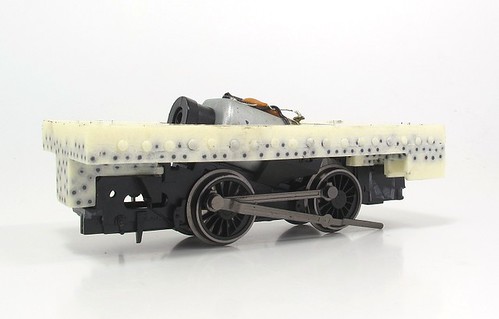
If more traditional skills are your sort of thing, and they are mine, the chat I had with Dave Walker about pantograph milling will have appealed more.

Simples driver

Dave has been using the technique a lot and produced a G3 loco from G1 masters in a way he described as reasonably easy. I'm interested milling like this, you make a twice life size plasticard master and then using the machine copy it on to brass. In 20 minutes I learned an awful lot and really want to see the miller we have in our clubrooms refurbished so I can give it a go. The concept is really simple and I even have a prototype in mind to try it out on.

Anyway, was the three hour trip worth it?

Yes it was. Sunday is a nice day to visit as the crowds are lower than Saturday and that meant I could chat to everyone I needed to. To be honest, I could have done with 2 days as I didn't give the layouts as much attention as I would have liked. I also wished I'd been more thorough with my shopping list as by Tuesday, I'd found at least half-a-dozen items that should have been on it.

Maybe next year.

Lots more York photos on Flickr


Friday, April 10, 2015

Ready for paint, but what colour?

Ready for paint

All the parts are fitted, apart from some copper wire inside the cab, so the model is ready for a quick scrub in the sink to remove any mould release and grease from my fingers. After this, there will be a shot of car primer and then paint.

But what colour?

The illustrations I have found don't help as they are black and white line drawings.

Personally, I fancy a green body, black footplate and deep, red bufferbeams. A bit of brass for the whistle, dome, spectacle plates etc. and then perhaps some weathering. The photo on this Gn15 forum is irresistible...

Thursday, April 09, 2015

Saving 2nd hand models in BRM

Modellers are always moaning about rising prices. It's true that wage increases in China and demands (sometime even tantrums) for ever higher levels of detail are pushing the cost of railway models skyward but this doesn't have to be the end of it.

While we see mountains of new goodies appearing on the model shop shelves, there isn't any need to buy absolutely everything brand new. I'd even argue that there is a lot of fun being missed by anyone who insists that the only pleasure in the hobby comes in new boxes.

This month's British Railway Modelling sees a news series from me - 2nd Hand Saviours. In each issue, I'll be taking stuff bought from second hand stalls or eBay, doing some work on it and (hopefully) ending up with respectable models suitable for a layout.

First up is a particular favourite of mine, the Hornby station halt:

Station

This model has been in the catalogue for over two decades and I've always thought it had loads of potential. Starting with the basic set, I've repainted the building and heavily reworked the plasticy platform.

Next on the bench is a Triang signal box:

Signal Box

I mentioned this model on the blog some time ago and helpful readers identified the prototype as a BR Type 15. Now I know Bachmann do a ready-to-plonk version but it's over 30 quid - ten times what this one cost me. OK, I hacked the end out of it and rebuilt with plasticard but since the prototypes varied a lot, you might end up needing to do this with the resin version, and the work is a lot easier with plastic.

I've also had my soldering iron out and built a point using DCC Concepts new kits featuring stainless steel rail and sleepers cleverly etched so they don't need to be gaped before wiring up.

Finished Point

On the DVD, I'm starting a basic skills course. With all the plasticard work going on, I'm showing some of the techniques needed to cut and glue the stuff. Plenty of people will be sniffy about this under the impression that everyone knows all this already, but talking to modellers at shows, quite a few don't. That being the case, I think a few helpful guidelines might set some on their way to hacking up acres of plastic sheet...

More details of this issue and comment on RMweb.

Wednesday, April 08, 2015

Crazy details

Details

One of the joys of Nellie is the crazy detailing to be carried out. It's the first time that I've found a load of large round-head pins to be sued on the ends of cylinders and tops of sandboxes (I think that's what they are).

The buffers are fun - brass tubes for shanks and drawing pins for the whacking great heads. Plenty of supeglue and they will look the part.

I've gone off-piste with the smokebox door handle. It's supposed to be another pin but I couldn't resist adding clock hands by inserting a couple of bits of brass wire.

Tuesday, April 07, 2015

Bracing joints

Braced parts2Zap superglue is marvellous stuff but like all such glues, there are times when the mechanical joint isn't as strong as you would like.

A good example is on the back of Nellie, where the cab back meets the footplate. The are of join isn't very large but the chances of catching the component with an errant hand are pretty large.

Add to this the lever effect on the join and you can spot the potential for trouble.

Fortunately, resin is easy to drill so I popped a hole through the bottom of the cab back and into the footplate. A length of brass wire was glued in to this and cut off with flush cutters.

Not being able to get the cutters in to the cab properly, there was a small remaining stub. This was dealt with using a curved file called a riffler. This can be poked in to small spaces and manipulated to file away the excess metal.

Braced parts1The dome provided an interesting problem. The cartoon loco didn't have to worry about the niceties of actually working, so Emett could draw a ball balancing improbably on a point.

Real life means the dome is make up of two castings that have to be joined. With such a tiny contact area, only drilling both parts for a thin wire and using this to join them can work.

The ball was drilled by eye and wasn't too bad. A little bending of the wire ensured the parts are in line.

Monday, April 06, 2015

Part built Emett

Part built locoIt's Easter Monday and I suspect most people will be happily tucking in to chocolate eggs or doing religious things rather than cruising the web for model train stuff.

With that in mind, here's a quick picture of the progress so far on the Rowland Emett inspired "Nellie".

Apart from the cab roof, all the big bits of resin have been fixed in placed using Zap-a-Gap superglue.

Cleaning up has been minimal apart from the top of the chimney which has a deliberate large flash area to be trimmed away.

In case anyone is wondering, the model is 18cm tall - I'll need to be careful with any future tunnel mouths!

Sunday, April 05, 2015

Advertising sign

Lennon Bros Sign

Rather nice advertising sing spotted in the middle of Rugby last week. I've walked by it many times until some bloke called York suggested that it was very modellable.

He's right too. Slaters plastic letters would be ideal. I can imagine using this in the background of an urban layout, poking over the top of a viaduct.

Saturday, April 04, 2015

Modelling a VW badge

Weathered SplitLes asks:  I am currently building a 1:43 scale model kit of a Volkswagen series 2 microbus for a friend, for his birthday.

I need the large chrome VW badge for the front of the vehicle. After extensive searching I have come up empty.

Do you know where I can obtain one?

I'm assuming there isn't a badge in the kit and that there isn't another kit available you could pinch the badge from.

My suggestion would be to cut the badge from some stiff metal foil. I've some from the Bare Metal Foil Company bought at the model shop in Northampton (You can get it from Little Cars) which would work. Cutting the thing would be fiddly but as it's a circle with straight lines inside, not impossible.

Friday, April 03, 2015

Nellie chassis part 2 - the cylinders

Emett Chassis 2

The cylinder arrangements are pretty simple on Nellie. The Hornby connecting rods slosh around in big holes, not unlike the way they work in the original Smoky Joe chassis.

While they are moulded with quite deep holes in the back. These need drilling out even more. Best tool for this (IMHO) is a large drill bit held in a chuck and rotated by hand. It's only a few moments work this way but if the drill appears to be heading off at an angle you can do something about it.

Stick it in a power tool and you'll be out the side before you know it.

Thursday, April 02, 2015

Nellie chassis part 1

Emett Chassis 1

"Take one nice Hornby chassis and hack bits off it with a saw" pretty much sums up the instructions in the kit.

It appears that the Hornby 0-4-0 chassis has changed over the years. I know people have told me that later ones run better than the early versions but it appears that the design changes extend to the fixings. This means that the Smallbrook instruction book mentions drilling for screws but the slip of extra instructions tells you the chassis will now clip in place without extra fixings.

And it does. At least it does once the couplings and cylinders have been removed with a fine saw. I used a piercing saw and finished up with a knife paring away the remnants of the soft plastic bits.

Now it fits perfectly. I'm impressed.

Wednesday, April 01, 2015

Emett's Nellie

Emmett loco bits

Last year, I visited the excellent Rowland Emett exhibition in Birmingham. I couldn't resist coming away with a souvenir of the day - a Smallbrook Studio kit for "Nellie". Since I'm desperately in need of a project that won't turn into a nightmare, it's been dug out for (hopefully) a quick trip across the workbench.

The kit is moulded in resin and designed to be powered by a Hornby "Smoky Joe" 0-4-0 chassis. Normally I dismiss these things as running like jackrabbits but here, it should be just right.

The resin bits are very cleverly moulded. To add weight, the footplate is full of lead shot and since it's very spindly (a consequence of turning a cartoon into a physical model) the cab front has brass wires incorporated in it. All very neat.

Complementing the kit is a book of instructions including an exploded diagram that has a cartoony element could have been drawn by Emett himself.