Showing posts with label Road vehicles. Show all posts

Tuesday, February 25, 2025

A tickle with the paintbrush


My first decision with the Jag, was to leave the body alone. It's shiny, but not too shiny. This is 7mm scale, and so a cherished car would enjoy a little shine. No need for my standard spray everything with matt varnish here. 

Looking at photos, I worked out which bits of the bumpers should be black, I used matt and should have probably gone satin, if I could find the paint, and "chrome". I didn't use chrome of course, I think I picked up a pot of matt aluminum for embelishments, including the screen surround and wing mirrors. Actually, thse were black, until I found a pretty close match to the model and realised they should be silver. Prototype research is always worthwhile.

Inside, the cream plastic has been painted cream, the dash binnacle is black, and the dash face, a sort of woody colour. 

My favourite touch is to wash the wheels with black Citadel ink, which has highlighted the spokes nicely. Strictly speaking, some of these could be gold, but I didn't like that look, so left them silver. 

The back end is more of a problem as the rear lights are wrong, but painting the brake ones red, and washing the whole lot with the black ink tones it down a bit. 

Finally, the numberplates come from an online generator, and are printed to the right size and glued in place. 

OK, this isn't the most amazing model, but with an evenings worth of painting, it sits in the scene very nicely. There, but not too gaudy. Good job I didn't buy a red one!

Monday, February 24, 2025

A new (to me) Jaguar


For my NG7 layout, I really want a modern car. Something to tell viewers that this is a model set in current times. With this in mind, I rooted around the stands at Doncaster, and came up with this from the Shell Sportscar Collection. 

Now, I know many of you are realising that this is a Jaguar XJS V12, and that's not exactly modern. Looking at the latest issue of Practical Classics, they mention the car in a feature, and Wikipedia suggests that this is a facelifted model from 1991 onwards. 

The trouble is: A) I didn't know. OK, I know it's not current, but didn't realise it was that old. B) There wasn't anything more modern available in my quick look around. 
 
Never mind, it was only three quid. 
 
Oh, and it's 1:40, not 1:43. 
 
Still, better than nothing. I'm going to tinker a bit, mainly with a paintbrush, to make it look more toy than model. 
 

 Undoing a couple of screws in the base, and the model largely falls apart. Some of the plastic parts have been heat riveted in place, but cutting off the plastic mushroom inside releases them to future treatment.

Wednesday, August 14, 2024

Unimog


Unimog
Another find in the box from yseterday, is this Unimog from the Tamiya 4WD Minis range. I'm sure I bought it from ToyTown in Leamington, and that shop closed in 1995. No idea why I bought it, at the time I didn't own an orange car (the colour of which is now my favourite) and I doubt I'd seen the real truck as they are uncommon in the UK. 


The kit has survived pretty well. Apart from cracked tyres, it's much as I would have put it in the box. Amazing really as the shed is open to the elements and certainly not heated!

Putting a couple of batteries in, and wiggling them around to achieve a good contact, and the model works! It zips along in what I suspect is a very un Unimog way, but it still looks great. 


Tuesday, July 23, 2024

Hornby Ford Sierra


Ford Sierra

The Ford Sierra is a problem car for me. Like the Class 58 diesel that arrived about the same time, I am old enough to see the first ones on the road. At the time the "jelly mould" design was controversial, even if it was logical to anyone who knew of wind tunnels. 

And now, when was the last time you saw either? 

I am old enough to have had an entire car range, and class of locomotives, arrive and depart in my lifetime.This really makes me feel ancient. 

Ford Sierra

Anyway, this car appeared at about the same time as the real thing. The Class 58 beat the real locomotive to the shops. 

It's a bit boxy, but recognisable. I wonder if they licensed the shape with Ford? Presunably they did as R271, containing three cars, is titled "Hornby R271 Ford Sierra Cars". BAck in the 1980s, and for a good few years later, this, and the Tri-ang cars, were pretty much all us modellers had to populate our roads! At least the Sierra was "modern image" in car terms. 

Hornby R271 Ford Sierra Cars

Anyway, this one cost me 50p. A bargain I think. Who knows, maybe I'll build an 1980s layout for it one day?

Monday, June 17, 2024

Beetle, done


Beetle
Back in January, I mentioned I'd bought a battered Matchbox VW Beetle, mainly because I felt sorry for it. At the time, Paul B pointed me in the direction of repro engine bay covers. I bought one, and it then sat around for months, until I got around to finishing the project. 

Drilling though the rivet, the model came apart, and I decided to try to strip the old paint off, before a respray. Well, half an hour in full-fat Nitromors didn't shift it. That stuff was put on properly!

In the end, I sanded what I could and then sprayed the car with Halfrods paint. Anoyingly, I didn't have any satin black, but the matt isn't particually matt, so that would have to do. I'd reached the stage where I wanted to finish this more than I wanted it perfect. If I change my mind, more paint won't be hard to do. 

The whitemetal engine bay lid isn't a bad fit. Not worse then then the Lesney original. I don't pretend this is a full restoration. If I wanted that, I'd find the proper plastic polish, something else that has hidden itself. A quick go over with Brasso improves the glazing a lot, but (again) it's not perfect. 

What it is, is back in one piece. As Voltaire said, "Perfect can be the enemy of good" and in this case, it doesn't help that the camera is a bit cruel. The model looks OK, and most importantly, is finished. It's easy to end up with half-built projects because they aren't going to be perfect, but sometimes, ir's better to push on and get the job done.Well, that's my excuse. 

Look, an engine!

Tuesday, October 25, 2022

Cars at the Spa 2022

Karmann Beetle

I've been very busy over the last few weeks, with precious little time for my own modelling, but I have been out and about a bit, so there are lots of photos to show you instead. 

We kick off, with "Cars in the Spa", the annual classic car meet in the centre of Leamington Spa. Well, at the bottom of the town on the Pump Room gardens. The good people of Leamington would be up in arms if someone suggested doing it on the main street. We can't even have pedestrianisation. 

Anyway, a fine display of horseless carriages was to be seen, and I've taken photos of some of the more interesting. This didn't include a really ugly modern Rolls Royce, brought along to prove money can't buy taste presumably. 

The green Karmann Beetle on the other hand. Now that is very nice. 

Cars in the Spa album on Flickr.

Monday, August 29, 2022

New crane

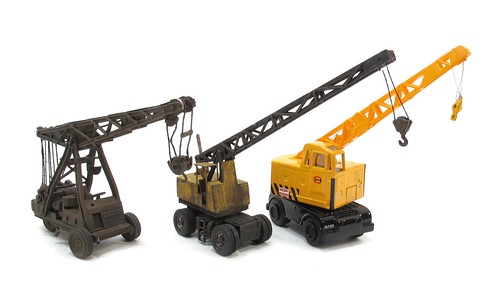
4mm scale cranes

Last week, I recorded a first look video on some of the new(ish) Corgi Trackside range of diecast models.

While looking at the Coles Crane, a really useful reintroduction to the range, I couldn't resist lining it up with some  of my older models. 

From left to right: Langley whitemetal kit, scratchbuilt (with some Airfix bits) and finally, the Corgi model. 

OK, the diecast cries out for matt varnish and a lor of weathering, but it's a good base model to work on.

The full video can be found here:

Wednesday, February 02, 2022

Cooper Craft AEC Monarch


For a change, the latest kit didn't go into the stash awaiting building. Instead, over the festive period, I built it up like a proper modeller. 

There's not much to say about the build, I wrote a bit more 7 years ago, but it all went together perfectly well. A bit of Contacta plastic cement and some Mek-Pak from my acient Humbrol bottle. It's important to build sub-assemblies for easier painting. Unless you like dodging around the chassis with a paintbrush that is. 

I ignore the supplied glazing in favour of Deluxe Glue'n'Glaze, the results are nice and flush, but it's important to let the windows dry reasonably horizontal to avoid the bottom being thicker then the top. 


The finished model looks suitably old. It's not been weathered yet as I'm not sure where it will end up. A little dry-brushing on the black bits with Humbrol 69 looks fine, but there will be powders once I have a use for it. 


Lettering is by mapping pen and ink, and it looks better in real life. There's something nice (I think) about hand lettering, although transfers do look more professional. This is a fun project and fiddling with tiny letters on the side of the bed would stop it being enjoyable!


Tuesday, February 01, 2022

Why do I keep buying this kit?


Another packet arrives in the post, signifying success an eBay auction. Inside is a Cooper Craft AEC lorry kit. 

I know I own several examples, the two pictured are just the ones that came to hand quickly for a picture. There are some tall body versions, and I'm sure at least one tanker. 

There's no need to me to buy more. While once this was pretty much the only way to add a lorry to your layout for sensible money, now we are spoiled for choice thanks to the efforts of Oxford Diecast. Even if I really needed lorries, none of the ones I own are gloued down, I can just move them to the latest model

It's not even that accurate a kit, being a bit of a hybrid between two prototypes. The finished model certainly looks the part though. Just the right amount of vintage, from the days when lorries pottered around at 20-30mph. 

Although I always rate a Cooper Craft kit, this is a bit fiddly to assemble. Lining up the two sides of the chassis would be a lot easier with some positive location pins to show you exactly where to put the chassis spacers. Mind you, the moudings are nice and crisp for the cam detail. Where that wing mirror fits is a bit of a mystery though. 

So it's not that acurate, nor really easy to assemble, but I still can't resist a reasonably priced example.

Why? 


Wednesday, January 26, 2022

Miniature Warehouse Wednesday: Scamell Trailer

From Nigel Hill: 

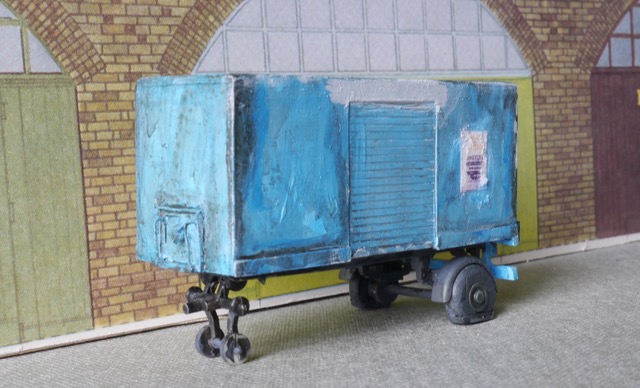
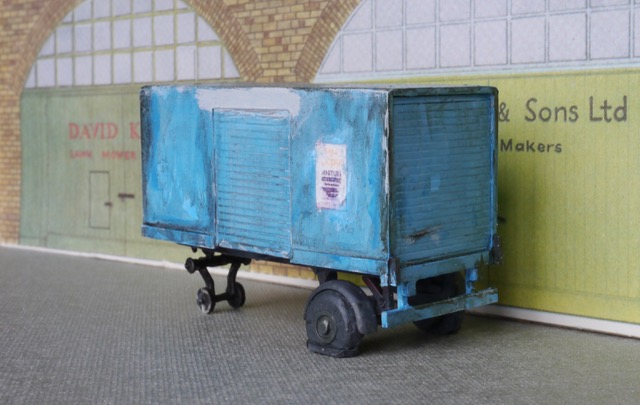
Attached are a pair of snaps of my recently completed blog post inspired Scammell trailer

It was quite fun to do and was built from stuff that most people would throw away. I should have tried to get Chris to paint it, but as it is only going into my orphanage for waif and stray models it will not offended innocent members of the public. 


Thanks Nigel. It's really nice to know people are inspired by stuff they read on here, and well done for beating me to building a model. The flat rear tyres are an especially nice touch, and appropriate for the prototype!

Tuesday, November 02, 2021

Weathering the Dublo Scammell

The Scammell weathering turned out to be a lot more involved than that for the VW. 

For a start, while the trailer is screw assembly, the tractor is all rivets, so much work with the drill to get the thing apart. 

The glazing was particularly difficult to remove. Eventually, I just broke it up in the cab since I planned to replace it anyway. 

After a spray of matt varnish, and being left to dry for a couple of days, work started with a bit of dry brushing. Humbrol 25, let down with some 147, proved to be a nice soft shade to match the original paint, just highlighting the detail and making the model look worn. 67 did the same for all the black areas. 

Then it was powder time. The plan had been to dust the model, then wipe it down and finally, dust a little more. In the mostly plastic trailer, this worked perfectly. 

The tractor though - well, wiping down with water caused the varnish to lift away. Obviously, it didn't like sticking to the really smooth paint on the metal. Eventually, I wiped it all off, set the model aside to dry and then shot some of my precious Dullcote on it. 

Running out of time, the model was warmed on a radiator for a few minutes and then powdered dry. Lots of brushing, but no water. The result is a dirtier tractor than trailer, but not unreasonably so. 

Reassembly involved superglue followed by Glue'n'glaze glazing. The result isn't bad. OK, it's not the amazing weathering possible if you have lots of time. I didn't, but sat on a layout, it will look fine, and upset the collectors.


Monday, November 01, 2021

Weathering the Dublo VW

A show deadline persuades me to stop messing around and get this "valuable collectable" properly ruined. Or improved, depending on your point of view.

A single cross-head screw is all that holds the chassis in place. The glazing is held in with a rivet, so I ground that away with a fat drill bit. 

Nice to see we have a full microbus interior. Since you can't see it in the van, it makes sense for Oxford not to do another moulding. Pity the steering wheel is on the wrong side though!

Around the window edges, I filled in the gap between the chrome moulding and the glass with some black paint. It looks better than the yellow body colour appearing where no yellow should be visible. 

After that, a dusting with weathering powders was followed by a wipe with a damp cloth to make the powder slushy and get it into the crevasses. I didn't want this van too mucky, just to look like a working vehicle. 

After that, a glazing with Deluxe Glue'n'Glaze and the model is ready for service.

Saturday, August 21, 2021

Saturday Film Club: Driving toys

Hands up if you had Matchbox cars in your childhood. 

Yes, me too. While mine spent quite a bit of time whooshing along those plastic tracks, there were more skilful driving options out there. This video shows you three of them, including Matchbox's own "Steer and Go" version. 

Even if you aren't in to driving, the mechanisms are fascinating things. Sadly, these all suffered badly at the hands of their young owners, so be prepared to pay proper money if you fancy adding anything like this to a collection via ebay.

Friday, January 08, 2021

The Airfix Beach Buggy is back!


Excellent news from Airfix - the 1/32nd scale Beach Buggy is back, and should be in stock early in the year. 

Young Phil built one of these many years ago, complete with orange bodywork. It wasn't great, and like most plastic kits, gradually deteriorated until it was thrown away. I've always fancied building another, but the prices for unbuilt kits were truly terrifying. 

You might remember, I had a go at the Revell kit a couple of years ago. It was OK, but (and it might be rose tinted specs doing this) I remember the Airfix version being made of proper, hard plastic and just a much better model. It also enjoyed a bikini-clad figure as part of the kit, which can't be a bad thing. 

So, I'm a happy bunny and plan to get the glue and orange paint out as soon as my kit arrives.  

I wonder if they can find the moulds for the Bond Bug next?


Friday, December 18, 2020

A new delivery van for Garden Rail


If you've read the latest issue of Garden Rail, you'll have spotted a review build of 3D Wayne's "Mostyn Seven" van. As well as the kit supplied for review, he also sent one over to me and I've turned it into a delivery van for Garden Rail. 

The kit is 3D printed so needs a little clean-up to remove print lines. A couple of coats of high-build Halfords primer did the job well enough for me. After that there was more rattle-can painting and a set of transfers made on my printer. 

I'm particularly pleased with the spoked wheels. The spokes are printed and all I did was draw them in with a bow-pen full of silver paint. 


This was a nice simple project and a bit of fun. I like the cartoony looks of the model. This fits in with the sort of people I populate my outdoor line with. Look out for this appearing on lines I visit - if we are ever allowed out to visit anywhere in the future!

Friday, June 05, 2020

Mystery Fowler

Here's a little mystery. I have this lorry on a shelf - presumably bought because it's an Isle of Man collectable - but can't identify the maker. It celebrates the 1993 Douglas vintage rally.

The model is 105mm long. On the gaudy orange chassis, all we have is "Fowler Steam wagon 1927" but no makers mark.

The cab is riveted on, but the load bed attaches with screws which suggests that alternatives were available.

Can anyone tell me more?

Friday, March 27, 2020

Heritage Lego VeeDubs

HO scale Lego vans

I've always loved Lego and always loved VWs, so combine the two and I'm a happy man. 

These two VW panel vans date from the 1961-67 period when Lego made a range of HO scale vehicles. There were pickups and minibus versions of this model in a variety of colours. 

Made from acetate with metal wheels, neither model is perfect, but as I paid a pittance for them, I'm not going to complain. Sometimes you just get lucky on a second-hand stall and for once I did. Maybe a sensible person would ship them straight off to eBay for a decent profit, but not me. I really like these little models, which is surely what collecting is all about.


These weren't the only Lego models picked up at the time, I'm now the proud owner of some of a few Bedford lorries. 


These have suffered badly from the plastic warping over time. With nothing to lose, I'm wondering about a hot bath for the worst affected. Again, I can't complain as the oldest could be over 60 years old, and plastic technology wasn't as advanced back then, as anyone who owns any Tri-ang short coaches will know!

Monday, May 13, 2019

Build-a-Bug

Inspired by my trip to Stanford Hall, I have dug a plastic kit for a cabriolet Beetle out from the stash. One that will hopefully be a nice simple job to stick together. 

Imai's kit is from the Junior range. Apparently, it can be built with a motor, although sadly, there isn't one included in this kit. Nor the working headlights - and I'm going to resist the temptation to do something about this. 

The main body is a single moulding with plenty of chromed parts to add. We love chromed parts, don't we? 


Step 1 - respray the main body. I think the idea is that you are supposed to use the self-coloured plastic, but that's rubbish as at the very least you'll need to polish it once the mould lines are removed from the top of the wings. And they really must be, it's one of those lovely curvy areas you look at on a bug. 

Paint of choice is Arrow Red from the Humbrol Acrylic range. Mostly because we seem to have lots of cans of the stuff left over from other projects. Working outside (the spray booth is packed away) it goes on well in light coats and dries nicely. I primed the inner wings with white before giving them a dose of body colour too as this is a new car and that's what VW did.

Tuesday, December 18, 2018

Servicing a Micro Scalextric Alfa 159

A couple of years, I bought a friend a Micro Scalextric Alfa 159 set as a bit of a joke. She liked her Alfas and driving fast, and it was stupidly cheap. There have been very few presents that I've enjoyed handing over more. I didn't care if it never came out of the box, the gifting was the fun. 

But, it turns out that both her young daughter and husband loved it. Lots. Enough that when I mentioned I was at a slot car swapmeet, there was a request for more cars. 

It seems that just like the real thing, one of the Alfas has become temperamental. I offered to take a look. How difficult can it be to service? 

Sticking a 9V battery on the pickup braids, the motor turned over freely. In fact the only potential problem I could see was the state of the braids themselves. They were a bit ragged but I'm not sure if this is the problem. 

Micro Scalextric cars clip together, so I took the body off and blasted the braids and motor with contact cleaning spray. Wiping the excess away, I realsied the braids were clipped in and not soldered to the motor. 

Basically, they are folded in half, one end under the car, the other rubbing on a contact for the motor. So, I simply reversed them so the good end is under the car and hopefully this will have solved the problem. The "fluffy" end is still fine at touching the motor contacts - and the battery test still works. 

A drop of light oil on the motor bearings to replace anything removed by the cleaner, clip the body back on, and the car is ready to return to it's owner. Let's hope I've cured the problem and it's now reached Japanese levels of reliability.

Saturday, August 04, 2018

Saturday Film Club: Making the master for a Matchbox car


An American video, which appears to aimed at 5 year olds, this shows the basic process of making the master for a Matchbox car in (I guess) the 1980s.

Nowadays, there will be some CNC milling involved, but using a 3D pantograph tool looks interesting, and would require a lot of practise.