Showing posts with label Airfix Beach Buggy. Show all posts

Tuesday, August 24, 2021

Beach Buggies compared - Airfix vs Revell

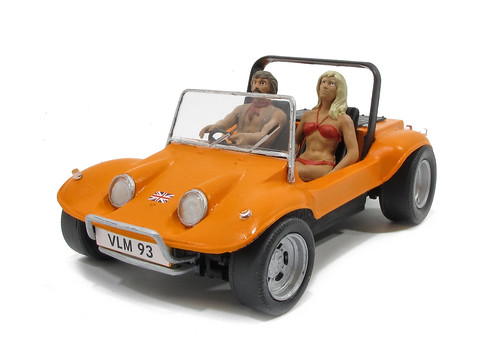
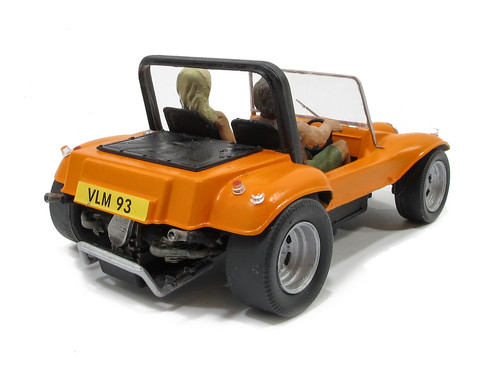
 Left: Airfix Right: Revell

I suppose we ought to compare the recently finished Airfix beach buggy with the Revell version I built three years ago. The web loves this sort of thing after all. 

Both are the same scale, and fortunately, not the same prototype. Revell is slightly cheaper, but Airfix uses stiffer plastic. Revell give you rubber tyres, but I think the Airfix wheels and tyres look better. You get figures with Airfix and not with Revell - and in this sort of car, I think that's a big thing. 

Around the back, Airfix has a Type 1 engine, Revell, Type 4. Another win for Airfix here I think. Interestingly, the British kit is right hand drive, the German left hand drive. I can see arguments for both as this is a vehicle you'd mainly associate with the sunnier climbes of America. 

I'd give a small win to Airfix, mainly because of the engine and figures, but both are fun builds. 

However, all this got me thinking. While I'm not big on customised Beetles, I do have a soft spot for a Baja bug. 
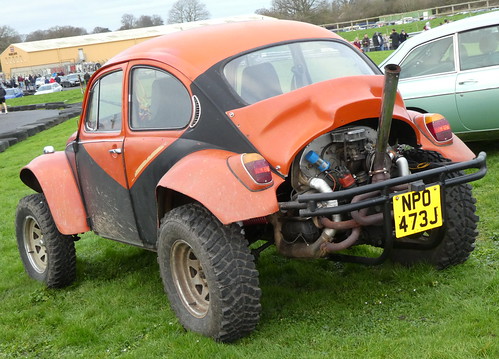

Baja Bug (1971) 

So, I wonder if I could take the buggy wheels and engine, plus the Airfix Beetle kit and make one of these? There would need to be some scratchbuilding of course, but that would be a big part of the kitbashing fun wouldn't it? 

Something to think about anyway...

Monday, August 23, 2021

Airfix Beach Buggy - ready for the surf

Beach Buggy

 In odd minutes over the last week, I've finished the Airfix Beach Buggy kit. I know the project has jumped some steps, but I'm sure you don't need all of them. 

Anyway, the body is stuck to the chassis, seats and figures added and the clear parts fitted with Glue'n'Glaze. Told you it wasn't exciting.

Beach Buggy
There were a few interesting wrinkles. The roll bar is on the clear sprue, and is glazed. Not sure why this is as you wouldn't have a honking great window behind the seats, it would act like an air-brake for a start. carefully opening this up with a razor saw looks better, and makes it easier to paint. On balance, I should have replaced it with something thinner, but it's OK. 
 
Both figures are nicely sculpted, but a little laid back. They looked odd until I painted their eyes in (I don't normally bother with eyes on 4mm figures and sometimes not on 7mm, but these definitely needed them doing) and she is still staring at the sky rather than forward. I'm out of practise on skin tones too and think I could have done a better job - but every project is a learning exercise. 

Overall, I'm pleased to have had the chance to revisit the kit and enjoyed the build. Aside from a few issues, the model goes together well. 
 
If you want to do a really top-notch job, I'd recommend buying two kits and building the first to get a feel for the model, then making the second the exhibition job. There's plenty of scope for customisation too - the nerf bars on the front could be changed, and the rear cage is a bit basic too. That fan belt cover would be nice in mesh with visible pulleys too. 

But then that's the joy of plastic kits - so adaptable, and so much fun to adapt.

Monday, August 16, 2021

Yellow shocks


It's been a busy week, so progress on the beach buggy had been limited. I have managed to fit the  engine into the chassis and add the suspension. 

At the back end, like the exhaust, there's a bit of gluing things and having them hang in mid-air. If you have four very small hands, you'll be in a better position than those of us with only two large ones. The trouble is, you can't line anything up and hope it's right. Worse, until the wheels go on, you have no idea if they will all touch the ground. 

The observant will notice the shock absorbers are bright yellow. Airfix didn't specify this, it's a tribute to the time I decided to replace those on my bug with gas filled ones rather than the "boring" oil filled version. 

The result was a somewhat bouncy ride as they react faster than the standard items. A ride, I didn't really like, but had to put up with as the car was my daily driver. A lesson learned that you shouldn't believe what people in Volksworld tell you is cool - it might be, but they lower their cars and endure a terrible ride as a result. 

Adding the wheels and I think I've got away with things. There is a bit of slop so they all touch the ground. The back ones even rotate, but the fronts defeated me. Mind you, I didn't put up much of a fight as this isn't something I worry about much. It makes photography easier as the model stays put anyway. 

Really sharp eyed people will notice rubber parts (tyres, gaiters) are painted Revell Anthracite black , while metal bits are Humbrol black. No, of course, no-one cares, but it's my model and I'll have some fun!

Wednesday, August 11, 2021

The future is orange


There was only one colour for this car - orange.  

That's the colour it is on the box lid and that's the colour my Beetle is. There simply is no better hue. 

I'm spraying the body with Tamiya X-6 orange. Sadly, I couldn't get an aerosol, so the paint was thinned with car windscreen wash (it's what the military modellers recommend) over Halfords white primer. Trying to spray without the primer saw the paint puddle on the plastic surface, but while gives a better base than grey, so it's worth the effort. 

The result is pleasingly matt. Not dead, but not shiny. I'd accept satin, but gloss always looks too toylike. 

If I could have found a can of touch-up spray for my car I'd have used that, but since the aerosols I had mixed must be well over 20 years old, I suspect they might not be in the best condition. 

Tuesday, August 10, 2021

1/32nd aircooled engine


Airfix has kept the Beach Buggy engine pretty simple. Sadly, in the days it was designed, they didn't put in many positive location aids, so while most of the assembly is easy, the dual-cannon exhaust pipes sort of hang in mid-air while you assemble them with only half-lap joints to hold them to each other. 

The technique of using plastic cement for the initial grab followed by some solvent once they are tweaked into position seemed to work OK for me, although the tweaking went on for a while until the joints were solid and I was happy. 

Detail is sparse because (as I later found) you can see so little when the unit is fitted in the car. 

My bugs' engine is a bit different but was a useful guide. The air cleaner (missed out of the kit) is much larger than a mushroom version you'd have in a buggy. It's also more hemmed in by the tinware, something mostly missing on a buggy. You don't need those big hoses from the doghouse to the heat exchangers for a start. 

I've never detailed and engine before, but it looks like fun when other people do it, so I added a distributor and plug leads to fill the space. Pedants will point out I didn't include the vacuum advance canister, but I assume the buggy owner has replaced the stock VW unit with a 009 version which only has centrifugal advance. It's a popular mod, although one disapproved of by people who point out VW didn't spend millions fitting this stuff for it to be replaced by people who think cheap chrome makes their car go faster...

The dizzy is a piece of plastic tube, and the wires 15amp fusewire. The air cleaner is a bit more tube, which has since been altered to fit under the body. Main silver is Dark Star "Molten Metal" Old silver, a better match for a magnesium alloy crank case than the silver suggested. That's limited to the exhaust tips and pulley cover. A quick wash of black Citadel weathering ink finishes the job.

Monday, August 09, 2021

Airfix Beach Buggy

It was a great pleasure to read that Airfix planned to re-introduce the Beach Buggy kit earlier this year. I put my pre-order in as soon as I saw the model advertised, and last week, a box arrived. 

When a young modeller, I remember building this kit. The results probably weren't very blog-worthy, but with an interest in VeeDubs, it was always going to be on my list for another go. The trouble was, unbuilt kits on eBay were in the region of £65, and like an idiot, I passed up the one I saw at £15 at Stanford Hall VW show a few years ago, and the Revell version didn't satisfy my desire for the kit.

The 1/32nd scale kit isn't large, but it's pretty comprehensive. Mind you, there aren't that many parts to the real car. At least some suitably 1970s figures are part of the package. 

Everything looks nicely moulded. Presumably the moulds were refurbished as part of the reintroduction process as I can't believe they were this good after all the time, the kit first appeared in 1972 so it's nearly as old as me!