Wednesday, April 30, 2014

The mythical Ratio 528

One issue that has presented itself on Edgeworth is the disintegrating Hornby resin water tower. I commented on this a couple of months ago and the only good news is that a couple of applications of superglue and some internal splinting with brass wire seems to have cured the problem.

If I'm honest though, the join is a lot more visible than it should be. Exhibition repairs and less than perfect breaks don't make for a clean restoration.

Since this is the only ready-to-plonk structure on the layout, the solution is obvious - replace it with a kit.

I recalled that Ratio produced something appropriate and set out to look for a kit at exhibitions. Surely this couldn't be difficult, after all the range is widely distributed.

Sadly, no. Doncaster, Alexandra Palace, York. All were scoured without results. Eventually I began to doubt that the kit existed at all. Searches on the web didn't seem to bring back anything either. I assumed that I had been mistaken.

But no. This is not the Big Footed Loch Ness plastic kit. It really exists. Spotted on the Rural Railway stand at Sutton Coldfield exhibition at the weekend, I grabbed it and added it to the stash of projects. At least it will be finished quicker than the 1970s Hornby lifting bridge I also bought at that show. Now that is a rare kit...

Tuesday, April 29, 2014

Mastman Kit

Bantam Plastic Kit

The Mastman Models kit isn't a kit in the way railway modellers would understand the concept. It is exactly what you get in the model boat world however.

A vac-formed hull, deck and front fender are supplemented by a sheet of plasticard and some plans for the superstructure. Basically, it's an aid to scratch building rather than a shake the box model. I'm happy with this as it keeps the cost down and lets me build the boat I want.

Bantam Plastic Kit 2The idea is that the deck is trimmed to drop in to the top of the hull. As far as I can tell, this means that there will be a lip around the top edge - strong for a model and easy to build, but nothing like any of the real tugs.

Never mind, this is all fixable and since the hull is very good indeed and I certainly can't make anything better - it will form the basis for the model I want to build.

Running a ruler over the hull, the model works out at 1:24 scale, a normal one for boat modellers which should make buying a suitable captain easy.

Monday, April 28, 2014

Bantam Tug

Bantam Tug

From Jim Shead's Website: During the fifties and sixties E C Jones & Son (Brentford) Ltd built a series of tugs which they called "Bantams".

I first became aware of Bantam tugs when I visited the London Canal Museum a few years ago. In the basin at the back of the building is the museums own tug - Bantam IV. At the time I took loads of pictures as it would obviously make a fantastic model.

Back home, some research showed that while above the waterline, things are simple and boxy, below it all gets but complicated with a very weird shape hull. Without a plan and with lots of other projects, the idea of a miniature Bantam remained a dream.

Then, at the last model boat show, Mastman Models were selling a Bantam kit. This had the hull and I reckoned I could do the rest.

So, I dug out my photos again and also found a card kit from the museum that I'd bought 2 copies of. An hour or so later (the painting takes time), a 7mm scale waterline model was on the workbench.

Bantam Card Kit

Sunday, April 27, 2014

Two old photos of trains

I was looking for a card kit the other day, working my way through a bookshelf, and I tripped over an old scrapbook. The pictures were falling out so I stuck a couple under the scanner. Both date from the 1980s - sadly I can't be more precise than this.

Class 47 at Leamington

The first shows a Class 47 diesel pulling flat wagons through Leamington Spa station. The view today isn't very different as the building is listed so can't be altered much. The loco is probably long gone and even if it isn't, won't be pulling bogie flats on the main line any time soon. This was a last gasp from the "good old days" for train spotting when every train was headed by a proper loco and there were lots of different classes to look for.

KESR fillup

For several years, we took our summer holiday on a campsite in Kent. One of the attractions was the relative proximity of the Kent & East Sussex Railway. At the time it was a very friendly line and my father and I were so enamoured that we became members. This wasn't with any real intention of becoming volunteers, just to be part of it.

The photo shows an Austerity being filled with water at Tenterden station. In the background is a Pullman car that as I recall, was part of a dining set that did good business at the time.

Sadly, we gave up our membership a few years later when I found myself refused access to the station during a Thomas the Tank day. I'd travelled down to Kent camping and hadn't realised it was a special weekend. This didn't worry me and I wasn't expecting to have a ride, but not being allowed to go to the shop and buy some binders for the magazine incensed me.

Later on the same day, I followed the line to Robertsbridge where the Rother Valley Railway is based. There I found the friendly attitude that, at the time, had gone from the main group. At this time, the two organisations were at loggerheads despite trying to re-build the same railway. Apparently all this has now been resolved, maybe one day we'll be able to take a train all the way along "the farmers line".

Saturday, April 26, 2014

York 2014

York TicketI won't keep you in suspense - my round trip to York show is 300 miles and it was worth every one of them this year.

Visitor no.4700 started his visit with a trip to the restaurant at the top of the hall and enjoyed some tea and chocolate cake. For around the same price as coffee and cake at a chain shop in the town centre, it was just what I needed after 2.5 hours on the road.

Martini GardensAfter this, it was down a floor to see the exhibits. As my father and I walked in to the room we were hollered at by a gentleman from the Hull model railway club.

Dave Birks (for it was he) has lost around half his body weight and the role of tea boy in the exhibitors refreshment lounge. This means he will no longer rescue people from excessive deserts in pubs and that we weren't going to get a free drink later on.

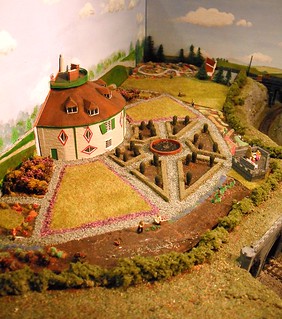
He was sat behind a rather nice N gauge layout - Martini Junction - which had some fantastic colourful civic gardens.


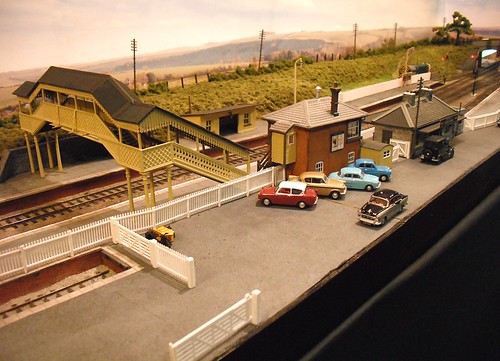
After this we found the EM gauge Stoke Gabriel which looked like a nice follow-on plan to Edgeworth.

Stoke Gabriel
A through station, it has bay platforms and plenty of operating potential. Not a flash layout by any means but the sort of realistic model that you'd be proud to have built.

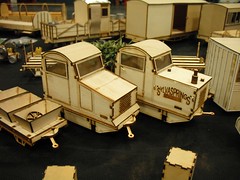
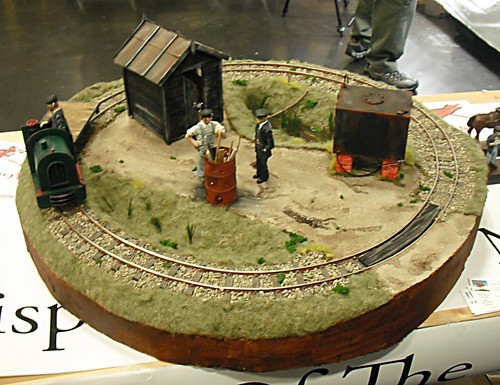
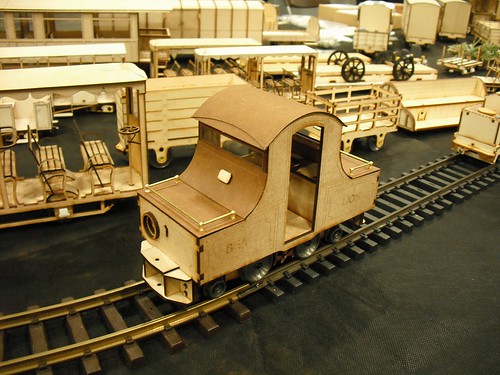
Finally, there was the 
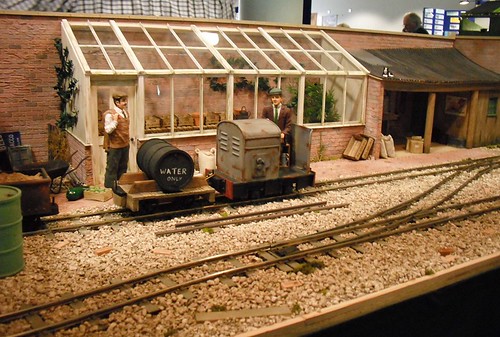
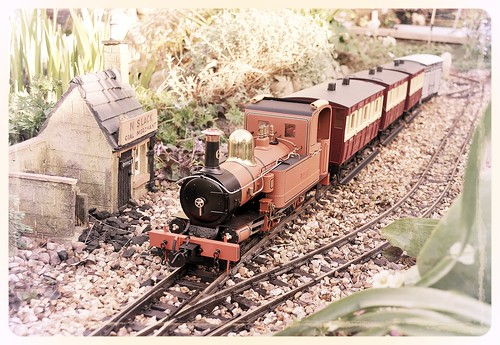
MOMING14@YORK collection. Half a floor of micro layouts based on minimum gauge railways. Many were in the larger scales of G and even 1:12 scale but running on OO and O gauge track.

Albion Estates

I found the who display inspiring. OK, the operational possibilities weren't much to shout about in many cases, but the modelling and imagination was fantastic. Chris Payne organised this and deserved thanks for pulling a very different display together. I'm certainly inspired to have a go at something similar - when I've finished all the other projects of course!

After this, I know I talked to a lot of people and looked at even more layouts. I spent some money too - mostly on bits of magazine projects but also some interesting pamphlet type books that I'll be bringing to you in the future.

Another trip for drinks (large bottle of orange juice) and cranberry and orange cake (also very good) and we headed to the ground floor. It might seem perverse working from top to bottom of a show but in this case it hopefully allowed us to avoid the worst of the crowds. I understand that numbers were slightly down this year but it didn't seem like it. Presumably the late Easter and good weather kept some of the families away. Pity, they missed out.

The ground floor was rushed around a bit as closing time was approaching. Leighton Buzzard is always worth a look as you don't see models dating from a time when everything had to be made the hard way very often. Leicester South is a huge layout with a real look of the late BR steam period. Novelty provided by the motorised vans to replicate capstan shunting appeals to me too.

Anyway, as usual, loads of chat, some good trade and more inspirational layouts than normal.

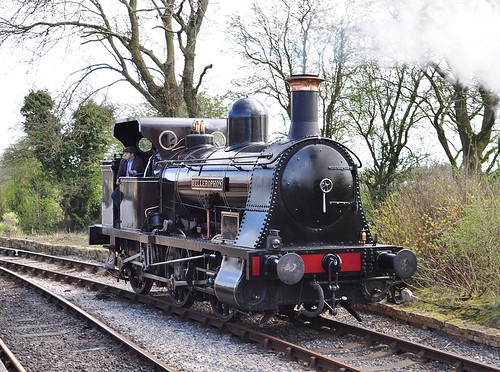
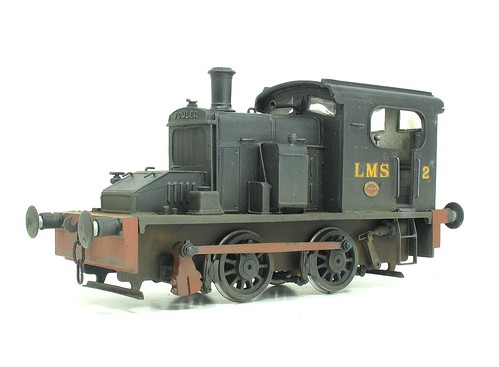
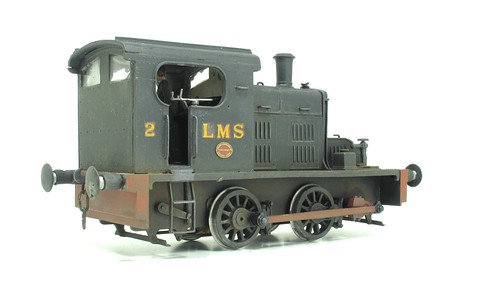
Go and have a look at my photos on Flickr.

Edit: Any reference to food has now been crossed through to avoid offending people.

Friday, April 25, 2014

Someone must love a Penny Post tram

The great tramcar sale continues over on eBay and we are gradually reducing the pile of Corgi diecast models and increasing the garden railway locomotive funds.

It's interesting to see which models are popular in the world of tram collectibles. I'd expected that the early models would be rarer than later ones and therefore more valuable. It seems the opposite is true.

Less surprising is the lack of interest in the 7mm scale American Birney trams. They are lovely models and fetch nothing. I can't understand why the 7mm narrow gauge fans aren't snapping them up, sticking a SPUD underneath and making NG railbuses out of them. Either that or stick a normal chassis underneath for an interesting coach.

The saddest model of the lot though, is this Penny Post commemorative tramcar. It's in it's box and lovely condition but now on the third re-listing as we try to find anyone who will over it a home for £4.99. Some one must collect stamps and postal memorabilia out there.

Go and have a look at all my current eBay auctions, it's not just trams!

Thursday, April 24, 2014

Painting a 16mm scale guard Part 2

16mm GuardRailway uniforms tend to be black so I gave the Modeltown guard a quick once-over with some Humbrol 33 after picking out his shirt in 147.

On it's own, the black looks a bit stark so I left it half an hour and dry-brushed with No.69. Getting this done before the base coat is fully dry allows the two to mix slightly hopefully avoiding any sharp colour changes whilst taking the edge off the black.

I probably over-did it a bit but then on my garden line, the uniforms are like the rest of the place, a little tired and care-worn.

Anyway, the flag is a nice bright grass green - these things are very loud in real life for good reason. It's  attached to a pale brown stick as the ones I've seen aren't the dark brown you get from track colour.

The cap badge is gold paint dabbed on with the end of a small screwdriver. Easier than a paint brush and there's no clean up afterwards.

Finally a shot of matt varnish unified the look and he's ready to signal trains out of the station.

Wednesday, April 23, 2014

Painting a 16mm scale guard Part 1

Guard Painting Part 1

I picked this figure up from a box at the end of the Modeltown stand at Peterborough. He was in a box of cheap figures and I liked the look of his pose.

Anyway, I'm assuming that he made it in the cheap box due to some air holes under his elbow and on his nose. A quick splodge of filler took care of these. The resin he's moulded in felt slippery so the next stop was the kitchen sink for a scrub with washing up liquid.

After this, a shot of Halfords car primer made it easier to see the detail. The white resin is as difficult to see in real life as it is in the photo above. Getting some colour on there made life easier.

Finally (for today) Humbrol flesh tone was dry-brushed with it's Revell equivalent and the eyes picked out with a small brush and some track colour paint.

Tuesday, April 22, 2014

Resin tank for a warflat


Paul asks: Where do you get the resin tanks from that you use on the warflats ?

The simple answer is that they can be supplied with the kit when you buy it from the Double O Gauge Association.

However, this isn't very helpful. As I recall, the supplier is Gramodels who produce a range of military hardware in several scales. I recently used a Ferret armoured car on my pizza layout for BRM.


When loading a Warflat, remember that not all armour will fit within the loading gauge. Early tanks and armoured cars will be fine but you won't squeeze a Challenger through a tunnel!


Monday, April 21, 2014

Easter Egg Special!

3 choccie eggs

It's Easter and to me that means chocolate eggs. Yum!

Anyway, this isn't a blog about chocolate, it's about making things, so looking for a connection, I decided that the ideal topic for today would be the contents of Kinder Surprise eggs.

My local newsagents were sold out but the nearest branch of WH Smith furnished me with a broadsheet newspaper and 3 of their 4 remaining eggs. I left the last for any small children who would otherwise miss out on a treat.

Carefully removing the chocolate, I unpacked the toys and found these:

Kinder Junk
 
From left to right -
 
An alligator. While the figure is a solid lump of plastic, the cardboard scenery does need to be folded and clipped together. The resulting pond isn't the most realistic I've ever seen but if you prefer, by reversing the folds your new pet can sit on a river bank. I decided he would prefer a swim.
 
A painting set. Clever this one. The yellow figure with bristles pointing out of his head is a brush and can be removed from the red feet that contain water based paints. Blue and yellow don't seem like the most exciting colour combo in the world but then you can make green as well. Mind you, the instructions on the pictures to colour in don't show any mixing, just different shades of the base colours. Seems a bit limited, don't think Humbrol will be copying this.
 
A beach buggy. Two parts, the grey chassis and yellow body clip into each other. The wheels are pre-fitted, probably by someone who wishes they didn't have to sit doing this. By pushing down on a plastic paddle at the back of the chassis, the car speeds away. Excellent play value. I'm tempted to paint this one.
 
By the way, the chocolate is horrible and if you live in the USA, according to Wikipedia, you don't get toys in eggs as they will kill small children.
 
Have a happy Easter.

Sunday, April 20, 2014

16mm Society AGM 2014

Sylvia Springs locosPeterborough showground. Home of the best chocolate cake in the world. Or at least it used to be three years ago. Sadly there's not sign of it. Perhaps some lucky git ate it all before I got there.

Anyway, cake quality aside, I was at the showground for the 16mm Society AGM. A big hall full of garden railway goodies.

Actually, it wasn't quite a full as it has been in previous years. High stand fees seem to have caused a few traders to drop out. There were certainly people missing from last year such as IP Engineering, Glendale Junction, Tuxcraft and Flexiscale. Doubtless there were others who I couldn't name.

Not to worry. I'm not looking to add to my stock of garden railway kits at the moment. I only went to have a look around.

A show gets my seal of approval if there is a model that makes me want to go away and reproduce it, or at least my version and this was the case here.

Pizza Layout

Sadly, my photo is a bit rubbish as I don't think the camera has ever recovered from being dropped on the cobbles at Scarborough. Never mind, you get the idea. A 16mm scale pizza layout just over 3 feet across.

Little Diesel

Plenty of detail on display. Some quality modelling despite the novelty subject matter. I'm already thinking how I could use take the idea and produce my version of it.

Of course, there were plenty of goodies to tempt the wallet. A 7/8th scale laser-cut kit for the Groudle Glen electric loco Sealion is high on the list.

&8th Sealion

I have the 16mm scale version of this Yatton Engineering kit the stash to build but despite not being that much larger, the 7/8th version looks even better. Of course the Accurcraft steam Sealion already on order does kind of push my thoughts in that direction anyway.

Anyway - head over to Flickr where the photos are. The square wheel Bagnall is especially clever.


Saturday, April 19, 2014

Manx Peacock

Peacock

It's spring time so the garden railway comes alive properly. Track ballast has been renewed. Rails have been cleaned. Plants have been pruned.

While we had the Peacock out I couldn't resist taking a photo, and then couldn't resist fiddling with some effects.  Enjoy!

Friday, April 18, 2014

Making chain

Chain Making

I needed some chain for a garden railway project earlier this week and the stuff supplied with the kit was far too small.

"No problem", I thought, "I'll quickly make some up."

The technique is simple enough. Wind wire around something round to form a sort of spring. Then cut along the length so it falls apart into individual links. Using pliers, bend these and make them into a chains. If you need oval rather than round links. squeeze them as you link each one up.

My first attempt was with 0.9mm brass wire around a 2.5mm drill bit. This wire was a bit fat and the resulting links were tight when assembled. Bending the wire with pliers was harder than it ought to be too.

0.7mm worked a lot better. The links can flop around properly and manipulating them with 2 pairs of pliers wasn't too hard.

I still wasn't happy with the result and so resorted to some I had in stock. A fatter drill bit or even some Code 100 rail to wind the wire around would produce better links and if I used the rail, they would be the correct shape too.

Thursday, April 17, 2014

Brush painting spray paint


I recently painted a model grey by spraying it with Halfords primer. It's lovely paint that applies straight from the can very well indeed.

The problem was that after a little hand lettering, I needed to touch up the grey. Only a little and that was the problem. Not enough to warrant masking and re-spraying. At this point I wished I'd used proper paint in tins.

Never mind, I decided to have a go with the primer. A little was sprayed in the cap and then picked up on an old brush. At first it was a bit thin but after about half a minute, the solvent seemed to evaporate leaving just paint. In the few second between becoming paint and becoming dry, I was able to tidy up my work with a matching shade.

OK, it's not perfect and I was working on wood which being porous is more forgiving, but it looks fine.

Wednesday, April 16, 2014

Beer research

kegsOK, I'm busy at the moment so please head over to the BRM Blog where you will find a little post I put together yesterday on my trip to the National Brewing Museum in Burton-on-Trent.

Before we went to the museum, we drove around taking photos of interesting buildings and I've posted a load of these for your information and entertainment.

There's also a picture of a ham roll and pint of beer. What more could you want?

Head over to read about my trip to Burton.

Tuesday, April 15, 2014

Stop your shunting!

Funny the things you find kicking around the magazine collection of your local model railway club. Here we have the Instructions to be observed with the working of royal trains.

Most of it covers block working and signalling stuff that passes me by. However, at the end we have this:

5. Shunting Operations

Shunting operations on any line or siding next adjoining the line on which the Royal Train will run must be suspended at least 10 minutes before the Royal Train is expected to pass the site of the shunting operation.

It appears that Royal personages were not to have their sight offended by seeing the ordinary working chap actually doing some of his ordinary work.

This gives us modellers the prefect excuse when there is a break in operations. Just say, "There's a Royal Train on its way mate." and no-one can argue.

Monday, April 14, 2014

Riding Bellerophon

Footplate ViewIt will probably come as a surprise to many people who know me, but one thing I've never done, until yesterday, was ride on the footplate of a railway engine.

Obviously I've ridden behind all sorts of engines but as opportunities to sit or stand next to the driver are limited. Bothering someone doing a complex job to be allowed to clutter up the cab doesn't seem fair.

Anyway, for some magazine work I was at the Foxfield Railway and offered the chance to loiter in the cab corner travelling from the top station at Dilhorne Park to the terminus at Caverswall Road. While the loco is effectively coasting downhill all the way, I wasn't going to say no.

My steed for the trip was the 1874 built locomotive "Bellerophon". As one of the few engines I can picture in my mind when it's name is mentioned, this just made the opportunity even better.

The cab isn't large and nor is it protected from the weather. The day was sunny but with a cold wind. The front sheet might well be larger than when the loco was built but it doesn't wrap around the sides and the wind was coming across us. Heaven knows what it was like when the loco worked day in, day out, at Haydock Collieries. Either men were harder then or just knew that if they complained, there would be someone else along to take over their job.

Admittedly there is a nice warm fire and our fireman for the day toasted his hands by it briefly, but in such an airy cab, the heat soon dissipates - far more than I had expected it would. Having said this, from what I've seen, working hard on an express engine in more enclosed conditions was a far warmer job and not in a good way much of the time.

Our run proceeded at 15mph. I asked how fast and two smart phones were produced and GPS consulted, the loco has no speedometer, just vacuum and pressure gauges. Despite some sharp curves dating back to the lines origins as colliery railway, it was smooth too. A recent axle-box fettling and some interesting equalising beam suspension saw to that I guess.

Thanks to everyone who made this happen. I was well chuffed (pun intended).

Bellerophon

Sunday, April 13, 2014

Coalville Model Boat show

Alien BoatTo go to Coalville or not? That was the question this year.

The event has snuck up on us without really noticing and I was busy first thing in the morning supporting my sister when she took part in a 10K run. This was over by mid-morning though and with the event only an hour away, we went for it.

You'd think that attendance was a no-brainer but in truth, although the first years even was very good, last year was a bit flat. Checking the web in the run-up all I could find on Model Boat Mayhem forum was a list of traders followed by the caveat:

This list is off the top of my head if any of the traders are NOT at the show please DO NOT BLAME ME.......These are the usual traders that attend shows

Basically, no-one knew. The organisers seemed reluctant to enlighten anyone either. There was no website and not even an official announcement on the forum. Odd.

The problem is that for this sort of event, trade matters. Ordering on-line is OK but sometimes you want to have a dig through the bits. You might even buy things you hadn't expected to want. Based on the drop in trade from year 1 to 2, we ha;f expected to walk in to an empty hall.

As it was, the hall was fuller than the first year. Trade was good, displays were good. Some we disappointed by the lack of water to sail on but I'm not that fussed.

I picked up all the bits I need to make my next project work. I could have picked up more projects but I have enough already thank you. Had I taken along some photos of the prototype, something precluded by the last-minute decision to go, I'd have picked up some detailing parts to. Never mind, I have a pretty good idea where these are coming from.

RNLI Ribs

Boats on display seemed restricted in subject. Although there was something for everyone, it helped if you liked lifeboats (I do) or grey boat (not fussed) as these were heavily represented.

Anyway, a good show. We'll probably go next year. Maybe then we'll be told in advance who will be filling the hall up.

Photos from the show on Flickr.

Saturday, April 12, 2014

Finished Fowler

Finished Folwer Front

Finally, after over 15 years ownership, my Fowler diesel shunter is finished. The black bodywork has been washed with brown to give those lovely mucky nooks and crannies, then dry-brushed with dark grey to simulate highlights. After this a gentle airbrushing with some earth, dark grey and track colour blended everything together. A light dust of powders just finished the job.

Glazing is Krystal Klear. Plastic would probably have been better but you have to cut it to fit the rebates before glueing the roof in place. This looks OK though even if it was a pain to do.

A driver leans on the controls. I've positioned him so he looks out of the side as though planning to look forward or backward at any moment, well it is a shunter and I think this is better than reversing while looking out of the front. Anyway, he settled like that and the glue dried and I decided he looked pretty good.

All in all, the Eric Underhill kit is very nice indeed. At 615 grammes, it won't need any extra weight to keep the model in the track. It could probably out-drag one of those Ixion upstarts too. Mind you, I didn't anticipate their existence when I bought this!

Finished Folwer Rear

Friday, April 11, 2014

Painted Fowler

Painted Fowler

Look at this - I've painted the Fowler shunter at last!

After a blast of Halfords grey primer, the black comes from a Revell spray can - 34302 silk matt Black. Once left to dry overnight, the result was a very nice, smooth finish. I was quite impressed.

The red bits are Humbrol red satin varnished - all applied by brush. The red isn't really a deep enough colour but the easiest way to get this is their gloss paint and that takes an age to dry. Once weathered, it will be fine.

Transfers are some old waterslide ones. The silvering behind the letters doesn't show in real life nearly as much as it does in the photo. Pedants will point out that on the real loco the letters were gold but unshaded and the number should also be sans serief.

I don't care for a couple of reasons:
  • I had these to hand and din't have to go any buy more.
  • I prefer this to the correct versio, especially the number 2 which looks nasty in real life.
If I must have an excuse, I'll say that I'm assuming a repaint at some point before the loco moved to whichever ficticious bit of track I'm claiming it is being run on.