Wednesday, March 16, 2022

Timpdon Models Rolling Stock Putter-Onner


Another bag off the kit pile - this time a useful device to make putting 45mm gauge rolling stock on the track a bit easier. 

Supplied as a mix of laser-cut MDF and basswood (I think) parts, everything slots together nicely with no fettling. PVA glue was my adhesive of choice. Using a few weights and clamps, construction took very little time. The results would be strong enough for a small steam loco, and possibly something a bit bigger is you were careful. At 26cm long, you'd need to feed a Garratt on, but I'm sure it could be done.

The instructions suggest spray varnishing the result, so I gave it a few coats of Halfords laquer. This sort of worked, but the results were a bit blotchy as the paint soaked into the MDF unevenly. The following morning, I gave it a sand and a couple of coats of Ronseal interior varnish, producing a much more satisfying result. 

Mind you, the varnish is just a nicely, the thing will work just as well without it, and perhaps even gain a working pattina more quickly! To be honest, the thing is so cheap, you could replace it when it gets tatty anyway.

Timpdon Models Putter-Onner.

Tuesday, March 15, 2022

Precision glue application


You can't have just one 3-link coupling hook, a spare is essential for when you lose or break the first at a show. Hence, I'm converting a smaller torch than yesterday's to do the job. 

For both, a wire has to be attached, with a hook on the end, the torch body. Firmly. 

Both torches are made of an unsolderable alloy, so it's down to epoxy glue, but I want to do a neat job and that's not easy with this stuff.

Unless you have a Tamya paint stirer to hand. Dip this in the glue and dabbing neat fillets in the wire/toch body interface, is easy. 

Glue can be scraped off the paint paddle once it has dried and the thing is as good as new.

Monday, March 14, 2022

Reconfiguring a Wilko inspection pen light


I need to make a coupling pole for 3-link couplings, and as any fule kno, these must be attached to a small torch so you can see what you are doing. Furkling around in the gloom trying to fish for small chain links is a whole load of no fun. 

Finding a suitable torch isn't as easy as you might think, but I thought I had struck gold with a Wilko Inspection Pen Light.  Metal, a nice length so you have control over the wire that will be fixed to it, and even a clip to hang it on your pocket. 

Back at home, I found a snag. The thing has three settings, which are cycled through by switching it on and off using the button at one end - On, half-on and an epilepsy-inducing fast flash. 

Seriously Wilko, why? 

If you are inspecting something, you really don't need the flashing, nor the half-on. On and off, that will do the job. 

Worse, it made the torch useless for my purposes. Full on is perfect. Half on less use, and the flashing gave me a headache. 

There was only one thing to do - take it apart and rebuild it. 

A quick check with the continuity tester showed that the switching was all handled at the opposite end to the light. No need to fiddle here. 

At the business end, we find a circuit board. The batteries bear on the reverse of this, but between them and the LED lights are some surface mount components. 

A bit of work with the soldering iron, the components were removed, and the wires disconected. Then all I had to do was poke around with the tester again to find out where the postive and negative connections were to be found. Solder the wires to these, and then reassemble it back into the light-up bit, and it worked! 


Saturday, March 12, 2022

Saturday Film Club: Let's talk about coal

A really interesting chat between steam railway managers about coal - the lifeblood of our preserved railways. If you don't understand the costs of getting a chuff-chuff out of the shed, then pay attention, running a heritage railway is a difficult job.

Friday, March 11, 2022

Tri-ang 12" Racing Yacht re-rig


I like model boats, I collect Tri-ang trains, so it's no great surprise that I own a few boats from the same firm. However, I don't own a yacht, mainly because I'm not into wind-powered craft. But them I spotted this one on eBay, and it was available for £12, and thought "Why not?"

OK, the box is battered, but the hull and the sails are intact. In theory, all I needed to do was replace a few bits of string and it would be as good as new. Or at least as close to that as matters to me. 

Balancing the boat while I worked on it was the first problem. Not owning a suitable stand for something with as deep a keel as this, I improvised with a couple of kitche rolls held together with a belt. It might look a bit Heath-Robinson, but it worked a treat, holding the model perfectly while I fiddled with it.

My rigging of choice is Lincatex Linen Thread. It's about the right thickness, if a bit white. It should be strong enough for the job anyway. 
 
Working out where everything  should go was helped by a diagram on the back of the box, which mostly showed me what I needed to do. No mention of replacing a fitting under the jib which had rusted away of course, but everything else seemd OK. The sails move, can be tightened if necessary, and since I haven't a clue what I'm doing, I suspect will be left as they are, and the elastic band on the tiller will centre the rudder. 
 
Will all of this work? No idea. At some point I'll put it on the lake and see. For the moment it all looks pretty. More importantly, another project ticked off the list, and that's what matters most. 

Thursday, March 10, 2022

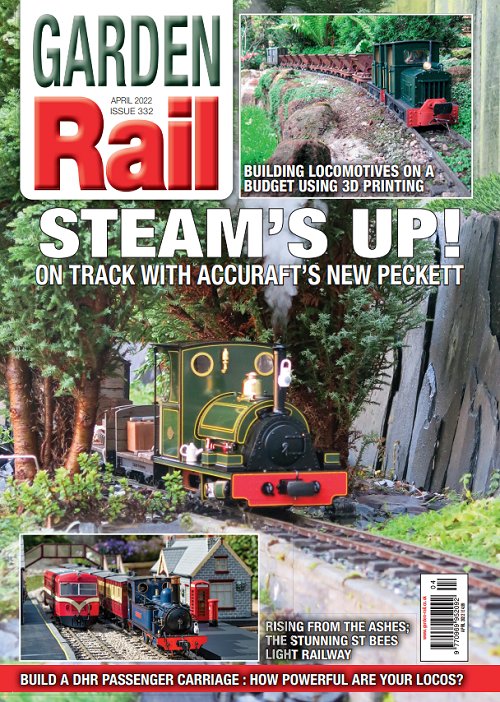
Manx magnificence in April's Garden Rail


Garden Rail April

Sometimes, to find your prototype, you just need to look out of the window. That's what David Mart did when replacing his O gauge garden railway. Taking the Isle of Man, which he can see from his house, as inspiration, the result is a beautiful line bursting with colour.

All railways need locomotives so we take a look at Accucraft's latest steam locomotive – the Cranmore Peckett. If diesels are more to your taste, Rik Bennet builds some on a budget using a 3D printer.

All this and more including the very latest new products for modellers in the larger scales.


Wednesday, March 09, 2022

Warehouse Wednesday: Crew coach


With a few minutes to kill at Princes Risborough station recently, I took a couple of photos of this old coach, now converted to crew accomodation on the Chinnor & Princes Risborough Railway

Peering through the windows, it's kitted out with storage, a well-equiped (OK, it has a microwave) kitchen and somewhere to sit and eat. 

The vehicle sits on an isolated piece of track which begs the question how it was moved there. Crane? Rolled in and the pointwork removed? Both seem overly complicated. 

Anyway, it would make a nice model as it sits behind a working mainline platform. A good use for an old Tri-and clerestory coach perhaps?


Tuesday, March 08, 2022

A suitable tea-stirrer

I like tea. And I like my tea properly stirred, not shaken. 

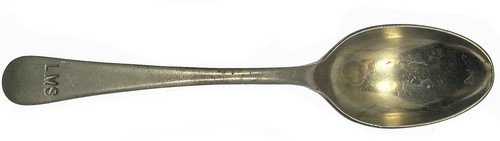
Browsing eBay randomly the other day, I couldn't resist a proper railway teaspoon. Branded LMS, I assume it's from a dining car or station buffet. What I do know is that it's considerably older than me. 

Despite this, the plating is OK, and it does the job. The bowl of the spoon is deeper than you find on modern teaspoons, and as befits a utlitary item, the metal is a good deal thicker. 

All this for four quid. That's a lot of history for not much cash. 


LMS Teaspoon

Monday, March 07, 2022

Testing the ultrasonic cleaner


Back in April 2020, I was battling to keep my airbrush clean and tried out an ultrasonic cleaner bought years earlier. It made no difference. 

MikeB commented: Reading through old posts and saw this. Ultrasonic cleaner probably only of use for acrylic paint residue as no amount of water action will get through dried enamel or cellulose. However, one useful bit of info I can pass on is that there are an awful lot of useless ultrasonic cleaners out there. To test one, put water in it and hold a small strip of aluminium cooking foil half way into the water. A proper working cleaner should make the foil get lots of tiny pinholes in it after only a couple of minutes. If it doesn't then unfortunately you have a machine that froths water and not much else. I bought a £20 jewellery version a few years ago that seemed to do not much apart from make small bubbles. Once I found this test from a reputable manufacturer I realised mine was indeed useless. Hope this helps you or someone else. 

Finally, I decided to give his advice a go. 


Half an hour of noise later and the foil show no sign of pinholes. From this, I concluded that Mike had a point. Mine was junk. 

But, I wanted to be sure. So, three screws and a lot of sawing later, I took a look inside. 

Do you see any sign of ultrasonicy things in there? All I see is a switch, and motor fitted with an off-balance weight. Turn the device on and it makes a noise, rattles and does bu**er all to clean anything in the water. You might was well stir it with a teaspoon!

I can't remember where I go this piece of rubbish from, but post this as a warning to others. Obviously I kept the motor and switch, but it's an expensive way to get those...

Sunday, March 06, 2022

Ulfstead Road part 2 in NGW


Part 2 of the article by Richard Awdry (with my photos) on his grandfathers' 009 "Rabbit Warren" layout - home to many of the narrow gauge engines from the Railway series, appears in the Mar-Apr edition of Narrow Gauge World


Saturday, March 05, 2022

Saturday Film Club: Hythe Pier Railway

I'm told by the maker, that this videois 40 years old. It looks like it was filmed on a tape camcorrder, and so presents a little slice of history showing this fascinating line. Another one to go on the list to visit one day!

Friday, March 04, 2022

Mystery PO underground train model

Digging in a drawer for an old wagon for use in a magazine article, I found something I'd forgotten I owned. Hardly surpriseing, as it's tiny - but there's no surprises that when I spotted it, I bought it. 

The prototype is a train from the famous Post Office underground railway

Scale is 4mm - the model is 90mm long. I didn't paint this, but I don't think it is a professional souvenier. 


It's cast metal, but feels heavier than whitemetal, but that's a guess and I can mark the base with a screwdriver, so it's soft. 

The ends are pivoted, but the wheels (unsuprisingly) solid. 

So, where did this come from? Who made it? Why can't I remember buying it?I know readers of this blog like a mystery, so any answers would be appreciated.

Thursday, March 03, 2022

Mazda K360 - Part 3: All finished

Mazda K360

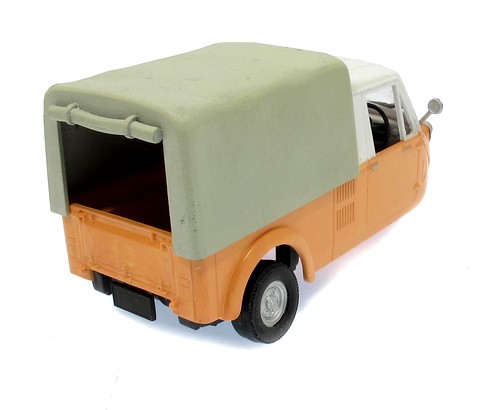
Here we go - the finished K360. It's not a bad model, but there are some niggles. 

The clear bits are best described as "interesting". Windcreen fit isn't wonderful, but Ok. The front lights though - they should be the same but one is twice the thickness of the other. Neither is a great fit in the front, but some serious work with a sanding stick at least fixes this. I could have reduced the depth of one of the lights too, but left it as the result would be opaque. 

Transfers are supplied with acres of excess film. I trimmed this back for the instruments, which is fiddly. The scripts are raised on the sides so I just painted them silver - far easier than applying decals. 

Overall, though, it's an attractive model of an interesting prototype. I'll admit I'm now pondering a cakebox size diorama to display this and the Diahatsu - but that will need suitable figures and I'm not sure it's a good idea for me to go and order some right now. Who knows what else I'll buy!

Mazda K360

Finishing this model clean is interesting, and a handy test of the paint and lacquer, but a bit of dirt would bring it alive. Something to consider in the future. 

At 95mm long, I can really see the appeal of building a collection of these cars - there are several others in the range. Tackled with more than my "stick it together for fun" approach, and they each make an interesting project, but won't consume too much display space.

Wednesday, March 02, 2022

Mazda K360 - Part 2: Fleshing out the paint.

The Mazda K360 box art shows and attractive two-colour paint job, and as a change from the last two models which came out mucky, I thought I'd have a go at something pretty. 

First challenge, chose your colours. The top is white, but I remember from chosing the paint for my campervan years ago, a pure white looks odd. Pick an off-white (I used a Peugeot colour) and it looks nicer. On that basis, I opted for Humbrol 147, one of my regular go-to colours, in fact the one I use for white on other models. 

The darker colour looks to be a peach, but I don't have that in my collection. Setting out to buy some at Doncaster, the closest match, and it IS close, is Tamiya Flesh colour. 


Applying the 147 was difficult as my airbrush is still playing up. The Badger 200 is a bit brutal (great for large boat hulls though) although it did an OK job. 

As an experiment, I brushed the Tamiya in the load bed area - and after two coats, it looked really good. No brush marks, nice solid colour. No need to spray!

Drying time is quick too. Both coats were on in an evening. A little touch-up where the masking wasn't perfect, despite my best efforts, then a little silver, and things were looking good. 

A 1/32nd scale model needs a little shine if it's supposed to be clean, and so I was presented with another oportunity to experiment. 

There has been a couple of cans of Halford Satin lacquer on the shelf for a while, and I resoned I ought to try them out. If everything went wrong on this model, it wouldn't be the end of the world. 

As it was, everything went right. Three thin coats look pretty good. The paint sprays well and provides a pleasent shene to the body. It's pretty controlable too, not always the case with car paints. Maybe the results would be a bit thick for N gauge, but if the airbrush (currenlty being cleaned again) is out of action, a realistic alternative.

Tuesday, March 01, 2022

Mazda K360 - Part1: What's in the box?


OK, I promise, this is the last weird Japanese 3-wheeler, but if I can built it, I've completed all the models from the Plaza Japan order that arrived earlier this year. Nothing has found its way into the "maturing" pile - and if that pile is to shrink, stage one is to not let it get any bigger. 

The kit looks a bit like the Diahatsu model - but with even more flash. The main body is reasonably clean, but some of the other sprues are interesting. The steering wheel is surrounded by a thin sheet of plastic for example. 

On the plus side, the canvas tilt is a lovely fit, so I will be using it this time. 

According to Wikipedia, 280,000 of these things were made, which makes me wonder why I'm not more familair with them. 

If you'd like to know more about the prototype, there's an excellent article on the Adrian Flux website

And Sotheby's has an excellent set of photos

Seriously, these little trucks are cool - why isn't every classic car show infested with them?

Monday, February 28, 2022

Brownhills West Station model shop


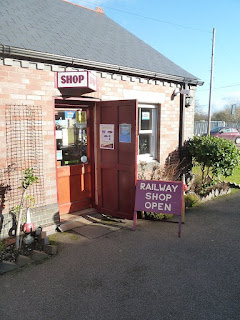
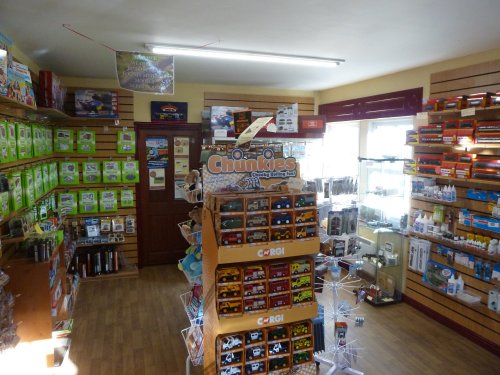
On a chilly, but bright, February morning, I was visiting the Chasewater Railway's Brownhills West station, and was surprised to see that the model shop found at the end of the platform was open. 

It seem that both this, and the cafe, stay open, even when the railway itself isn't working. A popular spot with the locals for country walks around the resevoir, both do good business, even in the off season. 

Many preserved railway shops are full of train-themed stuff for the benefit of the visiting public, with perhaps a nod toward the enthusiast. To be fair, the public are where the money is, gricers being notorously tight-fisted. 

However, this shop is a bit different - it's a proper model shop stocking Bachmann, Hornby and Peco products. Streamline track is particually popular I'm told. 

There's plenty of Metcalfe plus tools and glues to assemble your kits with. The second hand cabinet is small, but managed to tempt me to leave a few quid behind for a W&T 6-wheel milk van kit. 

There are souveniers of course, and some nice tasteful ones. It's only forgetfulness, and the realisation I needed to get back out and do some work, that meant I didn't come away with some Hitachi Rail pens to go with my kit. My only complaint was the lack of railway postcards - I always send one to a freind when I visit odd places. 

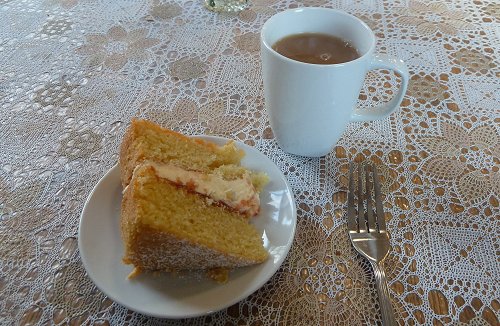
Best of all, next to the shop is the cafe, purveyor of excellent cakes. 

So, if you find yourself in Staffordshire, looking for a nice day out, check out the railway and model shop. 

Chasewater Railway website.


Sunday, February 27, 2022

Pilot Boat at "speed"

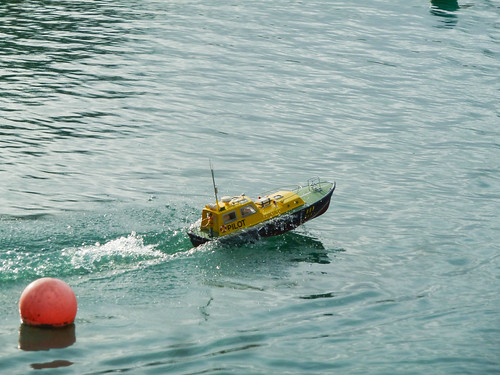
Pilot boat

The camera never lies? 

It does in this case. You'd think my Pilot Boat was racing along, blasting everything out of the way with it's wake. Nothing could be further from the truth. It's slower than MisChief, a real Karmann Ghia of boats (all show, no real go) even though the nose is in the air and we seem to be generating plenty of spray. 

Sailing this model is pert of my plan to get a variety of boats on the water, so I dug this out of storage and managed to find a battery that fitted it. Sadly, said battery has been around for years and was bought second-hand from the club. 

All that time with no charge hasn't done it any favours, and despite several charge/discharge cycles, the runtime was not much more than 5 minutes. 

So, time to buy a new battery, but maybe also replace the 540 with something brushless? 

You can read the build of this model here.

Saturday, February 26, 2022

Saturday Film Club: Why do you build a garden railway?

Garden Rail regular, Rik Bennet, explains why he built the Peckforton Light Railway. Lovely line, and with some really good invented history. This isn't just about running trains in circles.

Friday, February 25, 2022

I got my APT!


I wasn't sure that I'd be adding Hornby's latest version of the Advanced Passenger Train to my collection, so standing outside my local model shop holding the box pleased me enormosly. Nearly enough to make me forget the £430 I'd shelled out for it!

You see, Hornby have introduced a Tiers system for shops - those in the top teir have large and well laid out premised plus an efficient on-line operation. My local guy is in the bottom (3rd) tier thanks to a tiny premise and no web sales. New models go to the top teirs first. 

But, he got one! I ordered the model the moment it came out (OK, when I could officially know, about a month after I actually do), and two years later, allowing time to save some pennies, it has arrived. If you think that the teirs system means no models for the little guys, it seems that this isn't the case. I didn't pull any strings or make a fuss, it just arrived in the shop. One phone call and I was in the car to wave my credit card. 

I'll admit that this did leave me with a quandry - the weekend before I got the call, I had seen several sets at Doncaster, including on the excellent Tony's Trains stand, but I'd placed the order and wasn't going to walk away. This sort of big ticket item makes a big difference to local shops. I'm sure I was the biggest sale of the day, if not the week. Anyway, I can't bang on about supporting real model shops and head to the web the moment it is time to buy something. 

I've gone for the 5-car set DC set for several reasons: 

  • It's the same as my 1980s version.
  • It's the cheapest option. 
  • I don't have anywhere to run it, so there's no point in spending even more on a cupboard Queen. 

I mean, I want an APT, but it hardly fits in with the sort of layouts I build. This is just plugging a gap in the collection. A lollypop loco. But I deserve a lollypop. Occasionally. 

Comparing the packaging (no, I'm not doing a squeally unboxing) you can see that Hornby has changed a lot. The new model is in moulded cardboard trays, far more eco-firiendly than the big slab of poystyrene the old model arrived in. 

Out of the box, the shape is noticably less square then the older model. Colours are better (ignore the bright yellow, a trick of the light) and so much better applied too. The red line on the 80s version is best described as "fuzzy". There's more detail as you'd expect, although the train isn't exactly bristling with the stuff. 

Am I happy? Yes. There will be more detailed reviews in all the magazines, but I'm pleased with my model, although this is from an APT collector point of view rather than as a finescale modeller. Maybe one day I'll have somewhere for it to streatch its legs properly and enjoy it tilting around the curves. That will have to wait, but if it does, I'll still run the old one too!

Thursday, February 24, 2022

Lots of 3D prints and some recycling in the Spring BRM

Progress continues on my wagonworks project - this time I put together the buildings and scenery. 

Those two make up the lions share of any model railway, so I've found a few shortcuts to try to ensure construction doesn't take up ALL my life. 

First, needing some storage containers, I dug out an old diorama and recycled not only the boxes, but all the scenery too! How's that for green? 

Then, a lot of detail comes in the form of laser-cut and 3D printed parts. A little assembly, and a lot of painting, and the job is done. Not too painful, despite needing to fill a big shed with details because you can see loads through the big doors!

For BRM TV, I take viewers through the process of preparing 3D printed figures and details. To be honest, it's really not rocket science, but I've seen a few people on the web making a real meal of it, frequently because they don't see lack of knowledge or experience as a bar to authority on a subject. 

Obviously, I AM an expert... :-)