
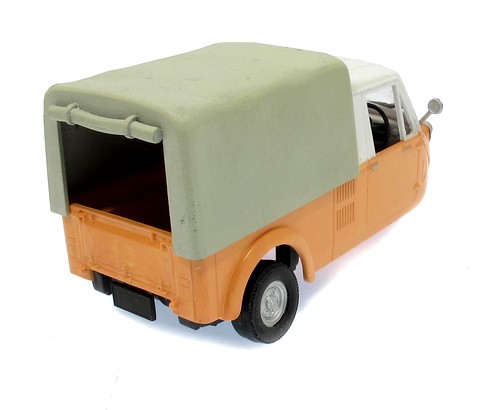
Here we go - the finished K360. It's not a bad model, but there are some niggles.
The clear bits are best described as "interesting". Windcreen fit isn't wonderful, but Ok. The front lights though - they should be the same but one is twice the thickness of the other. Neither is a great fit in the front, but some serious work with a sanding stick at least fixes this. I could have reduced the depth of one of the lights too, but left it as the result would be opaque.
Transfers are supplied with acres of excess film. I trimmed this back for the instruments, which is fiddly. The scripts are raised on the sides so I just painted them silver - far easier than applying decals.
Overall, though, it's an attractive model of an interesting prototype. I'll admit I'm now pondering a cakebox size diorama to display this and the Diahatsu - but that will need suitable figures and I'm not sure it's a good idea for me to go and order some right now. Who knows what else I'll buy!
Finishing this model clean is interesting, and a handy test of the paint and lacquer, but a bit of dirt would bring it alive. Something to consider in the future.
At 95mm long, I can really see the appeal of building a collection of these cars - there are several others in the range. Tackled with more than my "stick it together for fun" approach, and they each make an interesting project, but won't consume too much display space.
4 comments:
Just out of curiosity, how soft is the plastic on the clear stuff in this kit (like lamps)?
Also, what's the finest abrasive grade you go down to when dealing with these?
Of course, it's possible that you might not be able to answer this.
I've sometimes been known to use sanding sticks / pads / sponges on which the abrasive grade isn't specified - trade show and magazine freebies - nail buffing sticks - stuff like that.
Ultimately, though, there's an element of what works for you - and how far you want to go.
Probably just as well, though, that I don't tend to do too many "cut and shut" rebuilds of "muscle car" kits. I could imagine some potential projects that would really rattle certain people on car modelling forums ... .
These three vans have been great to see you do. And great to learn about them.
If you didn't know, the tarou sirokuro youtube channel makes small diorama showing off (maybe) the same vans, (and mitorbikes, and subaru 360's) parked next to models of old Japanese vending machines. Kev.
Huw - The clear is the usual slightly hard and brittle stuff from any plastic kit. If you were keen, it would be possible to sculpt a better set of lights using sanding sticks, but for this project, I can live with the results.
Kev - Thanks for the heads up. Those dioramas look great. I need to find some inspirational prototype photos of Japan to get a feel for the look.
For inspiration I came across this fun video showing 3-wheel-adjacent vehicle dioramas (among other themes).
https://www.youtube.com/watch?v=1qfixJ1tzwo&t=207s
insatsuya's junk-box
And as 2:50 shows, just stick a robot in the back, and job's done!
Personally I love the three buildings at 4:30. I could almost fit the thin right hand one on one of my "layouts"
Kev
Post a Comment