A daily updated blog typed by someone with painty hands, oil under his fingernails and the smell of solder in his nostrils who likes making all sort of models and miniatures. And fixing things.
I've always had a love-hate relationship with gearboxes in model locomotives. On one hand I can't mesh gears for toffee, on the other, making the gearbox work can be a real pain in the backside if the etcher hasn't done their job properly.
Branchlines boxes are usually better than most and it's rare the motor mounting holes have to opened out to increase the separation between the gears unlike some I've built !
This one is designed to take (supplied) Romford 40:1 gears and an open frame Mashima motor. Construction is simply a case of bending up the sides and fitting the super-slim axle bearings. As you can see I popped a jig-axle through these to keep them square. A touch from the reamer was needed to accept these
Once the metal was cleaned and dry, the motor was screwed into place, work gear fitted and finally the axles and final gear inserted. With a bit of power, the whole lot revolved beautifully first time. Very satisfying.
It may not have power but Caledonia's chassis runs when pushed so now we could carry on experimenting on the points for the Isle of Man model railway layout.
Many years ago (OK, probably 2) we built a 12mm gauge test track on a plank. It's about 4 ft long and has two parallel tracks and a crossover. The points on this are longer then the last ones tested and I hoped that they would prove easier for the stock to negotiate.
This turned out to be the case in spades. I sat the 0-6-0 chassis on one end of the track and tilted the board. It ran down the line, through the crossover and down the next bit of track without even a hint of a derailment. I did it again in the other direction with the same result. In fact I spent a happy half hour (I'm easily pleased) eating wine gums and tilting the board to make the chassis run. At no point did we even bump through the points never mind leap from the track.
This means that:
A) I'm not completely useless at building chassis.
B) We need to re-plan Foxdale around less tight point work.
So good news and not so good. I just hope it all still fits on the board.
I'd hoped that the chassis construction for Caledonia would be quick and simple. It's got 6 wheels and I wasn't planning on any of that fiddly compensation stuff, so how hard could it be ? Better still, if I stuck the thing on the Hobby Holidays jig, assembly ought to be a matter of a few minutes work ?
Wrong.
First up I laminated the rods. These are very thing in places as per the prototype. No complaints there although I suppose the tags holding them to the etch could have been a bit thinner.
Then I used these to set the axle positions on the jig. The holes were too small for the ends of the jig axles but I reckoned I'd got them set properly anyhow. Despite this I had to move one axle bearing over 1mm inboard by filing the ole out a bit. At least the jig kept things flat I hoped.
Then with the wheels fitted, I tried the rods. They bound. OK, so try one pair of wheels at a time. After lots of hole opening I managed to get these to rotate. Then the third axle. More hole opening. At the ends of the rods, the holes are oval slots rather than round.
The chassis now runs when pushed along the bench but I have a nasty feeling that a new set of rods will be required to get it moving under power. What I can't work out is where the problems come from. Did I set the jig up wrong ? Is there a problem with the kit ? Was I just having a bad day ?
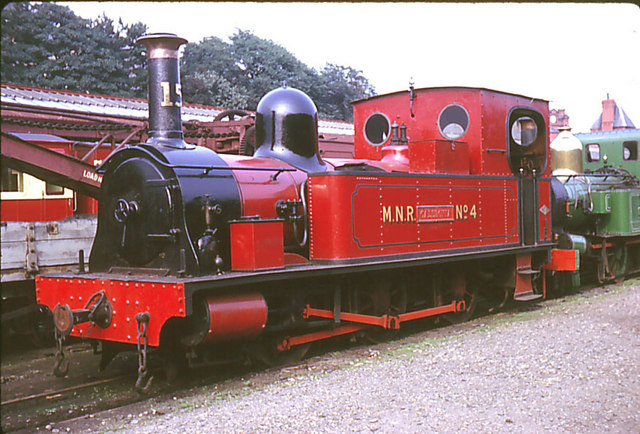
One benefit of building a model railway based on the Isle of Man is you know what your locomotives are going to be. There will be two types - 2-4-0 Peacocks and one 0-6-0, Caledonia. I have a Peacock chassis so it seems sensible to build the other one as well. That way we know our track-work will be suitable for all the chuff chuffs.
Branchlines produce a kit for Caledonia. It's mixed media - nickel-silver for the chassis, whitemetal for the body and cast brass for a lot of the detail parts. Mechanical bits are a Tenshodo motor, Branchlines gearbox and Romford wheels.
The chassis is designed to offer loads of options. Obviously you can work to the correct 12mm gauge but if you fancy an outside frames 009 model, this is catered for as well. Too well in my mind actually as the frame spacers have to be modified by snapping excess off the sides. Fine, except you then have to file the leftover half-etched metal away too which, if carried out too enthusiastically, will alter their width and therefore the width of the frames.
Racing is dangerous. We've all seen Formula 1 cars flying apart after a little touch with the track side wall or another competitor. It's no less hazardous (OK, perhaps a little bit) in the world of model boats and Club 500 racing.
On Thursday I was testing my newly mended boat on the lake. There was another 500 doing some laps and while we weren't racing properly, we did try and keep pace with each other.
Also afloat was a grey boat of some description. It's owner was pootling around for pleasure but often crossed our paths. Not that this was really a problem - we just steered around or slowed to let him out of the way. This was fine for a few minutes and then during an evasive manoeuvre, I clipped a buoy. Not a full bodied thump, just a glancing blow. Enough to roll my boat over.
For a couple of minutes it stayed upside down and afloat. Too far from the bank of course for reaching with any of the poles available, but at least on the right side of the waters surface. This continued for a while and then the model rolled over. It stopped with a serious list but at least the propeller was submerged. Sadly the electric were dead and any hope of driving to shore was lost.
Then things got worse. The boat rolled forward and sank. Not completely, the back end and spoiler stuck above the surface. I couldn't watch at this point and assuming my model was lost, went and packed up my stuff including a now surplus boat box.
This wasn't the end though. The boat stayed floating like this. Attempts to reach it with poles failed, as did a member with a fishing rod and lure - mind you is was glad when he stopped as those hooks looked a bit big and I was worried he might catch another club member !
Finally Errol, our resident water rat, ignored our suggestions and pushed out the rescue boat to go on a salvage mission. It's not a big boat as you can see, and it had no oars. The idea is that you haul the seafarer from the bank using a rope. This should stop solo use of the boat and hopefully keep people out of trouble.
As it was Errol used his hands as paddles and quickly grabbed the orange casualty. It was full of water and he said it was difficult to get on board. Emptying it out a lot helped, but even when I got it back on the bench I recon to have poured 4 or 5 pints out.
What saved the model (apart from Errol) was the slab of polystyrene under the lid. This kept just enough above the water to trap some air.
The results looks promising. The speed control is fine and the steering servo looks savable. Only the receiver appears to be borked and I'll even withhold judgement on this until it has had a few days to dry out. The motor has been sprayed with WD40 so it might survive - if not replacement is reasonably easy. Once I've done this though, there's a lot more polystyrene going in this hull - and those of the people watching I suspect !
There seems an awful lot of wire under this tiny layout !
In an effort to keep things simple, I've done my best to colour code everything. Red and black wires are for track power. Blue and white change the points and yellow is the common return that completes the point control circuit. These last colours have been the standard scheme on my model railways for a few years - partly because it makes things easier to remember but mostly thanks to three drums of cable in those colours I was given many years ago...
At first glance, this looks complicated but it's really just repeats of the same circuit. Each point has three wires - a common and one for each directions. Track feeds are duplicated so the power goes in at the toe end of each point. There also a bit of wire on the point motors to switch the frog polarity - something you don't need for RTR points.
The electronic dubrey at the bottom of the board with two "tubes" is a capacitor discharge unit. It's job is to take 16V AC and store it up. When the button is pressed to throw the point, the CDU supplies a big jolt of electricity which makes the solenoid action more positive.
Finally the wires are stuck to the board bottom with glued strips of paper. I know you can get proper clips but the board surface is too thin for nails and screws. Self-adhesive clips always fall off the wood after a few months. Gluey paper has lasted for 25 years on one layout so I think I'll stick with it.
Before I start, perhaps I should quickly explain my plan for the panel on Melbridge Parva. If I were a management consultant, you'd have to pay thousands for this bit but since I am a nice person (sometimes) instead, here it is for free.
All of the layouts I've build since I was about 14 have been designed to be operated from the back. The reason is simple - when I exhibit a model railway, the audience is at the front looking at the display and I am at the back, making it all happen. I know there is a fashion at the moment for operating the layout from the front but I don't hold with this for a couple of reasons:
The operator has to sit at the end of the display so he's trying to spot the uncoupling magnets at an oblique angle which is at the very least frustrating and possibly layout smashingly annoying.
They can't help but get in the way of the viewers at some point.
Since space has to be allowed along the front of the model for operator access, and since I'm a chubby chap, this puts the audience further away from the stuff I've built and makes it harder to see.
Occasionally we get people in front of the layout who consider are a stranger to soap and I want to be as far away from them as possible. We don't get extra expenses for olfactory damage !
But the Parva is different. I might want to operate from the back and I might want to sit it on a table and work it from the front. That means the control panel has to be movable. Fortunately a small layout needs a small panel which will fit on to the top of a plastic box from Maplin. The controller can plug in the side of this and all the wires come out in one bundle and attach under the baseboard.
I wouldn't bother with all of this for a larger model, or one intended for use as a "proper" layout rather than an adjunct to a demonstration stand. Then I much prefer to build the unit into the baseboard. It's more reliable and involves less plugs and sockets.
Of course there is still one issue with this plan. Where will I put my mug of tea ?
I have a dirty little secret to own up about. Despite all the blog posts, and an appearance in the Hornby Magazine yearbook (Number 3, still on sale), Melbridge Parva is not as other model railway layouts. There is something lacking. Something that didn't seem that important but will always make it less of a layout than others.
Wiring.
You see, I had a deadline for publication. I was also about to start a new job which was going to munch up my time like I consume chips after a night in the pub. Something had to give and that something was the bits that would make the trains work. The photos were to be static after all so I didn't actually need to make anything move. If I didn't mention it, easy enough when you've been asked to write about constructing the above board stuff, then who would notice ?
But now I face an appearance at Hornby Live in a few weeks and think that part of the display should be the layout in the annual. So I better make it work.
Things aren't so bad. I made the control panel and even the leads that will run to it. I must have been having a good day as these wires are super-flexible silicon covered things, not cheapo stuff. A SCART plug and socket is in the "to do" box of bits along with a DIN plug for the transformer feed (that is where I plug the power in, not sustenance for robots in disguise). The point motors are fitted and the frog polarity switching is in place. I just need to join all this lot up and make it work.
I'm building a garden railway, so what could be more natural than for bits of it to appear in "Garden Rail" ? That's what I thought anyway when I sat down and had a chat with Tag Gorton at the 16mm AGM earlier this year. He seemed interested, especially if I was the sort of person who can't stick to the instructions that come with a kit. That's me, so I submitted a piece to see what would happen.
This month, happen it did. Pages 39 & 40 belong to me !
The process was surprisingly quick considering the specialist nature, and tiny staff, of the magazine. The guest editor was in touch with me a fortnight after I mailed the words off to check a couple of points. These were were quickly sorted out and then I just had to wait, scanning every issue when it arrived in Smiths and even buying a couple because of the interesting content.
My article looks pretty much as I sent it off, which is a compliment, except for the phrase "32 Sovs" when they mean 32 quid. Regular readers of this blog will know "sovs" is not part of my lexicon !
Now, I wonder if I could follow the article on building a propeller powered Zeplin rail car in G gauge...
A few years ago we were happily sailing on the model boat club lake one Sunday morning. A car pulled up and a man got out of it and came to chat. This happens quite often and usually it's just someone from the nearby holiday cottages who is curious to know what we are up to.
They weren't tourists though. It turned out that they were clearing a loft, had found a model boat and wanted to find a home for it. We were interested of course and out of the back of the car came the vessel in question.
A part built Aerokits RAF Fireboat. The big one - 46 inches long.
The work that had been carried out looked nice, although the model was pretty mucky thanks to it's long stay in the loft. Everyone like it, but no one wanted to take the project on. To be fair, this is a big model and not easy to accommodate in the average home. Also, while all the wooden bits were present, none of the fittings were. To get the thing on the water was going to cost money and take a fair bit of effort.The owner was happy to be shot of the boat, it probably freed up a big chunk of loft space, with the knowledge it had found a good home. Or at least he could image it had.
You are probably saying "Stick it on eBay". But that didn't seem fair. We'd been given the boat for free after all. Anyway, people don't really want half built Aerokits, they want upstarted ones in boxes or finished and ready to sail example for about 3 quid. Finally, it would be a hell of a thing to ship what with being fairly fragile and 4 feet long.
So, the boat went in to store again. Until one day when one of our club members, Tom, was showing off the 36 inch version of the kit he had built and explained that he was building the same prototype in lots of sizes, something to do with being given a small model as a kid and loving it. He was on the hunt for the biggest version now.
Knowing Tom would finish the model and do it justice, and not flog it, we immediately offered the boat in store. He was delighted and picked it up from the club stand at the model boat show at the end of last year. We sat it there to show exactly what a "loft find" model looks like. It attracted a lot of interest from people and I think even a couple of enquiries about selling it.
Anyway, fast forward a few months to last Sunday and we saw the boat again. This time finished and in all its glory. Tom has done a fantastic job - the model looks superb. Power comes from a pair of brushless motors, each developing one horsepower of thrust. On the top are a pair of working (squirt and rotate) fire monitors.
On the water, the boat is magnificent. Large Aerokits were intended to be powered by IC engines, electric motors of the day being heavy and feeble, but the modern motors really do the job. In fact for our smallish lake, they are too powerful. Still, all he needs to do is refrain from pushing the left stick all the way forward !
At the end of the day the model has been saved. OK, it's not a valuable old master of unique bit of literature, but someone started building it and now it's finished. They probably saved up for a long while to afford what wasn't a cheap kit. Why they stopped work and deposited it in the loft, we'll never know, but at least the boat is now on the water so the story has a happy ending.
Odd-ball tools fascinate me and so I couldn't resist this one. It came to me at the weekend while digging through a box of second hand tools for sale. I'd already acquired a spoke-shave, for no better reason than I don't own one already, and was looking at a pile of steel rules when Dave shouted at me "You don't want to use those Phil."
Enquiring why, it was explained that they were pattern makers contraction rulers, sometimes called "shrink rules". These are used when producing anything that will be cast in a material, such as whitemetal, that shrinks when it is moulded. So the markings are slightly bigger than they should be. Each scale is marked by the amount of contraction so on the scale above we have scales for 1/40 and 1/30 contraction.
The only material I use that shrinks is polyester resin, and even that is negligible. Thus, this tool isn't actually of any practical use. Maybe I could make models with it that are slightly bigger than they are supposed to be. Never mind, it's another interesting addition to the toolbox.
Anyone else bought an odd-ball tool that they have never used ?
I hate the Coventry ring road. Whoever thought that putting exists and entrances in the same tiny gaps in the surrounding concrete wall of death was obviously playing a practical joke. Or they were a sadist. Or hate the people of Coventry. Whatever, when I go to central Cov, it's the train for me.
On Friday, the train was unusually full of well dressed people, especially women in hats and fascinators (and I do know the difference). Then I remembered hearing something on the news about it being Ladies Day at Royal Ascot. This was a bit of a surprise - I hadn't expected that the sort of people who eye up the royal enclosure with envy would be seen on anything as common as public transport. Not to worry, I found a seat and read my paper.
The trip to Coventry was due to being invited on to the Shane O'Conner breakfast show on BBC CWR. This was my second visit as I'd been on in January to talk toy trains. As requested, I turned up at the studio by 8:30am and was directed to wait in the corridor that also serves as a production area. A mug of super-hot BBC teas was profered and accepted. Might as well get a bit of licence fee back !
The team (both of them) seemed to be co-ordinating some stuff about Ascot. They had a reported with a group of ladies boarding a coach to the races. By the sound of it, they'd hit the champers early and would be in high spirits buy the time they arrived. There were also several attempts to get Suzi Perry to answer her phone to do a planned insert talking fashion'n'stuff. These got a bit frantic, messages were left and not returned. This left a gap in the programme.
I was due on at 7 minutes to 9. The day before this had been quarter too but schedules change. However I was a bit more hopeful that I might get a bit more if they needed more material. As it was about 8:45, Shane came out of the studio, recognised me and I was ushered in.
The results were videoed for your entertainment. I think it went well. The important phone number went out and I made a few jokes. Still look like a prat but it's radio, so who cares ?
The Club 500 racing rules say that all boats must have a number on the top so that laps can be counted.
No matter that I already have the number in massive size on the bow deck. The rules say number on a fin so number on a fin it has to be. The fin was even provided by the top bloke who organises our racing. He must have spent ages making the things. They even came with sticky foam pads on the bottom.
However kind it was to supply the fin, it looked a bit rubbish. Very square. Not at all sporty. And (my fault) the boat didn't fit in the box with it on.
So, the foam was replaced with some Velcro - which the rules do allow. I even put a little bit in the boat box so the number can be stuck in there when not required.
Then I rounded off the top edge. It looked better but I wasn't happy. Staring at it, inspiration struck. If I could cut another curve, I could turn the fin into, a fin. A proper, sexy, sharks fin. One that would scare my opponents out of the lake.
Drawing around the edge of a tin gave me the curve and I thought it looked fab. Then I remembered that we race anti-clockwise. So if I can't fin another number 9 sticker, then the fin will have to be fitted back to front !
This week I've been doing a bit of publicity work for the model boat club. A press release was prepared a couple of weeks ago and then passed to my PR-savvy friend to turn it into something that would have news editors salivating and begging to cover the story:
Issued: 8th June 2011 Hard work pays off for model boat club.
Knightcote Model Boat club, based on Southam, Leamington Spa, will be officially opening its new club house on the 19th June.
This south Warwickshire based group has over 50 members from the Warwickshire area who meet every week. The club is open to all with an interest in things nautical and members can sail electric, steam and sail boats on 1/4 acre lake. Those with a competitive streak can race speedboats while others prefer the relaxation of operating highly detailed scale models.
Chairman David Pledge said “The old clubhouse was starting to leak so we decided it was time for a revamp. Our numbers have increased so much since we built the old club house, it was also time for some more space.”
Now, four months later after 240 paving slabs, 20 tons of road scrapings, 11 tons of sand, over 1000 man hours and a giant crane; the new clubhouse is ready to be opened.
Work started in February with the help of a hired digger and lots of shovels. A crane normally used to move canal boats in and out of the water lifted the new building over a 30 foot high hedge. The old premises haven't been scrapped but are now to be used as storage.
With a limited budget and the environment in mind, the club house and surrounds have been remodelled with a lot of recycled items donated by local builders and friends. This has even meant rescuing some curbstones that have lain in a hedge for more than a decade.
David said “I'm really proud of the work put in by the members. A group of us have been putting in a lot of effort purely for the fun of it. We've had a good laugh, even when wallowing around the in the mud laying paths, but the results are something the entire club can be proud of.”
For more details about the club contact club secretary Derek Nelson on XXXXXXXX
I then sent it off to all the local papers and TV. A couple of hours later a phone call came in from Radio CWR who had received the press release from their colleagues on the telly side. Whilst we weren't going to get on camera, they were keen to send a reported to record a "package" for later broadcast.
I also had a call from the Leamington Observer. They didn't like the photos I'd attached but could they come and take their own ?
Of course they could. So on Monday, Mike, David and I posed with some boats for the man with the camera and an incredible 15mm wide angle lens. The results appeared in the paper yesterday and while the words are excellent, I can't help feeling that I would have picked this picture or this one rather than the shot used.
Anyway, on Wednesday, Russell Joslin from CWR arrived and proceeded to record a load of stuff for editing together. I'm not sure what he made of us initially but like a pro, he quickly worked out a plan and we recorded what to me soudned like lots of good stuff. As part of this, we taught him to sail a boat since that always works well for media types who like that sort of "beginner tried something new with hilarious consequences" shtick. He left having been plied with tea, and then came back again to get a bit more.Then left only to return a few minutes later to say that the presenter had really gone for this and could someone go along to the studio in the morning to do something live for the breakfast show.
46 minutes in - Pre-recorded item with me and David Pledge done at the club.
2 hours 48 minutes in - I took a little boat along to the studio and had a chat. This will appear as a video soon so I'll link and tell a bit more when that happens.
To get an idea of how Foxdale's track will work, we built a test piece. Nothing fancy, just a point with bits of track going off a little way.
I actually want to test the ballasting method with this, but before doing so I've gapped the PCB strip and put some power into it. The single part-built locomotive was dug out of it's box and placed on the rails. Then electricity was supplied and it stuttered forward.
So I reversed the power and it stuttered backward and fell off.
Looking underneath, the linkage for the handbrake wasn't attached to anything and when swung down, caught the rails. A touch of solder tacked this out of the way. While I was under there, the pickups had been made of stupidly thin phosphor bronze wire so they cam off and were replaced with "Phil's standard" stuff.
More testing and another problem appears. The loco won't go around the corner. Isle of Man engines may only be 2-4-0's but the front 2 is a long way out front so the pony has to be sprung. I'd done this with a bit of nickel silver wire which appeared to be too stiff to allow the truck to swing. Replacement with phosphor bronze helped a bit but not a lot. A touch of gauge widening also helped. These are really long-wheelbase locos and we want them to go around tight-ish points.
All this is horribly familiar. When we built Flockburgh there were many sessions of testing when rolling stock seemed allergic to track. In the end we fixed this, let's hope it is easier this time.
I hate masking models for spraying but it is a necessary evil if a decent paint finish is required. Sadly I can't use the sort of masking tape found at autojumbles, markets and car boot sales at 50p for 10 rolls. It's far too coarse and doesn't give a decent edge to the paint line. No, it has to be proper model making masking tape.
For most people this means Tamiya. It is the best masking tape but it's also blooming expensive. For finescale model railways or even toy trains, this isn't too much of a problem. You don't use much even on 7mm scale models.
On the other hand a model boat, even a modest one, can use up several feet of the stuff at a time. I've just masked the waterline and deck of one such vessel and used 6 feet. Which is why I like BETTO tape.
Bought from a model shop that has long since closed down, it gives a nice clean line, is stretchy when required, comes in lots of widths and is reasonably priced. Or at least it would be if I could find any more.
Can anyone suggest a supplier ? Google isn't much help with an insistence of trying to palm me off with Betamax video tape. Any suggestions gratefully received.
When I was a kid, school wasn't very far away so I used to come home for lunch. While eating my food I'd watch TV and most of the time it was the commercial channel. The only thing I really remember about it were the adverts for products by Ronco.
I suppose to a young lad, Ronco products looked exciting. For a start they were orange, a colour of the future and no mistake. Then they all seemed to be very clever. The record cleaner would polish up both albums and singles. Better still, the ButtoneerTM attached buttons to your clothes without sewing using some sort of plastic clip.
But the one I always desired more than any other was the Supersaw. This miraculous tool was like a normal saw except that it could cut through bricks and steel as well as boring old wood. It was all the cutting equipment you could need. Better still, the blade folded back into the handle for easy carrying. You could have it in your pocket for those emergency chopping situations.
And now I have one. As per the advert, the handle does fold back on itself. Except that the blade is longer than the cover. That means a rubbery cover for the pointed end. And to unfold it you have to undo a wing nut at the top, wiggle things about a bit and then it will open. I don't recall that from the telly. I'm sure it was a much slicker process when the man in beige slacks did it.
Worst of all, the blade is blunt. Too much cutting through bricks and diamonds or something. Still, at least I have my dream addition to the toolkit. Now, I wonder if I could find a Buttoneer...
Back in March I built an Airfix GMC truck because I wanted to see if the kit was better than the Hasegawa kit. It was but then I was left with an American war lorry. Of course I knew I could find a home for it.
Overlord is a fine layout and one of the features that gets people excited is the large number of military vehicles covering every inch of baseboard. Sadly, there is a bit of an attrition rate amongst even 4mm scale trucks, tanks and cars. They are glued to a plaster road surface and sometimes that glue gives way. This usually happens during setting up or knocking down when the baseboards are being banged around (you didn't think exhibition layouts were treated like fine china did you ?). When they fall off it's not unknown for them to be damaged or even lost. Thus, the board often shows white patches where paint and vehicle have bee removed. Sometimes a solitary wheel or axle remains but not often.
The remains go in a box or tin with the intention of repairs being effected. Most of the time this happens but not always. So a nice new truck was appreciated and promptly placed in a gap in the dockyard clutter. A tank shaped gap I think but at least the plaster scars were hidden by the 6-wheeler.
Oh, and if you like that sort of thing, here's a Jeep I spotted at the same event.
I'm not sure how this came about, but Chris Mead had been asked to take his model railway layout "Overlord" to the British Legion Armed Forces Day celebration that was happening around the corner from where I live. It would have been churlish to refuse to go and help him out with it so I trooped (geddit ?) along to the sports and social club just in time to help him unload it from the van.
The layout was set up in the bar area well ahead of time. Not because we are particularly punctual but because the event didn't start until 11am. While waiting we sipped a NAAFI tea from impressive paper NAAFI beakers. Since it hadn't been used for a while and lives in the less than ideal confines of a garage, there was some nervousness about how well Overlord would work but apart from an electrical problem with one point, all was fine.
One of the things you have to do with this layout that I've not experienced elsewhere is to level up the sea. The front 2ft of the model is home to a large collection of boats. Ironically they sail on German water - the greeny mix comes from the BASF laboratories thanks to a helpful chap at Bremen show a few years ago.
The day went well. Not very busy but lively enough. We seemed to have people all round the layout rather than just out the front. Several even got to have a go at operating, or at least experienced the "interesting" wiring. They moved some trains around thoroughly enjoyed themselves. A couple of the youths involved we of an age when you wouldn't expect them to be interested in anything as uncool as toy trains but they seemed happy enough. Happy enough to help us load up again at the end of the day in the rain anyway.
I quite like doing this sort of show. At "proper" exhibitions, people know how to behave and aren't near;y as interested most of the time. This crowd were seeing serious toy trains for probably the first time and generally seemed to like what they saw, even if it was mostly tanks'n'guns. It probably helps if the operators are happy to chat rather than ignore their audience, but while we might not convert anyone to the hobby but we didn't turn up in grease top hats and make "choo choo" noises either so as to enforce the stereotypes more normally associated with this interest.
And the NAAFI chocolate cake ? Delicious. If an army marched on its stomach, then at least it's full of good cake. I think I'd just offer the enemy some if they stop shooting though, bound to work. Give cake a chance, I say.
Foxdale track building has commenced but if we are going to build model permanent way, we need some rolling stock to try it out with. In my Isle of Man box I've collected several wagon kits and so I grabbed the top one from the pile to stick together. Sometime in the future I'll do a proper blow-by-blow build but for now, here's a few notes on construction:
The Branchlines Isle of Man 3-plank drop-door "H" series goods wagon is supplied moulded in whitemetal with a plastic floor. It comes with wheels and non-working couplings.
I built the model using Zap-a-Gap superglue in a hurry.
First up, the floor has to be trimmed to size. In the instructions this is 24mm by 53mm. That's too short as I discovered when putting the ends on. A couple more mm would be better.
The body assembled easily enough after this - although I made a pigs ear of the corner in the photo. Never mind, I'm sure this is fixable. Underneath the solebars have to be straightened (mine were a bit wavy but the metal is soft enough to tweak) and shortened a touch.
Axlegauards are drilled for bearings and then glued in place. Care must be taken to get the axles parallel and ensure the wagon sits level.
Finally, the door stops. I couldn't find a decent photo that showed them so the parts are in the spares pot at the moment. Once I'm happy they survived to the period I'm modelling - something many of the 3-plank wagons failed to do - I'll fit them.
At the moment the wagon stays unpainted as it's role is to be shoved back and forth over the trackwork. No point in damaging the paintwork by handling it with flux covered fingers after all !
 I've always had a love-hate relationship with gearboxes in model locomotives. On one hand I can't mesh gears for toffee, on the other, making the gearbox work can be a real pain in the backside if the etcher hasn't done their job properly.