A little sequence of photos showing the construction of the final big bits of the Selly Oak walls.
A daily updated blog typed by someone with painty hands, oil under his fingernails and the smell of solder in his nostrils who likes making all sort of models and miniatures. And fixing things.
Wednesday, November 11, 2020
Building more plastic walls
Tuesday, November 10, 2020
Installing the walls
Once cast, the walls "just" needed to be bedded into cement alongside the line. Our track is laid on a bed of breeze blocks so there is enough spare either side of the track to cement too for much of the way, and where there isn't, the ground is compacted enough to allow for foundations.
Keeping the walls far enough away from the rails to avoid being clouted by Ragleth cylinders was achieved with a simple piece of wood Blu-Tacked to a Playmobil wagon. There were two, but one fell off.
Not only did the wagon help with gauging, it could have plastic tubs of cement placed on them and then shoved to my dad who was fitting the walls whilst I mixed muck. Around the back of our oval, it's a bit tight between plants and this turned out to be the easiest way to deliver materials.
This work wasn't fun, but hopefully, combined with the rail clamps, the line in this difficult to get at spot won't need much attention once the ballast goes in. Come spring, the plants will soften the edges a bit and it will look nice and tidy.
Monday, November 09, 2020
Casting walls for the garden railway
It's always been the plan for our garden railway to surround the track with low walls. These will neaten the edges, keep plants back a bit and stop the ballast running everywhere. The trouble, low wall sections are difficult to come by.
I found a couple of examples, one from a supplier who promptly disappeared, and another in a bundle of heavy concrete pieces under a second hand stall.
After lugging the later home, I set about trying to track the maker down. The walls were perfect, we just needed lots more. Sadly, when I did, they had also stopped making them.
However, they did agree that I could make some copies. For my own use, but enough to do the job required.
So, we bought some Gelflex Blue, made a simple set of wooden walls, heated the gel up on the hob in a cheap pan bought for the job, and made a mould.
The first lesson is that you need more gel than you think, but once it has cooled, the resulting mould works really well.
My dad set himself up in the greenhouse over the summer and every morning, made a concrete mix up and cast another section. The following morning, he'd turn out the previous section, mix another and repeat. For over a month.
We cast in excess of 40 wall piece from the mould and it's still going strong. Occasionally, some release was sprayed in but mostly we didn't worry too much about looking after it. The gel can be re-melted to make a new mould, but we didn't need to do that.
After a few days, the correct mix of water and concrete was established and we got better at turning out walls without breaking. As it happens, some short versions would be useful, but mostly they came out whole.
Sunday, November 08, 2020
Douglas signal box
This is the signal box at Douglas station in 1993. It's not there now.
That's because it was moved several feet forward when the station was remodelled and the carriage sheds behind the box replaced with a bus depot.
The box doesn't work any more, but at least it can still be enjoyed. And they've put the steps back.
Saturday, November 07, 2020
Saturday Film Club: Minecraft Big Boy
I don't really understand Minecraft. It's a sort of virtual Lego. If I was a kid, I suspect I'd be madly into it like many others.
Anyway, you don't have to understand it to enjoy this video of a virtual "Big Boy" steam loco running through a landscape. It's the details like the spotters and shadows around the station that impress me. There's certainly a lot of work in here, even if it is all mouse'n'keyboard rather then at the workbench.
Friday, November 06, 2020
It's back! Virtual Show II is this weekend
It's time for our second Virtual Model Railway Exhibition - I've been hard at work interviewing people and editing videos for the show.
Last time, we brought you masses of interesting content, and the plans tell me that there will be more of the same. The biggest problem will be finding time to fit it all in!
So, since we are all supposed to be hiding in cupboards, you'll have plenty of time for us to entertain you.
Thursday, November 05, 2020
Railcar build, canals and dirty diesels in BRM
The kit was reintroduced a couple of years ago by Branchlines and South Eastern Finecast, which gave me a good excuse to turn it into a magazine project. Single-car trains are always popular with modellers and in theory, a whitemetal kit with a RTR power unit should be perfect for the newbie.
Spotting a prototype piece on canals in the plan, I said, "I'm building a canal, why don't I do the modelling content?" Well, it never hurts to volunteer for jobs you are going to do already, does it?
And finally, on the BRMTV, I weather an N gauge diesel using simple methods.
More details of the December 2020 issue over on RMweb.
Wednesday, November 04, 2020
The big baseboard cut
Time for a job that I've been putting off. Cutting the excess baseboard away.
On the left hand side of Selly Oak, there should be a massive factory. It's not there now, I can't find much in the way of photos and even if I could, modelling the thing would take forever.
So, the plan is to trim the board back so it's a two foot wide at the end, which will allow any extension boards to just feature the embankment the line runs on to.
I had initially thought jigsaw for this, but that is dusty, so the work really needs to be done outside. And it was raining. Also, jigsaws are great for intricate cuts, hence the name, but a bit rubbish for straight lines.
So, out came the big fine-cut saw and I summoned up the courage to have a go.
With a but of care, I managed to confine the bulk of the cutting to the top surface, which was then peeled away, leaving the supports. These were then marked with a square and cut as neatly as I could.
A fresh piece of 6mm ply was nailed and glued in place and then trimmed back. The result looks quite tidy.
I'd like to do something with the corner between the two boards, but I have kept the old corner to experiment with. For the moment, I need to make progress on the scenery.
Tuesday, November 03, 2020
Servicing a 45mm gauge USA Trains point
Monday, November 02, 2020
Spooky goings on
Inspired by a window of Danish tat shop Flying Tiger, I decided that Garden Rail should have a couple of spooky images for Halloween.
A giant pumpkin loaded on a flat wagon seemed like a good plan , especially as such a plastic vegetable could be bought for a couple of quid.
It turns out that spending the money was the easy bit. While the pumpkin included a light, this only stayed on for a few seconds. And made a noise.
The solution was a real tea-light candle Blu-Tacked inside, not too near the plastic. As you can see, during the 15 second exposure, the "rope" holding it in place got a bit singed, but nothing caught fire.
With the pumpkin lit up, I needed a loco and a driver. An LGB 04-0 would do, and I wedged a posable rubber skeleton into the cap, also from FT.
On the track, I tried a few shots. Purely by accident, I hit upon the idea of illuminating the scene with a wave of an LED torch for a few seconds while the shutter was open. This worked really well, the blueish light looking just like moonlight and allowing you to see the models a bit better while leaving shadows that I could darken on the computer.
A lot of work for one silly image, but it's things like this that make my job fun.
Sunday, November 01, 2020
The best time to plant a tree is...
They say the best time to plant a tree is 20 years ago. The second best time is right now.
My horse chestnut, planted well over a decade ago, has produced a nice crop of conkers. The question is, what to do with them?
Well, there is a sports field near me which has a large copse area at one end. Most of the trees in there seem to be self-set, so I borrowed a dibber from the greenhouse and decided to add my conkers to see if some of them would flourish.
I picked clear areas away from the paths to give then the best chance. Don't know if anything will happen, but just maybe we'll have a few more trees in the future.
Saturday, October 31, 2020
Saturday Podcast Club: The BRM team argue over their favourite layouts
To promote the Virtual Show on 7/8 November, the entire team has linked up remotely to talk about the event, "discuss" our favourite layouts and take the mickey out of Howard.
I enjoyed making this and I think the in-team banter comes across really well. Our hobby is supposed to be fun and we wanted this to come across in the podcast. I'd be interested to know what you think - should there be more in the future?
Friday, October 30, 2020
Santaland G scale Christmas wagon
It's made of really cheap plastic, horribly tack, and the moment I saw it on eBay, I knew I wanted one.
As far as I can tell, the Santaland range of festive trains are an American thing like all the other plasticy train sets you find in cheap shops at Christmas. At least this is proper 45mm gauge so will work on the garden railway.
The exciting bit is that the elves (gnomes?) rock back and forth as the wagon moves along, apparently sawing the log between them. The mechanism is driven from one of the inner wheels on the bogie. To aid this, the wheelset is fitted with a traction tyre.
I'm assuming the 1997 on the side indicates there were new wagons every year. Digging further, there are at least two other versions of this wagon, along with a steam loco and caboose. Since I had to import this from the other side of the Atlantic, and paid several times the original $9.99 price, I won't be building a train up in a hurry.
Unless Santa brings me some of course - I have been a good boy!
Thursday, October 29, 2020
Rusty bridge sides
I don't know what the bridge sides would have looked like at Selly Oak in the 1970s, but rusty seems a reasonable bet.
Red oxide car primer is a good base colour for this work and will show up anything too horrible with the modelling.
After that, I opened up the Lifecolor Dust and Rust pack of paints and splodged the three darkest colours randomly everywhere. The paint was thinned a little by dipping my brush into some water every so often so the colours blended. It also makes the paint go further, 'cos this stuff isn't cheap.
One fully dry, I'll admit to being really pleased with the effect and I was tempted to stop there, but decided the bridge would probably have been painted, but that paint would be peeling off.
So, out came the hair spray, giving everything a good, thick coat. That was dried with a hair dryer and a coat of grey spray primer applied.
Next, the grey was scrubbed with a toothbrush and plenty of water. Sometimes the paint stuck well, in other places it gave way to reveal the rust. I think it's looking pretty good, you just have to be very violent with your carefully built model - that's the hardest thing!
Wednesday, October 28, 2020
Canal bridge sides
The massive canal bridge is another exercise in repeated modelling. The basic concept is a curved top slab for the side, but the ribs are numerous and need to look the same. I used a similar method as on the road bridge, although it's simplified a bit as no-one is looking at the canal in the same way.
This diagram might be a little crude, but it should help to explain. The numbers indicate the order the parts are assembled.
1 - Bridge side. 1mm plastic.
2 - Bottom plate. This sticks out both sides of the side and is 8mm wide.
3 - Vertial rib back. 3mm wide 0.5mm thick plastic.
4 - Diagonal brace. Basically a square of the same stuff as the rib. Yes, I know the rib should carry on all the way down to the bottom plate, but it's quicker this way and I don't think anyone will notice.
5 - More 0.5mm plastic for the rib. It's cut off at around 45 degrees at the bottom.
The key to making the ribs is plenty of solvent and smooshing the parts together so the molten plastic fills any unwanted gaps and hides less then perfect part fits. Where possible, such as at the top of each rib, I cut overlong and trim back once the glue has dried. There's less measuring that way, yet you can be confident they will be right.
Tuesday, October 27, 2020
The great Selly Oak canal near-disaster
In model form, the Selly Oak canal is filled with Woodland Scenics "Deep Pour" resin. It's excellent stuff, but you really do need to keep it in the canal.
I did my best. The ends were dammed with plastic and gaffer tape. The baseboard joint had a thin strip of plastic stuck in it. I'd filled all the gaps underneath.
But the stupid stuff still seeped out. I spotted a small puddle but it was too late. The layout has stuck itself to the MDF worktop. And, I realised, the boards had stuck together.
I did not sleep well that night.
In the morning, it was time for drastic measures. A couple of wallpaper scrapers were sharpened and slid under the board. This helped a bit, but the boards still didn't move.
Desperate times demand desperate measures. Out came a chisel which was hammers under the boards. Eventually, they moved. Phew.
Next, the chisel was "gently" hammers in between the two boards. Three goes later, these also came apart.
As you can see, the results aren't pretty, but it proves these White Rose baseboards are tough.
At least the canal looks fantastic.
Monday, October 26, 2020
Watch straps
I like watches.Wearing one for many years, my wrist feels odd without one. Truth is, my collection of pretty cheap* watches is huge and some of them actually work.
In recent months, the need to know the time has pretty much evaporated so my day-to-day watch was attached to a pretty unhappy strap when I recently had a chance to put it back on. The leather had dried up, the loops for the strap had broken and it was in a poor way. I know it went with me to Australia 7 years ago, so I suppose that's probably not too bad.
I'd also bought a new watch with a nice looking face recently. When I bought it, I felt a green strap would suit it better and as it turns out, the supplied one feels like it's made of cork and has a cheap and rubbish catch. Amazingly, it's the right length - I always need long straps - so I'll stick it in a drawer as a spare.
So, over to eBay for some shopping. For under a tenner I picked up replacements and when they arrived, spent a happy few minutes changing them over. A pair of pointy tweezers compresses the bars through the strap nicely and the results look like much more work than they really are. It's one of those simple and satisfying jobs that we all need at times like this.
*I like watches but can't get my head around something costing hundred of pounds. You can't do DIY wearing one of those can you?
Sunday, October 25, 2020
My top 5 tools
A few weeks ago, James Hilton posted about his favourite tools. Well, I thought I'd do the same, but used the idea as a chance to experiment with some video. Enjoy!
Saturday, October 24, 2020
Saturday Podcast Club: Kids Making Kits (with Maggie Gravett)
Not a video this week. Sit back and enjoy a Railway Mania podcast with Maggie Gravett talking about how she runs the kids making kits area at Warley and York.
Friday, October 23, 2020
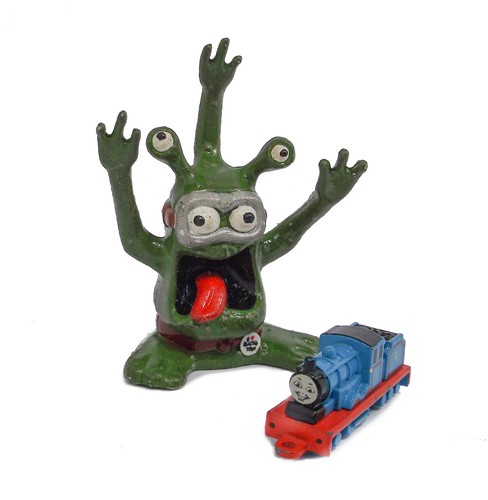
Layout mascots
Digging in my stock box last week, I found my layout mascots. These travelled with us to hundreds of shows and occupied the rear corner of our stock display box.
Lots of layouts have mascots - odd things that cart around and display to amuse themselves and confuse the public at exhibitions (remember them?).
The little metal Edward is because he's my favourite Railway Series character, and I have been known to write under the pseudonym "Edward de Blue Engine". I don't remember where he came from, probably a second hand stall.
The monster doesn't have a name, but I dug him up in our garden many years ago. Once the earth was cleaned off him, I decided that rather than adding him to landfill, I'd apply a coat of paint and varnish. That and an "I love Playing Trains" badge.
Come to think of it, he looks like he might be a member of RMweb...
Thursday, October 22, 2020
What goes in a model boat?
James asks:
Years ago I built a static model based on a Glyyn Guest design - I didn't know at the time but the prototype I chose actually worked on the River Welland just a few miles from where I now live.
Anyway, after a gap of 30 years, I'm tempted to have another go at one of his designs. I guess it is nostalgia, and despite being surrounded by dykes I suspect I might never get to sail it.
The design I like is his a US Fleet Tug "Chumash" I've got the plans and the original article from RCBM back in 1990. It is 4" beam, 25" long and he reckoned came out at 2kg displacement.
His recommendation was a 540 motor and a Graupner 2308.35 prop. So if I was building it today what would be the basics I need in terms of RC? I'm presuming a basic esc, a mico servo and a reliable 2.4 ghx rx . I'm presuming any Rx will bind with any 2.4 ghz Tx? and batteries?
I really want something that will be rock solid and simple, and cheap obviously.
Or for a
one off that will hardly get any use should I just buy a cheap
RTR boat/crocodile head and cannibalise it?
My suggestions:
1) Don't go the cheap boat route, you end up with rubbish steering and speed control.
2) I'm using a RadioLink T8FB now (ignore the Planet receiver in the photo above, you can't get these now). You can't bind any transmitter to any receiver, they need to be the same make. RadioLink seem to have the longest life and lots of people use them. Hobby King will do them if you aren't in a hurry, but there are UK suppliers. It seems pretty reliable and the transmitter aerial is robust.
3) You need a speed control (Viper 15A for brushed motors) which is about 20 quid and a servo. Batteries for a Tug, I'd go for a jelly cell since you need weight anyway and they will sail for hours on one charge. Component Shop are good, but others available. If you prefer Ni-Mh's, definitely Component Shop. Very helpful people.
4) Any servo will do the job. There are loads of options but they are all cheap. Again, CS above will sell them and the motor.
Hope this helps. Good luck and let me know how you get on.
Wednesday, October 21, 2020
Brickwork patching
I love working with styrene - it's so forgiving. There aren't many materials that allow you to make invisible joins in so easily.
The design of the South Eastern Finecast arches combined with the way I've used them on Selly Oak lets the end of one arch be visible where I don't want it.
Tuesday, October 20, 2020
Leave the door ajar
I can't remember which magazine it was in, but I remember an amazing, beautiful, model railway layout where the author made the point that he didn't like little people. Instead, he left hints of their existence - a bike leant against a wall and doors slightly ajar. Enough to suggest life without static people.
I'm not against model people (insert traditional note about not using running man figures) but I do appreciate the value of doors that aren't shut properly.
The Selly Oak arches are coming along and I've followed my own advice leaving a door in each arch ajar. Well, except for the one furthest from the camera, but there is a good reason for that which I'll come to another day.
I've also varied the design of the doors so it looks like the scene has evolved over time. It's not difficult to do when scratchbuilding, in fact it makes the job more interesting. I'm easily bored when repeating the same things!
All the above is in plastic sheet. Apart from the bricks, everything is scribed using an Olfa cutter with a few bits of plastic strip for embellishment.
Monday, October 19, 2020
Coal yard and sheep shelter in The Collector
Deadlines.
My life is ruled by deadlines. On a board beside my computer there is a list of magazine deadlines and the projects that I need to complete by them.
It should be a comprehensive list, but sometimes I manage to leave something off and it comes back to bite me.
Which is why a few weeks ago, I found myself turning out two small scenes in double-quick time so the articles could be delivered to the Hornby Collectors club for their Autumn 2020 magazine.
The problem with being up against it for time when you are making things is that paint and glue don't realise you need them to dry FAST and so there needs to be some clever juggling to keep work going while something else dries.
Handy hint: Hair lacquer sticks loads of stuff and yet dries very, very fast.
The first scene is a rural one.
I'd been asked to demo the Skale Scenics range and so we have their grass, flock and this rather nice ready to plant oak tree. The hut is an old Hornby model and the sheep and shepherd are from the range as well.
After that, we have a competition launch model.
For the 100th birthday of the company, we've launched the 100mm challenge, you can read the full details in the magazine, but the length of track is important...
Sunday, October 18, 2020
Hong Kong tram toys
Yesterdays video made me want to dig my Hong Kong tram souvenirs out of the back of the cupboard and take a photo.
Sadly, there's not much in the way of identification under them apart from the largest which is from "Peak Horse". I suspect it owes something to the HO scale Bachmann model. Which reminds me, I'm sure I have a motorised one of those somewhere...
Saturday, October 17, 2020
Saturday Film Club: Ding Dings in Hong Kong
I still remember my visit to Hong Kong a few years ago. Technically a stop-over on the way to Australia, it was amazing.
On the second visit, I managed to get myself on the ferry to see the traditional trams, nicknamed "Ding-Dings", running on Hong Kong island. I'll never get the chance to ride a double-deck car through busy city streets. Crich is nice, but you are in the country, something a bit alien to trams in their heyday.
Anyway, this video really sums up the experience. Watching the start of it, I could taste the city. The place has a gritty, metallic taste that I haven't experience anywhere else. Watching the video brought it straight back to me.
Friday, October 16, 2020
ANOTHER pair of glasses
Remember when I said I had three pairs of glasses?
Well, now I have four*.
For a while, I've been concerned that for real close-up work, I have been taking my specs off so I could focus properly. I don't like doing this as I still feel they offer more protect to my eyes than no glasses but the reading glasses wouldn't cut it. Clipping some magnifiers on the front helped a lot, but I'm not entirely comfortable with them.
Since I was due an eye test, I took the chance to have a chat and see what could be done. My main prescriptions hadn't changed significantly, so we did the reading test at closer range than normal.
The result is another pair that appear to do the job. I can focus closer, although as any glasses-wearer knows, it's taking a bit of time to get used to them.
Next stop, an optiviser...
*Actually, five as I have prescription sunglasses too.
Thursday, October 15, 2020
Garden Rail - November 2020
Some models are too big to fit in a single issue of a magazine. The Vale of the White Horse Railways is an impressive project that looks great, but needs space to cover all aspects so we start this month with a general overview before taking a closer look at specific aspects in the next two magazines.
We've also got Tag Gorton making some pretty significant modifications to an Accucraft steam loco, a couple of "lockdown projects" and an manor house with an amazing secret.
Should you need an observation car for your line, we can help with that too.
Full contents listing and link to buy over on RMweb.
Wednesday, October 14, 2020
Developing the repeatable Part 2 - The arches
Now for the REAL challenge - the viaduct the railway runs along the top of. Unlike the road, these will be at least visible and people might even look closely.
Unlike the prototype, I have to contend with baseboard joints and using existing arches rather than starting from scratch on a cleared site. I don't want a break in the middle of an arch for a start, it will look more natural between arches and I can invent a drainpipe to distract the eye. The model is modified to fit the boards as it is, so I feel justified in taking a few liberties with the design.
I think this is recognisable from the prototype if slightly simplified. The 5 rows of bricks on top of the stone line are toped with a 45 degree angled brick that would be difficult to model neatly for a start. As I said yesterday, keep it neat and no-one will (hopefully) spot the cheat. If they do, tough.
I'm filling in the arches with workshops as I think that's how they were, and more importantly, working out what to do under there if I don't fill them in makes my head hurt.
To make matters more interesting, I'm modelling both sides of the viaduct. This test is the rear version. I think we'll want to take photos from this side occasionally, so no skimping for me here!
Tuesday, October 13, 2020
Developing the repeatable Part 1 - Roadside walls
There are a lot of brick walls on Selly Oak so it's important that they not only look right, but I can produce them in a sensible time frame AND that they all look consistent.
In fact, consistency is the most important thing as far as I am concerned. You aren't going to look at these walls, if they are done properly.
For the road, where there is very little to go on as it's all been modernised, I've adopted a pretty simple version with 2mm thick plastic covered with Slater's embossed Plastikard. Pillars are another layer of 2mm wrapped in more embossed brick. I'm being good and covering the sides as well as the wider faces.
Decoration is limited to a strip of bricks. Another easy to apply detail.
Colour is grey. I'm not 100% sure about this, but the few original remaining bricks on the canal bridge are grey and the colour suits the model in what Jason calls my "creative vision".
The important thing is, I can churn this stuff out by the mile and make modified sections reasonably easily. Then everyone can ignore it on the finished model. Such is life.
Monday, October 12, 2020
Using scalemodelscenery Old Wooden Fencing
Selly Oak in the 1970s was a bit scruffy and the area beside the canal was a prime example of this. Modelling scruffy can be time consuming and right now, time isn't something I'm over-supplied with. I need quick and effective solutions and when I spotted ScaleModelScenery's wooden fencing online, I guessed I'd found one.
The kit arrives laser-cut in what I think is called "Laserboard", basically a very high qaulity cardboard about 1mm think. Each fence panel is made up of a front with the planks and the framing for the back. Assembly is simple - stick on to the other. The five lengths make up 72cm of fencing, nearly enough for the full run along the canal on my model.
Although the fence has scruffy built in, I felt that a few planks replaced with corrugated iron sheets would only enhance run-down look so chopped a few out before fitting them to the framing. Some South-Eastern Finecast corrugated sheets were then fitted in their place.
Even allowing for this modification, building the fence took less than half an hour, or one episode of Only Connect. It helps I'm too dumb to answer any of the questions in the first three rounds so can concentrate on some modelling.
Painting is nearly as quick. I start with a blast of Railmatch track colour spray to get everything nice and brown. After that, some washes from the Lifecolor "Weathered Wood" set of acrylic paints.
I washed over some planks more than once so the colours (should that be colors?) blended together, in a haphazard way.
The corrugated panels were washed with paint from the Lifecolor "Rust Wizard" set, which didn't seem to stick very well, but the pooling effect looks quite nice to me so I'll enjoy the happy accident.
Planted into 1.5mm diameter holes, the fence was errected along the canal in time for me to take the final photos for a magazine article. Once I'm ready to glue it in place, I'll add a bit of grass and weed along the base for a properly unkempt appearance.
I really like this stuff and have ordered some more packs for the other side of the canal and also beside the road as I found a photo showing wooden fencing for one section, it will make a change from brickwork.
Old Wooden Fencing from scalemodelscenery
(Just for clarity, I bought the fencing for the project with real money but the Lifecolor paints were left over from some review samples supplied a few years ago.)
Sunday, October 11, 2020
I can't draw - and I know why
As a bit of light relief from all the stuff in the world, I thought I'd take part in Inktober. The rules are that you take the title for each day, draw something based on it and then post the result online.
The idea of being able to draw has always appealed to me. I filled many sketchpads when I was young, and as you can tell from my profile picture, I fancy myself as a bit of a cartoonist.
Needless to say, the reality hit me quickly - I'm not nearly as good as I wish I was. Lack of skill, time and a couple of bad days saw me give up in under a week.
There is a good reason for this, and it's amply explained in this video by illustrator Shoo Rayner - I don't practise enough. If you want to become good at anything, you can't skip the dull practise, trial and error.
"What has this to do with modelmaking?" I hear you ask.
Simple. I am not bad at making things and that's because I do a lot of it. All that practise means when I work in Plastikard, I know how the material will behave. Using solvent allows me to joins parts by shoving them together with just enough force. When things go wrong, I have the experience (sometimes) to bodge my way out.
Those skills took time to develop.
I often read, especially in the finescale model railway world, of people who assemble and read all the correct books. Who buy the right tools. And when they finally decide to build a model, they are convinced it will be as great as any of those they have read about in magazines. How can it fail, after all, they have accumulated the knowledge.
It won't work like that as knowing what to do is one thing, actually putting that knowledge into practise is completely different. Glue won't set. Solder won't flow. Paint will flow too well. You'll file too much off something, or bend it wrong. That a chassis jig will help, but it won't build the thing for you.
That's why, like Shoo, I encourage people to get their hands dirty and do some modelling. The quicker you start, the quicker you'll find out what you are good at, and where you need extra practise. Start small and work up to the dream project or end up disheartened and abandoning the whole thing.
Me - I'm going to find some old editions of Buster comic, the one I had as a child and whose cartoon style I emulated with my face picture. With more study and more practise, maybe next year I'll get all the way through Inktober.
In the meantime, if you want to see someone who can draw - follow @tabletop_mog on Instagram.
Saturday, October 10, 2020
Saturday Film Club: Fly drive in the 1960s
With summer now behind us, let's load the VW Beetle on an aeroplane and head off the continent to enjoy a bit of sunshine and swimming in this old cine film.
Friday, October 09, 2020
The most satisfying job of the day
A couple of weeks ago, I wasn't having a good day. Every so often, the news really gets me down and I can't concentrate on anything useful for work. Trying to do some modelling, or pretty much anything isn't going to happen, but I was lucky, there was one job that I was confident I could do.
My sister has a shed/studio at her cottage and one of the windows had broken. She had specified a plastic replacement and a sheet was ordered from the same shop I get my baseboard wood from.
I picked this up along with a couple of lengths of quarter-round strip. Oh, and some pin nails as I'd forgotten to pack some. These, and some tools, headed to her place and within 20 minutes, the hole was filled. Quite nice and neatly too.
Oddly, it was a really satisfying job. Not difficult to do, but definitely "a good job done". We all need this sort of task occasionally I'm sure. I know I did.
Thursday, October 08, 2020
A bus UNDER a bridge on a model railway?! This, fire and waterslides in November's BRM
November's BRM sees me tackle the centrepiece of the Selly Oak project - the bridge itself. A complicated structure, it's actually very cheap to make, but took me far more hours than you'd expect for a mag project. I'm pleased with the result however.
There's also a cracking opening image from the 1980s that I managed to arrange. It's not always easy to find contemporary photos that we can use, but this time I really think it adds to the piece on the page.
Since November means Bonfire Night, I'm creating a working fire, complete with Guy Fawkes, using a couple of Tea Lights - one real and one electric. You'll have to read the issue to find out how that works.
Finally, on BRMTV, I take a look at waterslide transfers and try to explain now they work with the use of some props.