
Back in 2012, I was freelanceing for Hornby Magazine and in my "Parkers Guide" column, pushed the envelope a little with some simple scratchbuilding.
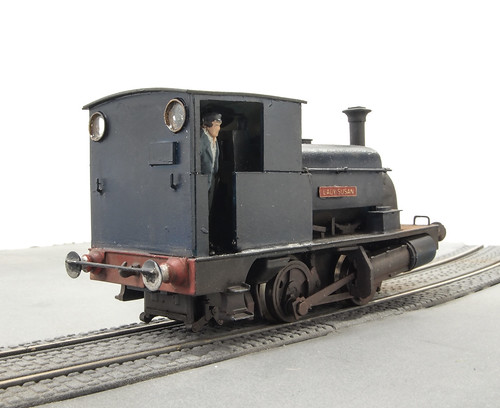
Taking the Dapol (now Hornby) L&Y "Pug" as the basis for a model, I scraped the entire body away and built a new version using Plastikard and a whitemetal chimney. The end result ran as well as a Pug does, which is OK, and looked (IMHO) pretty good.
Best of all, I know the article inspired a couple of people to do the same project, and both were as happy with their locos as I was with mine.
I suppose nowadays, there would be the cry "can you 3D print it to save me some effort" but that defeats the object of the exercise. Nothing here is difficult, you just need to take your time and throw away any bits you cut out that aren't as good as you would like.
5 comments:
Hi Phil you make a really good point about throwing bits that aren't as good as you might like.
In the past I haven't done that, using the excuse, well the real railway wasn't perfect, or the real locomotive would have been bashed around or had a crooked chimney. The result was that stuff I built was not right and I was disappointed. On my new layout I have decided to scrap anything that I wasnt happy with. Whilst building has taken a little longer (only a little), the end result is far superior. The layout runs better and I and overall much happier and enthused. it is a good principle to stick with.
Looks great, Phil.
These really are quite nice little chassis, I remember building several Springside 0-16.5 kits on them back in the 1990s...it's surprising more modellers don't take what can be a fairly inexpensive model and use it as a basis for something their own. You could even (shock, horror) use one as the basis for an early diesel shunter...
I've just converted a Pug to EM the (very) easy way with an Ultrascale conversion set, though I'll probably leave the body as is with a few cosmetic tweaks and possibly an (industrial) repaint.
Something I noticed was that the loco ran a lot better on EM, I suspect because of the decreased amount of slop between the flanges and rails meaning it doesn't waggle its way down the track.
Simon - I build my first Class 01 shunter on one. Right wheel size and wheelbase.
There is a counterview to this.
I can’t use my airbrush as well as I would like, which means I can’t get the results I would be happy with. Trying something again and again with no obvious improvement can mean I end up getting discouraged putting it away for month on end. Loss of modelling mojo.
Sometimes it is best to do as well as you can and finish the project.
Maybe come back to it in the future, or do it again, go on a training course, learn from those who also make mistakes and see how they do things.
To misquote somebody: “If At First You Don’t Succeed, Try, Try Again. Then Quit. There’s No Use Being a Damn Fool About It”
Luke - That's a fair point. Most of my projects get put away part way through so I can come back with fresh eyes. The important bit in your quote though is "Try again". Too many people stop at the first sign of difficulty, which is daft, because we are only talking about toy trains, so it doesn't really matter. #controversial
Post a Comment