Saturday, February 20, 2021

Saturday Film Club: Jumbo Railcar


Spotting this video of the Australian diesel hydraulic 2000/2100 class railcars running from Adelaide to Gawler - and thought "I've done that trip". 

Looking through my Australia photos, I found a couple of shots of these interesting looking vehicles. What I can't remember is if I travelled on them. More head scratching required.

Urban train


Friday, February 19, 2021

Killin Pug

Time for a bit of a flashback - many years ago, I built a model the Killin Pug. (The best web link I can find is the amazing simulator film) for Hornby Magazine. The main build appeared in September 2010 with the chassis the following month. 

At the time, the resin body was a Deans Sidings product, but this is now available from Phoenix Precision Paints. It's intended to fit the Hornby 0-4-0 chassis, but with some extra wheels. 

A better chassis was required and this came from Branchlines - but it was nice to cover both average modeller and high(ish)-fi options. 

The finished model looks a lot like the Hornby Caledonian "Pug", but subtly different. One to run on your layout when you have visitors with sharper eyesight. I notice, searching for back-issues, that one forumite commented "Took me a while to work out the point of the Killin Pug, seemed to be just replacing the Hornby body with a almost identical resin one until I spotted the extra rear wheelset."!

 The kit is one of those that any beginner looking for a bit of variety in their fleet could take on. Nowadays, there is a fine selection of 3D printed models offering the chance to drop a new body on a RTR chassis, and it's a very satisfying thing to do. For me anyway. 


Thursday, February 18, 2021

Rocket train

Rocket on a train
Another random shot I've set up for a work project. This time we have a Hornby Rocket (the 2020 version, I still can't find my Tri-ang model) on a seven vehicle train. 

Amazingly, even though it's sat on stainless steel rails, given juice from a 9V battery, the little 0-2-2 still managed to haul this lot. A little wheel spinning to start, but it goes, and the track is slightly curved too. Very impressive.

Wednesday, February 17, 2021

Yellow, tin house roof


Driving on a work trip to click'n'collect from Tony's Trains in Rugby for a work project last week, I passed an amazing building. With the trees free of leaves, it stood out a mile and only the lack of stopping places prevented me taking a photo. 

Looking every inch like a plastic kit painted by a beginner who choses colours they like rather than realistic ones, the roof is bright yellow, and I mean bright. 

Interestingly, it's a corrugated iron roof too. I'd guess a replacement, possibly for thatch? 

Whatever, this would be an interesting model to include on a layout, but keep a photo handy to prove you haven't made it up!

You can see the building on Google Streetview.

Tuesday, February 16, 2021

Trams in all scales

LNER J70 locomotives in 2,3,4 and 7mm scale 

Set up for some recent filming, I couldn't resist a photo of my collection of LNER "Toby's" in 2, 3, 4 and 7mm scales. 

From the front - whitemetal, etched brass, resin, etched brass. Sadly, I now can't remember the kit makers apart from the O gauge model - Connoisseur Kits. The main lesson to take from this, I think, is that you can't really beat an etched brass kit for crisp modelling!

Monday, February 15, 2021

Class 02 Diesels

02 Diesels in 4 and 4mm scales 

Over the years, I've built quite a lot of Class 02 diesels. The first loco kit I bought was a DJH beginners model. The ready built chassis appealed to me as the £50 price tag was a big chunk of cash to a trainee (and hopeless) accountant earning a pittance. 

I asked my friend Dave Elbourne to look at it during a show and he said it all looked good so I jumped in. 

The resulting model looked great and worked well enough to do a few turns on Scotland Street - something I was very proud of. The photo below shows it working the yard.

Eventually, the whitemetal chassis twisted, probably the reason later kits came with an etched version, and the loco ran like a dog. Then it was stolen and replaced with a Craftsman etched brass kit. 

I think I've built two of these. One was for my bookazine, as I considered it the perfect introduction to the medium. 

Since then, there has been a 3D printed kit which went together well and finally, the O gauge beginners kit from Tower models. This one is so well designed, it can be put together without solder!

Now, the prospect of a RTR model in 4 and 7mm scales is on the horizon from Heljan. People probably won't build 02's any more. Probably not even me. Shame really, but that's progress. 


Sunday, February 14, 2021

Inspiration, or the lack of it.


Is anyone else struggling to keep themselves inspired at the moment? 

I look at the modelling projects in my stash and not one of them leaps out at me crying to be built. Worse, this has been the case for weeks, if not months. 

OK, I have build stuff for work, but I'm not getting as much pleasure out of that as normal. Projects that I'd once looked forward to are done, but with little enthusiasm. Selly Oak has stalled as the delivery date moves into the far future. Fortunately, I've received a couple of positive e-mails about it which have provided a welcome jolt of enthusiasm. 

My writing partner wrote recently that she was bored with everything and I think that's a big part of it. With no end to lockdown on the cards for months, if ever, everything just seems like a trudge. 

I know there are people out there being enthusiastic. Sales of modelling products are up, hugely in some cases. All that knowledge does for me is wonder if I shouldn't clear all my stuff out on eBay while the going is good. Ditch the lot, and take up some other hobby. But what? It's not like there is anything else that interests me either at the moment. 

All my life I have loved making things. Really loved it. Being creative, working with my hands, turning nothing into something. But not any more. 

OK, I can't stop - there is a list of work projects for various publications awaiting attention. I'll not be giving up so maybe some of my previous enthusiasm will return. I hope so. 

In the meantime, if someone finds mu modelling mojo - can I have it back?

Saturday, February 13, 2021

Saturday Film Club: Build a Fairy house from cardboard

A really impressive build - creating a fairy house out of cardboard and lashings of hot glue. 

Recording this video must have taken some effort, and the model itself benefits from the builder's artistic skills.

Friday, February 12, 2021

Bogroll bandits in miniature


I'm a bit late tot he party with these, but tidying up a box from the office, I found some Busch HO scale bogroll bandits - a tribute to the famous toilet paper shortages of 2020. I couldn't resist setting them up for photos.

The models here are 7910 and 7912 - supplied ready painted and assembled, with empty shelves and signs. 

Put them on your layout and you've firmly nailed the sate down, but that might be what you want. 


 I think these will be interesting collectables in years to come. Something to remember the early days of the pandemic by - something that will (hopefully) be a memory.

Thursday, February 11, 2021

Garden Rail March 2021


Transport yourself back to the Exhill Light Railway's last days. John Besley takes us on a tour of his fictitious West Country line where we can enjoy the extreme levels of detail he incorporated into the model.

Detail is also the theme of Eddie Lund's Hunslet tunnelling locomotive build, but then he drives the real thing so should know a bit about it.

How tight can your curves be? We do the maths to see if you stand a chance of fitting the Ffestiniog Dduallt loop in your garden.

And staying in Wales, we review Talyllyn No.1 from Accucraft. 
 

Wednesday, February 10, 2021

Print your own decals (transfers)


When I showed a picture of my Garden Rail Mostyn 7 van, someone asked me where I'd got some GR transfers from. I explained they were a print-your-own waterslide set but couldn't find the details. 

I've used the same stuff for the shipping container, and have tracked down the supplier: 

Expert's Choice decal system. 

I use the clear background version. Simply run them through the inkjet printer, spray with a few coats of satin varnish, leave to dry and then use as normal. Microsol and Microset seem to work on them to make the sheet, which is a bit stiffer then "proper" transfers, bend over lumpy bits of the model. 

They work well for this sort of job, but if I'm honest, the Humbrol varnish makes them slightly yellow, and you need to put them on a white background as of course, the printer doesn't print white. Maybe I could use a different, or just less, varnish.

Basically, if Fox Transfers do something suitable - use that. If not, this will work, but isn't as good.

Tuesday, February 09, 2021

A container full of Garden Rail?


With the wagon, came a shipping container, and well, there was only one colour I could paint it. 

The model is a slot-together laser-cut MDF kit. Nothing exciting here, but the roof is very well supported and that is the sort of job that pre-cut parts make easy. I wouldn't have put this many ribs in if I'd been scratchbuilding, but if the pieces are there, I'm going to use them. 

Laser-etched detail doesn't cut it for me however, so strips of Plastikard were superglued in place and slices of microrod stuck on these. It might be a bit overscale, but my garden railway style is cartoony, so they look the part. I like to think I have over-emphasised the detail for dramatic effect. 

The roof is plastic glued and pinned down because I didn't trust it to stay put. Over this, some tissue paper is fixed with lashings of plastic cement.


Monday, February 08, 2021

Ash Models 16mm scale Lowmac


Spotted on eBay, this Lowmac (OK, that's the BR classification and not really appropriate for this, but I'll stick with it) looked like it might be useful for my railway. Buildable in 32 and 45mm gauges, I have a few ideas for loads that could be strapped to the back - especially for advertising Garden Rail


This kit is supplied laser-cut in MDF with glass-filled nylon wheels and couplings. No instructions were included, but it's hardly rocket science to slot the bits together. 

I'm assuming you are supposed to pick the chassis sides to suit the gauge, but for 32mm, that would leave gaps in the cross members. 

I used both, but chopped the inner ones back. The wheels are a tight fit on their axles, so I'm hoping I can slide them in and out to fit the track. No axleboxes are included and for 32mm, they will be needed to stop the axle sliding to the side. 

Once built, the wagon was treated to a coat of sanding sealer, then a couple of coats of spray primer, sanding between each one. The finish is OK, but not very polished. 

The finishing touch is a set of tie-down rings soldered up from copper wire and fitted into plastic plates. I'm wondering if they should be at 90 degrees to the way I've fitted them, but it's too late now. 

Nice model, easy to assembled and ideal for my purposes. £25 well spent.


Sunday, February 07, 2021

Missing Stafford

Bus 1 - Bristol RE 

With all model railway shows cancelled for the foreseeable future, I've been pondering on which I miss the most. Which has lead me to think about what makes a good show from my personal point of view. 

I'm going to ignore shows I attend purely for work, and by that I mean the Warners events at Ally Pally, Doncaster and Peterborough.  Much as I enjoy each of them a lot, and would probably go to at least one if I were paying to go in, for obvious reasons, my relationship with the event is different. On the same basis, I can't say Warley NEC, even though I've visited Warley shows since they were at the Harry Mitchell Centre. At all these, I'm "performing" all day, I'm not there to enjoy myself, even though I do.

This also counts out Leamington & Warwick shows - especially since I might only see them from the car park. 

I also need to limit myself to the shows as they currently are. No point is dreamily thinking back to Auchtermuchty in 1993, because it has gone. It's in the past. It's also fictitious, but you get my point. I mean I could say Nottingham when it was in the centre of the city and the trip there included my first sighting of a Sprinter train. No time machine, no revisit.

Ultimately, it all comes down to two - York and Stafford. I've been going to both for years. 

But the winner has to be Stafford. It ticks a lot of boxes for me, most importantly, being a day out. 

The journey starts with a bus ride to the station. Then a train to Stafford followed by a vintage bus to the showground. I enjoy all of that. York means a three-hour drive and I prefer travelling by train. I just do. 

On arrival, I head to the cafe to let the first crowds get in while enjoying tea and not standing in the cold.
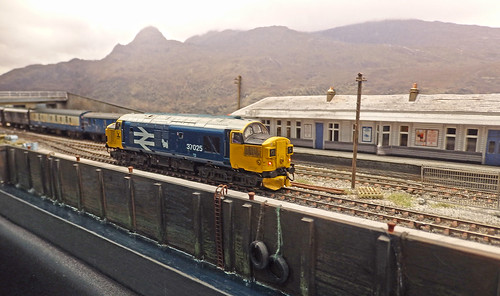

Kyle of Lochalsh 

Once I do make it inside, it's straight to the back of the show for the second-hand stall. I'll never give up the pleasure of a club bring'n'buy and the friendly team here always relieve me of some money. They seem to know to expect me and I'm greeted with a glint in the eye! The addition of a card machine only made this worse, but I don't care. There have been some terrific bargains picked up, things I've been looking for for a while, and junk that I probably shouldn't have purchased, but did anyway. 

After that, it's time to work around the hall looking at layouts and picking up essentials from the trade. I get to chat to people I know, but in a more relaxed way than when I'm "working". There will obviously be a bit of work done - I'm always layout spotting for the magazine as well as picking up gossip. 

Lunch is back to the cafe where something warm is accompanied by some cake. Regular readers will know how important that it. Afterwards, I try to remember to check the timetable for buses back to the station. 

And this is pretty much a standard day. I know what I'm getting into and how it will pan out. Maybe if the train in gets there earlier, I have the chance to nip over and see the aviary in the park next to the station. If it's really early, the hothouse is perfect for a warm-up. Well, the show is in February after all, snow on the ground isn't uncommon!

Maybe York has a nicer venue. The cafe is posher and no-one struggles for mobile phone signals to make card readers work, but Stafford, and shows like this, win for me because I turn the whole day into something special by leaving the car at home. 

Perhaps this stems from my early show visiting days. My dad doesn't drive, so we used to take the train and those trips were special. Mind you, even when we exhibited at shows, the evening involved a look around the town rather than just the nearest pub. I'm a bit rubbish at travelling, but in my own small way, I like to get out and about. I'm really missing that.

Relive some past shows:

Stafford 2020

Stafford 2019

Stafford 2018

Stafford 2017 

Stafford 2016 

Stafford 2015 

Stafford 2014

Stafford 2013

Stafford 2010 

Stafford 2009

Stafford 2008

Saturday, February 06, 2021

Saturday Film Club: Exploring Hellingly Station


An interesting tour of Hellingly Station, now a private house, junction between the "Cuckoo line" and The Hellingly Hospital Railway

With my long term interest in the line, I have been to the station, but it was many years ago and I could do nothing but peer at it. Certainly not bang on the door as ask to look around with a camera.

Friday, February 05, 2021

TMNR Times


Friday posts here tend to be a bit collectory. Well, this isn't something I own, but I'd certainly like to change that.

Between 1963 and 1966, Tri-ang produced a 10 1/4" railway system. Yes, a real ride-on railway. 

Obviously these are very rare, but a surprising number still exist in various stages of repair. If you own one, you really need to join the Tri-ang Minic Narrow gauge Railway society.  

Normally the in-house magazine is just for members, but the latest issue has been made public, and it's well worth a read with interesting articles on the history of the models.  

Read the TMNR Times. 

And if anyone has one of these going begging, let me know. Heaven knows where I'd put it though! 


Thursday, February 04, 2021

Book Review: Unconsidered Trifles by Geoff Kent


Long term blog readers who remember my "Warehouse Wednesday" series of prototype photos that ran here for a few years, will know that I'm a fan of photographing interesting structures with a view to building models of them. 

It seems that I'm not alone - Geoff Kent does the same thing, and has published a book through Wild Swan with many, many fascinating photos. 

Living in a more rural part of the world than me, his are probably more useful for the majority of modellers with all sorts of old huts, signs, fences, memorials and bridges featured. 

Even if you don't plan to model any of this stuff, the A4, 64 page book can be treated as a coffee table publication and enjoyed by anyone interested in looking out of the car window as they travel, spotting interesting things. There's plenty to reminisce about if you are old enough and much useful information on aged street furniture if you aren't. 

All the photos are reproduced large enough to be useful and apart from one, in full colour too. 

Railway nerds will probably whinge there aren't enough shots of signal boxes and stuff - but these are available in lots of books, what Geoff has presented us with is all the other stuff you need for an attractive scene that isn't on your bookshelf in a compact and easy to flick through form. 

At £14.95 (from Titfield Thunderbolt) there's a lot of inspiration in these pages, making it well worth the money in my opinion.

Wednesday, February 03, 2021

Waste ground


In front of the station side road, there is a section of ground with no real purpose. Literally "waste ground", and since this sort of land was quite common in the 1970s, that's exactly what I've decided it will be for now. If I come up with another idea, just like the prototype, it can be redeveloped. 

Several colours and lengths of static grass were laid on the "mud" and once dry, scrubbed away on patches with the toothbrush to reveal the earth colour. I'm quite pleased with the look this gave the model, especially considering how easy it was to do. Like hairspray weathering, the technique seems to produce a natural finish almost automatically. 

After that, it's more Forest in a Box around the corners and a couple of clumps in the middle. A bit of grass and perhaps some smaller undergrowth using scatter over poitin in the future, but for now, I can leave this bit. 

I'm tempted by a burnt out vehicle, but wonder if that's a bit cliche. Dunno. One to consider later.

Tuesday, February 02, 2021

Really thick undergrowth


For the embankment at Selly Oak, I wanted some really thick, scruffy undergrowth. More texture than static grass alone could offer. The sort of horrible, spiky bushes that self-set in ground no-one cares about, forming a thick and impenetrable barrier if you try to walk through them. 

After a little bit of pondering, I decided to use lots and lots of small pieces of "Forest in a Box". Green Scene supplied me with a box marked "S" which contained shot, but dense material. All I had to do was cut it up even smaller, dunk in PVA and press home on the embankment. 

After that, watered down PVA was poured everywhere to ensure the stuff stayed put and then using hair spray and scatter, the bushes were given their leaves. 

What should have been a quick job took more time than expected as the Seafoam needed to be cut into small pieces and quite a few of the less dense stalks were discarded. It looks nice though, in a horrible, wouldn't want to have to retrieve my school cap from there* sort of way. 

Bad primary school memory involving a rose bush.

Monday, February 01, 2021

Mini Airbrush With Compact Compressor test


 I saw it advertised on Facebook. Decided it could be useful and not too expensive, but am I happy?

Sunday, January 31, 2021

Support your local shops!

It's been an odd week on various social media. Three posts on different forums had a common theme that troubles me. 

Example 1 - Someone asks about glue spray for scenic work. I suggest hair lacquer to which they reply "Good idea, I'll check what the missus has and if not head to Amazon."

Example 2 - I've demonstrated a simple continuity test in a video sponsored by Squires Tools. One response, "Thanks Phil, I've always wondered how those work and have no ordered one off Amazon."

Example 3 - A post about a compressor and airbrush uses Amazon links to point readers at the model under consideration.

The common factor is Amazon. Now, I use them myself occasionally, but it seems that the web behemoth has become the default option for a lot of people. While convenient, and possibly cheap if you buy the Prime service anyway, I'd love to see a bit more imagination. 

For example 1, I pointed out that hair spray is available from every supermarket and chemist. Your corner shop will have some and it's going to cost less than two quid a can. Even with free postage, I doubt Amazon can beat that. 

The tester is trickier. I really like Squires, but you have to ring them up - the website isn't very good. Plenty of people prefer to avoid all forms of human contact, clicking being easier than speaking. You are also limited by opening hours too. That said, once you do talk to them, the service has always been excellent and I don't believe you can stop at one tool costing a fiver. I can't anyway. 

For airbrushes, I'd normally recommend Airbrushes.com, especially since we were looking at a Sparmax compressor and Iwata airbrush. More excellent service both before and after sales. Their price is slightly lower too. And Mick Bonwick agreed with me and he knows a lot more about spray painting than I do. 

For lots of people, Amazon or eBay are the go-to destinations for anything and everything. Maybe I'm old-fashioned, but that's a shame. Our hobby has loads of small businesses trying to keep themselves going and offering more than just a buying experience. What do you do if you have a problem or question about your new Amazon purchase? Head to a forum, 'cos you are on your own. 

Partly, this is about cost. Modellers will trade pretty much anything for the chance of a bargain, but as many eBay auctions prove, neither they nor Amazon are always the cheapest, it's just that people think they are and that's enough. 

I'm not sure this is anything other and thinking out loud. I can't change anything. I can't even say I don't use big stores, because I do. The lack of taxpaying send me to local shops where I can, but sometimes convenience wins. Just like I eat McDonalds when I should seek out local cafes. 

All I can say is please support the specialist trade. They need us and I think (I might be wrong), we need them. 

What do you think?

Saturday, January 30, 2021

Saturday Film Club: William Towns designed cars that were ahead of their time.

William Towns was the designer responsible for, among other things, the Aston Martin Lagonda. A car so futuristic, that quite a bit of the amazing technology didn't work when new, and still terrifies car restorers today. 

He was very much ahead of his time. The video shows The Hustler, complete with removable fibreglass body panels so you can "repaint" your car by changing them over. Just like a Smart car today. 

There's also MicroDot - a hybrid powered by batteries but including a tiny engine to charge these up. BMW made some swoopy sports car a few years ago that worked like this, but the MicroDot featured working indicators too.


This film of the MicroDot in action intrigues me. I'm sure it's filmed near Leamington, but I can't work out where. Some of the buildings look familiar, even 40 years after the film was made.

Friday, January 29, 2021

New home for a very old layout required


Tom from the Model Railway Club dropped me a line last week to say they are trying to find a new home for a very old O gauge model railway layout. 

You can read the full details on their website. 

This is a historically interesting project. Power is from an outside third rail - prototypical for Southern electric trains but we are talking steam here. I don't think I've ever seen such a pick-up method in real life, but it used to be very common 60 years ago. 

Sadly, the stock is not part of the sale, but would be available separately. For me, this would be crucial to taking this project on (no, I'm not) as running modern tinplate would take away a lot of the historical interest. That, and you'd have to convert modern centre three rail (yes, you can buy it) to outside rail. 

Mind you, there is a mixed bag of stock. One of the steam locos appears to be a Bowman, so you could let that go and concentrate on the electrical stuff that isn't going to be of great value on the open market. 

The good news is that the model is designed to be split up so you don't need an angle grinder to chop it up. At 4 by 3 metres, it could even be turned into an interesting exhibition layout, if exhibitions ever return. Old trains thrashing around make a serious crowd-pleaser!

I hope the model finds a home. So many of these things end up in a skip, but being a bit different, this ones chances are better than most.

Thursday, January 28, 2021

Woodyard, pylon, coach and gremlins in the March BRM

 There's an awful lot of me in the March 2021 issue of BRM. 

The main project is Selly Oak's timber yard. Six pages of scratchbuilding, kitbashing and general modelling joy. 


Next, I build a 2mm scale Pylon from Severn Models. It's not a difficult kit, and the instructions are excellent, so I cover a lot of bending, soldering and messing with etched brass techniques. 

Over on the review corner, I'm looking at Hornby's new generic pre-grouping coach. 

This was a novelty - the model arrived before Christmas, weeks before it was officially announced. I don't recall this ever happening before. We usually get our paws on products before they appear in the shops, so the mag appearance coincides with this to maximise sales, but before announcement? That's a first. The box had to be kept hidden when I was on a Zoom call with my mates!


A long while ago - in the time before Covid, I photographed the 7mm scale layout Amalgamated Wagon Works. The results are now on the page. It wasn't on the list to shoot, until I saw it at Doncaster 2019 - and then it very definitely was.

Finally, BRMTV

I'm showing you how to diagnose simple electrical problems around a point. To do this, I had to make the point fail - which turned out to be easier said than done. In the end, there was PVA glue used to "break" the point (simulated a typical fault) that I could then repair. Just my luck, I want something to be unreliable and it won't play ball...

More on March 2021 BRM over on RMweb.


Wednesday, January 27, 2021

Tidy up the sides


This is one of those quick jobs that makes much more of a difference than I had expected - covering the sides of the hill with some nice, tidy plywood. 

In our stock of wood is some LitePly about 3mm thick. More expensive than normal ply, it has the advantage of being cutable with a heavy craft knife. Since I wanted the top to follow the contour of the hill, this seemed worth it. Besides, I wasn't looking at big chunks of the stuff - and anyway, there's no point in buying these materials if you keep saving them "for a special job". 

Anyway, the hill had to be trimmed back to allow the ply to be fitted, but I clamped it in place with a wodge of filler behind it and then tidied up the top (yes, I should have cone this before working on the mud) for a neat job. 

It looks stupidly good. Eventually, I'll paint it grey. Matching the colour of the rest of the boards won't happen so a contrast will look a lot better. 

As well as looking good, the ply will protect the polystyrene from knocks as the model is moved around in the future - another win!

Tuesday, January 26, 2021

Building a hill for a model railway

 A quick step-by-step guide showing how I made a hill on the corner of my Selly Oak project. 

The basis of the hill is expanded polystyrene blocks fixed together with PVA glue and then carved to shape. Ideally, you do this with a hot wire cutter, but a less smelly, if considerably messier, method is to use a bread knife. 

To give the hill a hard shell, pieces of plaster impregnated bandage, often sold under the trade name Mod-Roc, are dipped in water and then laid on the hill. By overlapping them and then smearing around the wet plaster with your fingers (another messy job) the whole hill is covered and left to dry overnight. 

I like quite a thick "crust" on my hills and while I could achieve this with extra layers of the plaster bandage, using some DIY store wall filler is cheaper. Apply it with a palette knife or one of these spatulas used for icing cakes. Wet the tool as you work, it makes the filler go on a lot smoother. 

Once the hill is covered to 2-3mm, leave it to dry overnight. 

You might be better at plastering than I am, but generally, the surface needs sanding to get it smooth. 

We're not looking for perfection, just to take the worst lumps and bumps out of the surface. Imagine you are a scale person standing on it and then think about a real hill. They might have the odd crevasse or cliff edge, but generally the land is smooth thanks to years of weather and erosion. 

This is another messy job. Have a vacuum cleaner to hand and use it constantly. You really don't want this stuff in your pointwork. 

 
Unless you are modelling s now scene, your ground needs to be mud coloured. I use emulsion paint to give me a basic shade. If you mixed your own filler for the previous step, it's not a bad idea to put a dollop of it in there, but I cheat with ready-mix for time and mess reasons. 


Finally, it's time for greenery. This is the first coat of static grass. I'm just giving it a base colour as the greenery will be more detailed with extra layers of grass and some scatter to replicate weeds. However, this makes a big change to the look of a layout, so even if the detailing is a way off, it's worth doing to show progress and inspire you to carry on. 

I hope this quick guide has helped. Don't forget if you want to know more, you can always Ask Phil.


Monday, January 25, 2021

Shops'n'steampunk in The Collector


Two new projects of mine appear in the winter 2021 issue of the Hornby Collectors Club house magazine The Collector

It's always interesting and challenging working out what to build for a workshop feature in a publication that you wouldn't think was as popular with people who make things as mainstream magazine. The main criteria is, obviously, that the project is based around a Hornby model. They normally supply the main item I ask for. 

Subject is usually a matter of discussion between me and editor Paul. He's happy to take my ideas, but occasionally chucks something at me - and that's how the first project came about. It's a good idea as he gets to assemble a varied magazine since I can be let lose on something he feels till work for the readership. 

Project number one is a pair of shops. 

Starting with a couple of Skaledale models, I've backdated them to work on a steam age layout. In the main this is getting rid of the white window frames, adding a canopy and most importantly, changing the signage. 

Finding suitable signs is difficult. These came from a Howard Scenics pack which look like they were hand painted. Producing your own is, IMHO, incredibly difficult. Yes, you can print some on the computer, but they always look too modern to my eye. I'm sure a proper graphic designer could do it, but that's not me. 

Project two was my idea. 


I've been keen to have a go at some Steampunk for a while now. Trouble is, while it sounds easy, coming up with a suitable idea is a lot harder, and realising it harder still. 

What we need is something Victorian but with modern hints. I've used the Wills bridge kit for a turntable and powered it with the bits from an Airfix Rocket plastic kit. This, and the engine shed kit, have been radically reworked. 

I'd like to go further with this - and maybe will do one day. I'm pleased with the result though, and all the techniques used are useful to normal modellers too. 

The other highlight in this issue are the models made for the 100mm challenge. Loads of them (I'm obviously wrong about the lack of modellers among the readership) and some really superb modelling from all age groups. Judging by the numbers and quality in the under 16 category, the hobby isn't as poorly as many would like to believe it to be. 

Hornby Collectors Club.


Sunday, January 24, 2021

Video: Hattons Genesis coaches


Another new box of goodies on the workbench for me to play around with. This time it's the pre-production Hattons generic pre-grouping coaches. Sadly, there was some miscommunication and it's the decorated samples that will arrive in February, not the production models. Those are hitting the shops in Q2 2021.

Saturday, January 23, 2021

Saturday Film Club: What's in a 1972 dustcart?


 Thanks to my collegue, Howard Smith, for spotting this. An interesting 10 minute documentary on waste disposal with some terrific 1970s vehicles and even railway interest right at the end. 

I guess the London waste plan must have been state-of-the-art at the time. It's certainly clean enough to have hardly seen any use. Not sure I fancy being a traffic controller there. The days must have been very long...

Friday, January 22, 2021

Getting the needle


My mum has been having a clear-out and decided that she has more knitting needles than she needs. I know this, because the excess were suddenly donated to me. 

Now, I shouldn't look a gift-horse in the mouth, but I'm struggling to work out what I can use them for. Experience tells me that the plastic-coated metal versions are made from a very hard metal that is difficult to cut and doesn't bend well. 

But, I don't like chucking things away if there is a use* So, I ask my blog readers - any suggestions? 

*no, I don't plan to take up knitting.

Thursday, January 21, 2021

Mud, glorious mud


There's quite a lot of scruffy ground on Selly Oak. My normal method of reproducing this involves lots of Wilco "Nutmeg Spice" emulsion, but I wanted to up my game this time, so added "Chocolate dream" and "Earthy Hue" to the palette. 

Mixing the three on the model gives a much better effect - but still too smooth. 

Not to worry, sifting some fine sawdust into the paint does the job. The stuff doesn't sink in, you have to work it with a stiff paintbrush. 


I know there are "proper" modelling paints for this sort of job, but they cost a fortune for the amount I'd needs, and I'm not convinced they are that much better. Maybe if you build a 1/32nd scale tiny diorama, but for a layout where most of it will be covered with undergrowth, stick to the matchpots.

Wednesday, January 20, 2021

Bigger adverts

I've mounted an adverting hoarding on the Selly Oak hill, but looking at photos, the realisation dawned that it wasn't big enough. Looking these things up online, I found this handy guide

Basically, a 48 sheet poster (so called because it's made up of 48 bits of paper) is 20 feet wide, bigger than the Wills hoarding and as large as I could fit in the space. 

Scratchbuilding something suitable in plastic wasn't that hard. I could see half of the prototype in a photo and guessed most of the measurement. There are some billboards near our local station that provided a bit of inspiration. Since they are on a junction, I've spent many hours looking at them while waiting for the lights to change.

The problem came when trying to find a suitable poster. I didn't want anything for a film as this sets the date of the model very precisely. Trying to find anything suitable for the late 1960s to early 1970s though - nightmare! There are a few modern ones around, but nothing for my era. Those I found tended to be portrait too. Oh, and although it might be authentic, no cigarette adverts please.

Two hours later, and thoroughly frustrated, I decided the Internet was rubbish and dug out my copy of Advertising the Beetle 1953-1978 and had a look through. VW advertising of this era was iconic, and since the basic shape of the car didn't change much, it should work for an extended period. 

Sadly, the adverts tended to be magazine ads, but there was something for a local dealer that looked like it might work. Scanning in the image (good for 1968 onwards) and matching the fonts, I mocked an advert up for a local garage. I'm no designer, but the end result looks OK to me. 

Most importantly, it doesn't stand out. I'll use coloured posters under the bridge where there are more hoardings, but this muted version will fade into the background in photos. 

In an effort to make the advert removable, I set a couple of tiny high-power magnets in the supporting posts behind the hoarding. The idea was that I could mount adverts on a piece of tin, and hang them to vary the scene. 

Utter failure. The magnets aren't powerful enough to grab anything. Good idea. Hopeless execution.