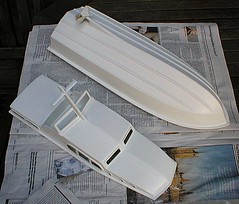
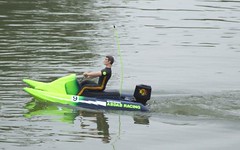
Just for a change I have managed to spray something without a tale of woe.
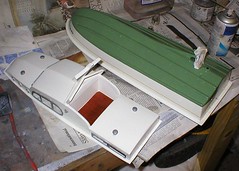
By learning from my mistakes, the launch is gloss varnished with no runs and a pretty good finish. All I did was air brush paint on and then go in with a hair drier set to half speed. Thin coat. Hair drier. Thin coat. Hair drier. Repeat until the tinlet of varnish is empty.
Then put it out on the garden table to harden and fail to notice the rain.
No damage done but next time I’ll remember to but the ‘brolly up !
A daily updated blog typed by someone with painty hands, oil under his fingernails and the smell of solder in his nostrils who likes making all sort of models and miniatures. And fixing things.
Saturday, September 30, 2006
Thursday, September 28, 2006
Who put that there ?
There is a railway modelling truism that when you are fitting point motors to a baseboard, the cross supports underneath will always be in the way of at least one motor. Don’t worry about planning to avoid this, the track plan will magically adjust itself to make your life difficult.
This isn’t supposed to happen with model boats. OK, the fish in the pond will get in the way and can even divert a small fast boat from its path, but generally they are mobile enough to move.
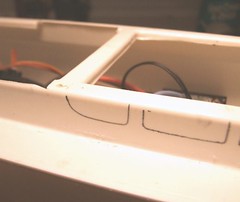
Get inside a boat though and the same problems start. On my launch I had to cut holes in the side for the windows. With that done I want to tidy up the inside a bit where it can be seen. There is a raised area inside to hold the superstructure in place and keep water out – there is probably a technical name for this but I don’t know what it is. This gets in the way of a clear view in.
My plan was to lower it where the windows are. To this end I drew around the inside of each window with my CD marker pen so I knew where to cut. Then I discovered that the crosspiece would have to be cut away as well. Who put that there ?!
So I’ve painted the bits next to the window black. No-one will notice them really…
Tuesday, September 26, 2006
Decking
My boat is white and green and silver. Nicely painted colours but they don’t really grab you. What I need is to paint it red.
This would look stupid however so what I have done is incorporated some redish wood in the construction which is nearly as eye catching, but looks like a proper boat would.
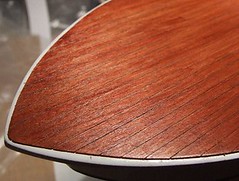
The deck is covered with 1mm thick plywood bought some time ago, probably from a model aircraft shop (they use a lot of that sort of thing) on spec. I made a paper template first as it’s a pretty weird shape and I doubted my chances of getting it right first time. Using the template a deck was cut out of the ply in a single piece.
Plywood doesn’t look much like planks though. Even though most of the model boats fraternity seems to think that drawing some lines on it will make things better, I like to think (stand back, my ego is growing) that I can do things better.
My solutions, developed after several attempts on a bit of scrap wood, involved scribing the plank lines with the back of a scalpel. Then the same blade was dragged sideways down the grove to open it out.
A bit of light sanding made the wood ready for coloured (mahogany) varnish. The first coat looked a bit rubbish so I re-scribed and used a sharp pencil down each line to highlight the line. Another gentle sand in line with the grain and another coat of varnish did the job. You have to be careful that there isn’t dust or air bubbles in the varnish but I managed this by using modelling brush (size 4) to paint the varnish on instead of the proper decorating brush from the first attempt.
Sunday, September 24, 2006
Why is my boat upside down ?
It’s the last round of the Tomkat challenge. My model boat is ready and working. Batteries are charged. I can’t win, but at least I can have a race.
At the lake I do a single lap just to practise. Only one though as I don’t want to run the battery down – need to save all those amps for the race itself.
Heat 1: After a bit of messing around with the wind blowing boats about on the start line, we are off !
The Tomkat surges forward. Half way through the first lap I’m in the lead and running really well. At the end of the lap I’m ahead of everyone else and it looks like nothing can catch me.
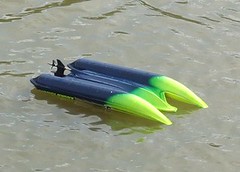
Heading for the second corner I clip one of the other boats which is struggling and at right angles to the flow of traffic. This flips my boat over and the view is the one in the photo.
A quick-ish rescue with the rake and I return to the bench. The good news is the driver is still attached and not swimming with the fishes at the bottom of the pond. I play around with the controls, pour as much water out of the hull as I can and with a change of battery we seem to be working again. Not quick enough to get back in the race but I should be OK for the second heat.
The numbers are called for heat 2 so I check the boat again. Everything is fine. So I wander over to the water and launch gently. Then I try the controls. Nothing. Zitch. Zip. Dead as a Dodo that has been hit by a very large lorry and then run over by a steamroller.
So that is the story of my attempt at the Knightcote Model Boat club Tomkat challenge. About 70 quid spent, 15-20 hours painting and working on the boat. Several sessions fixing drive shafts and motors. All this for one-and-a-bit laps.
Somehow I don’t think I’m cut out for racing.
Saturday, September 23, 2006
Spray away
So here is the plan. Instead of using stickers to put the name on the boat, I will print some waterslide transfers using a transfer making kit. This means I can have a fancy scripty font and possibly some clever graphics as well. Obviously I will have to gloss varnish the hull but this isn’t a problem.
Transfers sit best on gloss paint as it’s smoother than matt. So I need to paint the hull with gloss white. This needs to be sprayed to get the quality of finish.
So today and yesterday evening I have mostly been hating trying to get a good finish with the airbrush. I have learned several things:
Sometimes I wonder why I do this.
Transfers sit best on gloss paint as it’s smoother than matt. So I need to paint the hull with gloss white. This needs to be sprayed to get the quality of finish.
So today and yesterday evening I have mostly been hating trying to get a good finish with the airbrush. I have learned several things:
- Do not use old paint. Even stirring it doesn’t get rid of the skin. This then finds its way into the innards of the airbrush and blocks it up. The stuff is a pig to remove as well.
- Dry the paint as soon as it is on the model. Otherwise you get runs. I have learned this before but keep forgetting.
- Tidying up runs is a nightmare. Lots of sanding and hoping.
- I do not have enough patience to paint with gloss. It takes far too long to dry. Stupid paint.
Sometimes I wonder why I do this.
Friday, September 22, 2006
We are sailing
At last – a proper sail !
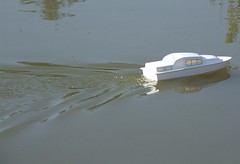
Yes my new model boat has been on the water and moved around under its own steam (OK, electricity) for more than 10 feet without breaking down. It sailed away from the launch area, circled a few buoys and then came back.
Of course things weren’t perfect. If you going to go for a sail it’s a good idea to charge the battery in the boat properly first instead of relying on the charge that has been in it for a couple of months and made a couple of abortive trips around the boating lake. The speed control spots the lack of charge and stops everything. It restarts a few seconds later to give the eager boater the change to get it within sight of the shore but of course I ignored several warnings like this. Still managed to sail back with no assistance from the various retrieval poles stacked against the clubhouse though.
The thing that really pleased me was how the model looked on the water. Previous sailing’s have taken place with just the basic superstructure. Now I’ve knocked holes in the sides for windows it’s looking pretty good. For a kit I was assembling quickly to give an easy-to-carry model, I think I’m now going to own a very handsome boat.
Wednesday, September 20, 2006
Windows
While I wait for the next trip to the lake for testing I might as well get on with the rest of the model boat kit. Next task on the list is to fit the windows.
These come as a series of resin castings. They suffer a little from flash but this is very easily removed with a sharp knife. The sort of job that I’d rather do myself than pay the manufacturer to do for me. This is after all a kit that requires modelling skills, not a plastic kit that can be stuck together by a three-year-old. Not that it is difficult, just that you need to engage your brain before grasping the sharp end of the knife. Always grab the blunt bit kids ! (That was a public service announcement for the terminally dim).
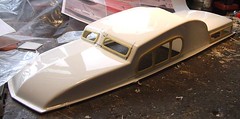
Anyway, the window frames are fitted on the outside of the superstructure. First though you have to cut away the plastic so the windows are open. I marked the holes to cut by holding the frame in place and then running a fine CD marker pen round the inside. These pens came from a pound shop in a CD marking kit – 3 colours, two of each, What a bargain. A special pen is needed because pencils and normal pens won’t mark the very shiny surface of the vac-formed plastic.
The holes were then cut oversize to allow for glazing to be glued in to the back of the frames and flush with the plastic superstructure. Superglue attached the frames and coated my finger tips but it seems to have held.
Only ones I had the funny shaped side windows in place did I notice the nearly imperceptible mark on the surface where I am supposed to put them. I’m not worried, they look OK to me.
Monday, September 18, 2006
Drive shaft
Every time I take my latest boat down to the lake there is a problem with the drive. The model travels about 20 feet and then the neopropaline tube that accts as the coupling between motor and drive shaft slips off. This is annoying and more importantly, embarrassing when it happens in front of other people.
I think that the drive shaft is too thin for the tube. If it were fatter presumably the tube would be stretched and grip properly.
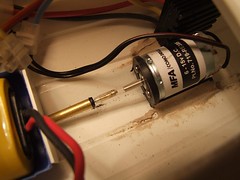
My solution (I hope) was to take a bit of brass tube and ream the inside so the shaft would go inside. Needless to say this wasn’t easy (the simple looking jobs never are) as holding a tube is difficult. I tired pin vices and clamps with varying degrees of success. I don’t own a 1.6mm diameter drill bit either, hence the reaming.
After nearly an hour I had a short tube that would slip over the drive shaft and with the aid of some superglue, stay put.
The neoprop tube seems to fit nice and snugly and certainly looks like it will stay put. I suppose I’ll have to take it out on the water to be sure.
The curse of the camera strikes again by the way. The shaft and motor are lined up a whole lot better than they appear in the picture, although I admit they aren’t perfect.
Saturday, September 16, 2006
Tomkat's ninth life
Hooray – The Tomkat is working again !
Since I still feel rubbish for not making Shipley, I thought I ‘d do one of those jobs I didn’t want to do in way of atonement. Stupid really but I digress. The job was removing all the useful bits from the boat before it made a voyage into the bin.
Pulling it apart I found a loose bolt stuck to the motor but this didn’t look like the problem. Removing it and connecting the terminals to a battery still gave short – or that spark and crack that indicates there is one. I twisted the shaft by hand and tried again. This time there was life.
Sooooo, I reassembled everything and still had no luck. Then I tested to see if there was life from the speed control. According to the meter I connected up the power coming out was reversing even though the voltage didn’t. Good news so far. Still nothing when the motor was connected.
Next I removed the speed control from my new boat and wired it up with the aid of crocodile clips and bits of wire (very useful things croc clips). Everything seemed fine.
The Tomkat control was wired into the new boat (are you following this) and worked. Intermittently. A little experimentation and waggling of wires indicated a loose connection in the plug. At last – a problem I could fix !
So the Tomakt now works with the motor to speed control plug & socket replaced with a chocolate block. A trip to the lake had the boat whizzing around as much as two nearly flat batteries allowed. Enough to show that we might be back in action though.
Fingers crossed, the last round of the competition is next weekend and it would be nice to take part in one leg.
Friday, September 15, 2006
Shipley no show
After all that effort, thanks to transport problems (which aren't even old VW related) Flockburgh won't now be appaering at Shipley because we can't get there.
I feel terrible about this as this leaves the manager with a hole in his show and public who see one less layout than they have paid to see.
I feel terrible about this as this leaves the manager with a hole in his show and public who see one less layout than they have paid to see.
Wednesday, September 13, 2006
Exhibition Box
Flockburgh is due to attend the Shipley show this weekend. Previous postings have covered setting the layout up to make sure everything works. Now it’s time to get the thing packed up and ready for the journey.
Actually, that’s not true. Traditionally I manage to leave most of the packing until the night before and then wish I’d done it earlier. Not this time – because we had the photos taken at the club, which meant moving the model, packing was carried out nearly a week ago.
The last jobs to be done are usually assembling the toolbox and exhibition box.
Toolbox is easy. Open box, chuck the tools I think I might need in and close it again. Re-open, put the forgotten tools in and then close. Repeat three or four time. Ideally the box sits on the bench for a couple of days as I gradually fill it with items that make sense but hopefully will stay inside for the whole show. I don’t like fixing stuff if I can help it, but should the need arise I don’t want the tool two hundred miles away !
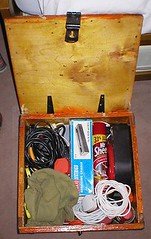
The exhibition box is special. For a start it is a wooden “Hatching Eggs” box I acquired from MAFF when I worked there twelve years ago. Into this I our all the leads, bolts, transformers, controllers, spare tools too big for the toolbox, cloths for cleaning, spare light bulbs and other stuff I think I will need for setting up. It’s a tight squeeze in there but I’ve packed it often enough to know roughly how to fit everything inside.
After the show the packing re-commences. One trick is to leave out the roll up extension lead. This frees enough space for a tired exhibitor to get the contents back in without making too much effort. This lead only goes in on the outward journey so I don’t forget it. I’ve not left it out of the jumble in the car on the way home – yet.
This is the end of exhibitions most model railway modellers never see. It’s not all about playing trains, you have to be a one (OK, two) man band and take everything with you. No one wants to go hunting for a four-way block in a strange town when the shop opens only an hour before the show. So next time you give a layout at a show less than thirty seconds of your time, think of the poor, bleary eyed owner who is wondering quite why he does this…
Tuesday, September 12, 2006
Troubled waters part 2
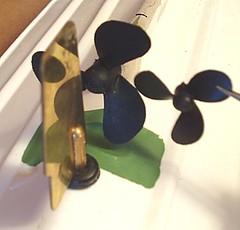
OK, so I have replaced the propeller on my model boat with a much bigger one. It looks like it should shift much more water and therefore to my simple mind the boat should go faster.
You should just be able to see that I had to fit a channel in the hull as the blades needed a bit of clearance. Filing away with a round file gave me the space and the thickness of the plastic hull meant that I had plenty of “meat” to stick some plasticard to. Once the joint hardened a bit of carefully sanding and trimming with a sharp knife made for a neat job. The paint is just to show how effective I’ve been as it’s difficult to see in the raw plasticard.
Back on the water, the boat accelerates a bit more effectively and then stops. The motor still turns but there is no propulsion. Thanks to the other model sailors making waves the boat eventually made its way to the most awkward and muddy part of the back for recovery.
The problem is with the coupling between motor and drive shaft. A bit of neopropaline tube has been used which is fine for small propellers but doesn’t look like it has enough grip on the drive shaft with this much torque.
Monday, September 11, 2006
Merchant Navy - Finished
The title says it all. You are looking at a finished model railway locomotive.
I’m very pleased with it.
I’m very pleased with it.
Sunday, September 10, 2006
Lights, Camera, Action !
Ray Lightfoot from British Railway Modelling spent a couple of hours taking shots from all angles. He admitted afterwards that this had taken longer than he thought as although it looks like a simple little layout when you first see it, look closer and there is a lot more to see than you expect.
All the pictures were taken digitally and then checked on a laptop when the card in the camera was full. For techies the main camera was a 9mp Fuji 9500 and the smaller one a Nikon Coolpix with 5mp. Apparently both will produce an A4 shot suitable for publication but the Fuji with its higher resolution is also suitable for cover pictures. No idea what the difference is but then he is the expert.
My role was to make put locomotives and trains in the appropriate places and suggest some of the shots. And to hold the “sky” (a £4 roll of sky blue cloth from the market) when required. Although the pictures can be digitally manipulated to remove bookshelves and other background, we used the railway club as it gave more working space, a plain blue background makes the job quicker. We also diffused the strong sunlight with the sheet to avid annoying dark shadows.
All this electronic stuff contrasts with the first time I had a layout shot for a mag. That involved a medium format camera and resulted in 10 or 12 photos. All first class and beautifully framed but the photographer must always have been worrying what would happen if none of them came out !
I have no idea when the pictures will appear. Proofs will be supplied in due course and then there is the little matter of some words to accompany them.
Friday, September 08, 2006
Axle Box
Just when I thought I might be finished I remember that the Merchant Navy is missing an axlebox.
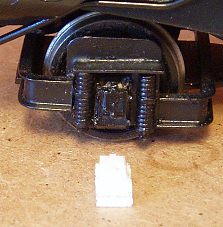
Early in the project I had noticed that the rear pony wheels were more exposed than they should be. At the time I hoped to get a replacement casting from the kit manufacturer so the missing part would be easy to replace. No sign of it though so I had to improvise.
Luckily there was only one missing box and I could use that to base my replacement on. If I had the stuff available a mould would have been taken and a new part cast in polyester resin. As it wasn’t a crude plasticard facsimile was knocked up instead.
As the model is destined to be a layout locomotive and not a glass case example my version will look fine. It’s not far off the quality of the real casting and will certainly past muster as the model rushes past at the head of a train. Even standing still the eye won’t see it – just the whole model. If the wheel was still naked then you’d spot it though !
Wednesday, September 06, 2006
Tail lights
Last job – paint the lights on the back of the Merchant Navy. Despite the model being in 7mm scale, they don’t work (Steam loco people are less keen on this sort of thing than their diesel comrades) being whitemetal castings. A touch of colour on the lens makes them look more like they could work.
Ideally a dark but imperceptibly red paint is required. I find gunmetal looks OK once it has a bit of gloss varnish on it as well. Mind you the camera makes them look matt which is most annoying. Never mind, at least this is another project finished and ready for the rails.
Ideally a dark but imperceptibly red paint is required. I find gunmetal looks OK once it has a bit of gloss varnish on it as well. Mind you the camera makes them look matt which is most annoying. Never mind, at least this is another project finished and ready for the rails.
Tuesday, September 05, 2006
Troubled waters
All model boats have to sail sometime and my new launch is no exception. I decided that I’d get the bare minimum of work done before she hit the water. Hence the propeller and rudder were installed along with the radio control bits – then we headed to the lake.
Actually I did check that she wasn’t going to sink using the bath but this was the proper maiden voyage.
With the transmitter switched on, everything appeared to be working. After placing it in the water a gentle nudge of the throttle sent her on her way. Steering worked OK and I tootled around the lake.
While all appeared well, the top speed was too low for a boat of this type. Not much but enough to mean I need to do something about it. The prop is quite small so a bigger one (if it will fit) seems the obvious move to me. You may gather that I know next to nothing about the complicated maths and mechanics that govern the movement of a boat. Like most people I reason that the biggest prop going round as fast as possible gives the best top speed. To be honest that’s probably all I will ever need to know as I don’t foresee any proper fast electrics or IC boats in my future.
Of course the voyage didn’t entirely go as planned. Once it made it around three quarters of the way to the other side of the pond the steering gave up and the boat just spun around in a small circle.
The only other boat on the water was tiny and not able to shove me to the side. 20 minutes later the wind did the job although a climb down the slippery muddy bank was required to recover it.
The problem was that I hadn’t tightened the linkage to the rudder properly. Next time my muddy shoes will remind me to do this !
Sunday, September 03, 2006
Locomotive crew
All model railway locomotives must have a crew on the footplate. I don’t care whether there are any people on the rest of the model, bare footplates are wrong. Actually bare footplates, bridges and cockpits are wrong but I’m only concerned with railways here.
After a bit (OK, a lot) of digging in the maturing cupboard I extracted this Nu-cast whitemetal crew from a box of O gauge stuff. Just the job to man the Merchant Navy. The cab will cover their shortcomings as neither is exactly the greatest example of the figure sculptors art !
Handily, both figures have pegs on one foot so they can be supported in a big blob of Blu-Tack for painting. I use a mix of greys and grey-blues with off white (Humbrol 147) for the shirts. The flesh colour is Revell as it looks (to me) more natural than the Humbrol equivalent.
Once the basic painting is properly dry, the figure is washed with matt black to highlight the crevasses. This is a really weak mix to give a subtle effect. Since the crew would be pretty grimy from coal dust and general footplate grime the models mustn’t be pristine. All except their boots which are properly shiny thanks to some satin paint.
Saturday, September 02, 2006
Little things please little minds
Allow me to let you into a secret dear reader. This blog isn’t exactly written in real time. That is to say I tend to store up pictures, and therefore postings, so that I have a backlog to work through. Sometimes you get exactly what I’m working on, sometimes it’s a bit out of date. This way you get a reasonably steady supply of posts and I get to have a life without thinking, “If I don’t build something this evening the blog doesn’t get updated”.
So, while I am fixing the damage on Flockburgh, here is something I did a few days ago. In case you are interested, the replacement bargeboards are fixed to the building and I’m fiddling with the computer while I let them dry. A bit of sanding is required and it’s never clever to sand plastic that has Mek-Pak on the surface since it’s not solid enough. There is a better chance of sticking the sandpaper to the plastic than smoothing anything.
But I digress. The subject of this post is a tiny little thing. To be precise a micro servo.
I have plenty of spare standard size servos. More than I thought actually as I found some more in a box of parts intended for another model recently. Therefore when buying the bits for the new boat I didn’t think I needed to buy any more. Then test fitting one in the hull it hit me that I was wrong. The task was like trying to park a caravan in a telephone box. No linkage imaginable however crazy, was going to get control anywhere a standard size servo would fit.
The instructions point out this and suggest a micro servo. I hadn’t actually bothered to read this bit.
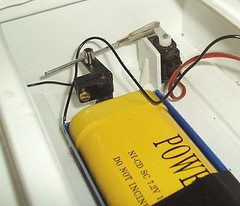
Howes supplied a micro device and a speed control (my spare one of these was too big as well) in a couple of days allowing me to build a little plasticard box from 2mm thick sheet. I had my doubts that something so small, and it really is tiny, would do the job but it does. Just like it’s big brother in fact. For around a quid over the cost of the normal version I can see a few more of these appearing on my bench – well worth the money.
Incidentally, don’t those bits making up the linkage look good. My first boats suffered from bent bits of wire until the discovery that a few quid bought the parts for a proper adjustable engineering job. Just like real model makers would do !
Friday, September 01, 2006
Awaking a layout from its summer slumber
Flockburgh is due out at an exhibition in a couple of weeks. On top of this, next week it will be under the lens of the British Railway Modelling photographer. This weekend is therefore the time to get the layout out and make sure everything is up to scratch.
I hate turning up at a show and trying to fix a fault. Too many people seem to consider sorting out electrical glitches or major track problems to be part of the process of arriving at a show. I prefer to get set up and then clear off to the accommodation or pub. On the day itself people have paid to see trains move and that’s what I want to provide. There will always be occasions when something fails in service but if you start with a working model then some crossed fingers and touched wood ought to mean a trouble free weekend.
First, the good news. After being set up, apart from one sticky point motor that quickly got better, everything worked. No dead spots, or dodgy points. All the locomotives were fine except the Y7 which has always played up. Even that improved after a few minutes pickup tweaking.
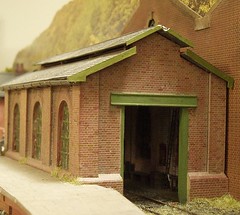
The only problem was some slight damage to the top of the engine shed. A couple of people and the water crane had come loose - nothing a touch of glue won’t solve. If it weren’t for the photographs I’d probably just bodge the shed top with a bit of paint, but the evil eye of the camera means a better repair is called for so this board is sat on the workbench for attention. I’ve already tried to remove the barge board but when the shed was built it was stuck in place properly so a bit of care and a nice sharp blade are called for.
Subscribe to:
Comments (Atom)
