Friday, February 29, 2008

Painting advice


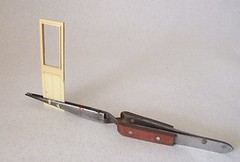
door held in tweezers
Originally uploaded by Phil_Parker.

Andy is the first to have taken advantage of the exciting "Ask Phil" link on the right hand side of this blog. He asks "I hate painting models as I usually ruin them. Have you any hints ?"


Painting's a pretty big subject with several books devoted to it (try this one, although it’s cheaper second hand) but as a general rule I find the most important thing is patience. I’ve ruined more paint jobs by trying to rush things than any other way. Usually I end up trying to hold parts that aren’t properly dry and leaving finger marks.


Enamel paint is good stuff – you can, with practise, feel when it is properly dry. Touch dry paint is soft to the touch. Leave it 24 hours and you can tell it has hardened. When it has you do what you like with it. Until then, leave it alone as a second coat will just cause the first to lift. This isn’t always a bad thing as when weathering you might want to blend the colours.


Another important point is to work out how you plan to hold something covered with wet paint before you need to. I like sprung tweezers for lots of jobs as they will sit and hold things without extra propping. Of course this doesn’t work with boat hulls of other large items !


Locomotive bodies are normally grabbed with a painting handle which is a sort of large flat sprung set of tweezers designed to spring open rather than closed. These are opened out inside the body and grip it. I often clamp them in a vice to support the item while it dries.


Hope this helps !

Wednesday, February 27, 2008

Servo linkage


servo linkage
Originally uploaded by Phil_Parker.
After an hour messing around with various options, I've squeezed a micro servo in at the back of the boat. Engineers will of course be horrified that it's been glued in place but in my defence, it's easily accessible and could be removed by sliding a knife blade in the glue.

You'd think in a boat this size would be easy to find the space for the workings, but all the volume is at the front and not easy to get at. I also need to be able to slide a reasonable size battery without clobbering the mechanicals.

The linkage itself is a brass wire hooked over the rudder end and attached with a proper fixing at the other end. With a small Allen key I can adjust this to trim the boat.

Tuesday, February 26, 2008

Tomsk on-line


tomsk
Originally uploaded by Phil_Parker.
A search on Google for "One man operated tugboat" currently gives the article I wrote about my tugboat Tomsk as the top result.

This was surprise as I didn't realise Model Boats we putting articles like this online. Still, it's nice to know my wittering are out there and not just on this blog.

You can read the article here.

Monday, February 25, 2008

Servo squeeze


servo squeeze
Originally uploaded by Phil_Parker.
Now I'd planned this properly. The tray that holds the battery and servos has a hole in it that allows the body to go through and hold it tight.

What I didn't reckon on was that there isn't enough headroom to rotate the unit to get it in the hole.

Hmmmm.......

Sunday, February 24, 2008

Rigging the boat


rigging
Originally uploaded by Phil_Parker.
Rigging the trawler is an easy job, it’s just that I kept putting it off. This was sensible I thought, because masts and ropes are vulnerable when working. You don't want to whack the mast while working and rip a hole in the deak or snap the dowel.

First up, the mast was, in my opinion, too long. I lopped it off at 18cm. This is a few cm higher than the cabin roof which is more in keeping with the cartoon appearance of the model. I think in hindsight I might have gone for 20cm but I’m not sure and don’t have a spare length to dowel handy.

The rigging is attached with wire loops. They had their tails shortened and then glues inside pre-drilled holes with superglue.

Finally some nylon string I picked up at the last Deans Marine open day was carefully tied in place at each end. I should have looked up a proper knot before starting but forgot, leaving me with some less than ideal fixings. To make sure these stay tied I flooded the knot with superglue.

The final touch was to paint the mast 147/white and ropes pale brown. I’ll run some darker colours over these to mute the colours in line with the rest of the model.

Saturday, February 23, 2008

Model railway advert


Model railway advert
Originally uploaded by fairlightworks.
Ingenious isn't it. This must be one of the few model railways where the plan was not to make it look too authentic. After all you can hardly run with the "Miniature Prices" strapline if people are looking at the picture and thinking, "That's a photo of the real thing".

I wonder how long it will be before someone brings the loco and train out in those colours.

Hat tip: fairlightworks

Friday, February 22, 2008

Airbrushing for idiots


spray stuff
Originally uploaded by Phil_Parker.
Last night I gave a lecture. 35 minutes on "Airbrushing for idiots" to the assembled members of the KMBC.

Some people go to pieces at the though of a bit of public speaking, even to their friends, but I enjoy it. Having the room pay attention to you seems like a good thing to me !

All I did was quickly run through the airbrushing equipment I have, brush, compressors, masks etc. The I worked through the process of the painting itself along with a brief run down of materials.

I should have written some Q-cards to help but thanks to a fraught time at work this week I didn't have the time to get notes together. Still, my off the cuff session went down well and several people claimed to have learn something.

Once I shut up the club members were encouraged to actually handle the equipment. Obviously I wasn't able to let them have a go what with the talk taking place in a public hall and everything, but at least several have had a good look at an airbrush.

Now I admit spray painting isn't for everyone, but a real mystique has grown up around it which puts people off. This is a shame because for a modest investment you can have a useful addition to you model making armoury.

Oh, and if anyone wants a repeat session, get in touch I rather fancy touring the country on speaking tours. I'll even write notes and do at least an hour !

Wednesday, February 20, 2008

Wonky 1361


loco looking wonky
Originally uploaded by Phil_Parker.
With the fishing boat reaching completion I’ve dug out another project in the unfinished pile. As a break from boating it’s back to trains.

The 1361 class had been progressing well with a largely complete chassis that just (just !) needs a body to look the part. I stripped the original K’s whitemetal bits some time ago and they look in good condition.

The missing cab back also turned up. It’s fixing inside the cab for some unknown reason so I’ll have to remove it and put it where it belongs. There was probably a good reason why it ended up where it did. Surely while he was scratchbuilding e new back the builder though, “I wonder why there isn’t a bit for this ? Hmmmm that bit I fixed inside the cab looks very similar to the bit of plasticard I’m cutting out…”

Oh, and the body isn’t nearly as wonky as the photo makes it look. I think that’s something to do with the way I took the picture. Of course it is a Great Western locomotive…

Tuesday, February 19, 2008

Painting brass


navigation light
Originally uploaded by Phil_Parker.
There is a lot of common ground between most model making hobbies. Soldering, cutting, filing – they are all pretty similar whatever you plan to build. The biggest area, IMHO where one hobby can cross-fertilise another is painting.

For years we’ve been told by those in the know, to look at military modellers to learn how to paint figures. Ironically, just as everyone starting doing this and learning the joys of dry-brushing and shading the creases in clothes, the military guys took the effects too far and invented “hyper realism”. This basically seems to be over-emphasising the effect, which might be technically clever but appears, to my eye at least, wrong.

Painting a non-brass item to look like metal is something we all have to do. The firebox on my mineral engine is made of whitemetal but the Victorian builders would have wanted to polish it so I had to try to hide the grey.

The trick, I think, is to paint the item with a metallic brass paint and then, when it’s fully dry, wash a tin coat of black over it all. Besides collecting in the crevices like dirt does on brass if you don’t clean it properly. The black gives the brass a depth that the metal paint alone doesn’t give.

Of course this wouldn’t be a problem if the items were metal in the first place. Except that brass doesn’t look right either in model form. It’s too shiny and needs a coat of satin or mat varnish for best effect – and to save cleaning !

Monday, February 18, 2008

Weathering the hull


hull front
Originally uploaded by Phil_Parker.
This is a job I’ve been putting off. Partly it’s because it means getting out the airbrush, and the garage is cold and unwelcoming at the moment. Mostly it’s because I didn’t want to mess it up and have to repaint the hull.

The obvious thing to do is to take a look at prototype photos and copy them. In this case that doesn’t help as this isn’t a model of a real boat, it’s a 3D cartoon of a trawler. I know who I would like to copy – Peter Barnfield. He paints fantastic pictures that are just like this model. I don’t have a 10th of his skill though so I have to do the best I can.

First stage was as usual to dry-brush the green bits with a lighter version of the base colour. Since this was “snot green” I had to improvise with something suitable from the paint drawer. The base is acrylic but the varnish coat protected it well enough so there was no paint lifting.

Next, the airbrush was fired up and a very weak mix of pale brown and rust sprayed on. I’m not sure you can really see it but at least the thinners helped take the edge off the light green.

As a cartoon this works OK. The colours are muted but still strong. I could probably lay on some more dirt but for the moment I’m happy. This is a working vessel after all, not one headed for the scrapyard.

Sunday, February 17, 2008

Plank racing


air engine
Originally uploaded by Phil_Parker.

Every year the Kinghtcote Model Boat Club holds a competition. A couple of years ago it was Tomkat racing, at which I was hopeless. Then we added Slingshot racing, which I won after a slow start.

This year, it’s plank racing. You can read the (hilarious) details here – go on, the rest of this stuff doesn’t make any sense if you don’t !

Plank racing is more of a “Great Egg Race” style challenge than an out and out racing series and all the better for it. Who needs to hurtle round in circles when ingenuity and model making skills can be brought to bear ?

To my mind there are two parts to the challenge:
Get the plank across the lake.
Hit the target on the other side.

I’ve been pondering on these and have come up with the few options, for the power bit at least.

Option one turned up while browsing in Maplin last weekend. Incidentally, aren’t Maplin shops turning into a nice replacement for the Tandy (Radio Shack for US readers) stores of years ago ? Just what the world needs, a high street store where you can buy a transistor off the shelf…

Anyway, option 1 is an air engine (if you are wondering why I don’t use an electric motor, go back and read the rules, I told you it wouldn’t make sense otherwise) from the Science Museum. It’s meant to blow along a four wheeled chassis loosely described as a car. What you get is the contraption in the photo and a pump. Filling the tank with air and then flicking the propeller gives about 20 seconds of thrust along with a sound very similar to an IC engine.

This is a really impressive bit of kit. I think I can put a boat propeller on in place of the aircraft one – it will be more efficient at driving the plank and the tank capacity need to go up. A large pop bottle was the obvious idea but I think replacing the end of the current one with a long balloon might be better. That way the pressure stays up as the air supply drops.

And just as I start fooling about with this, the BBC reports that someone is making air powered cars. Perhaps I can refit my Type 2 ?

Saturday, February 16, 2008

Thermostat Article repeat

In the VW Camper & Commercial special – “Maintenance & Restoration Guide” – you can read my article on replacing the engine thermostat again. Handy, if you missed my wise words last time !

Friday, February 15, 2008

Testors Landing Ship Tank


LST
Originally uploaded by Phil_Parker.
Normally, I don’t do grey boats but I just fancied having a go at this one. My friend Chris has a similar model on his layout and it’s always fascinated me. The different is, he built in 1:72nd and this Testors “Easy Build” kit is 1:613rd – there is a just a slight different in size ! In fact Chris’s model is the size of a short canoe whereas mine is under 15cm in length. He runs trains into his (they were used to transport rolling stock for French railways during D-day), I’d struggle to get a row of Smarties in mine.

For £2.99 this was a nice impulse purchase and occupied an undemanding half hour one evening when I couldn’t be bothered to do anything useful. The parts are pretty flash free and fit well. The only care required is to get the forward gun turrets level as the bases are angles to allow for the foredeck not being horizontal.

Painting is easy too – a quick spray with Halfords primer and then a wash of Humbrol 69 (appropriately Tank Grey) with just a bit of effort to make sure there we no obvious streaks.

Now I wonder what to do with it. I’ve had the fun and don’t need a tiny model of a giant vessel. Putting radio gear inside would be more than a little challenging. I suppose it would sail nicely on a puddle though.

For more information on the prototype, try this Wikipedia entry.

Wednesday, February 13, 2008

Extrudierte Copolyesterplatten

How’s that for a title ?! Proper science time on the blog !

To be honest I can’t remember how I ended up with a sheet of this stuff. I probably saw it on a trade stand and thought it looked useful or interesting. Quite a few of the materials I have to hand arrive this way. Curiosity makes me want to try new things and sometimes I get lucky finding something new that is a boon to my work.

The material in the photo is a transparent polyethylene terephthalate sheet – it feels like a plastic/Perspex hybrid. From a bit of web searching it appears the stuff is used in building works for clear domes. It’s described as having a “high self cleaning temperature” (whatever that means), high impact strength and a brilliant surface.

From my point of view it’s a 2mm thick clear sheet protected by plastic on both sides. It’s certainly very clear and looks more like a fresh pair of glasses than normal plastic sheet.

Cutting with a knife is nearly as fun as cutting Perspex. The sheet cracks at the end of cut lines fairly easily. It would probably be better cut with a piercing saw, something that should be reasonably easy as it’s not as brittle as Perspex. Filing wasn’t as easy as I’d have expected, you really have to go at it to make an impression.

I used the stuff to glaze my fishing boat. This worked well enough but then I only needed rectangles. I’m not sure if it is better than plastic sheet or the acetate that normally resides in the clear section of most model shop plastic racks.

Tuesday, February 12, 2008

Painting a lifebelt


lifebelt
Originally uploaded by Phil_Parker.
While I might not be sure about my faded wood effect, I’m much happier with my lifebelt painting.

The white is a Humbrol 147/white mix – white but not too white. The red is obviously bright red. Once dry the whole lot was washed over with the thin coat of 121 (Pale Stone) which combined with the slightly dirty turps give a nice warm faded cloth feel to the belt. I worked the wash off the centre of the white sections a bit more than at the ends.

Sunday, February 10, 2008

Electrical pull cord


Electrical pull cord
Originally uploaded by Phil_Parker.
Or “anatomy of a piece of string”.

Who’d have thought that something as simple as a bit of string could be so complicated ? The cord is made up of three strands surrounded by an elastic coating that’s very similar to bungie cord. I suppose this is to reduce the shock loading on the switch itself and reduce mechanism breakages. In this case, the covering has snapped leaving the switch usable but needing a couple of quid and 5 minutes to make things look nice again.

Perhaps I’m the only person in the world who is interested in this – I bet there aren’t any other picture on Flickr of snapped string ! Once there must have been a group of boffins who came up with the idea of course - what else did they invent ?

I took the shot as a test to see if adding a 2dp close up lens to the camera made any difference. I’m not convinced that it matters on a digital as it does on a conventional SLR. The thing that brings you in really close is a set of extension tubes or bellows but the ones I have won’t fit my current camera. Still, it’s worth experimenting, especially now I’ve bought the lens !

Saturday, February 09, 2008

Exhibition paperwork


exhibition paperwork
Originally uploaded by Phil_Parker.
Time to knuckle down and do one of the dull bits associated with appearing at model railway shows – exhibition paperwork.

I’m afraid that while it is very flattering to be invited to take a layout to a show, filling in the forms is less appealing hence I tend to return things slower than I really should. Be honest though, how many people leap upon a form sent through the post with glee ?

Anyway, the forms from shows are all very similar. Exhibition managers want to know the details of the layout, scale, gauge, prototype etc. A bit of blurb for the programme is also requested. Ideally this will include a plan. Sometimes the more upmarket brochures ask for photographs too.

As someone who has run shows before, I know which questions your average manger wants to read the answers to; those relating to money. Expenses, number of operators attending and how many meals you want matter most at this stage. With this information he or she can work out if the show is likely to bankrupt the club.

Working out how much to put down for expenses is a toughie for the newbie exhibitor. Some are so grateful to get to go to a show that they decide to fund the whole thing themselves. Some shows (tramways ones for example) expect this and don’t even offer reimbursement. Years of being on “the circuit” have hardened me though. If you expect me to give up my weekend, travel across the country, sometimes use my annual leave to do this and then spend the days entertaining your paying public, then the least you can do is pay the petrol to get me there.

The trick is to work out a realistic figure. Rule one is: You don’t make a profit. I’ve heard of people doing this to fund the building of the next layout but it’s not on. Model railway clubs aren’t rich, the proceeds of the annual exhibition often make the difference between running the club for another year and not. Building the layout is the responsibility of the modeller, something we do for fun remember.

I have a simple rule. A trip to the AA website gives me a mileage figure for the journey. This is doubled and then a few miles are added for travelling to and from the hotel. Then I divide the result by 18 – because I’m assuming I’m going to use my VW van which gets a terrible MPG. This number is multiplied by 7 (the cost of petrol roughly by the time I do the show – I’m guessing a couple of years into the future) to give a figure that is then rounded up to the nearest fiver. That’s what I put on the sheet.

Now I try to avoid using the Type 2 for shows. It’s slow and can be unreliable. Check back on this blog to see what I mean ! I prefer to borrow my Mum’s Berlingo for the trip. This sips diesel and goes to the moon and back on a picture of a fuel pump.

That allows me to get to the show, work out what it has really cost and claim this instead. The club treasurer always looks happy when you come in under budget. I never come in over budget, hence my high estimate. Of course the high figure could get some of the invites rescinded but I’m in the happy position where this doesn’t worry me. This rarely happens though and when it does, it’s not always a bad thing.

Once an exhibition manager accused me of putting in a “standard fee” when I had worked it out in the normal way. He then claimed the distance was ten miles shorter than it was. Since I’d done the show a couple of years before and had the chase the expenses which were sent on after the event (payment is normally made during the show, which pleases the traders as it often finds its way to their stands) and the cheque had arrived with the wrong name at first, I wasn’t surprised or disappointed not to go. That is a very rare even though.

The rest is easy. I have ready to use blurb sheets, which are also on the web for download. An exhibition diary which states we do 4 or 5 shows maximum a year – hence the booking two years ahead.
Friday, February 08, 2008

Faded wood


faded wood
Originally uploaded by Phil_Parker.
I’m in two minds about this effect. The plan was to simulate weather beaten wood in need of a re-paint.

The base colour was a nice bright red. This was dry-brushed with the same colour mixed with Humbrol 147. When fully dry a weak mix of a muddy brown was washed over it to put some dirt in the joins between the boards.

The result isn’t bad but I feel it’s still missing a little something. Perhaps another feint wash concentrating on the bottom of the wheelhouse to represent the sort of dirt and water that works it’s way up from the deck instead of down from the sky. Maybe some cracking needs introducing into the paint – that’s a small scale detail though, and I’m building a boat to be viewed from a distance.

It’s not bad and definitely not bad enough for me to want to re-do the work. Perhaps once the hull, currently a bright green, is dirtied down things will seem more natural.

On the other hand, that rope on the hatch looks good. Even I think it looks like a separate part (it’s not) and I painted it. Maybe I’m just easily fooled !

Thursday, February 07, 2008

Resin rope


Resin fender
Originally uploaded by Phil_Parker.
This fishing boat kit is a triumph in polyester resin. If it’s not made of plastic then it’s made of the stuff.

The ropework is particularly nice. My picture shows the fender for the front of the boat. I suspect the master may have been made in real rope, if not George is an incredible model maker.

The photo doesn’t do the finished item justice. I started with a coat of dark brown and then dry brushed paler browns on top. Brushing talcum powder onto the pale coats before they were absolutely dry provided finishing touch. This gives some extra texture, which nicely mimics the rough rope the real thing would be made from. It also kills any shine dead. The result would fool anyone who deosn't actually touch it.

One thing the resin can’t do of course is replicate the softness of a real fender. It’s solid as rock so I’ll need to be careful not to hit anything too hard for fear of damaging the hull. Since I want to use this boat for the club steering competition I’m not sure that will be possible. Still a bit of weathering will hide any damage won’t it ?

Tuesday, February 05, 2008

Skin tones


splodger crew
Originally uploaded by Phil_Parker.
You gotta love the interweb. Once upon a time, when a model maker needed to find out what colour oilskins worn by fishermen were, he or she would have to pour through books in search of a rare colour picture. Black and white shots would be hopeless as the clothes would just look black. You’d wonder if they were black. Or grey. Or dark green

Now a quick note on an e-mail list asking the question elicits the response, “The old wet weather gear was oilskins. Colour black when new, sometimes fading to gray. Compared with modern gear they were stiff, limited movement and bloody uncomfortable especially round the neck. They did keep water in and out.” (Thanks David)

So I can get on with a quick coat of black weathered down with shades of grey (this is a British model so it’s not gray whatever David says…). Easy.

The more modern trawlerman will of course have shiny yellow waterproofs. I’ll need to satin varnish these and then perhaps dry-brush some gloss on to highlight them. Mind you, this figure is excellent value for money in terms of the amount of resin so there aren’t many creases, at least on the front !

And in case you wondered, the fleshy bits are Humbrol skin colour dry-brushed with Revel’s version. I wondered about a touch of red to give that weather-beaten look and then decided that I didn’t want anyone on the trawler looking like they were wearing dodgy make-up. Some effects are more trouble than they are worth.

Monday, February 04, 2008

Cleaning resin castings


splodger castings
Originally uploaded by Phil_Parker.
Determined as I am to get some of the projects that have kicking around out of the way before embarking on new ones, my footie fishing boat is now on the workbench. Checking back, I’m shocked to discover I last worked on it in August.

In the model boat box there is a very complete looking model with paint on the hull and even a name. To finish it I just need to paint all the castings and sort out the wiring. Castings are more fun than wiring so I start on these.

The crew figures suffer from quite a lot of very light flash which takes a bit of time to remove completely. Everything else though is clean. I thought the polyester resin material felt suprisingly slippery and decided that this was probably due to release agent still being present on the surface.

Release agent is a liquid applied to the inside of a mould to help casting out without undue stress. I’ve never needed it but with complicated two part models it’s a wise precaution. I suspect that moulds also last longer if you use it.

A dip in some soapy (washing up liquid) and a good scrub with an old toothbrush made things better. The surface is still smooth but not as slippery. Hopefully the paint will stick as I’d like to avoid priming the items.

Saturday, February 02, 2008

Stafford Model Railway Exhibition


Holland Park
Originally uploaded by Phil_Parker.
It’s a while since I’ve visited a model railway show purely as a visitor. Four or five a year behind the barriers usually is enough and besides, I’ve never been that keen on actually watching layouts preferring to chat to the people behind them. However I wanted to see EDM models stand, which meant a trip to Stafford exhibition.

The show is held on the County Showground, accessible from the station by a reasonably regular bus service. I know I’m probably the last railway modeller in the country to visit shows by train but that’s how I prefer it. Besides, between me and Stafford is Birmingham & Coventry - both places I prefer not to drive through.

Anyway, if I hadn’t caught the bus I’d never have found the sizeable aviary full of tropical birds or the hothouse with it’s banana tree complete with growing fruit in the park beside the station. These are the sort of things I love tripping over on visits to random towns and were almost worth the journey on their own. Nor would I have eaten later in the superb cinema conversion that houses the Weatherspoons pub. But I digress.

The show is held in two halls. Assuming you followed the correct signs and didn’t end up in the adjacent cat show, you enter the smaller one. Both halls follow the format of trade around the edge and layouts in the middle. There were several models I’d not seen before including Holland Park (photo, bit fuzzy sorry) which wins the prize for getting a model railway based around the Heljan operating container cranes on the circuit first.

Sadly the show was worse then most for non-operating layouts, at least while I watched. Apparently the hall had been bitterly cold on the set up day and the subsequent warming up had caused electrical gremlins for more than one model so this could explain matters and these would be resolved later in the day and on Sunday I expect. Quality was pretty good with a few very nice models I could watch again and would have had I not been limited to 3.5 hours.

Trade was as usual RTR heavy with few sellers of “bits” – although this might just be my opinion as the sort of person who would be happy with one purveyor of RTR and dozens of people flogging strange shaped bits of metal ! Getting to the trade was difficult so they were hopefully doing good business. Since I wasn’t really looking for anything perhaps that means the exhibition manager has better sense than me when balancing his show.

I haven’t been to Stafford show for years and that was as an exhibitor in a previous venue. My impression is that next year if I’m free another trip beckons.

Friday, February 01, 2008

Finished Shanty


Finished Shanty
Originally uploaded by Phil_Parker.
After a week of postings, I suppose it’s time for me to shut up about the crossing shanty and show you the finished model.

Once the roof was tiles, I put on the self adhesive ridge tiles and flashing around the chimney. This is a reasonably clean whitemetal casting. It’s a bit wonky in the picture and I like it like this – gives the model character don’t you know…

The roof was painted with a nice terracotta colour with individual tiles picked out with thinned rust colour before the first coat had dried properly.

Glazing is supplied in the kit. It is laser cut although the process doesn’t work as well on thin plastic as it does on wood. The parts took a bit more separating from the sheet. Perhaps this is due the properties of the material, you don’t want the laser hanging around too long or the heat will re-seal the cut.

The brick base is in the kit – or at least the wood bits were, I used some Paper Creek brick paper for more solid looking foundations. I think Superquick weathered brick would look better but they don’t make it in 7mm scale.

The model still needs weathering and an interior. The former will wait until a suitable site is found on a model railway layout not yet built. If I dirty it up now I’ll find the colours I’ve used are wrong !

At the end of the day, this is a lovely kit for a very attractive building. It goes together well and is fun to make. Cost is just over £16 in the UK. I certainly plan to try other models from the range – in fact I’ve got a couple on order already.