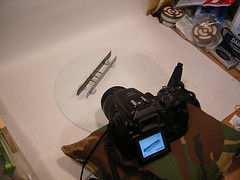
David Gander asked: I wonder if you could give me a few pointers on how you get your photographs whilst modelling. They're always so sharp and clear - and close up. What set up do you have? Whenever I try something similar, I never end up with anything good!
Any hints, tips and advice gratefully received!
My set up isn't awfully sophisticated. As you can see from this shot of yesterdays photo being taken. The background is a sheet of card from an art shop which is stuck to a worktop with Blu-tack. You can see that there is all sorts of detritus surrounding it, which I try to keep out of shot.
The camera used is a Fuji S9500 bought in 2006. It's a bridge camera which means I get a nice focusable lens, excellent macro capability (focusing down to 1cm) and, most important, a live view on the back screen. When I bought this camera, having seen it demonstrated during a photo shoot for BRM, the only DSLR that offered this was an Olympus at £900 - a bit outside my price range !
For blog work, a reasonable compact will also do the job. My Fuji F460 takes shots that appear in here every so often, including this one ! None of the photos are large even if you click on them and view the bigger version in Flickr so the 5mp limit isn't an issue. Of course the larger camera at 9mp will produce stuff suitable for print work as well as blog.
The camera is supported on a bean bag which hold it steady. If I need more height then I put a box under it. There are usually some kits in boxes kicking around. Mind you a book would probably be better but boxes are thicker.
For a long while I've let the camera sort out its own exposure and then lightened the image on the PC. More recently I've been using the manual settings, stopping the lens right down and then taking a series of shots with different exposures. It's vital to have a solid support for this as some of the exposures can be quite long in photographic terms. The advantage is better depth of field, something the auto setting doesn't really give. Focusing is still done automatically, whack the macro mode on and then let the camera do the work.
Light comes from the spotlights I use for my layout Melbridge Dock. These come from Ikea and are fitted with daylight balanced bulbs. This arrangement solves a couple of problems - storage of the lighting bar and illumination for the worktop. When I take the layout out I just unscrew the lights, change the bulbs for normal one and off we go.
The main trick is practise. Writing this blog I have to produce a photo for every day. That's over 1000 shots so far. At some point I hope to be getting good at this !
A daily updated blog typed by someone with painty hands, oil under his fingernails and the smell of solder in his nostrils who likes making all sort of models and miniatures. And fixing things.
Wednesday, May 13, 2009
Photographing models
Labels:
ask phil,
hints'n'tips
Subscribe to:
Post Comments (Atom)

3 comments:
Might I suggest a Beanpod?
www.Beanpods.co.uk
Cheers, Mark.
They look quite impressive - any chance of one for review on the blog ? :-)
Hi Phil
That's another great article!! Eerily enough I was taking a photo of an Ivatt 4MT for my blog earlier and I decided to pass on the automatic and go for the variety of shots using a variety of times and stops. I then took those photos and then used a Paint Shop Pro to give me an extra stop or two where necessary.
I think I will have to go through a lot of practice sessions as it is almost 12 years since I took a photography course and these digital cameras are a lot more sophisticated than what I had then. lol
cheers & keep up the great blog
Stuart
Post a Comment