Saturday, August 21, 2021

Saturday Film Club: Driving toys

Hands up if you had Matchbox cars in your childhood. 

Yes, me too. While mine spent quite a bit of time whooshing along those plastic tracks, there were more skilful driving options out there. This video shows you three of them, including Matchbox's own "Steer and Go" version. 

Even if you aren't in to driving, the mechanisms are fascinating things. Sadly, these all suffered badly at the hands of their young owners, so be prepared to pay proper money if you fancy adding anything like this to a collection via ebay.

Friday, August 20, 2021

Pinch bar

For reasons that will be explained another day, I recently had to help move a railway van without the aid of a locomotive, or even a horse. Fortunately, it rolled pretty easily for most of the 20 feet or so we had to move it, but for the last few inches, a pinch bar was required. 

I've never properly looked at one of these before, and it's not quite the same as the one in the old Cooper Craft plastic kit. Theirs is a very simple affair, but here, we had something with a clever ratchet attachment at the end. If you click on the photo, it will enlarge so you can have a proper look. 

Using one is simple enough, if very time-consuming, very, very time-consuming if you let the wagon roll back again...

This video comes from the excellent Barrow Hill "Tools of the Trade" web page.

Thursday, August 19, 2021

Russell Lupins


Another quickie practical over on World of Railways, this time making one of my favourite additions to a layout, Russell Lupins.

I've used these flowers on pretty much every layout I've built, and an awful lot of the dioramas, because they add some detail and colour to any scene, and yet are simple to make. 

Modelling Russell Lupins.

Wednesday, August 18, 2021

New look Humbrol weathering powders


The nice people at Hornby recently sent me some of their new-look weathering powders to use in my projects. I understand that there has been a change in supplier and also, more importantly, in the packaging. 

Gone is the thin-necked glass jar, and in comes proper pots with wide lids. Much easier to use as you can pull the powder out of the pot with one of their Stipple brushes (I really like these) and then use it from the lids, even mixing it up in there. It's less messy than the bottles, although I still wouldn't work over your best tablecloth!

There are new colours too with light and dark rust in addition to the iron oxide. 

Sticking power seems to be about the same as the old mix. I happily threw them at some standard wagons and the powder didn't fall off the sides. I don't bother sealing it as varnish changes the colour of the weathering. OK, lots of handling will wear the powder away, but largely from those areas that would be less mucky anyway - it will still be in those nooks and crannies. 

Good stuff. 

Tuesday, August 17, 2021

Tree bodging


If there's one thing that holds new modellers up, it's the belief that they must do things the "correct" way. Learning the "correct" way takes time, and so they never actually do any modelling. 

This is, of course, a complete load of rubbish. Most experienced modellers are expert bodgers. As long as the end result looks right, it is right. 

An example. Hauling a layout out of storage to use as a photo backdrop, I found one of the trees had broken. 

You might try to glue it back together, but the contact area is tiny and the glue won't hold. The "correct" solution is to drill both halves of the trunk, insert some wire, and then glue. The wire supports the joint and all is well. But it's a bit of a faff. 

My solution? 

Pull the trunk out of the hill, remove a few twigs lower down on the rest, and replant. Can anyone spot anything? 

Nope. Looks all right me!


Planting model trees

A little video I recorded while working on a magazine project. With so many channels, we need to generate quick little bits of content alongside the full-fat magazine stuff, and this is a bit of an experiment in doing just that. 

Nothing heavy, but hopefully, something useful for the beginner.

Monday, August 16, 2021

Yellow shocks


It's been a busy week, so progress on the beach buggy had been limited. I have managed to fit the  engine into the chassis and add the suspension. 

At the back end, like the exhaust, there's a bit of gluing things and having them hang in mid-air. If you have four very small hands, you'll be in a better position than those of us with only two large ones. The trouble is, you can't line anything up and hope it's right. Worse, until the wheels go on, you have no idea if they will all touch the ground. 

The observant will notice the shock absorbers are bright yellow. Airfix didn't specify this, it's a tribute to the time I decided to replace those on my bug with gas filled ones rather than the "boring" oil filled version. 

The result was a somewhat bouncy ride as they react faster than the standard items. A ride, I didn't really like, but had to put up with as the car was my daily driver. A lesson learned that you shouldn't believe what people in Volksworld tell you is cool - it might be, but they lower their cars and endure a terrible ride as a result. 

Adding the wheels and I think I've got away with things. There is a bit of slop so they all touch the ground. The back ones even rotate, but the fronts defeated me. Mind you, I didn't put up much of a fight as this isn't something I worry about much. It makes photography easier as the model stays put anyway. 

Really sharp eyed people will notice rubber parts (tyres, gaiters) are painted Revell Anthracite black , while metal bits are Humbrol black. No, of course, no-one cares, but it's my model and I'll have some fun!

Sunday, August 15, 2021

Old car corner

I'm very busy right now, so you'll have to make do with some photos of cars I spotted  while dropping my parents Berlingo in for its service earlier this week. Leamington's "Car Quarter" is always interesting. 

Interesting colour Alfa Sud - but in really nice condition considering the propensity of these cars to rot.

The DVLA MOT checker doesn't like the numberplate on this 1300, but it's in a good, usable condition.

How is this a classic? I remember then coming out!

Always good to see a Beetle on the road. Those wings are replacements in the number plate is correct as that's a 71, and the sloping headlights were replace in 1968. Looks good in a kind of rough'n'ready way.


Saturday, August 14, 2021

Saturday Film Club - Amusing Daleks

 If you must have a serious modelling angle to this film, take a look as the BBC's Dalek design has changed through the years, and how the special effects people have dealt with what you see under one. 

Or you can just chuckle like I did.

Friday, August 13, 2021

Industrial unit and model boats in BRM


A nice simple project for me in BRM this month - a Metcalfe Models industrial unit in N gauge. For modern(ish) modellers, it's a really useful building. The sort of thing you see by the dozen in light industrial yards. 

I didn't quite build it as per the instructions of course, there would be no fun in that would there? 

Over on BRM TV, we have the first full Phil-produced feature. We've changed a few things behind the scenes and will be doing all our own video work for the future. It's a challenge, but I'm looking forward to it. 

Anyway, I'm talking model boats for railway modellers - a feature that has been on the "to-do" list since our first virtual show and I'm glad the weather allowed me to do it. The subject is massive, bu t I hope I've scratched the surface at least in my short film. 

And before you ask, the water in the boat club pond is that colour for a reason...


Thursday, August 12, 2021

Zen and the art of Garden Rail


Matthew Foster's write up of his superb Takasaki Light Railway contains one of my favourite lines in a model railway article.

Spending time in the garden ‘boiling water’ is the main attraction of my railway. Live steam locomotives running in the natural garden setting is when I can sit back and indulge myself.

That sounds good to me. A hobby should be relaxing, but how often does anyone actually say this explicitly? 

Elsewhere we look at a live steam "Caledonia", construct a waterwheel, consider the model railway PW department and build a powered coal wagon and Rapier diesel.

Wednesday, August 11, 2021

The future is orange


There was only one colour for this car - orange.  

That's the colour it is on the box lid and that's the colour my Beetle is. There simply is no better hue. 

I'm spraying the body with Tamiya X-6 orange. Sadly, I couldn't get an aerosol, so the paint was thinned with car windscreen wash (it's what the military modellers recommend) over Halfords white primer. Trying to spray without the primer saw the paint puddle on the plastic surface, but while gives a better base than grey, so it's worth the effort. 

The result is pleasingly matt. Not dead, but not shiny. I'd accept satin, but gloss always looks too toylike. 

If I could have found a can of touch-up spray for my car I'd have used that, but since the aerosols I had mixed must be well over 20 years old, I suspect they might not be in the best condition. 

Tuesday, August 10, 2021

1/32nd aircooled engine


Airfix has kept the Beach Buggy engine pretty simple. Sadly, in the days it was designed, they didn't put in many positive location aids, so while most of the assembly is easy, the dual-cannon exhaust pipes sort of hang in mid-air while you assemble them with only half-lap joints to hold them to each other. 

The technique of using plastic cement for the initial grab followed by some solvent once they are tweaked into position seemed to work OK for me, although the tweaking went on for a while until the joints were solid and I was happy. 

Detail is sparse because (as I later found) you can see so little when the unit is fitted in the car. 

My bugs' engine is a bit different but was a useful guide. The air cleaner (missed out of the kit) is much larger than a mushroom version you'd have in a buggy. It's also more hemmed in by the tinware, something mostly missing on a buggy. You don't need those big hoses from the doghouse to the heat exchangers for a start. 

I've never detailed and engine before, but it looks like fun when other people do it, so I added a distributor and plug leads to fill the space. Pedants will point out I didn't include the vacuum advance canister, but I assume the buggy owner has replaced the stock VW unit with a 009 version which only has centrifugal advance. It's a popular mod, although one disapproved of by people who point out VW didn't spend millions fitting this stuff for it to be replaced by people who think cheap chrome makes their car go faster...

The dizzy is a piece of plastic tube, and the wires 15amp fusewire. The air cleaner is a bit more tube, which has since been altered to fit under the body. Main silver is Dark Star "Molten Metal" Old silver, a better match for a magnesium alloy crank case than the silver suggested. That's limited to the exhaust tips and pulley cover. A quick wash of black Citadel weathering ink finishes the job.

Monday, August 09, 2021

Airfix Beach Buggy

It was a great pleasure to read that Airfix planned to re-introduce the Beach Buggy kit earlier this year. I put my pre-order in as soon as I saw the model advertised, and last week, a box arrived. 

When a young modeller, I remember building this kit. The results probably weren't very blog-worthy, but with an interest in VeeDubs, it was always going to be on my list for another go. The trouble was, unbuilt kits on eBay were in the region of £65, and like an idiot, I passed up the one I saw at £15 at Stanford Hall VW show a few years ago, and the Revell version didn't satisfy my desire for the kit.

The 1/32nd scale kit isn't large, but it's pretty comprehensive. Mind you, there aren't that many parts to the real car. At least some suitably 1970s figures are part of the package. 

Everything looks nicely moulded. Presumably the moulds were refurbished as part of the reintroduction process as I can't believe they were this good after all the time, the kit first appeared in 1972 so it's nearly as old as me!


Sunday, August 08, 2021

How do you flick through a magazine in Smiths?

Quality publication on sale

Time for a quick poll. At work, we were discussing which way people flick through a magazine when browsing in WH Smiths, or other newsagents. 

I thought that most people held the mag in their right hand and flicked from the back to the front. 

Younger members of the team say they hold it in the left hand and flick from the front to back. 

Who is right? Can we trust the opinions of people who wear a baseball cap back to front? 

Do, please comment on this post - enquiring minds want to know.

Saturday, August 07, 2021

Saturday Film Club: Action Jacks

A bit of nostalgia for me this week. When I was a child, I'd occasionally stay with my grandparents who lived a few miles away. The local newsagent sold a few interesting, and cheap, toys. I remember plastic motorbike kits for instance. They clipped together and I built several and painted them. 

They also sold Action Jacks - little jointed figures with accessories, the subject of this weeks video. Mine used to go on all sorts of adventures, particularly in "submarines" made of plant pots to the bottom of the grandparents water butt. I was always one for lowering things on bits of string, our front garden was the landing place for many a Lego spaceship that slowly descended from my bedroom window. 

I haven't seen an Action Jack for years, and don't really have any interesting in finding one, except that they might be the right size to become garden railway drivers, with a bit of Milliput for the clothing...

Friday, August 06, 2021

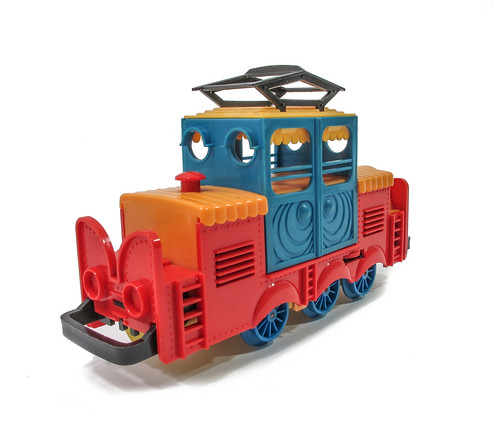
Faller Hit Train - the mad electric loco

Faller Hit Train electric loco

Good things come to those who wait, and in this case mad ones too!

Earlier this year, I picked up the steam loco version of the Faller Hit train, but in truth, it was the electric locomotive I was really after, and I've finally found one for the sort of money I'm willing to spend. 

You might be surprised that these things are quite collectable - but then who wouldn't want the maddest model railway design ever made on the shelf?

Faller Hit Train
This whole set is brilliantly bonkers, and it's German! 
 
The nation best known for logical, rational thinking, decided that what the world really needed was an overhead electric loco with no basis in reality. 
 
Team that with some fantasy rolling stock and you have a winner, at least as far as I am concerned. 
 

The loco came as part of a set for £12 from ebay - a real bargain as it's pretty much mint. I've got track and three points and some clips for Faller Hit car track to fit to. Yes, they did a racetrack system, but that is properly expensive if you can find it!
 
The whole lot is very clever. A switch on the bottom of the loco and throw it into reverse when it runs over the orange arrow, so it can operate automatically if you fit this at the end of a siding. I don't have space at the moment to lay the track out, or I'd give it a go. 
 
I'm already thinking about a Hit Train session at the next NGRS - which will probably get me thrown out for not being serious enough!

Thursday, August 05, 2021

Saxa Salt wagon - Part 3


After a coat of sanding sealer, the colours I chose for the wagon all came from the Humbrol acrylic range - 69 Gloss Yellow for the body, 33 Matt black for the chassis and RC414 Executive dark grey for the roof. All chosen because they were in a box of paint I bought second hand - I knew it would come in useful!

The lettering is a vinyl sticker. You press the front to fix the lettering to the clear carrier film, then peel away the white backing sheet. Place the film over the wagon side, where it's the perfect size so no lining up, run the letters down and then peel away the clear sheet. 

This didn't quite work on the first sheet. The letters stayed on the backing, and I ended up peeling them away with tweezers, putting them on the wagon side and lining up by eye. The letters are pretty robust and with a little care, everything worked out OK. 

The instructions say you don't need to seal them with varnish, but I shot some satin over the sides anyway. 

Underneath, the bearings are chunky bits of brass - impressive as you don't always get (or really need) them. I reamed them out a bit for some slop to accommodate less than perfect track and the wagon is now a nice smooth runner. A lump of lead underneath adds useful weight, without it, the wagon is very light. The plastic wheels should be OK, but metal ones would add useful low-down mass.

All in all, a really nice kit. OK, it's not very realistic, but it is pretty and goes together well. If you can wield a PVA bottle, I don't think you'd have any problems building it and the design should ensure any modeller can end up with a vehicle they can be proud of.


Wednesday, August 04, 2021

Saxa Salt wagon - Part 2


The wagon rides on an inside framed chassis which can be built to either 32 of 45mm gauge - but once you've chosen, this can't be changed. I pondered this a bit, eventually deciding it's time we had a proper non-LGB train for the garden railway and choosing 45mm. 

Note the Peco loco cradle coming in handy again - not a use its designer will have contemplated!

Everything slots together nicely, those squares are just to ensure the frames are perfectly upright as there is a tiny amount of slop in the joints. 

On top, I added a bit of detail - very thin plywood forms the top doors with hinge detail using a cocktail stick and more ply. Handles are thin aluminium tube, because I'd just bought a bundle and it looked about right. Wire would have been better, and not cracked on the bends, but I think I got away with it. 

Of course, you can see that I can't resist slotting the wheels in loosely, just to check all is OK. nd screwing the couplings on as well. Does anyone else have to keep putting the bits of kit together just for the satisfaction of seeing progress, before taking it apart and getting back to the build proper?

Tuesday, August 03, 2021

Saxa salt wagon - Part 1


While I might have come back from the NGRS without any new kits, the same can't be said of my parents. My mum was particularly taken by a Timpdon Models Saxa Salt wagon, and so this arrived with the instruction to get it built. 

Saxa Salt wagons are a model railway classic, with everyone from Hornby to Bachmann producing them in 4 and 7mm scales. Bright yellow, they look pretty and while being a bit of a modelling cliche, it doesn't really matter. Timpdon's 16mm narrow gauge take on the prototype is less than accurate, but looks nice (hopefully) and appeals to lots of garden rail scale modellers. 

The main parts fit together quickly and easily using Deluxe Materials Super-Phatic glue. The Elastic bands aren't essential as the stuff grabs very quickly, but better safe than sorry. 


I think it's possible to build the body and chassis as separate entities, and use the edging strip to hold the top on, but I glued everything together as it's not going to make painting much harder, and I don't plan to use this as a battery holder. 

The little bulldog clips will just open wide enough to clamp things together. Another of those occasions when you can't have too many clips!

The hipped roof needed to be weighted down while drying, a job for those handy bits of steel and some masking tape. This is a pretty strong little box, so the weight won't worry it while the glue dries.