A quick search on the web revealed this to be a common problem with older 206's and also showed the fix - but without any photos. So, having performed the relatively easy task, I thought you'd be interested in seeing some. Anyway, the Haynes manual isn't very clear on this job and doesn't bother telling you the size of tools required.
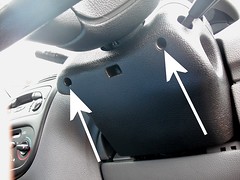 Stage 1 - Remove the plastic casing for the steering column. For this you need a T20 Torx screwdriver (That's a star shapped one, don't try normal screwdrivers as you'll damage the fixings - and one in a multi-tool will be too short and fat) .
Halfords had sold out of the normal ones but do a set of Allan key style versions for a tenner so that's that I used. Undoing the screws releases the top part of the casing and allows it to be pulled away. The bottom part can then be unclipped. Haynes tells you to remove the volume control stalk but I left it plugged in in the foot well. Just be careful not to catch it with your feet.
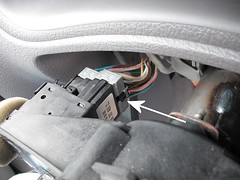 Stage 2 - Unplug the connectors. Each has a black clip (arrowed) which pushes in. The plugs then slide off easily but be careful not to tug the wires too much.
I didn't bother disconnecting the battery to do this job but suspect that it would be a sensible move. When you re-connect it beware that some electronic things may need looking at - not sure if the stereo holds it code without power for instance.
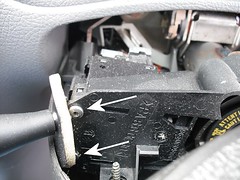 Stage 3 - A T10 Torx screwdriver is needed to undo these screws. The switch then slides out sideways. It took a bit of a wiggle to get it past the fascia panel. Unlock the steering column adjustment as this helps a bit.
At this point you could just replace the switch if you can find one. If that's the plan just plug the new one and reassemble the casing.
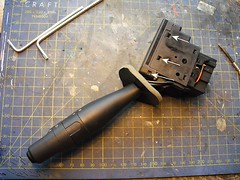 Stage 4 - I'm too stingy to buy a new part if I can fix the old one. Hence the switch was taken to the modelling board and the top removed by pushing the plastic tabs using a small screwdriver. A bit of care here as this is plastic.
Cleanliness is important here too, don't work in an area full of detritus as we don't want anything untoward getting in the switch. Watch the springs under the lid too - they shouldn't come off but it's wise to keep an eye on them.
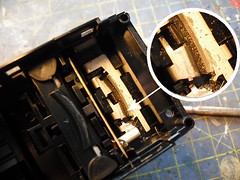 Stage 5 - Here is the culprit. Metal shavings. When you move the stalk, a steel contact slides in the metal grove you can see here. After many years and a lot of indicating, it wears and deposits filings in the contacts. These sit at the bottom of the track and sometimes make the circuit causing the indicators to flash. When I wiggled the stalk this was moving them enough to stop the problem - but it was only going to get worse.
Blowing them away and brushing out the grove fixed things. I also took a moment to smooth off the contact (not shown in the photo) with some emery paper as well and hope this will stop the wear for a while.
Reassembly is the reverse of the above. When putting the top on the switch, make sure the spikey thing at the end of the stalk engages with the silvery grooved thing otherwise when you turn the light switch it won't turn them on. If you don't fiddle though, this will already be in the right position.
Do test the unit before putting it in the back of the car - any stiffness in movement probably means something's not gone back right. Incidentally, the stalk sticking out the opposite side of the switch to the operating stalk is part of the self-cancelling mechanism and should go in and out as you work the switch.
I carried out this work a week ago and haven't had any problems with the indicators since. This work is (IMGHO) well within the capability of any DIY'er and for an hours effort can save you quite a lot of cash. Good Luck and happy flashing !
Legal note: This is a record of what I did. If you try the same and it doesn't work, don't blame me !
181 comments:
Would you believe I also own a Green Peugeot 206 and live in Coventry (although mine is only 9 years old). I have also had this very same problem, which started yesterday. I had the same problem about 3 years ago and these instructions served as a very useful reminder of what to do. Works a treat again now. If you have the Torx screwdrivers to hand its not a big job - it only took me about 30 minutes.
Half an hour sounds about right - any quicker and you've either done it too often before and should get a new switch ! I reckon I took an hour including taking photos which was quicker than expected.
Thanks Phil, I'd been struggling to find out how to split the box and your diagram simply pointed to the tabs!
Easy... so thanks for saving me at least £30 fro a scrappy.
I've posted a link to yout site on "how to mend it .com" whic had some ideas on the problem, but nothing a patch on yours!
Thanks Phil, found these instructions off a link you posted in some other thread. Worked like a charm.
(Even if i've just had to install it in -3... Good old UK weather)
Thanks again
D
Thank you so much Phil! My boyfriend followed your instructions and it has saved me £230, which was quoted to get repaired at a garage! Many thanks!!!
Fantasic, little bit of a fiddle to get indicator apart.... but apart from that great work. Garage was going to charge me £46 for part & £20 labour! Cost me £10 for a set of star keys! Great stuff. Thanks
Thank you so much, Phil!
My indicator again works OK now!!
I had the same problem with my Peugoet 206 and when I took it to my local garage they said it was a problem with the 'multi box' (what ever that is???) It was going to cost £100+. I followed the instructions and Im no DIYer but it works fine now!!!! Thanks is saved me loads of money!!
Funny when you start searching the internet....I also have a 10 year old Peugeot 206...in red though ;o) with exactly this problem. The photos and instructions were invaluable for a very novice mechanic like me. Was fairly quick and has done the job perfectly. Thanks!
Thank you for this amazing information Phil, I own a Peugeot 206 in silver and have had the same problem for over a week, my right indicator light was on constant and a garage wanted to charge me £100!!!
After just taking it apart and cleaning the switch the job was done.... brilliant....!
Thanks again.
Lou
This is great! I fixed mine last year and was just looking for a link to give to my friend whose 206 is now playing up. I wish this had been online when I did mine!!
Thanks Phil
Followed your instructions and my problem was solved.
I must confess i got one of my engineering grads to do it for me but we found your instructions really good and easy to follow.
It was really worrying when my 206 started random indicating. I must of looked a right idiot to other drivers. My 206 is ten years old next week and also comes from Coventry (like me). Seems to be a bit of a trend.
Thanks again - a fantastic service
Thanks so much for this! when it first started happening on my 99 206 i was thinking it was gonna have to be a replacement switch or something more costly, but so glad it didn't as the cleaning worked a treat! got some torx keys off ebay for about a fiver and it took maybe 20-30 minutes, mainly because the top of the switch didn't wanna budge despite pushing the tabs in as hard as i could without breaking it!
My son's W reg 206 (also green) developed this fault.Quoted £55.00 for a used one from the scrappers, but this fix cost £6.00for the torx drivers. Genius!!!!!!!
Thanks for the info.
Bruce Smalltree.
Thanks - these instructions were just what I needed to fix my faulty indicator. You saved me a lot of money and it didn't take too long. Thanks!
this must be a very common fault judging from all the comments! thanks for writing this up; made it a doddle. nice one ;D
hi i have a peugeot 206 2004 mine is faulty but the indicators and wipers seem to be one whole unit. do you know how to remove it
Riggy - I think you have a later car than mine. The design changed in 2000 aparently. The one piece unit (according to the man who changed my clutch) needs the steering wheel to come off and the airbag disabled. I haven't done it so can't offer any more advice. Best bet is either a mechanic or one of the 206 forums. Good luck.
thanks very much phil,info on size of torx tool most welcome.like others saved myself a few quid and a lot of hassle.once again many thanks.
regards
colin.
OMG you are a life saver. thought it was going to cost laods then i sae this. easy and like u said 30 mins on the dot.
cheers.
George
Thanks a million,it fixed the faulty indicator problem on my '00 pug 206!!!
Hey Phil, You're a star!! just fixed (well actually my boyfriend) has just fixed the indicator.
Thanks again
K.
Hi Phil;
Many thanks, as others have posted before me. My partner now loves me even more.
The only thing I think would be wise, is to advise people in the write up with the 2nd to last photo, that you need to push the tags on both sides of the stalk housing to release it, as the less mechanically minded might just try to prise the thing off after pinging one side only.
Overall, I'd like to say thank-you for taking the time & effort to post your step by step guide.
Regards,
Garry (Kings Lynn)
Fantastic, thanks for saving me money and time taking this to a garage.
Like others I found the box hard to prise open, but other than that your clear and concise instructions made it easy- I hope someone saw me do such an expert job! ;)
Great Job and website.. Thanks
Sha (Exeter)
Good clear instructions. It took me just 10 minutes to fix it. Thanks.
Just to tell you I had the same fault on my 406 (1999). It was driving me nuts! Thanks to you we managed to fix it, with the right screwdrivers of course!
absolutely brilliant thanks very much phil! i owe you a beer! done it in 30-40mins lol
I have an Expert van and had a similar problem, the indicator started to click erratically on a right hand turn. Removed the unit and found lots of grease on the contacts so cleaned and re-assembled. All Ok so far so thanks for the info phil. More people should submit info of this nature. Already had the torx screwdrivers so this repair didn't cost a penny. Up your's Peugeot, money stay's in my pocket this time !!
Thank you for the simple instructions and especially the pictures. It worked for our 206 indicator.
I also own a green 10 year-old 206 and had this very same problem. v annoying as you look like an idiot driving along with indicator flashing randomly - also I suspect it's illegal as well.
Carried out Phil's repair yesterday and it worked like a treat. Saved myslef £170 (quoted by the thieves at my local dealership) - money I will put towards my new camera. The pics were great - would never have attempted it without.
Couple of things for anyone else trying it, however:
1)you need to unclip the indicator housing on both sides and lift the top off. Once inside use a cotton bud to wipe away residue and a pin to scrape out contact grove inside.
2)Reassembly is fairly simple but make sure the black cancelling pin (attached by springs) is pushed back so it slides into its hole and also make wure you the light switch will click onto all 3 settings. Had to to take it apart again after first attempt.
3)clips are very tough to remove to be careful, alo you need to position the wheel correctly to get as screws for indicators so think about it.
All in all though a brilliant fix. Can't thank Phil enough for taking the time to post this fix. could very easily get ripped off with this fault (people charging for electronic diagnostics etc) so without knowing real cause!
Phil, I salute you!!
I have a silver Peugeot 206 that is 12 years old with this problem and having just followed your advice the indicators work perfectly. For what its worth the job took me about 1 1/2 hours as I experienced a few problems when testing the indicator stalk with the headlights remaining permanently switched on.Fixed this by dismantling the indicator stalk as you describe and taking extra care in the re-assembly.Many thanks for this advice as you saved me £100 that was quoted by a local garage!.
I'd just like to say thank you to everyone who has taken the time to post messages of thanks as well as helpful hints and tips from thier own effort. It's great to know that so many people have found this information helpful.
Thanks Phil... managed it in 3 hours (most of that was searching for a T10 screwdriver). I had a bit of a scary moment putting the switch back together - the part with springs had a black knob on either side, one fitting it to the lid and the other had to fit into something on the indicator stalk which took several attempts to get lined up.
Your instructions where really clear, much appreciated!
Thanks Phil, yours instructions worked a treat. It onlyb took me 15 minutes to replace. Much cheaper than going to Peugeot, they're well overpriced to do same job. Thanks.
Is this the same for a 52 plate 206? My indicator stalk looks a little different to the ones in the pictures
Sorry - the only 206 I know about is mine. There are some good web forums out there who light be able to help.
Mark said...
My son in-law has a 1999 Peugeot 206 and he had problems with his indicator sticking on even with the ignition turned off, we followed your instructions on how take the indicator apart and so far so good it seems to have solved the problem. It took about half an hour and saved him pounds.
Many thanks.
Thanks for the info. I followed your instructions and it appears to have worked....fingers crossed!
Many thanks for this fix. The plastic switch cover on my '99 1.4 Lx took some getting off. There was another clip on the other side.
My only advice to add would be that if the self cancelling pin comes out the springs hook onto the plastic pins in each corner.
good luck and thanks again.
Thank you, Even with being an absolute novice with cars, (ie. if something goes wrong it went to the garage) it took me about 30 mins to fix, and another 10 mins to line up the housings. (Cos it was dark). No more random indicating for me from now on then! my only point was getting the self canceling pin right, when I took the switch out it wasn't to be seen, must#'ve been stuck inside, but after reassembly there it was stuck out. Refitted the switch, took for a test drive and self cancelling seems to work Again
Just a quick point, hunt down a new indicator stalk on ebay and look at the picture. When I took ours off the car, there was no sign of a self cancelling switch (it was stuck inside the unit), hence when i prised to top off, out popped the switch which I didn't have a clue what to do with, but finally worked it out. Compared it with pics on ebay and now looks the same.
Thanks Phil i followed your instructions and indicator works fine now, took about 30 mins.
thanks Phill the indicator works a treat now
Good lad Ian. I've joined the diy bandwagon. Thanks for the info.
Thanks, Phil. It went exactly as the instructions and was finished within an hour. Indicators worl perfectly now and it only cost us £14 for a set of torx screwdrivers!
Nice one! My indicator was driving me crazy and this really fixed it!
Best Regards!
Hi Phil and all.
Great post. It took me less than an hour to fix mine.
Best Regards from sunny Portugal
Fix worked perfectly so thank you for saving us £££.
Total cost was £14.99 for a set of torx drivers which will come in handy for the future.
A couple of tips.....
1) the torx for us was the six sided version and not the 5/star type.
2) as others have said, unclipping the indicator box is the hardest bit but the key is to use a small screwdriver to push down on the body in the hollow 'just below the clip' rather than the clip itself. For the clips on the ends I slipped a narrow flat headed screwdriver underneath the body and gently twisted it.
Our Peugeot 206 has been in the family since 2000. It's a 1999, green 1.1LX. And, would you believe it, the nearside mirror is....taped up to hold it in place! My son who is 18 is very grateful for the fix - thanks Phil.
Thankyouuu, been living with the problem for ages, after coming accross this i did it straight away, took about 20mins and now its perfect. Many Thanks :)
52reg 206 with driver airbag. As others note the unit appears to be a single unit with several stalk controls, and Haynes tells me to remove the airbag and steering wheel to remove the unit, to do this it claims I need to remove the centre console to uncover the switch to disconnect the driver air bag. The procedure for which looks straight forward but tedious and involves lots of plastic clips (which means I'll break some), getting well beyond what I had hoped to do.
At this point I think I'll vacuum the unit as best I can as it is rather dusty and covered in cobwebs and hope that shifts whatever is causing the issue. Garage says the price of a new unit (excluding VAT and without fitting is £128), and the local breakers yard says they are really popular (I wonder why) and knew they didn't have any left without looking.
I too also have a green '99 206, and i have had this problem for the last month :/ Your guide is very helpful, worked like a treat :) Thank you soo much for the help :)
hi phil
have fixed the indicator problem real easy with your help saved a fortune! thanks again
sarah.
Thanks for great description and pictures - I used also about half an hour following your guide - When I opened the indicator, it was clear to me, that dust and other rubbish may be the reason for my random indicating left(although in off position!?).
Hopefully this helps.........time will tell.
P.S Please note, that the lower plastic tab is a bit different, than the upper 2. The upper 2 needs pushing on the tab itself, where the lower one needs lifting of the case around the SOLID tab(screwdriver fits under case)
Thanks for all your help:0)
Morten from Denmark
Thanks for your easy to follow instructions. You must be a hero in your day job doing such throughout documentation. It took this nincompoop just under an hour to do this. I wish I saw the last comment before mine regarding the tabs on the indicator stalk unit :) It didn't look like it had too much metal shavings and gunk inside the contacts though, so I wiped them down with turps. Will see how things go...
It works just as well on an 11 yo red 206 :-)
The random indicating was getting really bad and driving me nuts as well as becoming plain unsafe.
Found instructions before your blog, but thanks for pics, it's nice to know what to expect before you pry something open.
thanks for the tip on the indercator i had the same problem with my stalk due to following your instructions i fixed it today with noproblem it took me 5mins easy job :) many thanks
Thanks for this. I did this fix about 2 years ago when my left indicator kept staying on. I also have a ten year old Green Peugeot 206 and my right indicator is now playing up so will have to do this again!
I too have a 10 year old Peugeot 206 that had this fault when I bought it 6 months ago. I thought it was just my luck but obviously not!! This week however, both indicators starting flashing (as though I had my hazards on) whenever I indicated left or right. That's when I Google'd the problem and found these instructions. With the help a friend we followed the steps and it has mended the problem. Thank you so much for your clear, well written instructions. It has saved me yet another trip to the garage with said car. Don't suppose you know how to replace a light bulb in the clock?... The latest thing to go wrong!! :)
The clock isn't too hard. Unclip the cover then then remove the duff bulb - there are three in there. It is removed by twisting it to unclip the unit. Spares are available from Halfords.
Mind you, it sounds like I ought to do a blog post on the subject !
Hi phill I know it's been almost 2 years since you posted this blog but we have a 206 in the family it's a 2000 model
And the right indicator would not cancel,
Followed your instruction saved me a load of time only 20mins to do thanks mate
Hi phill thanks thanks for your instruction did the job in less than 30mins cheers mate
Excellent guide here, I was driving into work this morning and felt like a crazy nutter with my indicators going randomly left/right, I had people pulling out in front of me constantly!
The photographs REALLY helped me fix this, as I usually don't do this sort of thing.
Thanks for saving me a lot of money and hassle!
- From a guy who's really glad he Googled for the solution!
phil you are the man (LEGEND) nearly had about 4 crashes in the last week i think you have saved my life and now i think its sorted good clear pics and it was easy to follow many thanks from ralphie in tyne and wear
Help yourself to a beer Phil! Saved us a fortune and worked a treat! Thanks again!
Did this on my 12 year old 206 didn't realize how simple and easy it was! Although opening and putting the indicator was a little challenging it really did work!
Thank you so much!
Phil, Brilliant. Thanks to your time and effort in describing what to do, I have received some "Good Boy!! Dog Chocs." from my wife who has been driven mad (along with the tailing motorists!) with the indicator switching on constantly without warning. There was a nice burr on the contact that I smoothed out and I've added some more lube to help with wear. Thanks again, I've never found such a good tip in all my cost cutting Scrooge like searches. Ian from Plymouth
Hi Phil, Thanks for the advice followed the instructions and the indicator is now working however i now have a problem with instrument cluster lights and tail lights staying on all the time even without the key in the ignition. was not happening before and can't see any pinched wires, any ideas ? thanks in advance! Rich
Not to worry I found out what the problem was! the lights part had snagged and and although the unit had gone back together ok I did not spot that the light turning part of the lever was stuck. I loosened it up and wiggled it a bit and it freed up and started to work! then when i put it back in the car no light issue!
Thank you so much for this. Indicator was driving me crazy, but girlfriend and I fixed this in under an hour.
Thank you very much Phil
The garage quoted me £180 to replace the stalk and this is not money I can afford. Your advice and time spent in making it available to all is greatly appreciated by me.
Paul
Phil
You are a star! Fixed my Peugoet 406 which had the same stalk in no time. Save me a £100!
Thanks
Brendan
Hi Phil,
I appreciate this is a very old post of yours but it is still relevant to the problem I have today.
On that note do you have any ideas what the part number is for a new indicator stalk for a 206?
IF not then no worries.
Thanks for this excellent post by the way.
All the best.
Take care,
Keith
Sorry - I don't have part numbers or even know much about later 206's other than that they are different. Now if someone wants to send me a later car, I could have a look...
:-)
Hi Phil - you just saved me about $500 Australian dollars! After putting up with crazy blinkers for about three months I got a quote last week - $400 for the part and two hours labour! I'm a 30 year old single girl and did it myself following your instructions and it is now perfect. Thanks so much!!!!
Excellent info. Thanks loads!
Great tips...
I just tried to fix the stalk on my 406... it's the same1
Thanks!!
Well the Ghost in the machine has been exorcised!
A couple squirts of WD40 and a wipe with blue paper, et voila!
Switch stub (the little silver knobbly bit) was slightly eroded by too much use, which is where the bits of metal came from. The gap is a bit tight between the positive and negative terminals, and so a bit of the silicone grease used to keep the switch smooth had jammed the bits of metal across the contacts.
You have saved me £36.00 from buying the switch. Like you I repair whatever and whenever I can. Labour at Peugeot would have been £260.00!!!!!
Merci Monsieur.
Great article, I can finally stop swearing at the dashboard and drive relaxed again now!
One additional tip for anyone attempting this - don't make the mistake I did of overtightening the screws when replacing the steering column. I wore through the holes in the bottom casing and then couldn't secure it properly. I managed to fit it together ok in the end but it's not as secure as it was.
Thanks for your help Phil!
Hola! I've just bought my partner a 206 on a W reg, 50k on the clock, full Peugeot service history, paid £975 cash and this is the only thing wrong with it! Spent half an hour after a careful read of your instructions and bingo - sorted! Many many thanks! Also did it without disconnecting battery and no issues! Switch tabs (3 either side) are a little stiff and need a bit of pressure but switch is quite meaty so no real concerns! Would just add it's easier to put the auto-off mechanism back onto the switch lid, and then offer together at a slight angle to ensure light gear meshes together correctly, otherwise can be a bit fiddly! If you don't snap the lid fully on, you can actually see the movement of the light gear before you commit to closing it propoerly! Many many thanks again! Job and knock! Cheers, deebo
I've just bought a little 206 ( 1998 reg. diesel) The hazards do not work, and only the o/s indicators are working. If the stupid garage cannot fix it ( it has been with them for 4 days!! being 'fixed under warranty') I may give this a try. So far they cannot find the problem and have just gone to get a indicator stalk from a breaker. You couldn't make it up! I'm sure that a 'real' auto electician could sort it!
Excellent walkthrough, many thanks. I've repaired hundreds of cars over the years, but they all have their own little unique challenges (like how many screws, and what type and size of bit) that a good photo tutorial sorts really quickly.
The only thing I would add is that in stage 4 I found it far easier to separate the top of the assembly by inserting a small knife blade down the side of the assembly, rather than trying to press the 4 plastic lugs in with a screwdriver, then using a screwdriver for the remaining two plastic lugs closest to the indicator stalk.
Worked like a charm. Thanks for the tip my friend
Thank you very much Phil, your story gave me the confidence to fix this problem myself and it was much fun repairing this! Best from the Netherlands!
Thanks very much for making this available. took me about 30 mins to do this on an x plate 206 this morning. Works correctly now. Best wishes. Chris
Thank you so much Phil. I had the same problem with my car and I was fed up with it. After reading your explenations it just took me 30 mins to fix it. I'm really happy to be done by myself and I didn't spend even a penny on it. Thank you again.
I don't know how to say thank you as I was fed up with the same problem with my Peugeot 206, 1.4 petrol. After reading your clare explaination I was able to fix it witout taking it to mechanic.
Best wishes
If i could meet you in person, you would be getting hug straight away! I took my car to the garage and they quoted me £200 and me being stingy decided to follow your guide and it worked!
Thank you so much!
Thank you so much for this blog.
I have lived with this problem for such a long time thinking it was a major problem.
Your blog is highly appreciated.
Phil, that is amazing!! With no previous experience I did the whole thing myself!! Brilliant!!! Thank you so much.
Very useful, saved me 100 pounds.
Brilliant - I am a 60 year old lady driver with no experience of cars (except driving) and it worked like a dream.
Only problem I had - the spring thing came out and I couldn't work out where to connect them, I read all of the posts and found the answer there.
A picture of the springs attached would put the icing on the cake!!
Thank you so much Phil
Car failed the MOT because the stalk was shorting in one direction (apparently there are 12 new additions to the MOT from April 2012) along with my drivers seat (although it is bolted to the floor soundly) had some play in the spring of seat, block of wood sorted that (Ministry of Transport are having a laugh by failing motors on this). Anyway, just used this method on a 306 merdian diesel estate indicator stalk and it helped a lot. The inner guts of the 306 look a little different from Phils pics but the princible is the same. Soaked the contacts with W40, wiped clean and dried. Be careful when taking apart and pay attention to the black cancelling pin that has springs on each side. The lid has 3 very small ridges near the rear and you need to give a bit of 'push' to ensure the inner plate with springs and white housing and bronze rollers click into place. If you remember how the cancelling pin was removed then use this knowledge to ensure it is assembled correctly, unlike me who fired of the lid, gubbings fell onto the deck and I then spent about 3 hours working out how to get it back together :-(
Just done this (15 July 2012) on a Peugeot 106. In my case the screws holding the covers on were T10 not T20, and I didn't have the right screwdriver. Removed the screws using a standard small Allen key, as they are not in very tight, and got a driver later for replacement.
Thanks a lot for the excellent advice
Excellent instructions and photos. Solved the problem.
Thank you.
Thanks Phil.
It really worked.Wish I could get other problems on my Peugeot 206..like speedometer not working etc, sorted with plain simple instructions like yours.
Thanks
Vineet
Dinni4040
Just wanted to say a MASSIVE thank you for being so kind to pass on your valuable knowledge. Hadn't been able to drive my peugot 206 for a week because of this problem, then I found your wonderful site. Had it back on the road in 40 minutes. Fantastic
Thanks so much for this post, took me an hour tops to fix and was previously quoted £85 just for the replacement switch!
Hi Phil, I can see this is a fix for the indicator problem, but im hoping you might know something about why the headlights come on on my 206 (2205 1.1 sport 3 door). Iv tried disconnecting the battery & doing a BSI reset (thought im not sure if it worked). Do you know if these two problems are a similar fix? or know of a solution? Regards
Hi Phil my problem is the headlights come on by themself? Car is a 206 1.1 sport 3 door. Iv tried disconnecting the battery & a BSI reset with no luck. Do you know of a fix for this??? Or if the two have the same solution??? regards
Sorry Alex - I have no idea. I don't even know what a BSI is. There are some 206 forums out there where the accumulated knowledge is huge. Do a quick Google search for them. Good Luck.
Hi the BSI is peugeots on board computer. I was hoping maybe the 2 problems may have been related as there both on the stalk. I suppose it doesn't hurt to try. Problem is the headlights are being tripped and draining the power from the car, maybe someone will be along with some answers as there are no solutions that I can find online.... :(
Had a simialr problem with my Mum's Berlingo recently. Truned out to be earth leakage in one of the headlights caused by a dodgy connetion. Try pulling fuses to see if the problem goes away, if it does then this might point you in the right direction. Good Luck.
Hi Phil thanks for your reply I will try looking at all the fuses both under the steering column and in the engine bay, about the problem you had. How much wiring is involved with headlights?where was your wiring not earthed properly? it's possible it might be the same solution with the 206.
The engine bay is in abit of a mess, there is paint all over it. Possibly that might have something to do with it? Thanks
Earthing in the headlight itself. Look for anything attached to the bodywork and clean the connection. 206 probably very different from a Berlingo. Mind you, my old VW camper does wierd things when the earth connections get corroded.
I don't usually leave comments but this walk through is priceless. Took me about an hour but that's because I struggled with the clips! Invaluable advice! Thanks a lot
Thanks for your fix' I did this for my mum and now her indicators work perfectly..... The mechanic quoted her $400 to fix it.... Much appreciated!
Just fixed indicator stalk using this guideline. You sir, are a legend. Thank you!
Excellent article! Thanks for posting. I just cleaned out the indicator stalk on my wife's 206, same problem: indicates to the left on its own accord; but not anymore!
Phil why isn't there a statue to you? I used your guide to fix my wife's car and have passed a link to your guide to mt Brother in Law who has the same problem with his 206.
Thank You Very much
Another fan here.... what a legend you are.
I own a 2000 green xreg 206 LX as well...
To my shame I have put up with the randomly blinking indicators for over a year... gradually getting worse before I got round to sorting it out (just before the MOT).
Followed your clear concise instructions. Thank you so much for saving me a bunch of cash (and a potential crash).
Phil
Just thought I would also take the time to say thankyou for the info, my 10 year old 206 has been doing this on and off for 2 months now, its actually quite dangerous given some of the idiots on the road these days.
About an hour work and fixed although half of that was spent looking for the right tools.
T10 and T15 torxscrews on my model. Thanks again.
cheers phil just done this on my peugeot and its working great now .
Really helpfully, I'm not handy at all generally but this walk through made it so easy. Thanks for taking the time to post such an informative how too.
Anyone know if this fix works for the '02 hdi model?
I think I need both sides if I was replacing from new.
Sorry - No idea about the later cars. I think the stalk design changed in 2000.
Thank you so much Phil!!!!! I have been putting up with an indicator that randomly indicates right for over two years. It's been getting steadily worse to the point that I thought I was going to have to fork out £200 or so to get the thing fixed. And then I found Phil's Workbench. The step-by-step instructions are perfect and I fixed it this afternoon. It only took me about half an hour - I used an air duster to give the groove a good clean. I found the hardest part was fitting the outer casing back once I had reinstalled the unit. I cannot thank you enough for this.
thanks mate, that worked perfectly first time.
Being a novice, I did manage to put the lighting switch back in the wrong position, which left the lights on, so had to take apart again to move back, but stunned at how simple it was!
Many thanks for sharing your knowledge!
thanks a lot for posting this indicator stalk works perfectly now. cheers for your time.
thanks for posting this. worked like a charm. cheers
Wow, such a simple post, but so much pain & suffering alleviated! I just wish I had found it sooner though. For years my 306 indicators had been driving me nuts, but search the net as I may, all I could find were posts saying the stalk had to be replaced. I even had the indicator stalk out before, considered trying to open it but decided against, fearing a gazillion intricate springs & contacts were part of its makeup and would never again go back together if opened...
Not a bit of it, once the fiddly bit of actually opening it without doing too much damage has been achieved, the contacts in question are pretty much bullet-proof, with nothing to fly anywhere. The only wear was with the sliding contact itself and after rounding it again with a small file my indicators are perfect again! :D
PS. Although I don't drive the 306 much now (Corolla man!) I decided to start it up yesterday and take it for a spin only to be greeted with smoke coming from the indicator stalk, which on 'cooling' refused to switch to the left-side indicator position anymore. I really thought it was done for then. But after another Google search, I found your blog post, had my little epiphany and made straight for the Peugeot. 15min later I'm rocking & rolling.
Voted 'Most Valuable Post', at least by me. Thanks man.
Oh my god you just saved my life. Same problem ,same solution. Thanks a lot
Followed your post after my 2001 406 Coupe had the left indicator stuck on for a week and a half ... Diddnt know if they were the same, but took a chance and so far so good. Thank you :)
Any idea if this would be a similar fix for my wiper switch stalk?
My rear wiper doesn't turn off without a good giggle.
However I have a 106, you think it would be much different?
Thanks for the tips :)
Charlie
Charlie - Possibly is the best I can say. Some gentle investigation might be worth it though. Try not to dismantle anything you can't put back together.
Or go to a scrapyard and remove a switch from a 106. Then you get to learn how the thing goes together without messing your own car up.
Good Luck
Any advice for me, when I use my left indicator it just stops flashing and if I tap the control it starts flashing again do you think its caused b'y the same debris problem as stated on above posts?
Can anyone help me? I just got my Peugeot 206 03 plate and my left indicator just stops flashing during use, do you think it could be residue causing the problem like stated above ?
Hi Phil. Can you give me any advice on why my left indicator just stops flashing during usage on my Peugeot 206 03 plate, if I just tap the control stick it starts working again
Thanks kindly
Sue - It sounds like an electrical contact that is only just making contact. I suspect that there is a spring that has lost its spring BUT this is a guess. I've never owned an 03 car to have a look at and previous respondents have mentioned that the controls have changed design since 2000.
Please note: I don't monitor this 24 hours a day so repeatedly posting a question won't get it answered any quicker. This isn't my job, just something I do for fun.
The repeating was because of my tablet playing up,
But thanks
Worked perfectly on my '96 Peugeot 106 (phase 2) as well. The stalk is exactly the same, the only difference is that the steering wheel covers are held together with T10 screws instead of T20.
Thanks for the directions!
My mums car was also indicating for itself at random times. I ordered a replacement part of ebay for £18.00 and due to your instructions took me only 20 minutes to change the stalk. Thanks very much!
hey i just done this its solved the problem but the self cancelling is now not working any ideas? thanks
Sounds like you need to take it apart again - Unless something has broken, it's a case of checking the re-assembly.
Fantastic. I finally gave in and did mine today. £12 for the tools (another set!), and another complaint - it didn't take an hour, it took 10mins max. And I did it in Homebase car park. Homebaae sell a Black and Decker set with all of them correct sizes.
Hi Phil, Great post, obviously useful becuase it came up first in Google. I tried this for my 306 but it didn't solve my problem (even though there was loads of filings in the stalk). I tracked my problem down to the indicator relay. I cleaned it, is resettled the pin seats, but no. then I gave it a firm tap while it was running and bingo, fixed. Probably only a short-term solution. I'll replace the relay (black plug-in box in the inside fuse box).
Also Phil.
Further to my post above. I found my problem was a faulty indicator relay (1" black cube on internal fuse board). I opened up the relay and worked out that the magnet that moves in and out of the coil jammed occasionally. This was because the copper leaf spring had lost some of it's spring. A wee tweak of the spring with a pair of pliers and it's working like new. Also Phil.
Oooh! You had me excited there for a while, Phil. I have the same common problem and set about following your instructions. However and unfortunately my 206 is an estate and therefore has a combination stalk and it is not possible to simply slide out individual switches.Whilst I had the cowling off though I blasted the exposed part with an air canister and let's see how that goes. Thanks though. It looks like many others have benefited from your advice AND saved a packet too.
Also work on Citron XSara MK2
Fixed my problem. Thank you!
It took me 25mn to fix it. It's so easy. The tricky part was actually to remove the plastic part from the stalk. Happy days !!
brilliant . repaired with ease once i got the plastic cover open. paid £60 for a replacement last time. many thanks
hi Phil,i have a 206 peugeot 53 plate and i am having the same problem,i have read on some sites that you can only replace the indicator stalk by replacing the whole comms unit,is your method ok for my peugeot please...thanks,,,gary
Gaz - No idea. I think later 206s had a different column arrangement (some of the comments mention this) so your best bet is to take the plastic casing off and have a look. I've not got a later car to play with so can't help much more. Anyone else?
Hi, I also have a ten year old 206 on a 53 plate, from Coventry!
And yes, I'm having an indicator problem but not quite like yours. I find that if I'm indicating to make a right turn, then take the corner, the auto-cancel feature works but 'throws' the switch too far to the left so that the left indicator comes on. It doesn't happen from left to right turns however.
Very frustrating to have to catch the indicator with my fingers when straightening up from a right hand bend!
hello i just had this problem with my 1999 206, when i was inside the pin that makes contact was worn on one side so i turned it around and cleaned all the shavings off the contacts and now it works perfectly....... thank you for this post as it has saved me £30+ for a new stalk
GREAT !!!!! It works. Took my husband less than half and hour and saved us a fortune. Thank you so much for this post !!!!!!! :)
Nicely explained fix Phil, just worked all this out for similar fault on 2000 yr. phase 2 306, wish I had read your post first! You need a long Torx driver or l-keys, a driver/ bit set just wont go in to the front screw holes. Fault on the 306 was left indicator intermittent, caused by the bullet shaped contact been worn on one side, right indicator worked fine. Fixed it by swapping the bullet contact for one in the lower part of the switch. This works because the lower switch uses the end of the bullet contact rather than the edge. Always worth a go at fixing these things because if you break it you are no worse off than before - you need a replacement switch. Found out about the other bullet contact because I opened the low part of the switch first.
Thanks Phil. I followed your instructions on a Nissan Serena here in New Zealand, it isn't the same as the Peugot but by using your instructions it was easier to follow than anything else I could find on the web. By following your instructions I can now rule out the indicator stalk switch and it must be the relay. My problem is the relay keeps clicking when the indicator isn't in use.
Thanks Phil, you've made me popular with the wife at last! Brilliant instructions, very clear and saved us a lot of money.
Unbelievable... I was quoted NZ$300 to fix this. Google is truly a friend and you Sir are a Scholar! Very easy to follow and had it opened and cleaned up and screwed back in 20 min. i however did struggle getting the cover back on (Step 1) that alone took me 30min of fidgeting and trying to get it to clip back. I getting me a Single Malt to drink in you honor.
You are a star. It took me 25 mins.
Thank-you Phil for taking the time to post this; you have another successful fix.
2000 206 1.4 petrol. When indicating both sides would flash. Googled, found your blog, followed the instructions and my wife's car is fixed.
Not sure why everyone is posting what colour their car is but: - Silver! :-)
Thanks again.
Posted on 16th June 2015, so your post is still helping people nearly six years later!
Brilliant. It worked just as you said it would.
Phil, your a legend. Quite apart from the fact I saved money I felt good that I didn't wreck anything and actually completed the tast successfully.
Wooohooo I got indicators again and two new torx screwdrivers :)
This worked a treat and solved the problem ........ many many thanks
Thanks for taking the time to write this, much appreciated :)
I've a 52 plate Pug. I've a problem where when indicator is turned on it flicks a few times then the indicator stops and lights come on. A quick nudge to the stalk gets indicator going again, only to have to repeat the process. Using full beam is a pain in the butt as they won't stay on. Before I follow your above instructions, do you think they will solve the issues or am I looking at a new stalk?
Louise - The short answer is I don't know. I also have a feeling that the 52 plate will have a different switch to mine, looking at comments above the design changed over time.
What I suggest is try taking the casing off and sticking a vacuum cleaner nozzle in every hole you can see to suck out any detritus. That might save you taking things apart. However, I suspect you need a new switch. Of course, if you can get a second hand spare, it might be that once the cover is off, the way of fitting it becomes obvious which would still save some cash.
Good luck.
Great stuff Mate. I have a peugeot 306 GTI 6 that failed the MOT because of the Right indicator flashing frenetically at the relay but not working the light properly. The dismantling of the binnacle is not identical but similar enough (same T20 screws) and the rest is very similar. Cleaned it out put it back together with a bit of fiddling and jobs a good un.
Garage quoted me £78 for the part plus labour so easily saved me £100.
Only thing I would suggest to people is take photo's as you dismantle so you can see how it goes back together. There seemed to be a lot more springs and connectors in this unit.
Hi Phil,
I know you posted this in 2009. It is now 2016 and I was encouraged by your courage to pull the switch apart. My problem was somewhat different in that my Dim headlights did not work (Brights were fine). I checked the bulbs - Ok, I checked the fuses under the steering wheel - Ok, I checked the fuses in the engine compartment - Ok.
I looked up on several sites, all of which suggested removing the steering wheel with the possibility of being gob smacked by the airbag.
On fiddling with the switch, I actually managed to get the lights on if I pushed the rotation hard.
Taking your advice I removed the switch, tore it apart and realized the components I needed to repair were on the other side of the switch. So with your courage in my wings, I removed the other side of the switch too. There was my problem, one of the sprung contacts (whatever you call them) had got stuck in it's sleeve probably due to heat. Using a paper clip I removed the spring and contact, then using combinations of a craft knife and a drill bit, I cleaned up the melted plastic. In putting it back together, the spring and contact would not stay in so I put a drop of super glue on the end, popped it in, and Bob's your aunty. Re assembled it, and it works beautifully.
Thanks for your advise. I have photos which I would love to show but don't know how.
Mike Patrick
South Africa
Cheers! My stalk started to randomly switch on the right indicator. So I opened and cleaned it (I also rotated the "needle", which makes the contact to switch indicators on, so it has better contact now). Works perfectly now!
Thanks, Peetu.
My offside indicators were on constantly even with ignition off!! So removed stalk as per Phil's blog which made no difference lamps stayed on! So stalk OK!! Removed fuses for Indicators & Hazard warning lights Then replaced both and to my surprise all back to normal!!! Tidy!!
Thanks so much for this Phil, worked a treat!
Thanks Phil,
I've successfully dismantled my Peugeot 106 indicator stalk to find out that it is worn away and needs replacing. I'll order a replacement tomorrow and will have no problem fitting the new one. Brilliant post… thank you so much. Saved me a fortune having the garage dismantle and fit another one!
Nina
I have 206 cc 2004 1.6 indicator switch sometimes work and stop and I have to push it to work again
Do I need to change comm2000 or just replace new indicator switch with old one?
Thank you Asgar
Sorry - no idea about more modern cars.
My left indicator has been coming on randomly since I brought my Peugeot 206, 6 months ago. I was told it would cost £80 to fix. After finding this post an following the simple instructions I have successfully fix it myself. I am so pleased as I’m blonde and female :) thank you Phil.
Had a 1999 Peugeot 206 with this issue; a colleague and I followed this guide and fixed it in about 9 minutes! Fantastic help, thank you!
Another vote of thanks. A fix made very easy by your excellent instructions.
This post must be so old but it saved me !!!!
I bought a Y reg 206 (1999) for 250 pound to get me to work and back
( I was trashing my new car )
This post saved me !
Thank you so much
This post must be so old but it saved me !!!!
I bought a Y reg 206 (1999) for 250 pound to get me to work and back
( I was trashing my new car )
This post saved me !
Thank you so much
19 Nov 2019
I have a very old (2000, X reg), but very low mileage (45,000), 206 GLX.
Thank you so much for this thread, I had the dreaded random trafficator coming on by itself, and this post saved me. I had concluded that a switch failure was unlikely and was blaming the BSI box. Thank goodness I did one last Google and this post turned up, hooray!!
Anyway, I followed Phil's method and it does seem to be fixed ok now.
Its worth noting though, that stage 4 is pretty difficult. To get the cover off from the 6 lugs (3 each side) needed a combination of pressing down hard on the top pointy end of a lug and at the same time prising the edge of the cover upwards to give a bit of room for the lug to slide under it, and at the same time prising the cover away with a fine 1/8" screwdriver blade in the tiny gap between the cover and the main body. You need to work round all 6, and watch out that one might snap back into lock, while you're working on another! Also the very outer lug on each side needed a screwdriver up the hole behind it to lift the plastic cover up from the lug.
I used an illuminated magnifying bench light, as it's pretty hard to see what's going on with these tiny black-on-black plastic retaining lugs.
I took some close up photos but can't see a way to post them here, but willing to email them if anyone would like them.
Phil
Thanks for this post, I've got a 19 year old 206 Roland Garros with 66km, this was the cheapest, easiest fix to a pain in the backside car problem I've had for quite some time. Dismantling the indicator unit with the 6 lugs is fiddly but the whole job was completed in 30 mins
Great advise but after cleaning the switch my positioning light stays on as soon as I turn the engine on. Any advise what's wrong as inside all seems to be good.
Difficult. I'd get your vacuum cleaner out in case there is a missed bit of metal hiding in there. Good luck!
Hi Phil,
The timestamp at the bottom of these post only gives the time, not the date. given that the threads been going for 10+ years, it would be useful!! to add the date as well.
Thanks again for the fix info, and my X reg 206 is still going strong after the comments I left in 2019.
Posted: 10 Feb 2021
Not something I have control over I'm afraid. There's no setting in Blogger to switch it on - otherwise, I would as I agree, that would be handy.
Dear Google...
My Peugeot 206 cc indicators, when engaged properly, stop working for a reason unknown to me and when they stop, the lights come on! Replace the indicator arm? Or clean it? ukcommando41@aol.com
Phil you're a genius and a gent for taking the time to post this solution. W reg 206 here, 23 years old, worked a treat!
I also have a green 206 and live in Coventry, strange coincidence. Anyway, neither of my indicators work but there is a fast clicking sound. I shall follow your instructions and see what happens. I already have the torx divers so hopefully it'll be a free fix 🙏 🤞
Post a Comment