A daily updated blog typed by someone with painty hands, oil under his fingernails and the smell of solder in his nostrils who likes making all sort of models and miniatures. And fixing things.
Friday, January 31, 2014
Weathering powders are go
I don't know when I first used weathering powders on a model building, it was probably with an air of desperation when traditional methods had let me down or I was fighting a deadline and wished the paint would dry. Now, every building I produce is on the receiving end of a dusting.
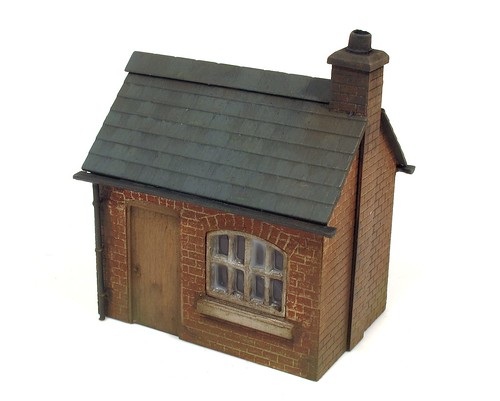
The Ratio Yard Office is no exception. Around the lower brickwork there is a hint of Humbrol green to simulate rising damp. After this dark brown with perhaps a hint of rust grubbies up the brickwork. Finally, smoke is heavily applied to the chimney (which has been drilled out so it looks hollow) and dusted on the roof.
The tones are amazingly subtle. Scrubbing away with the bristle brushes seems to blend the colours in a slightly magical way. I'll be pretending that it's all skill but that wouldn't be entirely true.
Overall, a nice little quick project. The only improvement I can think of would be a thinner window, perhaps something etched. Even glazing with Krystal Klear doesn't really hide the depth of the frame. Next time (I'm sure I'll build this again) I could paint the inside edges of the frame with black and only the front surface with white.
Hmmm, you never stop learning.
Thursday, January 30, 2014
More roof work
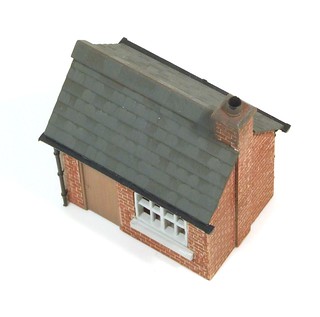 According to Mr Welch and his book, once you've painted a roof and then picked out individual slates, the modeller should dry-brush the surface with a slightly paler mix of the base colour.
 I mixed up from Humbrol 66, let down with a little 27, picked out a small, knackered, brush and worked the colour over the surface. To tone down the picked out tiles, I found quite a bit of paint needed application. Even then, I think I probably should have been a bit more subtle with my highlighting of individual slates.
While I was dry-brushing, the top of the chimney received a little tickle too although this will also get a dose of weathering powders as part of the next stage.
After this, the door, window and guttering have been painted. The last was in Railmatch weathered black which yet again, dried with a satin finish. Why isn't it matt? At least a blast of Dullcote sorted that.
Wednesday, January 29, 2014
Book Review: Full Cicle by Jane Evans
Subtitled, Ted Evans and the story of The Model Shop, this book is a history of both a man, a shop and a hobby.
Ted Evans founded "The Model Shop" in Northampton in 1937. An aeromodeller, he originally saw it as a way of supplying the demand for high-quality materials for those seriously building rubber-band powered model aircraft. "Super Model Aircraft Supplies" - the name can still be seen on small plate above the door today - was a mecca for those 1930s model makers who aspired to the leading edge of competitive flying in the Wakefield Cup.
As a designer of prize winning model aircraft, Ted was well placed to understand his customers needs but clever enough to know that a general model shop would survive the turbulence of the hobby industry better than a specialised outlet.
The book takes us through Ted's life, especially his aircraft designs, but against the background of model making as a hobby. The authors has researched many the history of many major firms producing models and kits including Bassett Lowke, Hornby, Airfix, Mainline, Lima and Bachmann. These all come in to the story at various points in the narrative. Although the main focus might be Ted and the shop, it's really a history of our hobby and how it has changed through the years.
Nowhere is this better illustrated than the title. In the early days of modelling, there were shops a-plenty. Every reasonable sized town would have several outlets and there was next to no mail order. Then the world changed, shops closed and people ordered by post and later on-line. Now, the wheel is turning again and customers are apparently realising the benefit of dealing with real, knowledgeable people face-to-face.
Although not a fat volume at 120 pages, the test is full of fascinating information. I suppose I could pick the odd hole in some of the model railway history but only on very minor points. Presumably the other branches of the hobby suffer in a similar way although being much less familiar with them, I wouldn't know.
What I do know is that if you are interested in history from the perspective of model makers, then this is an excellent read.
Full Circle from The Model Shop, Northampton.
Tuesday, January 28, 2014
Painting the yard office part 1
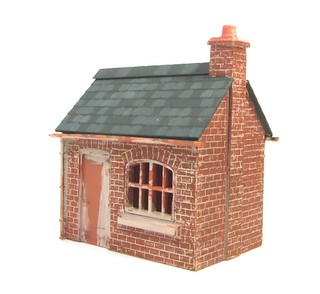 Yesterday, I was concerned that the bricks on the Ratio Yard Office kit weren't prominent enough for me to use the pencil crayon technique to colour them.
 As you can see, I was (happily) wrong about this. A coat of Humbrol 121 for the mortar followed by a good rubbing with 3 shades of brown has done the job. It is important to sharpen the crayons to get them in to the nooks and crannies when doing this. I often file the point to look like the front end of a duck billed platypus as this works well.
On the roof I'm trying a little experiment. I've never been entirely happy with my slate painting so having read the appropriate section from "The Art of Weathering", I'm going to do it "properly".
So far, the roof has had a coat of Humbrol 66 and then individual tiles are picked out with a mix of this and number 27. I put a couple of splodges of each on a bit of plastic (ironically the back of a scrap piece of Wills tiles) and mix then with the brush to get varying amounts of each.
Despite care, the effect is a bit strong at the moment so I had to paint a lot of tiles to avoid it looking like only odd ones had been coloured. Hopefully the next stage will calm things down a bit.
Monday, January 27, 2014
Ratio Yard Office
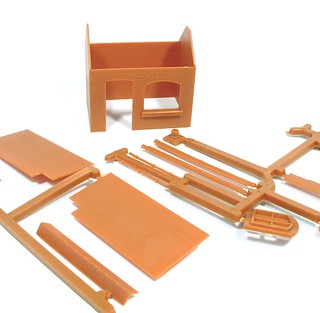 Thanks to Railway Modeller giving away a Ratio plastic hut kit with the latest issue, small buildings seem to be what all the cool Kidz are interested in at the moment. I've had the same kit but found a different use for it.
 However, as a demo for Edgeworth, I also stuck the bits together on a Ratio Yard Office. I'm not going to be using it on the layout but...well you'll see when the mag comes out.
The kit is both cheap and simple yet produces a nice looking little brick built hit that is generic enough to appear in all sorts of guises. The best feature is that round topped window which meant the designer had to include a curved brick arch in the wall, something that is the very devil to scratchbuild.
Obviously I wouldn't be proper railway modeller if I didn't moan a bit about it. You could argue that the chimney stack running down the side of the building has been designed with moulding rather than realism in mind since the sides are not at right angles to the back. A bigger criticism is that the brick effect is very lightly marked on the sides. While this might be scale, I'm not sure how well this is going to work with my normal pencil brick colouring methods. I might have to try something different here.
I don't have a project in mind for this but I'll finish it anyway. After all, it seems a shame to have yet another half-finished project kicking around.
Sunday, January 26, 2014
Model Engineering Exhibition London, 2014
 People have many different motivations for visiting an exhibition. Mine was to practise some driving.
 In a couple of months, I'll be having to head to Alexandra Palace on a Friday afternoon for the London Festival of Railway Modelling. I've never driven in London. I never want to drive in London. The idea of doing it on a Friday afternoon appeals about as much as a Knickerbocker glory made up with root vegetables rather than ice cream.
So, my theory was that if I have a go on a Sunday morning, I'll get a feel for the run. The show provides an ideal excuse as I don't want to drive there, look at the view and come home. I enjoy the ME shows and at least there was a chance of cake inside.
The run down was fine. Ignoring the satnav, I headed for the M1 as this gives less North Circular time at the southern end of the trip. We parked up in a free space and wandered in to the hall. An hour early admittedly, but who cares. A reward of tea and carrot cake seemed like a good idea, although the sausage stand was very, very tempting.
We also had time to look at the snooker table that accompanied the tournament taking place at the same venue and kicking off a few hours later. It would make a cracking place to build a layout although perhaps a little hard to move.
Anyway, inside the hall the show is just like every other engineering show. Some heavy metal models and people selling tools and stuff. I think the London shows is less engineering-y than the Midlands one. The exhibits tended towards the boats, lorries. planes and plastic kits rather than traction engines.
What we did get that you don't see in the Midlands is the Imagineering stand giving youngsters hands on time with some engineering projects. I'm jealous of all this as there wasn't anything like this when I was a kid. Given the chance, I'd have spent all day being taught how to make stuff.
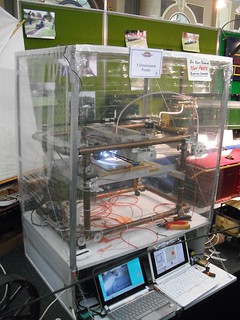 As it was, there was perving over 3D printers and CNC routers. At least 3 of the former were on show including a home-brewed version by the Harrow and Weldstone club. I'm still not convinced for production work but at prototyping tools, they are brilliant and yes, I would like one please. It wouldn't make me throw away my tools but as a bit of fun...
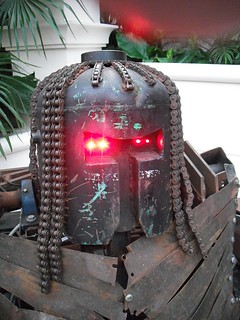
The other impressive display was from Robot Wars. The "robots" (they aren't, they are radio controlled) are amazing bits of heavy engineering. Watching something the weight of a sideboard flipping itself 5 feet into the air is amazing.
Lunch in the subterranean restaurant was excellent. Friendly staff and good food. OK, a bit pricier than normal (main meals £9.50) but you tend to pay a little over the odds at exhibition venues and it was very good stuff.
Back upstairs, there was a large radio controlled lorry display and RC flying in a netted off section of the halls. In this respect, the show is much more like a European multi-discipline event than a traditional UK show - fantastic as far as I'm concerned. I'd love to see more of this at the Midlands show. Mind you, they have been granted planning permission to extend the venue, so maybe in the future.
Possibly my favourite stand was that from The Society of Ornamental Turners. I'd never heard of them before but it seems that rescue vintage turning equipment, restoring it and then taking the machines out on the road to demonstrate the fascinating equipment. Maybe it's not proper modelling but watching special patterns being carved out of dense wood, perspex and metal is amazing. Maybe this sort of job is now carried out by computer control rather than complicated mechanical linkage, but I'd rather watch the later.
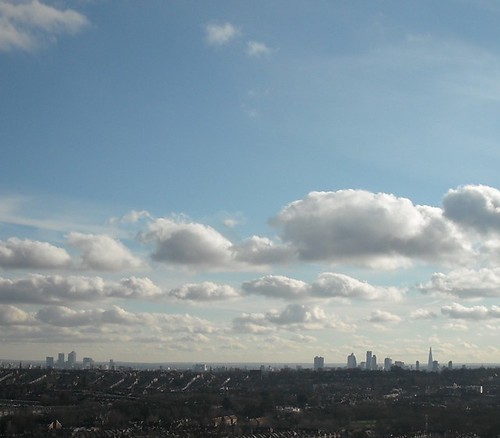
Outside is the final joy - the view from Alexandra Palace is amazing. A panorama of our capital city laid out in front of you. You get this bit for free too.
The trip back was less fun. Mrs Satnav insisted we go up Muswell Hill (it must be 1 in 4, clutch smokingly steep in a traffic jam) and then along to the M40 so I'll be ignoring it and heading for the M1 signs next time. It was worth the trip just to learn that.
My photos and videos from the London ME show
Saturday, January 25, 2014
Wanted: Daylight spotlights
Does anyone know where I can buy daylight balanced spotlights from?
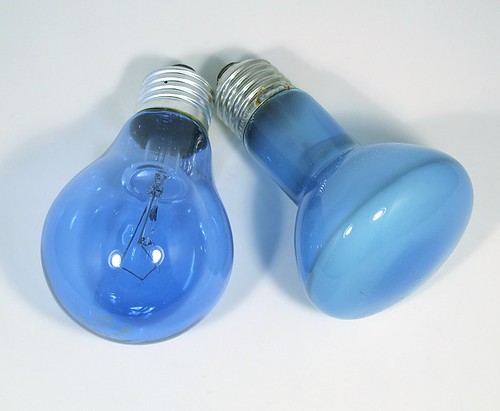
I use them to illuminate the layout building workbench and also for photography but while I can get the 60W bulbs (left) from t'Internet and possibly my favorite hardware store, they aren't as good as a 60W spotlight.
I'm assuming that the rules over incandescent light manufacture have killed them off but I'm struggling to find a suitable replacement. The bulbs have to fit a standard ES fitting but I'm happy to use long life versions IF I can get sufficient light.
Suggestions please dear reader.
Friday, January 24, 2014
A crop of huts for 50p
At the London model engineering exhibition (report coming up on Sunday) I picked up a bag from a box marked, "Everything 50p".
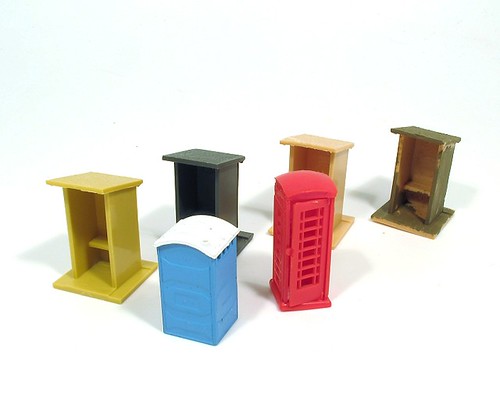
Inside were the models above. A Bachmann portaloo, Merit K6 telephone box and 4 Hornby fogman huts.
I'm not sure why I handed over my money - probably for the portaloo which is part of a set containing several pre-painted figures and therefore costs a lot. You never know when you need a portaloo.
What I don't understand is the 4 fog huts. Who needs 4? How did anyone end up with so many? If I remember rightly, these are supplied one to pack with two other plastic huts. Presumably someone has been buying lots of huts and decided to dispense with the extras that were surplus to requirements.
Hopefully I'll find a use for them although I suspect a long period in my stash of bits beckons first. If anyone is expecting a lot of foggy weather on their model railway, please feel free to make me an offer...
Thursday, January 23, 2014
Better layout lettering
Today's idea isn't new. It's not even particularly revolutionary - I mention it only because in the model railway world, there are going to be a few people who will say, "Why didn't I think of that." and then go away to copy what I've done.
Needing some letters for the Edgeworth fascia panel, I could have gone down the route of individual letters purchased from my favorite DIY store but having tried that on Clayhanger Yard, I wasn't keen on the results. They were just about OK but the vinyl stretched when I stuck them to the wood so some letters were slightly taller than others.
I've also painted my own lettering (Melbridge Dock) and used the biggest Letraset available in the local art shop sale (Hellingly). These worked but hand painting takes time and anyway, I'm not signwriter. The art shop is long gone and dry-print letters big enough for the layout probably don't exist anyway.
This time, I determined to do better than previous efforts. A quick search for local sign makers lead me to SignDepot based opposite a local branch of Sainsbury's in Warwick. After a quick phone call I was parked in said supermarket and nipped across the road to chat to the nice man in the shop.
15 minutes later I had the name cut out on a sort of super silhouette cutter complete with back and front papers. All I had to do was stick the thing to the fascia.
It's a fiddly job. Taking time to line everything up properly is well spent. Once the letters were smoothed down, the fronting sheet is gently pulled away to reveal a perfectly spaced name in suitably bold letters that will show up from a distance in an exhibition hall.
Cost - A very reasonable £18 including VAT.
Fuller details and photos will be in next months British Railway Modelling.
Wednesday, January 22, 2014
Book Review: Railways of the Isle of Wight by Marie Panter
Here is a book that contrary to received wisdom, you can judge by its cover.
The front shows a locomotive at Ventnor station in 1962.
For someone like me, it shows very little chuff chuff and an awful lot of surrounding infrastructure. Look at the slightly higgledy-piggledy nature of the buildings. That telephone box pushing its way in to shot like a chav behind a local news reporter on TV. Plant life competing for space around the base of the lamp and lineside.
Brilliant. Just what I like in books on trains, not very many trains.
Inside we get more of the same. Each line is described and photographed but the emphasis seems to be on the modelable bits of railway and not just the engines.
That's not to say rolling stock is ignored, it's just that this has been covered extensively by others - railway enthusiasts are notorious for ignoring the surroundings and only looking at the engines. Here we've images covering the whole island system dating from 1906 to the late 1970s. As far as I can tell, every single station appears, often several times. Not just the main ones either but all the intermediates stops of which there were many.
The island lines once provided a comprehensive transport system of a type that we don't really see nowadays. When you can't jump in a car and drive from one side of the island to another, communities seems far more individual. Thus, the lines were initially all separate entities, a bit like the system on the mainland before the grouping.
At the back of the book there is even a page on the various schemes to link the island to the mainland by tunnel. Ideas along this line continued into the 1980s.
As a boat enthusiast I especially enjoyed the pictures of rolling stock being delivered by sea. Maybe I should try modelling some of this one day!
Even if you aren't interested in the IOW railways, this is an excellent book. Quality of reproduction is very high with everything printed on glossy paper.
My only real criticism of the book is that complete lack of both contents and index pages. The later isn't uncommon sadly, but no contents page, what happened there?
For £13.95 though, this is a very interesting addition to the bookshelf. One worth many hours of careful study by both transport enthusiasts and modellers.
Railways of the Isle of Wight at Amazon
Tuesday, January 21, 2014
Great Western Emulsion
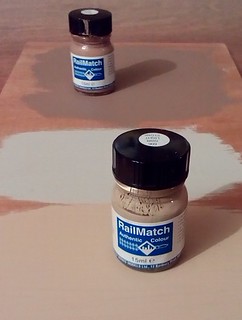 For Edgeworth's fascia panel, I've decided against my usual varnished wood finish. Instead some proper Great Western Railway colours seem appropriate.
 Obviously I'm not going to use my little pots of Railmatch enamel - that would cost a fortune. Instead I took them on a trip to my local Homebase DIY store. The plan was to wander around the racks of decorating supplies to pick some suitable big pot paints.
Once I got there though, an exciting prospect appeared. There was a Dulux paint station thingy which included a scanner. The idea is that you take in a vase or some curtains and they can precisely match the paint to these object.
So, the assistant had a go. First through the glass bottom of the jar. That didn't work, the glass confuses the scanner apparently. Next, to the inside of the screw top once the paint had been shaken and deposited plenty of pigment up there.
We got results and I had some 250ml matchpots mixed up. Sadly, only emulsion is available in this size (why?) but at the price, just over 3 quid, I wasn't going to argue. Well, that will be more than enough to do the fascia and fiddle yard front.
Top be honest, I felt the scanner had got the dark stone about right but the light stone was "Rum Caramel 4" and although the colour chart looked about right, the paint in the can didn't.
Still, assured that these things can change slightly as they dry, I went away and did some test painting.
Result - Dark stone (Velvet Truffle 3) looks pretty good. Light stone - rubbish.
So, the next day I tried again. This time I had a piece of plasticard I had sprayed with the colour.
Again we scanned and the results were even more laughable than before. So, the helpful assistant and I went through by eye and picked out Soft Almond 3. This looked better in the tin and just as good on the plywood.
So, the message is: Dulux colour scanners are made chocolate teapots but the mixing area is a good place to buy reasonably priced oddball colours in emulsion.
Monday, January 20, 2014
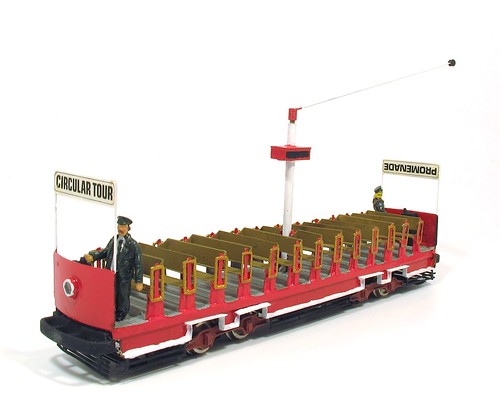
Blackpool Toastrack Tram
While clearing the display cabinet of diecast trams, a few cars are destined to remain, one of which was my first foray into building etched brass kits.
Designed by Ray Collins and sold as part of the Model Tramcar Design, I found the kit on a second-hand stall at an exhibition. It was cheap enough and I'd spent enough time in the company of "proper" railway modellers to know that soldering bits of yellow metal together was something I aspired to. Not earning very much money at this point, I wasn't keen on spending what to me appeared to be a fortune on a real loco kit so this ticked a lot of boxes.
Beside, thanks to my Dad, I liked trams and maybe we could run it on the layout he planned. At least it was the right scale - 4mm.
As I recall (long time ago), the kit went together quite well. The handrails were glued on as I didn't fancy my chances with solder at this point. Everything else was fixed with the iron though and I'm sure I learnt a lot along the way.
Power comes from a central motor driving rubber cardin shafts and powering the bogies. It's not a great runner but then the motor is one of those 50p jobs and I was a novice at fitting pickups in those days. Not that I'm much better at this now.
With the model unearthed, perhaps I'll one day find time to have a look at the running. Not sure where it will stretch its legs though, that tramway layout is still at the planning stage!
Sunday, January 19, 2014
St Albans 2014
St Albans show turned out to be surprisingly easy to visit from Leamington. If you set off by 8:30am on the Sunday, the M1 is pretty quiet, the trip from the motorway to venue is short and not too fiddly and you can bag the last parking place in the multi story next door which doesn't charge for parking on the day of rest.
There was a bit of a queue when we got there so whiled away a few minutes in the nearby Costa coffee (this is an in-town show) where I discovered you can buy giant sized chocolate teacakes and that one of those and medium hot chocolate is a bit too much choccie in one session even for me.
Once inside, it was crowded but moving around wasn't too hard. Our first objective was to talk to traders finalising bookings for the Leamington show. That meant lots of chat but I did manage to get a bit of layout gawping in too.
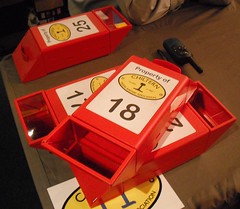 I wasn't the only one. The CMRA who run the show have invested in a pile of plastic periscopes. I recognise these from a few years ago and have asked one of the big noises in the Association if they can tell me where they came from as I'd still love to add one to my layout kit. From a safety perspective, these have got to be a better idea than renting out step stools for children to fall off.
For a change, my favourite layouts weren't the smallest ones in the hall. They were even foreign prototypes.
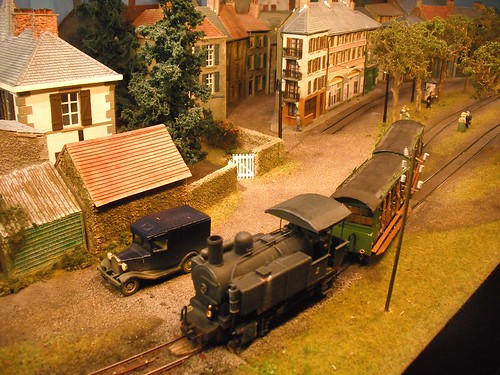
On the stage my eye was first caught by some exquisite, atmospheric modelling of La Baraque. Although using 16.5mm gauge track, the scale is 1:64. To be honest, operation was a bit limited with a single train circling the model repeatedly but that didn't worry me. The star wasn't the steam engine, it was the buildings. The modeller, Hans Lovet, has captured the look of a run down town with slightly crumbling architecture.
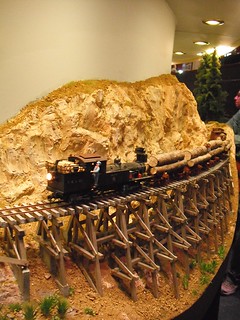 Next to La Baraque, there was Three Chop Roundup, On3 (1:48 and 3/4" gauge), an American layout that also had some cracking modelling going on.
Using a logging line as a prototype, this is circular layout which encourages the viewer to walk all the way round so they don't miss anything. Even the fiddle yard area has a substantial wooden trestle bridge running along its back.
By lunchtime the crowds were still thick so we headed out for some food. Sadly, I missed the turning for the upstairs cafe and we ended up in town again. There was a food fair taking place but the I didn't think I could manage a whole ostrich egg so we settled for a snack in BHS. Sorry, this means no review of the in-site catering but I can report the jammy doughnut was lovely.
Back inside, there is one more layout I need to mention, Christopher Paynes Pynton Tramway Company.
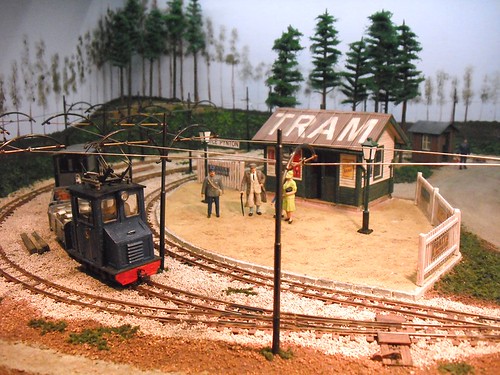
Another odd scale - O9 - 7mm scale on 9mm track to represent 18 inch gauge. The entirely fictitious model assumes someone built a rural line and then electrified it with overhead wires. The builder describes the idea as, "a bit of a stretch" but it's not that different from the Hellingly line which also featured overhead electric running through a bucolic English country scene.
The central station building with "Tram" painted on the roof reminded me of Laxey Station on the Manx Electric Railway although I think there was a Colonel Stephens railway (Rye & Camber?) with a similarly decorated building.
Although a flight of fancy, I think the scene is pretty and although it didn't exist, we wish it had done.
I've scratched the surface of the show here. The quality of the layouts was very high this year but I don't have time to praise every one of them. Instead why not head over to my Flickr gallery to see what I haven't mentioned.
There was a bit of a queue when we got there so whiled away a few minutes in the nearby Costa coffee (this is an in-town show) where I discovered you can buy giant sized chocolate teacakes and that one of those and medium hot chocolate is a bit too much choccie in one session even for me.
Once inside, it was crowded but moving around wasn't too hard. Our first objective was to talk to traders finalising bookings for the Leamington show. That meant lots of chat but I did manage to get a bit of layout gawping in too.
 I wasn't the only one. The CMRA who run the show have invested in a pile of plastic periscopes. I recognise these from a few years ago and have asked one of the big noises in the Association if they can tell me where they came from as I'd still love to add one to my layout kit. From a safety perspective, these have got to be a better idea than renting out step stools for children to fall off.
 For a change, my favourite layouts weren't the smallest ones in the hall. They were even foreign prototypes.
On the stage my eye was first caught by some exquisite, atmospheric modelling of La Baraque. Although using 16.5mm gauge track, the scale is 1:64. To be honest, operation was a bit limited with a single train circling the model repeatedly but that didn't worry me. The star wasn't the steam engine, it was the buildings. The modeller, Hans Lovet, has captured the look of a run down town with slightly crumbling architecture.
 Next to La Baraque, there was Three Chop Roundup, On3 (1:48 and 3/4" gauge), an American layout that also had some cracking modelling going on.
 Using a logging line as a prototype, this is circular layout which encourages the viewer to walk all the way round so they don't miss anything. Even the fiddle yard area has a substantial wooden trestle bridge running along its back.
By lunchtime the crowds were still thick so we headed out for some food. Sadly, I missed the turning for the upstairs cafe and we ended up in town again. There was a food fair taking place but the I didn't think I could manage a whole ostrich egg so we settled for a snack in BHS. Sorry, this means no review of the in-site catering but I can report the jammy doughnut was lovely.
Back inside, there is one more layout I need to mention, Christopher Paynes Pynton Tramway Company.
Another odd scale - O9 - 7mm scale on 9mm track to represent 18 inch gauge. The entirely fictitious model assumes someone built a rural line and then electrified it with overhead wires. The builder describes the idea as, "a bit of a stretch" but it's not that different from the Hellingly line which also featured overhead electric running through a bucolic English country scene.
The central station building with "Tram" painted on the roof reminded me of Laxey Station on the Manx Electric Railway although I think there was a Colonel Stephens railway (Rye & Camber?) with a similarly decorated building.
Although a flight of fancy, I think the scene is pretty and although it didn't exist, we wish it had done.
I've scratched the surface of the show here. The quality of the layouts was very high this year but I don't have time to praise every one of them. Instead why not head over to my Flickr gallery to see what I haven't mentioned.
Saturday, January 18, 2014
Road bridge
I'm a bit busy at the moment working on part 3 of the layout supplement I'm in charge of, so here's a shot of Edgeworth under construction.
There's a bit of tidying up around the ballast to do and a water tower to plant on the right hand shoulder of the photographer. This end of the model looks pretty attractive to me though so I'm happy, even if there isn't space on the bridge for the model railway cliche bus to be posed on top.
You can read more in the next issue of BRM or join the discussion over on RMweb.
Friday, January 17, 2014
Tramcar clearout
My Dad is clearing out his collection of diecast trams. For years they have sat in a cabinet, protected from dust but doing nothing more than looking pretty. Now he has decided that it's time they went to a new owner and were replaced by all the model railway locos that we have for the various layouts.
I can't argue. Neither of us a serious collectors. All the trams were bough cheap and mostly because they looked pretty. Very few have serious sentimental value and those that do are staying put. Mostly though, they are being packed back in their boxes and will head off to Warwick & Warwick auctioneers later in the month to be sold.
Looking at the models, they are quite impressive for mass-produced items. The Walls trams at the top of this post are especially interesting. On the right is one of the very early models of an advertising tram. The prototype was amazing when it came out and the fact that Corgi went to the trouble of moulding the relief signs on the ends was quite a thing then.
The later left hand version shows some of the improvements over time. The pantograph is no longer a crude plastic moulding but a realistic etched brass model. The glazing is near-flush too. Both are well printed and lovely colourful models.
Still, you can't keep everything and it's time these 70 moved on to new homes. It's easier to do this when you feel that they will be appreciated, hence selling through an auction house. It's a lot easier to do this too as they will collect and do all the hard work. OK, we might have received a tiny amount more selling each model individually on eBay but it's a lot of work and Warwick & Warwick's costs are very low so we'll just get it done.
Thursday, January 16, 2014
Return of the pink tractor
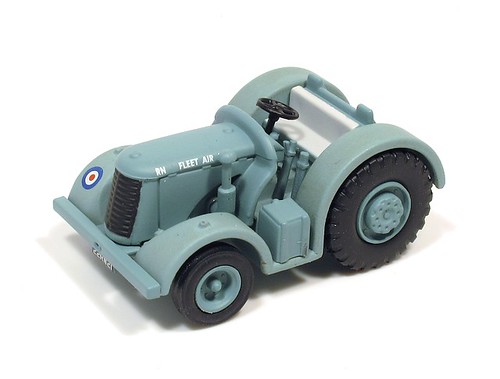
Last year I was noodling around with ideas for reproducing an aircraft towing tractor found in an old photograph. At the time, my ideas revolved around using a plastic kit with a few modifications. The parts are still in a little pot kicking around the deepest recesses of my workbench.
Mooching around Trinders sale last week, having decided I really don't need any more random plastic kits, I browsed the Oxford diecast collection and spotted they have introduced a cast metal version! Another kit I probably don't need to bother building I suppose.
I'm amazed that there are enough sales in something like this, especially when you realise that it's produced in 1:76 scale to match other models in the range rather than 1:72 to match plastic aircraft kits.
Not to worry, I handed over £4.50 for my little model as I have other plans for it in the future. For the moment, I've shoved it around the desk (come on, we all do this with toy car don't we) but Mr Nitromors will be featuring in its future I suspect.
Wednesday, January 15, 2014
Flore's highly modelable buildings
Every time I drive through the village of Flore in Northamptonshire, I think I really must stop and take a photo of the old workshops on the high street. Of course, I never do as I'm on my way somewhere or heading back home. Thank goodness for Streetview which allows me to do this from the comfort of my computer.
A mix of corrugated iron with flaking paint, wood and brick, they are probably less than popular with local residents but for modellers, what a gem! I'm sure that this sort of scene could be fitted in on all sorts of model railway layouts.
If this doesn't appeal, how about this terrace further along the street? Nice square buildings with no complicated curved windows. Ideal scratchbuilder fodder methinks.A few minutes counting bricks should furnish a plan which could lead to some pleasant time with cardboard and plasticard.
Tuesday, January 14, 2014
Gauge 1 Garratt seen in the wild
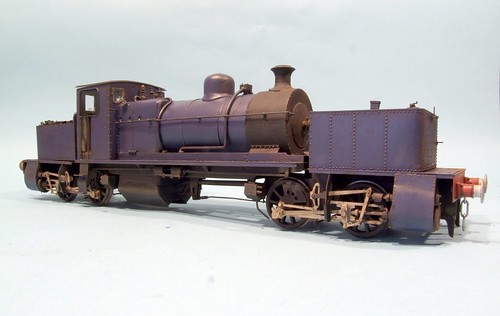
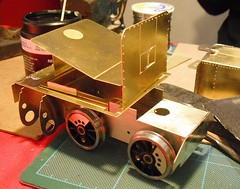 For many years, I've been suggesting to Trevor at Mercian Models that he ought to produce his rather nice industrial Garratt kit, currently available in O gauge, for Gauge 1 modellers. I've always thought that it's a good little big engine and would probably appeal to those in the larger scale.
 The idea appealed to him but you can't just blow the etch up, someone has to master all the cast lumps too.
A few months ago, he mentioned that Dave from Cromford models have offered to do this job and so the project looked like it was on.
Last weekend, I saw the first results. Dave was sitting in the basement of St Albans exhibition. I greeted him with, "How's the gauge 1 Garratt coming on?" to which he responded by handing me construction shown in the photo. A real live bit of the model!
At the moment, the model is just etched bits but it looks like progress is seriously being made. This means even more saving up for me as I'll be wanting one of these to add to my collection of unbuilt kits in the future...
Monday, January 13, 2014
Military Vehicles Partwork
Yay - It's partwork season again!
Looking at the shelves of WH Smith, it seems the ones relevant to this blog are "Build the Black Pearl" which I covered last time it was released, "Giant Warplane Collection" with a Lancaster bomber as part 1 that is such a hieous model that I wasn't willing to part with £1.99 for it and the subject of this post - Military Vehicle Collection.
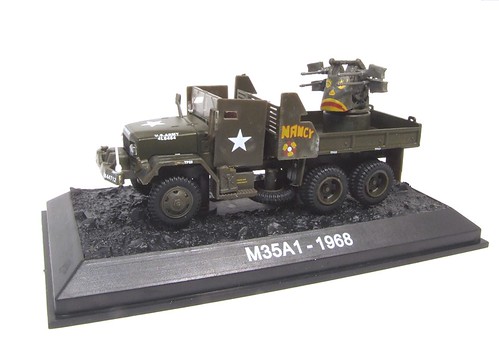
Published every two weeks, each issue arrives with a 16 page magazine that covers the subject of the 1:72nd diescast and plastic model that is attached. Each issue will cost £5.99 apart from Issue 1 (£1.99) and 2 (£2.99). Prototypes span WW2 to today.
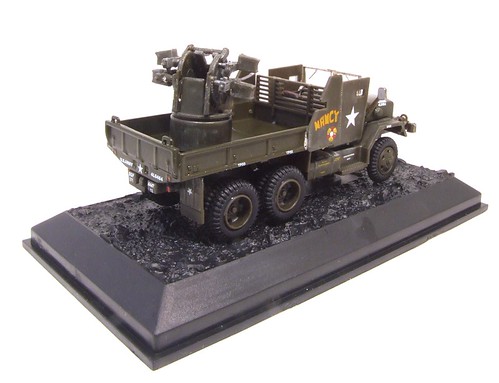
Issue one arrives with an M35 truck. An odd choice perhaps but it seems to have been a popular vehicle produced in many variants. I'd guess that we might see the same base model re-appear in the future. This version is one converted into a "gun truck" with four M2 Browning machine guns fitted in the back and some armour plating around this and the cab.
Looking through the magazine, I'd have gone for the version that carried the MGM-18 Lacrosse missile but perhaps that looked a bit toylike. The prototype certainly did.
Anyway, at first glance, the model truck isn't that impressive. Self colour plastic parts and painted diecast ones aren't a great mix. There's quite a lot of superglue bloom on them too.
Look beyond that and things improve. OK, the chassis is very basic which is a shame as it's quite visible, especially at the front thanks to those big wheels. The lettering is excellent, wing mirrors are fitted (a different design on each side) and telltales for the front so the driver can see the corners of his vehicle.
I quite like the rocky design of the base too. It's pity that there is a smooth rectangle under the truck, which is screwed down, but with some paint it could look quite realistic.
Price-wise? Not bad even at the full whack. £5.99 compares well with the bottom end of the plastic kit market. The nearest kit I can find will cost you £9.99 although I'd expect more detail, especially underneath. In diecast models, you are looking at 1.5 Landrovers from Oxford diecast, so not that expensive.
Obviously I haven't signed up for this series - I don't do collecting models like this. If I did, I might be tempted through as we are talking a pint a week for what appears to be a varied collection.
As a modeller, I'm looking at the model and wondering what I can do in the way of weathering to improve it. Well, it did cost less than 2 quid so it's an excellent test subject.
Sunday, January 12, 2014
Controversial Modelling
I should start this post by reminding readers, as I make it clear at the bottom of the page, the views expounded here are mine alone and not those of any publication I write for.
The cover feature of the latest BRM shows off Luton MRCs diorama of the events that took place in the so called "Great" train robbery in August 1963. The club have gone to great pains to ensure that they have produced a scene that is historically accurate and doesn't glamorise the events in any way, unlike most of the mainstream media accounts and those from the best known criminal associated with it all.
In advance of publication, there was a fair bit of discussion as to whether anyone would be offended by the model. The general opinion of those who I've talked to who have seen it is that the club have done a superb job. The story is told clearly and without any attempt to "sex-up" events. At the end, visitors are given the opportunity to donate to the railway benevolent fund. The model will be shown for 2 years, over the anniversary of the events and a year after. Then it will be dismantled. The static loco will be rebuilt as a conventional model and that will be that.
Obviously the most controversial aspect is the vicious assault on train driver Jack Mills, something that prevented him from returning to work again, the threats to his second man and those in the valuables coach.
Because of this, should there be no mention of these events?
I'd argue no. The mainstream media for many years have glorified those who took part as a group of lads who stuck two fingers up at authority. A bit like the characters in the film "The Italian Job" - forgetting that this was fiction whereas the train robbery was fact.
None of this was helped by Ronald Biggs overplaying his part in events. As it was he begged to be allowed to take part, and found himself in charge of recruiting a driver to move the train once the crew had been removed. The driver, Stan Agate, turned out to be useless at the job. Hardly the story Biggs wished to tell. It is perhaps a shame that he died the day a BBC drama clearly showed what a waste of space he really was and how his whole life had, if not been a lie, been a serious exaggeration.
Anyway, someone has to take back the story and tell it accurately. That mantle seems to have been taken by Luton MRC. If you want to know more, details of where the model will be displayed are on the club website.
This is all very well. Some people have been offended but not generally those who have taken the time to read the article or view the model. I find that very telling.
All this leads me to a bigger potential minefield.
2014 sees the 100th anniversary of the start of the first World War. Doubtless this will inspire many more models.
Are these to be seen as even more offensive? After all, the assault on a single man is awful but how much more terrible were the lingering deaths in no mans land of many thousands of brave men who had spent many weeks being taken to the front before being ordered over the top by (whatever Michael Gove says) idiots who had no grasp on the way warfare had changed since they last attacked people armed with little more than sharp sticks.
Should we pretend that none of this happened?
If you really want to go to extremes, should the bookazine "Railways and the Holocaust" that sat on the shelves for much of the end of last year have been banned? Even I had mixed feelings about that one although I can see it is an aspect of the story that should at the very least be documented.
My feeling is that we can't change history. All we can do is research in as much depth as possible and then make any recreations in either print or model form as accurate as possible. Then maybe we can learn some lessons.
I once helped take a layout called Overlord to Germany. It's a model of Southampton docks in the run up to D-Day. We asked the exhibition organiser why he had invited such a potentially controversial subject to the show.
He replied, "It is part of our history. Not a good part, but still part of our history."
Saturday, January 11, 2014
Hair spray
 "Do you use product sir?"
"Yes, but no on my hair, only on my model railway!"
It's true. The Parker barnet might only see shampoo and conditioner but I do find myself the current owner of 4 cans of hair spray.
Why?
Because it is a very good, but weak, adhesive. Ideal for scenic work such as sticking layers of flock powder down on electrostitic grass, partly because it works well, partly because it's stupidly cheap but mostly because it doesn't smell as horrible as the alternatives like matt varnish.
Current favourite is Morrisons Extra Hold (Hint: ALWYS buy the extra hold version whatever the brand) which doesn't seem to be as presurised as other versions.
This means that when I spray it over a tree or bush before sprinking with scatter materials, the laquer doesn't blast anything already present on the model off into the corner of the room. Since I tend to build up layers of flock, this is A Good Thing.
Friday, January 10, 2014
Chassis spray paint
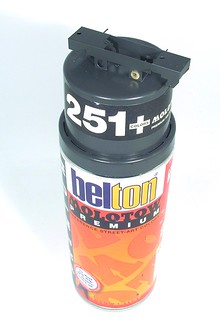 "Street Art" has brought us many things, Banksy and errr, lots of kids scrawling on anything that doesn't move for a few minutes. Now it has produced my new favorite model loco chassis paint.
 Picked up from 4D Models, this Bleton Molotow Premium spray can is in "Grey Black". Basically it's Railmatch Weathered Black in a spray can. Since I love the paintable colour, putting it into a spray makes life even easier.
After cleaning the freshly soldered chassis, a quick blast of etching primer, I sprayed the model with this paint. It's got quite a gentle action, some sprays seem to blast paint hard into the metal but these are more airbrush pressure.
The colour is good, a dark grey rather than black. It's very slightly shiny but if this is a problem a shot of Dulcote will fix this. Working in a cold atmosphere, the finish isn't perfectly smooth so I fancy weathering powders will stick well enough to handle this.
Sadly, 4D has dropped the range but looking at the manufacturers website, its still available.
Thursday, January 09, 2014
Coal stage and Edgeworth Part 2 in BRM
Christmas plays havoc with magazine deadlines and left me a week shorter than I'd have liked. Part 2 of the layout supplement I'm writing was taking a bit longer than I hoped so there were a few late nights - needless to say I got my copy in on time and now you can enjoy it in print.
Edgeworth isn't confined to the supplement. I've taken the opportunity to turn a bit of it into a 2 hour project. In defiance of the trend toward buying buildings ready to plonk on your model, I decided to scratchbuild, and in wood too!
The prototypes were often pretty crude structures making them ideal for people who want to have a crack and building something themselves. The main material used is coffee stirrers, which you can retain after your drink, or buy for stupidly small prices from catering suppliers.
In the bag with the magazine of course, is part 2 of the layout building supplement. I've taken the model to the stage you see below. Buildings are made up from kits, hills have some Action Man hair style covering and the things is coming together nicely. A backscene makes the model look larger than it is and again I've eschewed the fashionable options with a Peco product. There are good reasons for this, which I've explained in print.
Part 3 next month, sees the model come alive with details. The hills lose their uniformity and I'll make up some legs and lights so the model can be taken out to exhibitions. We'll need some rolling stock too, so I'll be Pannier tank shopping.
Wednesday, January 08, 2014
Route Indicator
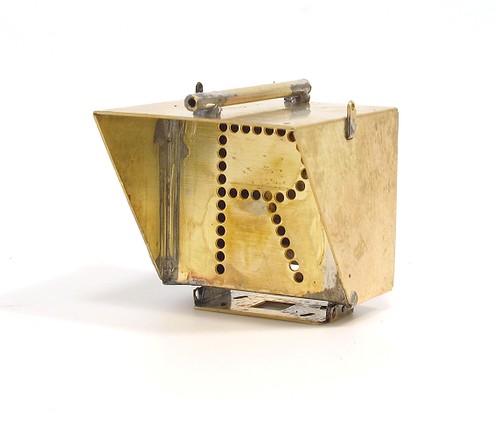 Delving in to the world if signalling again, this time with a Route Indicator box. A large letter ligths up to let the driver know which way they will be going - since train drivers have to be passed to drive a particular route this matters.
(Note: sit in the cab of a train and you don't get to take it out without having learned the route you'll be driving. Sit in the front of a lorry and you can let the satnav do the thinking. Which is why trains cost more but are safer and IMHO, better)
Construction is pretty simple, the big letter (chose 1 from 3) folds up and fit inside the shroud. First though, laminate the Dorman Dorman cover plate up and fix this in place. Again, the idea is that the keen modeller fits a light inside the unit.
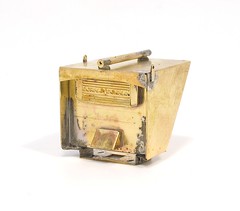 Apart from messing up the folds on the bracket under the shroud resulting in a bit falling off and having to be soldered back in place, construction is OK. Yet again the RSU was invaluable for fixing the fiddly bits in place with the minimum of solder (paste) and I used tube slightly too large for the sighting tube (should be 1mm, I used 1.3mm) hopefully once I've cleaned and polished, this will look nice.
 Talking of the sighting tube, would anyone like to explain it? I'm assuming it's used when installing the unit to make sure it points at the driver but I'd have though you don't need an aid to do this as it can't be that crucial can it?
Tuesday, January 07, 2014
Feather Signal Assembly
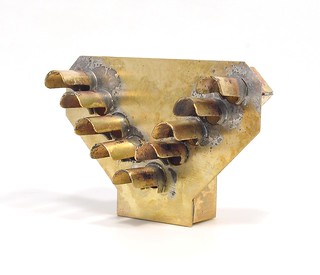 With a selection of kits to chose from, which one do I start with?
 For no particular reason, I picked the Feather signal. From my limited understanding of railway signalling (those who know more, please feel free to add detail in the comments section) these show drivers which direction an approaching junction is set to so they know if they are heading straight or off in another direction. Presumably this is to allow them to judge speed as there's no steering involved.
The kit makes up into a double feather with arms in both directions. In model form you can make the device light up by fitting LEDs into the holes. I've not been asked to do this thankfully although if you treat the model as a modest project rather than a simple assembly job, I can see that it wouldn't be too hard and the results really impressive.
Assembly wasn't too difficult once I'd figured out a couple of points.
The first is that the shrouds over the lights have to be formed from flat. Although not mentioned on the instruction sheet, the metal really needs to be annealed (heated to red and left to cool) to soften it. Then you find a screwdriver or bit of rod to form the shape around. One from my cheapo Jewelers set living on the modelling board turned out to be right and I bent the metal around it first with fingers and then with flat faced pliers squashing it against the screwdriver shaft.
1 spare shroud is provided and in my case - used.
Next, fixing involves locating the shroud into a half-etched grove around the hole for the light. That's not easy, especially if the bend isn't exactly right. A little wiggling with fingers locates it but then you have to hold the parts in place while soldering. I tried my normal iron but holding the shroud with all the heat around seemed impossible.
After this, I broke out the Resistance Soldering Unit (RSU) and used this with some solder paint and loads of flux. Since you can set the joint up cold and hold the shroud with the probe before applying electric juice with a foot switch, the job becomes a lot easier.
After this, the backing box is a simple fold up then located in the back of the target board in another half-etched line.
The model have been cleaned up in the sink but really needs a polish with the fibre pen and some Brasso as I've been asked to finish it in raw metal. For your consumption, I'm showing it in the unpolished state so you see how it looks straight from the workbench.
Monday, January 06, 2014
PH Designs signals
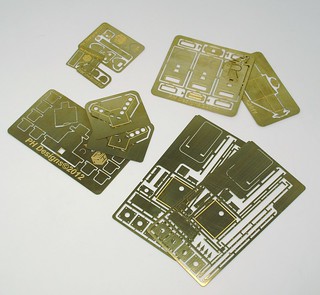 I'm not quite sure how I managed to say yes to my latest project but it seems that I've agreed to build a few 7mm scale signal components using etched parts from PH Designs.
 This is unusual for me as I don't really do signals and I certainly don't do them in O gauge.
On the other hand, I recently assembled a mobile 'phone mast from the same maker in 2 hours for a magazine project and that went OK. Other people have said good things about the designs and I like to try something different now and then.
Anyway, the packet arrived and the etched parts look very nice.
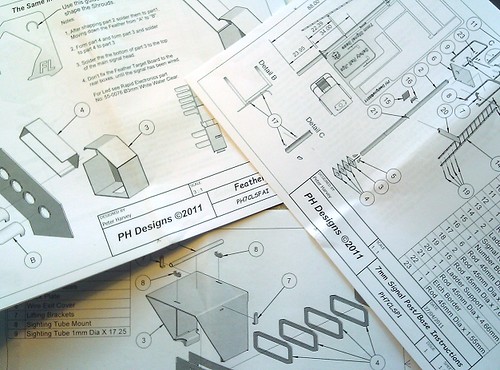 Better still, the instructions are mostly really nice looking exploded diagrams for the hard of reading. There are even helpful notes and sub-diagrams to aid the builder, all of which bodes well.
 Still, as they say, the proof of the pudding is in the eating, so it's time to warm up the soldering iron and have a good munch.
These parts will be sold through C&L Finescale.
Sunday, January 05, 2014
Calendar Time
New year, new NRM calendar.
Time to plough through the pages of 2103 to see what events I need to look up new dates for and add to the pages.
While I'm at it, I've updated my on-line exhibition diary in case anyone wants to know where they can find me trapped and having to be polite to them.
Obviously there are other events but at those I'm not attending in any official capacity so it you are smelly or obnoxious, I can bop you on the nose if I see fit.
It's quite shocking how many events are already in place. March is full of toy train shows and the end of the year is looking busy too.
Much of this is work - I'll need to be at all the BRM shows so that's 4 taken care of. I'm booked in to the L&WMRS event and the Kettering O gauge spring show. At the moment, I'm not planning to take one of my own layouts on the road but this could change depending on how circumstances change.
Mind you, there are lots of other events I want to go to - the IPMS show at Telford, Model boat show, Large model aircraft event. I could really do with more weekends in the year!
Am I alone in this? My suspicion is that the world is split in two types of person. There are those whose weekends are bursting at the seams and those who don't do anything and fill time with times from "We love telly" magazine. Personally, I'm happy to be the former even though it is frustrating at times when several events dates clash!
Saturday, January 04, 2014
Quickbuild Quick build
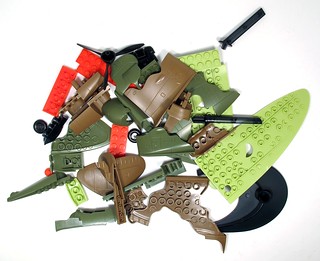 Years ago, I used to look forward to a Christmas addition to my extensive Lego collection. Sometimes the larger and more complicated models that Santa would bring were a bit much for my limited skills and my Dad would be allowed to help. Somewhere we have a black & white photo of him puzzling over the construction of an oil rig.
 Anyway, I no longer get Lego, something I'm a little sad about, but that doesn't mean there shouldn't be some brick building fun over the festive season. Early last year, Airfix introduced their Quickbuild range of models. These look suspiciously Lego-like, probably due to the Danish company losing a patent case some time ago, resulting in a rash of lookielikey products which are cheaper but claim compatibility with the original brand.
So, I thought it would be fun to buy my Dad a plastic kit as a present and settled on the Spitfire from the range. I know he has a stash of unbuilt plastic kits so instead of a "proper" kit to add to this, something different that he had no excuse to finish seemed more fun.
Looking in the box, the components are Lego like. A few are almost identical copies. Other are very specific to this model. To avoid the need for paint, the parts are weird wavy shapes to correspond with the camouflage markings.
Construction wasn't too taxing for a 72 year old I'm told and he soon had a descent sized model of the WW2 classic. Stickers for the RAF markings completed the model. Should you be somewhat younger then there is as much play value in this as there would be in a diecast model but here to you get the fun of building it first.
OK, so this isn't the most detailed model in the world but I bet a few IPMS members will have a tinker with them as the shape doesn't look bad. I bet there is fun to be had if you glue the bits together, apply some filler and paint the result.
Is Quick-build the future? Of course not. But if you look at the range, it is a good starting point and this isn't the first time Airfix have dabbled with blocks either - anyone remember Betta Builda ?
Also, the Quick-build system has made its way into the Scalextric range with the Demolition Derby set and also a micro version in this years range. How long before we get something in the railway range?
Friday, January 03, 2014
Inside the Formo envelope
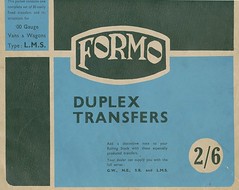 Mooching around my local model railway club one evening, I found an envelope marked "Formo" and apparently containing "Duplex" transfers for use on LMS rolling stock. Since this is a new old name to me, I borrowed the package for a closer look.
 According to the instructions on he envelope back, the transfers are printed on duplex paper; that is to say a thin tissue backed by a stouter paper for ease of handling.
Nowadays we'd describe the "tissue" as carrier film and the stouter paper as backing sheet. The instructions make it clear that these are early Presfix transfers. First, you separate the stout paper from the tissue then place this on the model. Next, the tissue is soaked with water and will eventually float away. That's quite sophisticated for the time, which I would guess is the early 1950s.
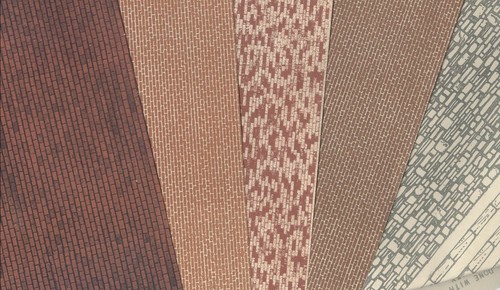
Also in the pack is some building paper (brickpaper) from Modelcraft. There are many finishes including several versions of brick, some stone, tiles and even stucco.
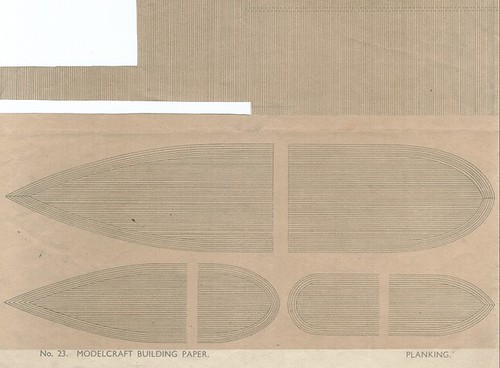
Sheet 23 is especially interesting as it's planking but planking for the decks of model boats. I'm not sure if there were plans to go with this stuff but I would guess that you might end up building a boat to fit the deck if there aren't. The decks look most suitable for yachts which is odd as models I've seen from the time in magazines tend toward the working boat line - Puffers and other cargo vessels rather than gentleman's playthings.
I suppose you might now consider these a bit crude but remember they come from a time when someone had to paint the original by hand. You couldn't do a bit and let the computer fill in the rest! At least this means there isn't the obvious repeat patterns that modern papers can exhibit. Interestingly, the colours tend toward the brown. Is this a result of age or were they just printed this way?
Thursday, January 02, 2014
Removing solder
Brian asks: I'm soldering together a Gauge O Castle Class Loco (David Andrews kit perhaps a bit ambitious as a first foray into brass kit making!) and am looking for a good way of removing excess solder. Any suggestions please? So far, I've tried a variety of tools including:-
- scalpel - dicey
- chisel ended craft knife - best so far
- wood turning chisel - not giving fine enough control
- ground down file end - ditto
- glass fibre pen - OK for smoothing but not removal
- scraper board tool - OK but slow and laborious
I'm reluctant to try remelting the solder as this usually just spreads the problem or solder braid or solder suckers as each of these can lead to the work coming undone.
 Ahh yes. Just when you get the hang of making solder stick to whichever kit you are building, you discover it's possible to put too much on and then have to remove the excess. Which turns out to be harder than getting the stuff to flow in the first place!
Let's start with solder braid. The idea is that you heat the solder to melt it, dip the braid in and the solder runs up it thanks to capillary action. As far as I'm concerned you might as well poke a cocktail stick in there for all the good it does. I can't make the stuff work.
Next, solder suckers. These are like syringes with sprung plungers. Designed for electronics workers, you heat the metal, poke the nozzle in and press the button on the side to activate the plunger which sucks solder into the body of the tool. I have has success with these but the amount of molten metal removed with each suck is small and of course when you heat it up, you can dislodge the parts you fixed down in the first place.
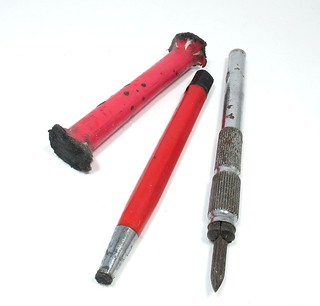
Scraping solder away with a scalpel, craft knife or the three-sided scraper shown in the picture will work. The problem is that it's very easy to gouge the surface of brass with a steel tool. You'd removed the solder but the newly exposed surface won't look too pretty.
I'll still do this for larger lumps. The trick seems to be to remove very little with each pass and stop sooner than you think. Work at a very shallow angle and hopefully if you do hit brass, any scratching will be minor.
My favourite method is to burnish the solder away. This involves vigorously rubbing at it with a fibreglass stick, effectively polishing it away. Yes, it takes longer than you might hope but it does leave a nice shiny metal surface.
I usually start with a fat stick of fibres (the red splayed end thing in the picture - I really should tidy that up) burnishing with gay abandon over all the metal. The fibres won't mark brass of nickel-silver so you can go mad. The stick seems to work better than the propelling pencil although I use one of those for small areas. If you can, slosh loads of flux on the join, melt it and spread the solder around. This makes the burnishing a lot easier. With practise you learn to part melt the excess so it can be spread without disturbing the main joint, which actually needs minuscule amounts of solder to hold it.
The main thing to take from this is that there is no easy way to remove excess solder. I've tried brushes in mini-drills and they don't work and chemical tricks can't differentiate between the solder you want and the solder you don't.
Once learnt, you discover the art of using lots of flux and ever tinier amounts of solder to make joints. I might have been helped by my Scottish and Polish ancestry to develop my parsimony here...
Wednesday, January 01, 2014
After 8
 Time for my 8th annual review of last years model making and blogging activity. Looking back at last year's posting, I see that the 3mm scale Class 25 has spent yet another year in its box making it 2 years hidden away. The shame.
Kicking off with the stats:
- 365 posts - Yay, one a day!
- 377 visitors a day with most looking at more than one page it seems, an average 602 viewed per day.
- Returning visitors have hit 100 a day over the year, we've been running at over this figure since September. That's a lot of people pleased to find regular new content.
- That makes a total of roughly 140,000 visits or 220,000 pages viewed.
- Most readers are from the UK, followed by the USA, Australia, Canada and Germany.
One highlight of the year was when I quit the exhibition circuit. That didn't go quite as planned, I still attended another 5 events as an exhibitor and will continue to do so it appears. Please stop telling me I promised to stay outside the barriers. It ain't going to happen it seems.
Well, sort of. I mean I built enough of it to appear in print but there's still quite a bit of detailing to go. Looks good on the water though.
Most of the year seems to have been taken up with O gauge modelling in the form of Clayhanger Yard.
This minimum space 7mm layout was based on the idea that we'd soon all be owners of a Dapol 08 shunter and looking for somewhere suitable to run it. The layout was built but there's still no sign of the shunter...
Not to worry, I built an LNER Y6 tram loco and am very pleased with it. At least this one hasn't appeared as a RTR model yet, unlike my still unfinished Fowler diesel now available from Ixion models, albeit in copper-capped GWR form rather than the superior LMS variant I'm building.
The Garratts still haven't progressed - something both embarrassing and annoying to me. Hopefully this year...
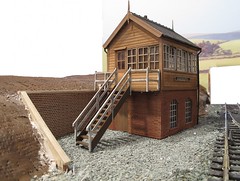 Of course the big change has been my move from Hornby Magazine to British Railway Modelling. This has resulted in an increase in modelling output, although not all of it blogable. Currently, the new OO layout "Edgeworth" is occupying much of my time and modelling space and since this is the topic of a series of suplements to the magazine, I won't bore you with it here as well. Well, maybe occasionally.
 I've popped out a good few interesting projects over the last year for print, starter locos kits, beach scenes, Clyde Puffers, far too many to list. Being able to earn a living doing something that I enjoy is a privilege although perhaps not always the panacea it might appear. After all, sometimes things don't go as planned and that seems to be when the deadlines are tightest!
In addition, my latest bookazine, "Modelling British Railway Diesel Locomotives" hit the shelves in October and is still available if you haven't got a copy yet. As a freelance worker, it's a good idea to try and spread your portfolio just in case one of the publications disappears - not something likely to happen to any of those I've worked for for a long while but better safe than sorry.
So, 2014 - well, there are still Garratts to build, a RTR Garratt to await. I'll be appearing at the BRM shows and possibly one or two more far-flung events too. Can't say much about this until everything is confirmed but it's a goodie.
There will be more publishing. My flatplans run into the March and April issues of magazine and I have a few other projects on the go to take up my time. You won't be short of readable Phil stuff assuming all goes according to plan!
My own modelling will hopefully include some boat and railway stuff. I've already got one project on the go that was a Phil/blog job and became a magazine piece. I'll be digging out a few goodies from the kit stash though as I need a little break from things with deadlines. A Christmas present canal tugboat should make a nice model ideal for casual sailing.
So the plan is - more of the same. Hopefully you've enjoyed my blogging from the last 12 months. Sorry that it hasn't always been full of exciting etched brass wrangling or hard-edged high-end model making. I'm going to try to carry on the daily posts, so please come back and see what I've been up to. Thanks for reading.
Subscribe to:
Comments (Atom)
