Thursday, September 30, 2021

Chassis paint


Before the motor'n'stuff go into the chassis, it needs paint. 

That's a simple enough job - give the metal another good clean and then rinse it thoroughly under running water. Then let it dry in a nice warm spot. This is a stage you don't want to rush as tiny drops of water can hang around for a long while. A blast from the hairdrier helps, but I prefer to leave it 24 hours to be sure. 

Next, a light dusting with etching primer. I'm using UPol from Halfords at the moment and it seems to work OK. The cheapskate in me remembers that I was always told a light dusting, rather than a heavy coat. 

Finally, I brush paint Revell No.9 everywhere. I could spray, but it's easier to brush and in my mind, the adhesion is better. A couple of coats on the sides seem sensible. 

Finally, the bearings and brake hanger wires are cleaned up with some scraping. I'll need to solder the brakes later, and you really don't want paint in the moving surfaces. 

Then, let it all harden again before moving on. Easy, if you are too busy to work on the model every evening.

Wednesday, September 29, 2021

Mystery metal


Time for some chassis detailing, and I find at the ends there should be some metal brackets. The fold up from the etch nicely enough and I bomp out the rivets - but then there is a mystery. 

Obviously they fit at the end of the chassis behind the bufferbeam, but how? 

It looks like the riveted flanges overlap, but then the bufferbeam won't be flush. 

I puzzled over this for a while, trying the parts in different ways, and then came to a pragmatic conclusion. 

I simply left one lot off. Yes, I know this makes me A Bad Person and Not a Proper Modeller, but I don't care. You can't see these things on a plan, or in any photos. On that basis, no-one is going to miss them. 

Were this a magazine build, I'd have to solve the problem. Fortunately, it's not, so I only have to please myself. 

And if you are thinking the brake rods look thicker than normal, you'd be right. I used 0.6mm wire rather than 0.45. It will stay straight much better, I always end up bending the thinner wires when fitting the brake hangers. I even remembered to file the ends flat to avoid punctured fingertips, something a remember from previous builds!

Tuesday, September 28, 2021

A running chassis


Crunch time. After three chassis builds, will the wheels turn over then power is on? 

The omens were good. Those rods slipped straight on, but then as the bearing spacings were set by the rods, you'd expect that. Add in the massive amount of slop those oversized holes in the rods allow, and if there was a problem, it would be a BIG one. 

For testing, the rods are retained with a bit of insulation stripped from a wire. This trick saves a lot of soldering action if there is a problem and they need to come off again for fettling. 


A bit of electricity from my 60-year-old H&M controller and the model works! 

To be fair, it worked a lot better once a drop of oil was applied to each bearing. I know all that rod slop is bad engineering, and that the worm gear really should sit over the middle of the axle gear, but I'll take this right now. The model moves up and down the track, and it's long while since I built something that did that.

Monday, September 27, 2021

Parkside battery powered soldering iron

Picked up for a quid at the Lifeboat day, my first thought when seeing this soldering iron was, "How rubbish will this thing be?"

Parkside tools are available from the infamous middle of Lidl, and in my experience, are usually pretty good quality. I have a small cordless screwdriver which is nearly as good as the Bosch version but half the price. 

Powered by 3 AA batteries, this could be a useful addition to the toolkit when emergency cord-free soldering is required. 

Anyway, the first problem with this was that it didn't appear to work. The light on the front came on, but the bit warmed a little, but then cooled. Not great, so with nothing to lose, I poked around inside. 

To be fair, there's not much going on inside. The batteries are held in the handle, and a pretty simple switch does the work. Fro this, I work out that to warm the iron u, you have to slide the switch forward AND press the button on the front. That's why it appeared not to work. The iron is hot when the LED is on.

The connection between switch and element wasn't good. A bit of plastic that holds the two parts together was broken, so I blobbed some solder on the joint. 

Screwed back together, I managed to make the device melt solder, but at 6W, it's a bit gutless. I tinned a couple of wires and eve soldered them together, but it's a slow process. Having said that, for a pound, it can live in my toolbox as being much better than nothing in some situations.

Sunday, September 26, 2021

Knowing when you are beaten


This is my photo booth for small models. It sits in the chaos of the corner of my office.

A portable booth with a couple of photo lights above it, it's been used many hundreds of times for some pictures of models I've generally been very happy with. Over the years, I've become expert at long exposures and bouncing light around, then processing the image to have just the right amount of shadow under the model. A flat base is assured thanks to a bit of melamine faced chipboard, and the background is a mix of plastic sheet with paper on top.

All that junk in front is a collection of things I support my Splat on while shooting. That or a beanbag. There's even a monopod that can be jammed in position if required. Basically, I'm creative enough to get the results I want. 

However, last week I started on a project to replace the booth with something bigger and better. 

The key would be a pair of LED panels. The subject would sit on one, another would be over the top. The photo lights would still be available too. 

A white wall would surround the photo area. Simple huh? 

Well, the booth is still there. Admittedly, I've tidied up a bit, but it's not been replaced. 

The new booth turned out to be one of those project that was a disaster from start to throwing the materials in the bin. Every single step went wrong: 

  • Ordered two panels. One arrived broken. 
  • The replacement was also broken.It took three days to get a pair of working ones. 
  • My measurements for the MDF to make the box were wrong and had to be altered at the wood shop. 
  • Painting the white walls turned into a nightmare. MDF is smooth, but not once you inflict trade silk emulsion on it. 
  • I had planned to use the emulsion as a primer and spray the MDF white The (admitedly old) can was faulty, paint dribbled out. 
  • More sanding and rollering gave me a surface that could in no way be described as smooth, but eventually I decided I could live with it. At worst, the booth could have another lining of foamboard. 
  • Screwing the panels together, I managed to get the first corner wrong twice. Then realised I was screwing the sides together and not the back. 
  • When I eventually fixed all three sides together, not easy as this thing is 60cm wide and floppy until complete, the corners weren't as perfect as I'd hoped machine cut MDF would be. 
  • Sliding the panel in the bottom, it left a gap in one corner, the thing wasn't flat. Not a problem in a ceiling, but hopeless here. I did try screwing it to the nice, flat MDF, but the gap, while better was still rubbish. 

At this point I gave up, put the panels and their transformers in the box, put the boxes into store and threw the MDF bits away. 

Lesson learned. When a project fights you at every stage, give up. I didn't have the skills to make this thing work. What I do have, is the skills to make the existing setup produce results. OK, it takes a little longer on the processing, but it works. 

Still, a day and best part of £100 wasted. I need to know when I'm beaten.

Saturday, September 25, 2021

Saturday Film Club: New uses for a hole punch

You are going to have to trust me this week that this is an interesting video. 

Combining Lego and paper might not seem an obvious move, but the good people at Lego Central once thought it was a good idea. Then got bored, and a hobbyist took it up instead. 

It's all very clever, even if the colours are a bit garish.

Friday, September 24, 2021

Pick your paper


Do you remember art classes at school? There would frequently be a need to put newspaper down to protect surfaces against some mess, and every so often, the paper would turn out to be The Sun - with it's Page 3 model. Back in the 1980s, this would cause a little excitement among the boys, and a huff from the teacher who didn't think we were ready for life drawing classes yet. 

I'm reminded of this every time I have to mask a bit of layout with newspaper and then take a photo for a magazine. You need to be so careful, as readers will work out what you've used and judge you for it. 

No point in sticking a copy of Socialist Worker in front of them, even if it's nothing more than a peripheral part of the photo. You'll be able to hear the sound of subscriptions being cancelled...

My solution is either a local paper, or in this case, some old pages from Private Eye, Once without any swearing, or contentious stories on, just to be sure. Ideally, no photos either - someone will get offended. 

I suppose I ought to buy some rolls of brown paper, the stuff used for masking up cars for painting, but it's just another thing to store, and I don't need this that often.

Thursday, September 23, 2021

Talking garden railways at the Model Railway Club


A couple of weeks ago, I headed south to give a presentation I'd been asked for at the Model Railway Club in London. It was an interesting day. 

The talk itself went OK. There were about 20 people in the room and a similar number joined us via Zoom. There were a few technical issues with the setup, but eventually, these were overcome (although some made a later reappearance) so I could do my thing complete with a working next slide clicker, something the government can't do for their Covid briefings it seems. 

I think the audience enjoyed my waffle and I filled my alloted timeslots well enough. Maybe I've not convinced anyone to head out to the garden with their railways, but you never know. 

Exactly what to put into a talk was a challenge. Eventually, the first half was my story in the larger scales and how it was mostly driven in the early days by a lack of funds - proving that you don't need to be rich to model outside, quite the opposite in fact. 

After the tea-break, I covered some basic considerations to think about when looking to build a garden railway. It's a big topic, so I left plenty of time for questions, which mostly worked out OK. 

All this was despite a weird arrival in London. 

Marylebone station was being dressed for Christmas. Had I dozed off and slept on the train for a few weeks, shuttling back and forth between London and Birmingham? 

No. It's a film set. I'm not sure what they were shooting, but when I was dropped back at the station, things looked different. 

There's an awful lot of equipment in this shot!

Frustratingly, I couldn't hang around to watch for long as my train departed 15 minutes later, and I needed food. 

Having stuffed a burger into my gob, I got on the 10:30 train, expected in a nice ride back, but five minutes before we left, it started to fill up. And fill up some more. Worse, there was precious little mask wearing going on. I started to feel very uncomfortable.

Checking my phone, I worked out that there was another train in half an hour, which got me back only 20 minutes later than the previous one. So I bailed out and hoped for the best as it was the last service home. 

Of course, I'm now on the wrong side of the barrier to go and watch the fun. I notices that the posters on the platform had been replaced with festive images, so assume that later on that night, the camera would move on to the platforms themselves. 

Anyway, the train was quieter and I was back home and asleep by 1am. Good job the next day, I didn't need to be on the road until mid-morning!

If you'd like me to talk garden railway modelling at your club, send me an e-mail and I'll see if I can oblige.


Wednesday, September 22, 2021

MORE new spacers


Finally!

News 12mm wide spacers (I measured the width of the motor, something I should have done in the first place) and the whole thing can finally be assembled. The drive unit sits low in the frames. All the wheels are fitted. The chassis sits on the mirror perfectly. 

All this shows how rusty I am at building etched kits. It also proves that if you keep plugging away, you will get a loco to work. And that I am far from perfect as a modelmaker. But then the person who never made any mistakes, never made anything.

Tuesday, September 21, 2021

New spacers


After a little head scratching, I decided that there wasn't any way I could accurately reduce the width of the frame spacers fitted to the chassis, it would be a lot easier to make some new ones up from sheet nickel silver. 

First job, remove the old ones - I could have attacked them with heat, but wary of disturbing the bearings, I opted to cut them in half with a piercing saw. This gave me much better access to the soldered joints, which were heated and the errant metal removed, followed by a good clean up with a file. 

Then I cut some strips of nickel 10.5mm wide using an Olfa cutter and ruler. Even I can get things reasonably accurate with those tools.

Using the Hobby Holidays jig, the sides were lined up and the spacers fitted between them. I know the axles are in the right place relative to each other so the spacers don't need to slot into the chassis sides, I can pretty much fit them where I see fit. 

This time the axles stick out both sides of the chassis. It even sits flat on a mirror when fitted with wheels. Success? Well they look like they are a bit proud of the sides. But I can shim this with some washers to reduce the side-play. 

Except that the motor won't fit between the frames, and these are deep enough that this is precisely what it has to do. I did contemplate putting cut-outs in the frame sides to accommodate the motor, but there was really only one thing to do...


Monday, September 20, 2021

That's not so good then


With the chassis assembled for the Hudswell Clarke, and the motor and gearbox running, all I have to do is slip the later into the former and the loco will work. Simple. 

Except that the axles aren't long enough. They can stick out of one side, or the other, but not both. 

The frames are too far apart. Arghh

I don't know how this happened. There is only one set of frame spacers in the box, and I suspect they are the P4 ones. My guess is that I've nicked the OO and EM fret for another kit in the past, and forgotten about it. 

Still, I enjoy soldering things together, so it will be fun to do it all again (grits teeth).

Sunday, September 19, 2021

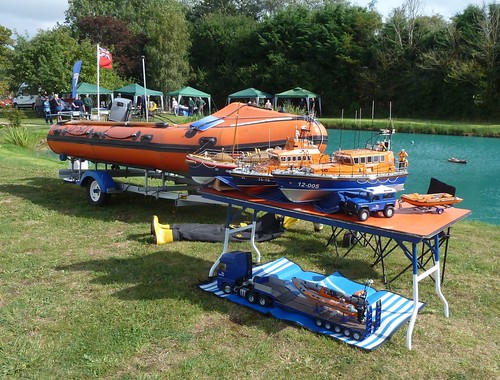
Model lifeboat day 2021

Lifeboats

 A nice sunny day and lots of orange boats, what more could you want on a Saturday morning? 

Cake? Yes, there was some of that, but I can't find my photo. 

The chance to buy some stuff from a second-hand stall? Yes, I managed a few bits of wood, a random bag of plastic propellers and a couple of tools that I'll bring to you later, once I've had a proper play. 

And, of course, and RNLI stall, who took some money off me too.

Prize of the day though, is a lifeboat I've always wanted. And by chance, a friend who does a lot of work for the RNLI had acquired one. On his book stand, there was a 1930s tinplate collecting tin, and I happened to mention that I coveted the plastic lifeboat launch version - and for a small donation, it was mine. 

I remember these as a kid, and am chuffed to get my paws on one. There will be more on it once I've figure out how it works. And then the chance to donate yourself when I do a show in the future. 

Sadly, it was a bit of a flying visit for me as I had some work to do in the afternoon, but at least I was able to see the magnificent Clyde lifeboat launched. 

There are more photos on Flickr.

Saturday, September 18, 2021

Saturday Film Club: Dune - Models & Miniatures

Apparently, there is a new film of the book Dune on its way. I remember trying to read the book as a teenager and getting bogged down before abandoning it. The David Lynch directed film might be cult, but that's code for about 5 people liking it and a few others pretending they did. 

But, the techniques behind the miniature and model work are fascinating. I particularly like the idea of shooting a model with a hole in it so you can see background live action stuff - a bit like a matte painting.

Friday, September 17, 2021

Tiger - my first home-built garden railway locomotive

Tiger wasn't my first scratchbuilt locomotive, that was a OO gauge Hunslet, but he is the first garden railway locomotive I built from scratch. At the time we had a Mamod steamer, but it was pretty uncontrollable, and I felt a battery electric loco would be a better idea. Of course, in the 1980s, my funds for this sort of thing were incredibly limited. 

What emerged from my workbench, isn't the most realistic in the world. The design is pragmatic. Square edges because that's what's easiest to cut in 2mm Plastikard. Side skirts because I needed to hide the wheels. Even I knew they weren't realistic. 

Underneath, the chassis is a rectangle of square brass tube soldered up, from which dangle running gear made from Coopercraft 16mm parts. Handily, these were available as a reasonably priced pack, but no loco ever ran on curly-spoked wheels. 

Power is a cheap motor driving a single axle through some Proops (remember them?) pound pack gears. 3 AA batteries provide the go, and a DPDT switch the control. To say the model runs slowly would be to underestimate it's lack of forward progress. Plenty of power though, you just better be not in a hurry. 

The body detail owes a lot to old plastic kit cars. While the model might not be fast, it's powered (apparently) by a honking great V8 engine. I have no idea why its mounted back to font, and I didn't really understand which bits were engine and which gearbox. 

Crew is an Action Jack figure with a paper overall to hide the joints in his lets, and some Milliput hair. The headlight is a Playmobil cup with the handle cut off and wires added. I suspect the lens comes from the spares box - I never threw bits away. 

Tiger hasn't run for a while, although he still works. I suppose Marjorie Kondo would declutter him to the bin, but I prefer he sits on the bookshelves behind me when I'm on Zoom calls. We all have to start somewhere, and shouldn't forget that modellers develop, they aren't born.


Thursday, September 16, 2021

Small layouts in Garden Rail


 Do you fancy building a garden railway, but worry you don't have the space?

Fear not – this month we feature five different large scale model railways to inspire you and cast aside all those space worries. Whether you can find the space in your garage, or need to fill the patio, we have something for everyone.

Back at the workbench, there are livestock wagons to build, a remote-controlled scale car and an Irish railcar.

All this plus the latest product news for the enthusiast including a review of Roundhouse Engineering's Palmertson “Small England” live steam locomotive.

Wednesday, September 15, 2021

Motor and gearbox


I'm still rusty at kit building, but some things are starting to come back to me. The gearbox in this kit seems familiar for a start. 

 The etch looks a bit hand-drawn. That's not a bad thing if done properly - the method is to work 4X normal size, so any errors are reduced when the parts are etched. To be honest, using a ruler and pair of compasses, an accurate part shouldn't be beyond the wit of man.  

Anyway, the first job is to work out which of the half-etched holes should be drilled out to fit the motor. The compasses quickly establish this - I think I've done it by eye in the past and things haven't gone well, but this time there's no problem at all. 

One common feature is that the hole for the motor boss is too small - no problem to open out with the tapered reamer, but if you've not done this before it might be off putting. Do NOT just screw the motor to the metal without opening out the hole, you'll bend things in a very bad way. 

More opening out is required for the axle bearing holes. Again, easy with the right tool and not bad practise as over-large holes are a nightmare to deal with and model railway etching isn't always as precision a craft as we might like. 

A much bigger problem arises when it's time to fit the worm gear. The one supplied had a great big, fat boss with the grub screw in it. It's so fat, that we find the motor is fitted off-centre in the cradle and the boss rubs on one side. Bad enough to stop the motor turning. I have no idea why this is, but it shouldn't happen.

A bit of fiddling around and it seems I can mount the gear backwards on the motor spindle with the boss just clearing he crown gear. 

Now, I seem to remember this being a show-stopper in the past with replacement gearboxes being the order of the day. Hopefully, I'll get away with it this time...


Tuesday, September 14, 2021

Pink chassis cleaning


It seems that Shiny Sinks, my favoured cleaner for post-soldering sessions on etched locomotive kits is no more. Maybe my annual purchase of a bottle wasn't enough to keep the company afloat or something. Whatever, I need an alternative. 

Cue, much rummaging around in the cupboard under the kitchen sink to see what could be found. I'm sure that most people have far more cleaners than really required, unless you are one of those annoyingly smug people who use vinegar for everything and tell us it's a miracle that we don't know about. 

Anyway, nothing really seemed to work. Not stainless steel cleaner, Cillit Bang (Bang and the flux is still there!) but then I gave The Pink Stuff a go. And it worked. 

I've no idea what is in this bubblegum coloured paste, but apply, leave for a minute and then scrub away with the old toothbrush and it works. This is annoying as anything that describes itself as "The Miracle Cleaning Paste" or looks like something you buy from one of those market stalls where the vendor uses a microphone to keep up some running patter, should be rubbish. 

It should also be expensive, and this stuff is a quid a pot. Bargain. And Vegans can eat it too, what more do you want?

Monday, September 13, 2021

Chassis on the jig


Since this is a blog build, and not a magazine one, I can use any bit of fancy-pants kit at my disposal, without worrying how anyone else will be able to do the same. Hence, out comes my Hobby Holidays chassis jig. 

It needed a little freeing up, but nothing that some WD40 and remembering to slacken ALL the Allen bolts wouldn't cure. 

The rods were carefully set to match the spacing of the conrods, reminding me that I never got around to ordering the set with smaller ends that actually fit into the crank pin holes. Still, I think I'm accurate enough. 

Once the chassis sides and spacers were soldered up, I put it on the jig with the bearings. Or at least I did once I'd opened out the centre holes and huge along (at least 1mm) as they seemed to be in the wrong place. The ends are fine, and using the jig, this isn't a problem - just slosh plenty of solder around and let it sort itself out. The gas torch was handy here as there's a lot of heat absorbing metal. 

Once cool, I cleaned it up and then remembered I've run out of Shiny Sinks cleaner and need to find a replacement before the flux stars going green.

Sunday, September 12, 2021

Repeat after me - I do NOT want a Rolls-Royce...


When I was a kid, I thought there were two things that marked you out at rich:

You owned an electric toothbrush. 

You drove a Rolls-Royce.

Simple really. Now, I have achieved electric toothbrushing, and a few weeks ago, I was faced with the opportunity to complete the list. 

At Warwick classic car show, there was a man selling his Rolls. £15,000 and I could have driven it away. 

Tempting. For a start, it's the right car. Not one of the horrible modern ones that look like they hit every branch as they fell out of the ugly tree. This is the proper Rolls shape for people my age. 

The colour is good too. I'm not a fan of gold cars, but on a Rolls (I know the cognoscenti say "Royce" because he started the company, but Rolls is traditional) it seems to work. Gold and dark brown really looks nice. 

Now, these cars are notorious money-pits. If you have the hydroelastic suspension, it used to be £2000 a corner to fix.  This car doesn't have that. Apparently there are some of the fittings at the front, but they were blocked off at the factory. 

From that you will guess I chatted to the owner. He was very nice and let me sit in the drivers seat, because I've never been in a Rolls before. It's very plush in there in a very 1970s way. Lots of controls and stuff that you would take for granted in a modern car, but in the later, I suspect they need less attention. 1978 wasn't a great time for electric stuff, but the chances of fixing it if it goes wrong will be higher. 

The MOT history looks good, this car has been well looked after. It's not used for weddings, just wafting around in. I'm told everything works. The only bad bit it there is a wing that could do with a bit of touch up spraying.

Technically, I could have ponied up the money and bought the thing. OK, it's a big hit on the savings, and the insurance would have been an "interesting" bill (out of curiosity, I looked a quote up on Direct Line and the website refused to produce one) and the running costs wouldn't be paltry either. 

However, I need money to get the Beetle back on the road and that matters more than buying another car that I don't need. It wouldn't fit on the drive (these things are massive!) and I don't have a need for "wafting around" anyway, not one the Peugeot won't satisfy anyway. 

Maybe I should buy as an investment. Not too long ago, this car was worth £7000, so looked after, the value is only going one way. But investment means dry storage is required, and that's expensive. 

But I can dream. 


Saturday, September 11, 2021

Saturday Film Club: Mattel Vertibird Toy Helicopter

The Vertibird helicopter is firmly in the realm of toys I looked at in my mum's mail order catalogue, but knew I'd never actually see. To be honest, I'd still rather have had some Lego or something for the train set at the time, but that didn't stop me wondering. 

This video is fun because it's recorded by someone into RC helicopters who can explain what the controls really do, and also shows us how the toy works, which is very ingenious. If I'd had one, I'd probably have taken it to bits and broken it anyway.

Friday, September 10, 2021

OO/009 micro layout, Lyn and Copenhagen Fields in BRM

Last month, my BRM project was deliberately on the small side, because I needed the time for something a bit bigger - a micro layout with both OO and 009 track.


The model is a test-bed for several Geoscenics products as well as a chance to scratch an itch that's been with me since we visited Rocks by Rail a few months ago. The idea of building a loading bank appealed a lot, and there an obvious influence from Giles Favel's "End of the Line" too. 

I really enjoyed using the scenic material - the pole hole road kit has long been a favourite, but the track weathering is the business too, especially the oil spill kit. Look out for these returning in future projects. 

Sticking with 009, along with Narrow Gauge World editor Andrew Charman, I've take a look at Heljan's "Lyn". 


 And finally, the camera has been out again, this time for a visit to the MRC's "Copenhagen Fields". 

 
The club were very generous and allowed me to place the camera within the layout so I could snap angles and scenes that you can't see from the normal viewing position at an exhibition. Being able to get the G12 right down into the model shows some really interesting scenes that won't have appeared in print before. 

Finally, BRM TV has me talking viewers through the little industrial layout. 


This is a fully Phil filmed and edited piece, and I've been experimenting with the content a little with extra cutaways and odd snippets filmed during construction. I hope this works well - I'm quite pleased with it, and have plans for the future.


Thursday, September 09, 2021

Talking about garden railways


If you are in London this evening, I will be talking at the Model Railway Club about green-fingered modelling. I have a feeling that when I agreed to this, I thought it would be by Zoom, but it seems I need to get on a train - not sure how I feel about this...

Wednesday, September 08, 2021

Sides and spacers

Moving on the big bits of metal, chassis sides and spacer were removed from the fret, bent up, and then test slotted together - something they did perfectly. 

The tabs on the spacers fit through slots in the chassis, but stick out proud of the side. This makes keeping everything together without frying my fingers a little bit of a fiddle. After a bit of juggling, I found a way of holding bits of leftover MDF from another kit in such a way that I could tack the joints together, at least on the ends. 

Checking that the chassis was both flat and square, pleasingly it was, I added some generous fillets of solder. Not because they are really required, but because they are fun to do. This metal flowing is what I dreamed of when I decided to build the kit. 

The centre spacers went in easily, if a little wonky (it seems to make no difference) and all the tabs filed flush with the outside face. A little scraping and polishing and I'm convinced that whatever skill I have building these things, hasn't entirely deserted me. Maybe it's like riding a bike, you never forget. I hope so...

Tuesday, September 07, 2021

Bendy rods


With the soldering iron warmed up, water in the tip cleaning spong and solder and flux to hand, it's off to work on the Hudswell Clarke shunter. 

A logical place to start is with the rods. These are made up of three layers, and straight away I find myself with a challenge. 

Real rods are jointed, and on the model the knuckle is represented with a length of wire through a hole beside the main crank pin hole. The trouble is, these are etched quite large, and there is only the thinnest piece of nickel outside the hole - so the rod tends to become a zig-zag once released from the etch. 

With care, each layer is tinned and then sweated together into something like a straight line. I filled the smaller holes with solder to keep things under control. Once happy, a little drilling of the soft metal allowed me to stick a bit of 0.7mm wire in - this being cut to length once the solder had cooled. 

It's also important to ensure the rods are handed by not sticking the wire in from the same side on both. 

These might not look like big jobs, but there's over an hours work here with all the careful soldering and cleaning up. Time well spent with a bit of luck.

Monday, September 06, 2021

Hudswell Clarke 0-6-0 shunter

For a few weeks, I've been in the mood to do some soldering. Maybe this is a sign of my modelling mojo returning, or just that I fancy doing something a bit different. Whatever, I've been dreaming about messing around with hot metal. 

Out of the stash has come this Mercian Models kit for a Hudsell Clarke 0-6-0 diesel-mechanical shunter. It looks quite a lot like the BR Class 07 with it's central(ish) cab and bonnet front and back. I've always like the 07, so this appealed as something a little different. 

BR owner 10 of these machines - numbers D2510 to D2519. Introduced in 1961, they only lasted six years in service before being sold off to the NCB. One, D2511, is now preserved. 

History records these locomotives as another odd purchase. By the time they appeared, the standard BR shunter offered either 204hp or 350hp. Was there really a benefit in a tiny class producing at the lower end of the scale? Perhaps they were a welcome re-design from nine earlier HC shunters (D2500 to D2509) with their distinctively steam-era styling, complete with chimney and bunker, but that's hardly a reason to buy more is it? Those machines also lasted until 1967, so were arguably more successful, even if none were preserved.

The locos found themselves allocated to Birkenhead, Borrow-in-Furness, Watford and Crewe South, whose staff must have been delighted to receive orphan locos whose quirks they would have to learn when maintaining them. 


Anyway, the kit wins it's place on the workbench by virtue of being complete - I have the earlier HC design to build one day, but need to sort out wheels and motor, so that can wait for another day. 

Most of the model is etched in nickel-silver, so promises good soldering. The instructions are exploded diagrams, and apart from the jackshaft drive, shouldn't be too challenging to build. Good, because my loco building skills are distinctly rusty...

Sunday, September 05, 2021

The great Model Railway Journal massacre!


Forgive me, for I have sinned. A few days ago, I owned a full set of Model Railway Journal magazines. 

Every single one, including the apparently rare, Issue 0. 

Now I own a few years in original binders, and a box file with a load of articles. Essentially the distilled essence of MRJ, or at least the bits that appeal to me. 

What caused me to commit such a heinous crime? 

Lack of space for a start. The things were piling up around the place. I never really looked at old issues, even though it's easy thanks to an on-line index. Were I the owner of a proper "railway salon" with endless shelves for magazines and books, I would have left well alone. But I'm not.

Years ago, I made a real effort to complete my set, digging through piles at exhibitions and even resorting to eBay. At the time, I wasn't convinced MRJ would survive (I think we were in the low number hundreds and things looked shaky) and a complete set would join my complete set of MORILs. But I'm pleased to say, the mag keeps appearing, so the completist in me has accepted defeat.  

It's interesting to see what I pulled out for the box file. Lots of practical articles on things that I'm actually likely to have a go at. Plenty of scenery, some buildings, weathering, a few locos and some rolling stock. Gordon Gravett, Geoff Kent, Martyn Welch, Stephen Williams and Pete Kaizer are the names on many of the articles.

There's lots of inspiration in the box, and none of the things that annoy me. MRJ can be very pretentious - "peak MRJ" was a loco weathering piece by Martyn Welch, described as "the most important and relevant article we have ever published". That alone consigned it to the recycling bin. For a start, it wasn't - there are many articles from the very early days that could lay claim to that such as the first mention of electrostatic grass, something that has changed the hobby. Also, most of the techniques were in The Art of Weathering, a book that is listed as an influence in many of the articles in the magazine.

At this point there are, I am sure, some people going, "HOW DARE YOU CRITICISE THE JOURNAL. EVERYTHING YOU WRITE IS RUBBISH AND SO ARE ALL THE MAINSTREAM MAGAZINES!". 

I don't care. With the possible exception of Garden Rail, no magazine is perfect. I've reduced all the ones I've not got a byline in to box-file contents. It's impossible to keep everyone happy all the time. Some topics just don't interest me - signalling and coaches being low of my list of preferred reading matter. On the other hand, I kept all the articles where Gordon G builds model boats, which I bet many readers aren't that interested in. 

I don't buy the "ALL THE MAINSTREAM MAGAZINES ONLY TALK ABOUT BUYING THINGS AND NOT PROPER MODELLING" either. There's plenty of articles in MRJ about fiddling with RTR and I'll admit I've kept none of them. The tone can often be a little bit patronising "Oh look, some RTR that we deem acceptable to us better modellers". To be honest, I don't buy MRJ for RTR stuff - I like that it is different to everything else. Even the occasional pretentiousness isn't an issue, I WANT the mag to see itself as a cut above, that's its character.

Maybe I miss the days in the late 1980s-1990s when to build an exhibition layout, you built kits. And with a bit of application, your kit built models would be better than the contemporary RTR. There was much modifying and mangling going on. That, to me was the era of the best MRJ issues - the ones I still have whole in binders. 

Anyway, the deed is done. I now have a box full of really good stuff that I will enjoy browsing through. All killer, no filler as they say in the music world.

Saturday, September 04, 2021

Saturday Film Club: Great Laxey Mine Railway

Another Manx video for you today - this time the lesser-spotted Great Laxey Mines Railway. 

This 19inch gauge line is a relative newcomer to the IOM train scene, re-opening in 2004. The ride is short, but fun and the locomotives are unusual. 

One interesting feature is the flange lubricator on the initial very tight curve out of the station. I can't recall seeing one before, although I know they exist on the main line.

Friday, September 03, 2021

A little piece of Ian Allan for my wall

The sad closure of the final Ian Allan shop in Waterloo leaves the country with no chain model shops. 

However, thanks to the generosity of the new occupant of the premises, a little piece of the shop will live on. On finding that there were still a few shop fittings knocking around, rather than throw them in a skip, they took the time to find RMweb, register an account and then post, offering the signs from above the shelves to anyone as a memento. 

The effort required was substantial, and incredibly generous. 

I leapt at the chance, and soon found myself the owner of the "New Title" and "Maritime" headers. I was beaten to the "Railway" one by another evil blogger, but I'm not too worried. The chance to own a little bit of somewhere I had enjoyed visiting means I'm not really fussed, and both are appropriate for me anyway. 

The shop itself is to become a dental practice. 

The iconic tiled frontage and unusual window is retained, so if you are in the area, it's still possible to spot the old place. 

This isn't the only bit of IA memorabilia in my collection though. I bought this for £3 at a show years ago. 

Luck was on my side - surely I can't be the only person who would want it?


Thursday, September 02, 2021

Partwork season is back


The schools are heading back, which must mean it's time for all the new partworks to launch. Cluttering up your local newsagents for the next seven weeks are a couple I spotted. 

Build the Fast & Furious Dodge Charger

If you enjoyed the films, then for only £1100, you can build a 1:8 scale Dodge Charger. At 68cm long, it's quite a beast of a toy car. Sadly, it's a bit of a static model although the steering works and you can fit batteries to make the headlights work. 

Assuming this is what it looks to be, a simple screw together kit, then if the Charger is your thing, it's probably as a good a way to spend money as any. The same cash would buy you a 2010 Vauxhall Insignia

First issue is 99p, but the bits in it looked a bit useless unless you plan to buy the set, so I didn't bother. 

Warhammer 40,000 Imperium 

This is more like it. £2.99 buys you a couple of plastic figure kits, half-a-dozen good quality dice and some stuff to play a game on including a clear plastic ruler thing. 

The figures are designed to push together without glue. That makes sense as paints don't arrive until later in the series and you are going to have to take these things apart for painting. However the two characters can be used for a game. In theory at least as I looked at the rules and was thoroughly confused. A step-by-step guide is included and I think it will make sense if you concentrate. 

A bigger problem is that one of the figures didn't want to stay together without glue, and even with, putting the final bits on defeated me, so it went in the bin. More dedicated, or less ham-fisted modellers will be fine I suspect. At 5cm tall, these are quite impressive and I will slap some paint on mine one day. 

Interestingly, there is a premium option for £10.99 per issue (£2 more than the standard issues) which give you extra figures and paint - but this involves four issues a month which sounds like a lot of money and an awful lot of painting. 

One thing that does fascinate me is the imagination that goes into all this. Whole universes have been created with epic back stories to give these character life. It's a bit of a pity that all that effort has gone into creating a world of continuous war, but then I guess they know their market.

Wednesday, September 01, 2021

Narrow Gauge World and Model Boats appearances plus explosive Rapido action


A couple of out-of-the-ordinary appearances this month. 

My cartoon model of the Hood appears in the Readers Models section of Model Boats magazine. I mention that I'm not happy with calling it the "Hood" and the designer suggests "Pud" as another option. I think I quite like that...

Over in Narrow Gauge World, there is a review of Heljan's "Lyn" in 009 to which I contributed photos and a few comments on the running of the model. Andrew has sorted out the prototype detail as it's his area of expertise, something I appreciate for the next issue of BRM. 

Finally, I helped out with some filming for Rapido a few weeks ago. The results have appeared on the web. You have been warned!