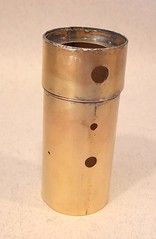
This boilers clean lines hide a whole heap of work. A fair bit of effort went into making something so simple looking.
For me, the boiler was supplied as a flat part. No problem (!) as all I need to do is break out the GW Models metal rollers and turn it into a tube. While rollers are not essential for modelling, I am rubbish at making round things so decided to invest for the future. There are lots of kits out there for me to build !
At first I though the etched lines along the centre were just marks, then I noticed the dimples for rivets. By that point I'd actually made quite a good job. And then had to undo it.
Rivets punched, the tube was re-rolled rightside out carefully not squashing the details I'd just embossed. Once nearly happy I soldered the but joint seam at the bottom and ran the whole thing through the rollers a few more times. Partly to make sure it was round but mostly 'cos it was fun.
Next a former went in and showed that I wasn't quite there but near enough.
The smokebox is two more lamination's of brass, both of which have to be rolled and then soldered in position. It's fiddly and a certain amount of tack soldering followed by adjustment is needed but using the chimney hole as a guide thus wasn't too bad.
The finishing touch was running a ring of copper wire around behind the smokebox. The spending ages cleaning all the excess solder off the surface. If I can find the RSU I just need to fit the boiler bands for a complete job.
No comments:
Post a Comment