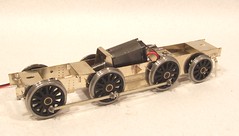
Before I could get to put the wheels in this chassis there was a little preparation required. Slaters wheels are excellent but as I've described before, you need to do a little work to put the crank pins in. The wheels have the correct flat face rather than traditional slender spoke of most steam locomotive wheels. If I have a complaint it's that the square bushes in the wheels grip the axle a little too tightly making it difficult to remove them from the axle. The trick (engineers close your eyes now) is to half undo the grub screw and tap it on the end with a hammer. This punches the wheel off the axle end. It's probably not too kind to the threads but you only need a gentle tap, not a full bodied wallop.
The con rods are a lamination of three layers of etch, the top being half-etched for detail. A touch of opening out of the holes allowed them to slip over the crank pin bushes with the tiniest bit of slop - if I need more I can introduce it but the less the better at this stage.
As it is, no extra easing will be necessary. With the motor connected to power everything runs well first time. The chassis runs back and forth on the workbench .
At the back I have assembled the pony/radial truck. The jury is still out on this bit as it all seems a bit odd to me and not nearly as solid as I would expect. I'll try the chassis out on a layout and might make some changes in this area. After all, the designer probably knew what he was doing and so just because it looks odd to me is no reason to make changes until I'm sure I'm right. After all, the mini looked odd to people when it first came out but still seemed to work OK.

No comments:
Post a Comment