Brian asks: I'm soldering together a Gauge O Castle Class Loco (David Andrews kit perhaps a bit ambitious as a first foray into brass kit making!) and am looking for a good way of removing excess solder. Any suggestions please? So far, I've tried a variety of tools including:-
- scalpel - dicey
- chisel ended craft knife - best so far
- wood turning chisel - not giving fine enough control
- ground down file end - ditto
- glass fibre pen - OK for smoothing but not removal
- scraper board tool - OK but slow and laborious
I'm reluctant to try remelting the solder as this usually just spreads the problem or solder braid or solder suckers as each of these can lead to the work coming undone.
 Ahh yes. Just when you get the hang of making solder stick to whichever kit you are building, you discover it's possible to put too much on and then have to remove the excess. Which turns out to be harder than getting the stuff to flow in the first place!
Let's start with solder braid. The idea is that you heat the solder to melt it, dip the braid in and the solder runs up it thanks to capillary action. As far as I'm concerned you might as well poke a cocktail stick in there for all the good it does. I can't make the stuff work.
Next, solder suckers. These are like syringes with sprung plungers. Designed for electronics workers, you heat the metal, poke the nozzle in and press the button on the side to activate the plunger which sucks solder into the body of the tool. I have has success with these but the amount of molten metal removed with each suck is small and of course when you heat it up, you can dislodge the parts you fixed down in the first place.
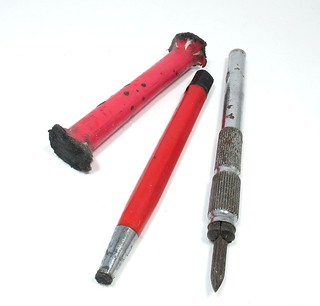
Scraping solder away with a scalpel, craft knife or the three-sided scraper shown in the picture will work. The problem is that it's very easy to gouge the surface of brass with a steel tool. You'd removed the solder but the newly exposed surface won't look too pretty.
I'll still do this for larger lumps. The trick seems to be to remove very little with each pass and stop sooner than you think. Work at a very shallow angle and hopefully if you do hit brass, any scratching will be minor.
My favourite method is to burnish the solder away. This involves vigorously rubbing at it with a fibreglass stick, effectively polishing it away. Yes, it takes longer than you might hope but it does leave a nice shiny metal surface.
I usually start with a fat stick of fibres (the red splayed end thing in the picture - I really should tidy that up) burnishing with gay abandon over all the metal. The fibres won't mark brass of nickel-silver so you can go mad. The stick seems to work better than the propelling pencil although I use one of those for small areas. If you can, slosh loads of flux on the join, melt it and spread the solder around. This makes the burnishing a lot easier. With practise you learn to part melt the excess so it can be spread without disturbing the main joint, which actually needs minuscule amounts of solder to hold it.
The main thing to take from this is that there is no easy way to remove excess solder. I've tried brushes in mini-drills and they don't work and chemical tricks can't differentiate between the solder you want and the solder you don't.
Once learnt, you discover the art of using lots of flux and ever tinier amounts of solder to make joints. I might have been helped by my Scottish and Polish ancestry to develop my parsimony here...
3 comments:
The trick to braid is cleanliness and heat. Melting the solder and dipping the cold wick in it is much the same as melting solder onto an iron then expecting it to stick to a cold model.
Give the wick a good dip in flux. Place the wick over the solder you wish to remove, then put the iron on top of the wick so you heat both wick and solder/model together.
When it gets up to temperature you can see the solder flow into the wick. For a short time you can drag the iron along the wick and joint until you've lost the heat and it stops working. At this point trim off the filled up wick and start again.
The trick is plenty of flux and plenty of heat.
As Ian says, when using braid slosh plenty of flux about, put the braid over the excess solder and heat.
I wrote a post about braid here: http://paulthehalfwit.blogspot.co.uk/2013/08/removing-excess-solder-using-braid.html
I only use a scraper. Apart from my jewellers' gravers I also grind up old Swiss files. Make a basic graver shape from a square file, grind of the remaining teeth from the sides, then stone it so that th edge away from the corner of the joint is slightly curved with the back edge stoned with a radius. This tool will not dig in the surrounding brass, because it can't. Fibreglass brushes just leave tons of scratchy, itchy bits around.
Martin
Post a Comment