 First decision - which cab to use ? The kit provides two different cabs for this particular locomotive. Without a picture to guide me, I had to guess which one to use and then check if I'd got it right.
The options were, a plain cab with beading or a more modern version covered in rivets. I plumped for the later as I think the other is for an earlier loco. This will be finished in LMS livery and I suspect that they'd been rebuilt by them. Anyway, it's a more attractive version, looks better with the rivet strewn front, to my eyes so that's what I used.
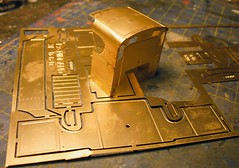
Despite only having two parts at this point, this is still a bit of a beat to put together. Both parts are half-etched and therefore thin. Theres also a load of detail that must on no account see any solder or it will disappear. And once part has to bend around the other.
I started by marking the centre of both parts, lining these up and tack soldering in place. Then the sides were carefully formed with the aid of suitable sized brass rod and pliers. The wrapper doesn't naturally bend in the right places as the cab side cutouts are weaker than the top where you want the curve to be. Gently massaging the metal did the job and after a few more tacks I was satisfied that both sides reached the bottom of the front (not a given) and it looked OK from all angles. And fitted the footplate.
After this the tacks were extended to seam the joints with the minimum of solder and I checked it all again.
Best of all, it seems I did pick the right cab. so I don't have to do it again.
No comments:
Post a Comment