 Step 1 - Pull up to the garage door, or behind another car in a traffic jam, anywhere you can see the reflection of the your headlights. Realise that one of them isn't working. Swear a bit, turn the lights off and take the key out of the ignition.
Step 2 - Go to your local motor store and buy a replacement bulb. The photo shows the one I got from Halfords for just under 14 quid. Buying a pair makes sense and there is little difference in cost between 1 and 2. More to the point, once one bulb has gone, the other can't be far behind and having a spare is never a bad thing.

Step 3 - I'm doing the driver side (UK car) bulb. Which is behind the filler pipe for the washer bottle.
At first sight, this is really going to restrict access, but for a change, someone at the car plant realised this and did something very helpful although if you have filled the washer bottle right to the top of the pipe, you might not think so.
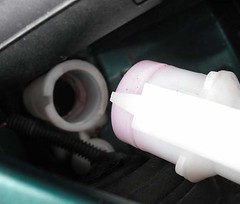 Step 4 - The pipe unclips, you can see the bulge in the photo, from the bottle. I slid my hand down it and tugged at the clip, then wiggled the pipe and it came away.
 Get your feet out of the way before doing this if you filled up to the brim.
Step 5 - Locate the wire to the back of the bulb.
To help, I've arrived it in the picture above. You might find a small torch handy as it's quite dark down there.
 Step 6 - Unplug the wire. This will come away with fingers and a bit of wiggling. The bulb is held in with a spring clip so it will wobble as you do this.
Step 7 - Peel away the rubber weather protector. It will probably grip the bulb but tug and you'll get it away.
Before you do, note how it sits over a rim at the back of the light fitting. It's an important parts as without it, the headlights will fill with muck off the road. If the rubber has split, give the thing a wash and try to glue the split. Let it dry before putting it back in place.
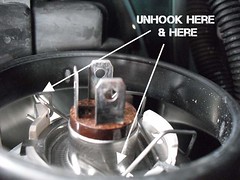 Step 8 - Unclip the spring clip holding the bulb in. To do this, unhook the wire either side of the bulb. Carefully, those clips are plastic. Mind you, the spring is pretty stiff.
Step 9 - Take the old bulb out and replace it with a new one. DO NOT touch the glass of the new bulb. Halogen blulbs don't like finger grease on them and it can shorten thier life.
Step 10 - Clip the bulb back, plug it in and check the lights now work. If they don't, make sure the plug is properly seated. If that still doesn't work, you are into checking for power in the contacts. It might be worth checking the isn't any muck in the plug first.
Step 11 - Assuming all is well, unplug the bulb, put the rubber seal back pushing it home firmly to keep the weather out, plug the bulb in again and pop the washer bottle tube back in place.
Step 12 - Try the lights again. If all is well, have a cup of tea. If not, check the plug again. Then have a cup of tea and a biscuit.
Legal note: This is an accurate description of what I did. I am not a professional mechanic and these notes are offered for entertainment only. If you chose to follow them and things don't work, it's not my fault. Sorry. If you are at all unsure then get a professional to do the job. The car used was a 1996 206, other models may be different.
34 comments:
Wow, that looks quite smooth compared to the nightmare job that is our Zafira!
Very impressive that the designers actually thought about someone changing the headlight bulb for once! Until last year, I had a Honda Civic...the access was so small that my partner was the only person that could change the bulbs with her dainty digits.
Tried this on a 206cc, slightly different layout but your method worked great thanks, I would never have thought to remove water filler top, I was about to remove the whole bottle,so you saved me a lot of time and swearing...Cheers
thanks your instructions were a great help saved me giving halfords £6.99 to fix it
thanks, very clear instructions.
Ill give it a blast. Thanks for the clear instructions.
Thank you Your instructions are brilliant.
These instructions are spot-on. Followed them to the letter and took only 10 minutes to replace both left and right main beam bulbs before an MOT. Thanks very much. DeeBeeDubya
thank you for taking the time to post those instructions, nice and clear and stopped an arguement going any further! One very thankful Husband!
Used this guide today, incredibly simple walkthrough for a nigh imposible task for me.
Thanks.
Just wanted to add another thanks for this very handy set of instructions.
The wire clips that hold the bulb in can be a bit tricky, but a good push down and to the side will do it.
Also wanted to add another optional step 9a - take out the old bulb and realise that the child in Halfords has sold you the wrong bulb. Go all the way back to shop, exchange, continue.
Thanks for the instructions. However on my 206 CC I also needed a wire coat hanger to unclip the water bottle neck. Just hook it over the bottom of the plastic clip on the side, pull it slightly sideways and the clip undoes.
Thanks for these instructions.
However on our 206 CC I also need a wire coat hanger to undo the securing clip on the side of the water bottle neck. Just hook the coat hanger under the bottom of the clip and pull slightly sideways to unclip it.
M
You wrote a very nice instructional post to replace a headlight. I agree with you in regards to buying replacements because having 2 or 3 spare parts on hand isn’t a bad idea; sooner or later, you’ll be able to use them. Also, replacing headlights on your own will really save you money and time. Why? Because you'd only have to pay for the parts that you need to use. You can do the work in your own garage in your own pace.
Enoch Ross
Very helpfull!
Thanks!
My 206 is from 2005 and it has plastic cover instead of ruubber one. The rest is the same.
Thanks for the info.Very interesting post.
Thank you so much!!! Worked a bloody treat!!!!
Thanks for all ther info - very useful - but can you also advise what type of biscuit to have and is coffee a suitable alternative to tea?
You Legend, darn fine instructions and saved a lot of time, well played that man
Hey Phil.
Thank you very very much for the tutorial, you really made my day of course you saved me £6.99 fitting cost. I was straggling how to access to the the bulp cover with water pipe opstructing me. I found the tip in your blogg. Many thank again
In case you're having trouble with the clips this may be of some help!
The clips are extremely fiddly but once I had worked out one I could do the others in next to no time. The clips undo from the top. If you imagine an equals (=) sign flipped vertically, they run aside each other like that. You find there's almost like a bump or ridge as you run your hand down from top to bottom. From this ridge you push down on it from above and whilst still holding down you move it out to the side.
Thanks for the info, it was very helpful and saved my paying Halford's to do a very easy job.
The covers on my 2006 206cc are a little different, but they remove very easily if you gently ease them with the help of a flat blade screwdriver. As for the Washer bottle filler, I had no idea it could be so easy to remove. I am very thankful to all contributors for their very useful comments.
Absolutely brilliant info mate.. First class... Thanks very much.. Very helpful.
Great advice! I had problems with Step 6 - Unplug the wire. I could not do it (tried 10 minutes), but then a spray of CRC lubricant and one minute wiggling, and OK. I was lazy so I did not change the other bulb (the washer side), but I sprayed lubricant for that one, so I can do it on the road in the dark middle of the night
Great tip about the washer bottle. Mines a 2006 model but basically the same. Dont use halfords, my bulb cost 2.57 from my local motor factor.
Yep. I bought a bulb from local parts firm & thought they'd missed a 1 of the front of the price ��
Many thanks! But does anyone know if this is for the standard or full beam?
As when i removed this bulb my full beam also stopped working when i tested with no bulb in.
Apologies but I initially purchased the wrong size bulb which is too small.
So when I put the original bulb back in, the standard was still not working but the full beam capability had returned.
Normal and full beam are the same bulb - it has 2 filaments.
Check it is plugged in tightly on the back and the connector is the right way around. Also, there is no dirt in the connections.
Good luck.
54 plat 206 has 2 bulbs one for main one for side
on a 54 plate 206 there is
2 bulbs 1 for side lights and 1 for main beam
Many thanks for this useful guide and for the comments that have supplemented it.
On the 206 cc, unless you use a coathanger as suggested, you run the risk of scraping your wrists raw while unclipping the water bottle filler.
Also, the 206cc has a fat electric conduit that obstructs access. The conduit is clipped to a metal anchor plate. Using a long nosed pliers, release the spring clip that holds this conduit in place by squeezing it, then pull the conduit up and over the anchor. Be careful not to damage the small wire that comes out the side of the conduit.
The 206cc has single back cap over the back of both the dipped and high beam bulbs. This cap is released by pulling the central plastic tab on the cap upwards and backwards. You don't have to move it backwards very much - just enough to clear the headlamp housing. There is a rubber sealing gasket in a channel in the back cap. If it doesn't want to stay in neatly place when you refit the back cap, apply a few drops of superglue in the channel of the back cap before seating it carefully in the channel.
The LHS bulb access is easier in some respects as there is no water bottle filler. But there is a cable that can get in the way and it's best to unlug this from the rear of the headlamp housing (plug is on the left side, standing in front of the car) before trying to move the back cap.
Thanks again
John H
Thank you!
It's easy just as the chap said changed the two in ten minutes.no problem.
Is this the main beam? My dipped ones have gone. Is there another housing?
Post a Comment