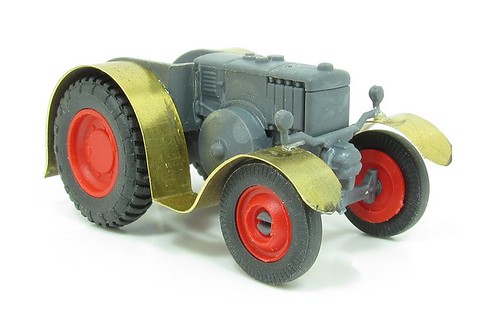
One job I really wasn't looking forward to on this build was forming the mudguards. On the prototype there are a lot of curves and I wasn't sure if I could form these neatly, nor if they would fit the model as it's not exactly the same as the real thing.
Anyway, I dug out some very thin brass (leftover etch) and cut some 5mm wide strips using an Olfa cutter. The width is guessed from the photo as the mudguards only just reach the edge of the rear wheels, but when I checked the real thing, they are 17 inches wide, so I'm not far out.
After this, bending started with the big wheels forming the metal around various pens until it looked about right. Then the sharp bend followed by more trial and error for the front. In reality, the mudguards are in two parts with the break where the sharp bend is. However the gap is tiny and it means when I add in the tiny angle fitted to support the front section, it can be purely cosmetic.
After which I just had to do it all again for the other side. Supeglue holds the metal to the plastic - the blobs under the lights aren't so obvious in real life and will vanish under paint later.
I know the cross-section incorporates some raised areas for strength but I reckoned I should stop bending while I was winning. Perhaps if I was soldering, I could have added thin wire for the effect but better go this far and be happy.

Now, I just need to go and measure the windscreen.
No comments:
Post a Comment