Wednesday, June 30, 2010

Isle of Man flag

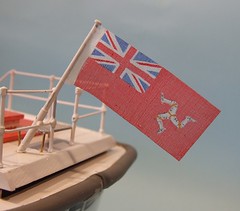
IOM FlagKadet has a flagpole at the stern and without something fluttering, this looks a bit empty.

Not any more. At the recent Mobile Marine open day, Mike Allsop of Scale Flags sold me this lovely Isle of Man flag for a very reasonable amount of money (less than a fiver anyway). It’s printed on silk giving a diaphanous result. Actually I’m not sure how much is printed and how much is hand painted. Whatever, the result is a little work of art.

The instructions show how to roll the white bordered end around a suitable rope but I cheated and wrapped it round the pole itself. Glue used was Bostick Solvent-free and this has held well enough during sailing. I’m not sure a rope would work well in this scale and since the flag is stiffer that it would be in real life (Mike can explain how to drape the flag correctly but I prefer fluttering for this model) wouldn’t hang properly anyway. However if it was draped properly you wouldn’t see the design and I think that would be a shame wouldn’t it ?

Tuesday, June 29, 2010

Melbridge Box Company on ModelRailway.TV


It's live - 5 minutes or so of me talking without a script about the Box file layout. Actually, it's not quite as bad as it sounds, the filming is very impressive with lots of different angles and everything. The final sequence where the layout is packed away is the best bit but you'll need to log in (subscription required) to see this.

A slip of the knife

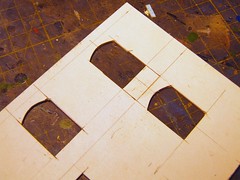
Warehouse errorAs I’ve mentioned before, my buildings are made from Daler board (2mm thick artists mounting board available from Art shops) covered with plasticard. The card is lovely and easy to work as well as being very cheap – five quids worth will be more than enough for two layouts this size.


My glue of choice for attaching bits of card to each other is Alphatic resin, a posh PVA used by the aeromodelling community. It sticks well and grabs quickly. This is handy when you screw up. I marked one of the windows too low and had to re-instate the rectangle I cut out. That won’t be a problem assuming the building progresses beyond mock-up stage. The plastic will hide it from view. However I’m quite pleased, a clean cut with a sharp scalpel and some good glue and it’s nearly as good as new. Perhaps I should have been a surgeon.

Monday, June 28, 2010

Warehouse planning

Measuring the heightLast week I mentioned the building that was to inspire the left hand corner of my layout in a box. Finally I’ve actually started working on it.
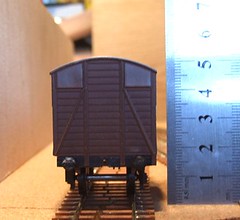
The first step was to measure the required platform height. I know there are standards for this sort of thing but they all need to work from the top of the rail to allow for different sleeper thicknesses. Not wanting to be bothered with this, I did some original research and came up with 18mm as you can see from the photo. In theory this will allow the doors of the van to open without catching the slabs. Pedants pointing out that the doors are part of a moulded one-piece body can shut up, they could open. Wanting to be on the safe side I’ll be aiming the platform top another mm or so lower, not that you can really see as it’s behind the siding so any discrepancies will be covered.

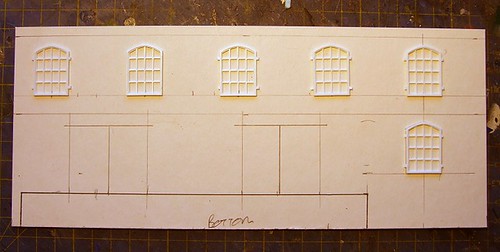
With this critical dimension, I was able to draw up a rough building side to see what it looks like. The windows are from Dornaplas and plonked on to give me an idea of proportions. They work out surprisingly well resulting in 10 foot high floors which I think is about right for a warehouse. They tended to vary from 6 and a bit ft upwards (I once did a show in the canal warehouse in Coventry. The ceiling is slightly barrelled and I had to stand in the tall bits and stoop slightly when walking around. The facia and lifts didn’t get attached to the layout that time) to today’s cavernous tin sheds.

Sliding doors have been arranged to match the position of van doors when the siding is in use. Presumably the 4mm scale workforce want to be able to wheel goods out of the van straight into store. A little fiddling made sure that when they slide open, nothing hangs over the end of the platform.
Warehouse start

Sunday, June 27, 2010

Slices of railway

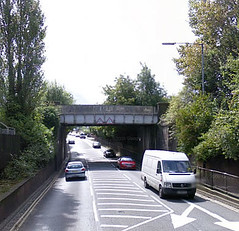
Princess drive railway bridgeI drive under this bridge most evenings on my way home from work. A couple of days ago, while I was approaching, a Chiltern Railways train went over it.

This got me thinking – there is a special joy in seeing trains in transit. To me it’s more exciting than seeing them at a station. Well, unless I’m meant to be catching one that is. What I’m thinking of is those moments as you drive along when you see a train on the main line from the car window. Or like this where all you get is a glimpse of train between the bushes (this shot is nicked from Google Streetview, the normal angle frames either side of the bridge with greenery).

A few years ago, the Double O Gauge Association ran a competition where we had to build a layout or diorama in a box file. Most people laid the file on it’s back to get the most area for their work. One guy though used the file vertically with the front opening like the cover of a book. In this he put a backscene and a slice of viaduct. Obviously you didn’t get a full train, just a locomotive, but the result was a 3D picture so good he won the diorama class.

Now this got me thinking – the scene above could be modelled in the same way. What you need is a circuit of track and in the middle a very small slice of railway. The slice probably wants to be quite deep and possibly even modelled using forced perspective.

Better still, how about a fiddle yard at the back of the circuit which releases trains randomly. The viewer would sit, as though in a car, in front of the scene and get occasional glimpses of movement. Maybe this is more art installation or even something you could have at home as part of a test track than exhibitable model railway but it’s worth a thought.

Saturday, June 26, 2010

ModelRailway.TV

End on shotThis post was going to start with the lyrics from the theme of the TV series Fame. Then I took a look at them and realised just how rubbish they are, so nuts to that.

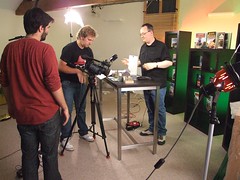
The reason for this trip into 80's nostalgia was that I have just made a bid for a bit of fame myself. Last Friday I visited the studios of Ashdown TV, home of several handicraft based Internet TV channels. With me was Melbridge Dock and The Melbridge Box Company as I was going to be filmed for ModelRailway.TV

The studios are in a business centre near Arundel. We parked up and met the crew, Jaspar and Tug who were camera, sound and studio engineers for the day. After a little discussion about the viability of getting the bulky Dock boards up a spiral staircase, the layout were taken upstairs by a straight run of steps and down a corridor. This was a bit of a surprise as downstairs is half a shed which normally acts as the set for programmes. Apparently this has been a bit over-exposed and the guys wanted to use the proper studio which allows for much better lighting.

Most of the Dock was set up. We didn't use the lighting or fascia - that later would have been in the way of the bank of ceiling lights that were carefully positioned. They felt these would be a better bet than a couple of Ikea spots ! Apart from a sticky point motor and a dry joint - both easily remedied - things were working well. That's more than can be said for the looks. We'd obviously put the model away with a touch of damp in it last time as mould spores were growning in the plastic cobbles ! These rubbed off OK with a bit of work from a damp handkerchief and stiff paint brush. I'll be taking a better look at this in the future. For now the layout is stored without any wrapping, it normally lives in a plastic bag, to let the air circulate.

Once set up there was another surprise. Previous films had involved the layout owner and an interviewer. No one had mentioned it but I didn't get someone asking questions, the plan was for me to do the piece single handed. After a little planning my hospital radio waffling experience combined with the practise afforded by giving a few conference presentations stood me in good stead. I was asked for ten minutes and didn't shut up for twenty. One take, mostly remembering to look into the correct camera and hopefully not sounding too stupid. The crew were nice and said it sounded good, but I expect that the editing process will involve a certain amount of turd polishing.

After I'd finished one of the cameras went on a boom, the other was augmented with a macro lens and lots more filming ensued. Trains ran back and forth so all the camera positions could be tried. Being a bit of a novice here, I was particularly impressed with the camera on the boom which swung along the frontage as well as giving helicopter views..

Melbridge Town filmingLunch (sandwiches) was followed by filming for the box file. Again I gave it my spiel, mostly about micro layouts this time, and again this seemed to go OK. We've put a nice shot together for the end - me packing up the model and walking off.

The whole process took about 6 hours. I've no idea how long the finished product will be but will let you know once it's live. Unless I look like a complete idiot, in which case I'll be keeping quiet.

Friday, June 25, 2010

Excavating the stash

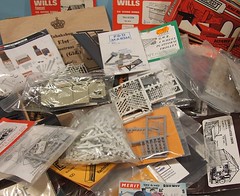
Stash of bitsAlong with all my other objectives for the layout in a box project, I’ve decided that I’m going to try not to buy too much in the way of materials of detailing parts for it. This is partly in the interests of economy but mostly to justify to myself the size of my cache of “bits”.

Like most modellers, leaving a show with my wallet full and bag empty doesn’t seem natural. Luckily I’m not a big fan of RTR stuff, preferring packets of bits and pieces found on scruffy and/or packed stands of goodies. A lot of these are parts for model buildings such as sheet materials and details. Over the years I’ve filled a couple of shoe boxes with this sort of thing and so hoped to raid these to supply the bits for the models I need to build.

This collecting isn’t avarice, on the contrary, it’s sensible planning. You can’t buy 4mm scale industrial windows in the evening or on a Sunday. In fact a good part of the cache is made up of various types on window. I know the clever modeller can make them for him/her self but I’m a bit lazy sometimes and prefer pre-made. Not just for convenience but because someone has worked out the sizes for me saving a load of research.

Anyway, the other night I dug out the boxes and randomly threw anything that looked like it might even be slightly useful into a big pile. A bigger pile than I’d expected actually but then my threshold for inclusion was pretty low. The build a building from individual bricks kits look interesting but I can’t face spending that long on an individual structure. Maybe I can do something ruined with them though. There are three different huts in there too and I know only one can make the cut.

[Pretentious bit] This is a bit like an artist preparing a palette. Unless he has a very clear vision of the finished piece, he squirts a little bit of every colour around the edge to give him the scope to do what seems right at the time. You can’t imagine Van Gough thinking, “Sod it, I forgot to squeeze out some yellow so I’ll do these flowers in red.” Can you ?

Thursday, June 24, 2010

Finished Railcar

Finished Railcar

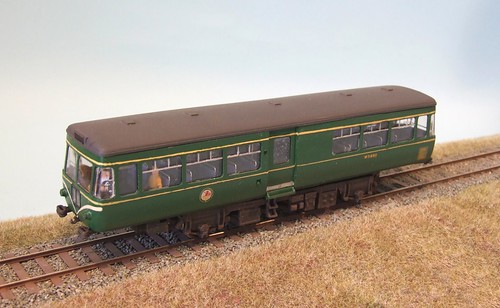
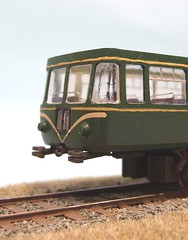
Job done. The Park-Royal Railcar is finished. At least it's completed to my satisfaction.

I know this isn't a perfect model. When Heljan eventually bring out their RTR version I'm sure that mine won't look as good, but then that wasn't the point. I had always wanted to build this kit and now I have.

Not all the faults are mine either. The side steps are incorrect as supplied and I didn't worry about scratchbuilding a new set of folding ones. There should be some side door handrails too, but these will be fiddly since they bridge the chassis/body divide and either need to clip into one or the other, or you better hope no maintenance is required...

Apart from this, well one side window (on the other side, you don't think I'm going to photograph it for the blog do you ?) is slightly fogged. I blame the passengers for breathing on the glass.

The lining isn't perfect but looks OK from  a normal viewing distance. In fact, to me, the whole thing looks fine that way. This has been a really satisfying project and one I'd recommend to anyone. It's not too difficult. If only I could get something similar in 3mm scale where I actually have a use for it !

Wednesday, June 23, 2010

Variable people quality

Little people
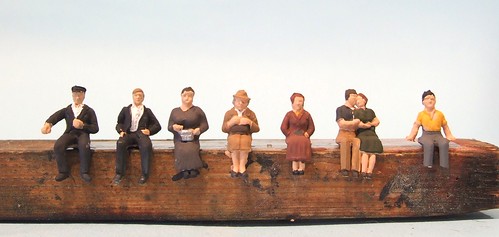
Look at this lineup, perfect illustration of the variable quality of 4mm scale people. I dug through my miniature figure box to find some occupants for the seats in the railcar and pulled out this selection. They are either whitemetal or plastic and of varying ages.

Prize for best detailed person goes, I think, to the lady in the middle who I think is of Arifix origin. Her proportions are right and the face is nicely carved. OK, the plastic is a bit soapy and prone to flash if you get a late moulding (earlier ones are sharper I find) but someone spent money finding a good pattern maker there.

On the right hand end we have Slaters plastic figures. They are a bit of a cliche nowadays as you'll see the limited range of poses on everyones layout but they are cheap, crisp and a nice hard plastic which takes paint well and can be chopped around if required. My only complaint is that they tend toward the two dimensional being a bit thinner then real people. Maybe I'm just jealous...

On the left hand we have Replica railways drivers which are very nice indeed. Both are well modelled and the guy on the end is in a useful pose. I like them although the range is a bit limited being spares from the RTR lineup. Well worth grabbing hold of for the diesel modeller.

Finally, the lady in the middle in the dark brown coat. A fairly typical cheaply made whitemetal figure. What is going on there ? I mean the overall proportions aren't too far out but the head is at best mis-shapen and at worst the result of some sort of steam hammer accident. There is next to no detail either. No idea who the manufacturer was of this one but I hope I picked it up cheap.

Of course with all of them going to live in the railcar, none of this matters. I'll just sit mishapen lady by the isle. Nicer moulded figures will get window seats.

Tuesday, June 22, 2010

Headcode - Plan B

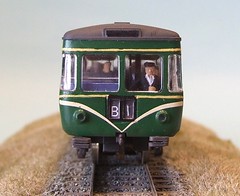
Railcar front endSo I tried to install my repainted headcodes. First I discover that you really need to do this before putting the etched interior in. The driving compartments are in the way otherwise. My solution was to cut a slot between the digits and slide them down. However I think that they are too small. At least they didn't seem to fill the windows for me - something I should have discovered before putting some glue on them but never mind.

As an added bonus the typeface appears to be wrong as well. Hmmm.

So, down to the computer and fire up the desktop publishing software. A few minutes with the ruler and then some nifty mousework, I managed to produce a sheet with a few versions of the headcodes on it. If you want the, download it from here (PDF file).

This time I separated the digits and slid them into place using tweezers and PVA for stickiness. The 1 is a bit wonky in this shot but the real thing was often less than perfect so I'm not going to worry. Actually the who roller blind thing on railways seemed to be less than perfect. Digits were rarely level because you would have to get out and look at the front to check, not something to be done on a wet day !

Monday, June 21, 2010

Installing seats

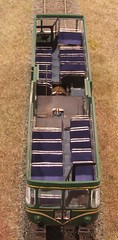
Seats inIf finding colour photos of the outside of the railcar was tough, interior shots are impossible – unless you know different of course. If that’s the case and you tell everyone, I will have my fingers on my ears and hands over my eyes as it will be too late for me.

According to the Branchlines instructions, the floor is blue lino. Seats are blue moquette but there’s no indication if they are the same shade of blue. My feeling is that lino tends toward pale shades whereas seat materials are stronger colours. My eyes tell me that the windows aren’t that clear anyway and with the roof on some approximate colours will be fine. I have tried to be neat with the grab handles on the seat backs which are silver as these will be reasonably visible.

The interiors are a snug fit in the body but by flexing the sides slightly they will drop in with all the glazing in place. I used a couple of dots of superglue to make sure they don’t rattle although one half will also be screwed down when I bolt the chassis to the captive nut soldered to its floor.

One surprise – just how heavy all this brass makes the railcar. I still had to sneak a little lead in there thought in the entranceway which provides the best cover for a heavy floor. Mind you, if you were building this and fitting a quantity of whitemetal passengers, a test run or two over the layout would be advised to make sure the single axle drive can cope !

Sunday, June 20, 2010

Festival Modelling

Ingerland car

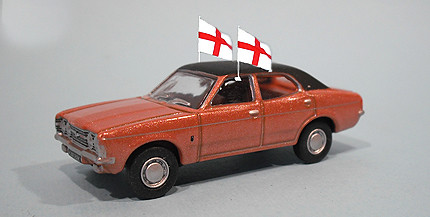
You probably haven't noticed, but there is some football going on at the moment. This gives me an idea.

There are a lot of model railway clichés. The bus on top of the hump back bridge for example, a bête noire of the 3mm Society Magazine editor. Every church has a wedding while around the corner a gravedigger surveys a hole. All of this takes place at the height of summer yet the passengers waiting on the platforms are wearing raincoats. Actually, that last one is more a symptom of British weather than anything else, so I suppose we can let it off.

Even the period the layouts represent doesn't very that much. At present the 1950/60 transition is the favourite, presumably as it allows for diesel and steam to run beside each other. The liveries are nice green ones too. As younger (in a relative sense, not actually young) modellers join the fray, we move forward to the early rail blue period of the 1970's.

Obviously there are weirdos like me who want to model things well before living memory but we aren't that common. Wartime layouts are starting to prove popular too, mainly because you get to make up a load of Airfix tanks. Or at least you think you do until a little prototype research shows that it's the soft-skin vehicles that predominated.

But, how about a break from all this. Why not model a very specific time ?

At present, on my drive home I see lots of cars with little England flags stuck to them. This will happen for around 2 weeks until they are dumped unceremoniously out of the World Cup by the Germans. Or Argentinians. Or Lithuanian Plumbers 11. Whatever happens, these flags along with those decorating houses and pubs, mark a particular point in time.

Therefore, why not model it ? OK, building a lot of limp (the car's aren't moving remember) flags won't be that exciting but at least the bigger ones will be relatively easy. Who know, if I'm wrong and our boys triumph, what a great way to mark and remember the event. People viewing the finished model will get a warm glow of nostalgia and recall how they enjoyed the “campaign”.

It's not just the current cup that can have this treatment. I'm sure alongside the big hair and tight shorts of the 1970's players, there were equally obvious shows of patriotism. Maybe the giant screen TV's didn't exist but surely people did something ?

If the beautiful game doesn't appeal, how about other major events ? What about a Coronation ? Or Silver Jubilee ? Both say streets full of bunting and shop windows specially decorated. Some towns produced special decorated trams for the occasion so I'd guess that the Parks & Gardens staff were busy at the same time. Royal Weddings generate plenty of decoration and doing this ties your model to a date in a way that's easy for non-enthusiasts to understand.

Looking bigger, Christmas layouts done properly are very uncommon. I don't mean raiding a cake decorating shop for plastic reindeer and spraying fake snow everywhere. I'm thinking about strings of unlit lights across roads and on the front of buildings. Notices and adverts mentioning festive stuff. Perhaps a Salvation Army band in the street and people trying to flog hats and mistletoe getting in peoples way. At the very least it's a good excuse to run some extra trains as passenger numbers are up. On top of this, the PW gangs will be getting ready to make use of the festive shut-down.

Of course this does introduce some interesting problems. Bunting, the traditional flags on a rope sort, won't be simple to make in 4mm scale requiring some dull time sticking little bits of paper to thread I suspect. The results should be pretty though. Those flags on cars could be made with a bit of wire and then some PVA to represent the furled material. Put a dot at the top and as it runs down I bet the shape won't be too far off. If you must have fluttery ones then take a look at the real thing - that material is going to be gossamer thin if it's scale. An etched flag (go on, someone make them) with a coat of paint is going to be chubby by comparison.

Whatever, this sort of thing ought to throw the dingy browns and greys of our models into sharp relief – a bit like real life really.

Saturday, June 19, 2010

Pete's train set

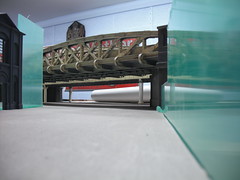
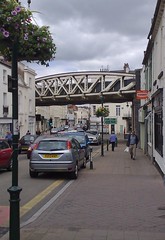
Railway bridgeLast Saturday, myself and a small group from the Leamington & Warwick Model Railway Society took a trip up north to see Pete Waterman's model of our local station (Leamington Spa, obviously). You have probably seen photos of this in some of the magazines over the last few months and very impressive it is too.

It's very weird looking at the rail bridge you drove under a few hours earlier, reproduced in 7mm:1 foot scale yet that's one of the first things I saw. 6 years into the project, the local area is very recognisable to us Leamingtonians. The Bath Street Railway Bridgecomplicated rail bridge you can see in the photo is at the bottom of Bath Street and the view is one I see (take a look at the real thing in Google Streetview) a lot while waiting for a post pub bus...

The layout is set in the early 1950's yet very little of the town has changed today. OK, so Avenue Road station no longer exists and it's corresponding bridge (behind this one) is long gone but apart from a single building beside some advertising hoardings, it all looks pretty much the same. An aerial photo confirms this. Obviously this makes measuring up a whole lot easier for the builders. That's a good thing really as they haven't been able to locate any plans for the current station despite Pete being friends with the current chairman of Network Rail !

The building construction is interesting. In an effort to avoid the warping that can occur in insufficiently braced models all are based on a perspex shell (the green stuff in the picture) with the surface material applied to this. As well as strengthening up the model it also results in pre-glazed windows.

I'll admit to not running any trains myself. Our visit was shared with some guys from Manchester club and they seemed keener to get some controller time which was great - no responsibility for 48 wagon trains yet plenty of watching them go by.There were even some nice sound effects coming from a diesel (Class 44 I think, one with a pointy nose that isn't a 37. Or Deltic.) as well as a pannier (different effects obviously). I'm sure the layout can be run very realistically to a proper timetable but to be honest we weren't there for a serious session. Besides, who is going to get tired of full length trains working Hatton Bank ?

The quality of modelling is very high. Pete gave us a quick demo showing how he paints teak coaches. I've read various techniques to reproduce this finish and all seem like a lot of hard work. This simply involved a spray of a suitable (from the Just Like the Real thing range obviously) undercoat followed by careful application of Ronseal teak stain. The trick is not to mix it fully and "pull" the stain as you apply it. This is exactly what you don't want to do when painting normally but this time it causes the pigment and shellac to separate slightly resulting in a very effective wood grain./ A second coat builds this up and if you want darker wood, keep doing it. When the finish is dry, the coach is lined, varnished and then weathered using powders.

Personally I preferred the demo of modifying the frames of an express locomotive with a Dremel and burr to stop the wheels shorting against the, Apparently the loco was built from an early JLTRT kit where the frames are a little too scale. A bit of violent modification saw the model traversing tight crossovers without upsetting the DCC though.

I really look forward to seeing progress in the future. The current station building is still to come as is quite a lot of detail. Once complete (if any layout this size can be complete) it's going to worth seeing. Good fun too.

Friday, June 18, 2010

Purple - WHY ?

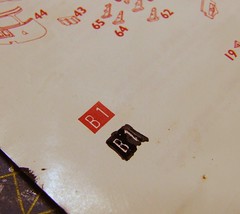
HeadcodesAt the front of the railcar is a route indicator. Behind the rectangular windows should be some lettering. Someone very cleverly decided that the easiest way to supply this was to print it on the instruction sheet. This could be cut out and stuck into the model So far, so good.

Back in the days of old money, Airfix instructions were in black and white. To be honest, when this kit was designed, everything was in black and white, colour not having been invented. By the time the kit I bought was produced, some numpty graphic design bod at Dapol presumably decided this wasn’t radical enough and opted for dark purple instead. (I know it looks red in the photo - I assure you in real life it's a regal purple)

Now, I’m no expert but I’m pretty sure that British Rail never used purple as a background on destination or indicator blinds. Not even your new fangled railway companies with their crayzie liveries have tried this one. Therefore I’ve got to fix this. The ideal solution would be make up new blinds with transfers. That’s not a goer as the typeface is a bit weird (does anyone know what it is called ?) and the only transfers I have in it are for a Class 20, whose headcode box is a lot bigger than the one on the railbus. I’m not buying a pack of letters for 2 digits on one model – far too tightfisted

Plan B involves doing something on the PC. I probably could find something nearly right but to be honest that meant going downstairs and switching the thing on and quite frankly I couldn’t be bothered.

Which leaves plan C. Paint over the purple with black. The result doesn’t need to be perfect as the “glass” it will be visible through is s scale 8 inches thick. Careful brushwork is giving promising results although I think I’ll need to do the white as well. If I can find my white gell pen and it hasn’t dried up then that will be the tool for the job.

If not I’m back to plan B.

Thursday, June 17, 2010

Glazing the railcar

Glazed front endThe place where an injection moulded plastic kit scores over all others is when you get to glazing. The parts are moulded so they fit nicely in the openings and the result is flush with the sides. This is especially important on the corners where the prototype designer incorporated curved glass. The only other way I can think of achieving this effect would be with some vac-formed plastic and even then it would be a fiddle to fit, albeit slightly clearer. Bending flat styrene would never work as the natural spring back would defeat any glue used to hold it in place no matter how much bad language went into fitting it.

Anyway, the first job I did was painting the bars on the side windows that represent those greatly missed opening sections. Matt aluminium from my nearly empty Humbrol pot (why don’t they do this anymore, it’s so useful) applied with a fine brush looks good. Where the paint ended up in the wrong place I used a sharpened matchstick to move it before it dried. Not a totally successful trick but better than nothing.

Glazing started at the front. I found that separating the four window part into two side and windscreen pairs made the install a lot easier. The gap between the flat panes could be reduced ever so slightly with the resulting join invisible behind the pillar. Working my way around the body I tacked the “glass” in with plastic cement (Revell Contacta) and then washing some Mek Pak along the top to get a nice strong join. Handling the parts with tweezers meant only one slightly fogged corner and that I can write off as weathering.

Wednesday, June 16, 2010

Inspiring warehouse

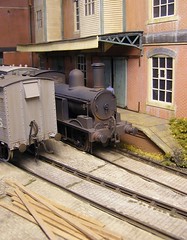
Wood StreetThey say that you should always build models from life rather than copying things that someone else has done. That way mistakes aren’t perpetuated or even magnified when the copier compounds errors made by the person they are copying. No Chinese whisper type modelling please ?

What they don’t say is that you can’t be influenced by other people. Look at this scene from the 7mm scale layout Wood Street.

Now at the back of the layout in a box there are some sidings, just like the picture, and I have a fancy to put a loading bay alongside one of them. In fact the track work has been arranged to allow enough space for this. The platform won’t be wide but I should be able to achieve the Board or Trade regulation 6 foot minimum – or did this jut refer to station platforms ?

The canopy is easy enough but I think I’ll skip the boxed in loading hoists as too pretty for me. There are some plastic industrial windows in the stash of bits so I have that problem solved. How I do the round toped brickwork above them I’m not sure at present. Scribed plasticard is my usual trick but if anyone can suggest something better I’d appreciate it.

One area I won’t be copying is the cobbled track. It’s not that easy to do properly and less common than you’d expect. Also, you only infilled track where vehicular access was required, not likely to be an issue on my little line. I fancy some fine ballast up to the top of the sleepers for this area. Unless I look at the finished product and change my mind again.

Tuesday, June 15, 2010

Dirty underframe

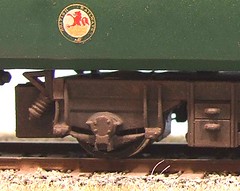
Dirty underframePhotos of the Park Royal railcar are surprisingly difficult to find. Colour pictures appear to have been taken on film based on unicorn skin. The only ones I’ve found, in "Scottish Region Colour Album No 1" by George C. O'Hara, are gloomy and really only show the vehicle end on.

Only a single picture gives me any indication of the state the sides got in after a little running. Basically the underframe is filthy. Really filthy. This contrasts with pretty clean bodywork. At a guess these things were looked after by the shed staff who cleaned the shiny bits and ignored the rest. I’ve never entirely understood this, surely you want the mechanical bits kept clean as well so the dirt doesn’t stop them working ?

Anyway, in mode form my solution has been to paint everything below the body with Precision Weathered black. This was dry-brushed with some rust and gunmetal. Then the mechanical bits are airbrushed with a few dilute coats of track colour. Finally I brought the body and chassis together and wafted more very dilute brown along them both. The look I’m going for is a railcar that is in service and has been cleaned but not recently.

Monday, June 14, 2010

Etched Brake Van in Hornby Magazine

This month's Parker's Guide in Hornby Magazine shows me building an etched ballast brake van from MARC Models. It's an interesting kit for an unusual prototype and goes together pretty well. I think I can claim a tiny bit of credit for this as I had the pre-production kit and made a few suggestions to improve assembly. These were taken well and the changes ensure things drop into place.

The article itself looks IMHO really good on paper - one of the best results I've seen. The pictures came out well and the designer has created a really lively set of pages. I know this isn't anything to do with me (well the pictures are but the layout isn't) but when this works I can't help feeling a bit chuffed.

MARC Models

Hornby Magazine

Sunday, June 13, 2010

Prices of models

Some things never change. This letter and its reply are over half a century old and yet seem strangely familiar to anyone who read the current magazines letter pages...

Model Railway News - September, 1946


An Open Letter to the Trade

Dear Sir,-One year after the war shows the model industry just beginning to open up again, and many of use who have had pipe dreams were hoping that soon we would be able to begin to realise some of them. Instead, many of us are finding that we will have to give up our hobby, and turn to aeromodelling instead. Needless to say, there is only one reason, and it is the high prices. Aero-model kits cost but a few shillings, whereas it looks as if at least fifty pounds is going to be needed to obtain the nucleus of a model railway system in the future.
I, and many others, saved ten or so pounds in the hope of restarting after the war, when things and prices, we hoped would return to normal; but it hasn't worked out that way.
The second-hand market was of no use to us because of the ridiculous prices being asked; for example, a Hornby Princess Elizabeth, costing five guineas before the war, is very often today offered second-hand today at prices varying from fifteen to seventeen guineas.

Of this, I say little, because anyone who is foolish enough to be fleeced thus, deserves all he gets, but what of the new models now appearing on the market ?

Messrs. Bassett-Lowke start the ball rolling with a kit of parts for building a Mogul. This, pre-war, cost £3 15s. 0d., but now I see that the price has risen to £9 9s. 0d., plus purchase tax. I cannot see myself how such a large increase is justified, but, no doubt, Messrs. Bassett-Lowke can explain. Practically everything has risen in price since 1939, but seldom more than 100 to 150 per cent. Some things even remain practically the same, except for purchase tax, and to give examples I will merely quote Messrs. Hover, with their vacuum cleaner, and things like electric light fittings, and certain domestic fittings.

Many of these things are made of the same materials as our models, so the increase cannot be caused there, and I do not think that labour costs, wages, etc., have risen 200 per cent.

I have not picked out Messrs. Bassett-Lowke for any other reason than that they are first in the field, bit I think that I, and many hundreds more, would like to know how we stand. Are the model firms going to cater for the masses, or only for the lucky few who can afford to pay big prices ? Don't kill the Golden Goose.

Lastly, I should be very interested to hear the views of the Editor, the many firms concerned, and my fellow readers, on what I think is a very important question.

Yours faithfully,

D. S. Codner

London, W.2.


Model Railway News - November, 1946

Post-war Prices

Dear Sir,-We are very interested to read Mr D. S. Codner's letter in your September issue with reference to post-war prices of productions of model manufacturers.

Might we preface our remarks by stating that we do not think that there is any manufactured article, where skilled labour is involved, which has not had its retail price doubled (exclusive of Purchase Tax), unless the price is reduced by a subsidy from the Government. We would also point out that, as stated in the House of Commons recently, the present purchasing value of the £1 is now only 8s. 5d.

Now as to the special case stated by your contributor, our kits of finished parts for building a "Mogul." The original price of £3 15s. was an estimated price before any of the sets had been produced and immediately the first production had gone through the works, it was found that the price was very much under-estimated and the actual retail price was altered to £5 5s. until the out-break of war. As far as materials are concerned, these have not increased to an extent of 100 per cent., but it must be remembered that the cost of the materials used in models is very small proportion of the total cost. However, owing to the shortage of materials, and the small qunatities obtainable, it is very often necessary to produce goods in small batches, which adds to the cost.

Labour is the most important item in the cost. In pre-war days, the process of upgrading labour from boys of school-leaving age to journeymen of twenty-one produced semi-skilled labour between the ages of eighteen to twenty years, which at present is not available owing to the calling-up of workers for the Forces. Thus this leaves unbridgeable gap between the unskilled and full-skilled labour.

In common with most employers, youths who were called up for the Forces now return as men, and are being reinstated. The four to five years which they have been away resulted in the loss of the experience they had in the skill of model making.

Skilled labour, including tool-makers necessary in the production of our goods, costs at least twice what it did before the war period.

Overhead expenses have not increased to the same extent but, owing to the Limitation of Supplied Order, a smaller quantity of goods have to carry larger overheads.

Some engineering products, we agree, have not increased to 100 per cent. above pre-war prices, but these are in cases where skilled hand labour is almost eliminated and where huge quantities of a single article are made at one time.

We can assure your readers that the whole of the industry is anxious to keep prices as low as possible, consistent with good wages (which were very rare in pre-war days), as we hope the rate of pay of the expert can be maintained in the future, according to his skill, always taking into consideration the relative cost of living.

We also hope that production will soon make it impossible for extravagance and high prices to be charged for second-hand pre-war goods.


Yours faithfully,

Bassett-Lowke Ltd.

(W. J. Bassett-Lowke, Managing Director)
Saturday, June 12, 2010

Back to the 70's (part 2)

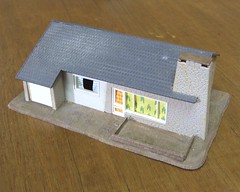
Pola bungalowI'm sure this building was in the Hornby Railways 1978 catalogue. I remember it well be cause it inspire to me to do some real model making.

In case you don't recognise it, this is a modern bungalow manufactured by Pola and re-sold by Hornby. There were several models in the range including a very un-British coaling stage with bucket crane. Despite being HO I doubt anyone cared much as we didn't have much choice in those days. Apart from a few Airfix models, plastic kit buildings were something Johnny foreigner enjoyed. We Brits had Superquick or scratchbuilding. Every so often someone would write a magazine article showing how you could bash a continental kit into a reasonable looking UK station.

None of this mattered to me. My pocket money didn't stretch to anything as exotic as a plastic kit like this. What I did have was a sharp knife and cornflake packets. As I recall my version was the same colour and, to my eyes, every bit as good as the one in the catalogue. That's not to say I wouldn't have loved to take the trip to the local toyshop and buy the plastic version but in the end the experience was character building and helped get me where I am today.

Please note: This is my 1500th post to this blog. That means I've either assembled a terrific body of work, or been wasting far too much of my time ! Now as a thank you, how about you all club together and buy me a Tamya Sand Scorcher. Go on. Pleeeaase !