On a steam engine the chimney performs the vital task of letting the mucky stuff out and thereby providing a draught to pull the fire through the boiler tubes. Visually it's also a focal point for the locomotive. Model railway enthusiasts agonise for hours over the exact proportions of this part. No longer can you just stick a tube with a ridge on it on a model and expect people to be happy.
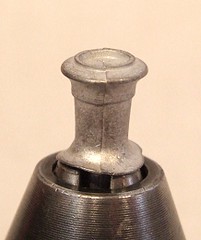
Barclay locomotives have a rather elegant (to my eye) chimney. Nicely proportioned with a cap on top that speaks of a well made machine designed to be used for many years. The one in the photo is a nice 4mm scale representation of it, albeit with a slight mould mis-alignment exaggerated by the camera and easily dealt with using a small file.
Unfortunately the locomotive being modelled doesn't have a chimney like this - it has an unusual but not unattractive stove pipe with a thin ridge near the top. This wouldn't be an issue except no one makes a casting for one of these. Therefore my first task was to try and create the part or admit defeat quickly so a proper pattern maker could be employed to do the job and make a suitable part for the future kit.
I fancied that all I had to do to convert the casting I had to the shape I wanted was stick it in a drill, file the cap off by holding to rotating part against a file and then fit a ridge around the top. Easy. Well, it is if you say it quickly...
The cap removal went well. A few minutes against the file resulted in a reasonable stovepipe. It looked a bit thin at the top without enough taper for the version in the photos so I built this up with 100 degree solder and "turned" it to the right shape.
Once I came to add the ridge using fuse wire everything went pear shaped. The built up solder started to melt, the wire wouldn't solder despite being tinned copper and the resulting blobby mess looked terrible. I could have repeated the exercise but very disheartened decided that perhaps this was a job for someone with the requisite skills rather than me.
A break for lunch before calling for help gave time to come up with a plan B. The hardest part to make on any boiler fitting is the flared base. The whitemetal one I had was OK, all I needed to do was fix the top. Perhaps I could use the flare and make a new bit to stick on to it.
Years ago I bought a Unimat 1 lathe tool. It's not a proper lathe and engineers laugh at it (It's a modular tool and so accuracy, especially in the tail stock isn't much to right home about. The standard motor is a bit weedy too) but it didn't cost me much and I fancied dipping my toe into the machining waters. That was a long while ago and apart from watching a demo on a trade stand once and feeling enthused to have a go myself, it's lain in it's box ever since.
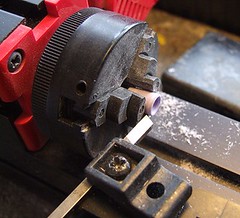 Set up on the bench the Unimat does look OK. I dug out some round, high quality plastic normally used as a knitting needle and had a play. With a bit of practise I turned some groves and finished the end of the rod. Both the proper tools, files and emery paper were tried. My technique combines elements of metal worker and wood turner but it seemed to work. Once I'd had a bit of practice the chimney proper was started.
All I wanted to produce was a tapered part with a grove to accept the ridge. A coarse file did the first bit and the cutting tool the second. The top was flatted and then drilled out - first with a 2mm bit all the way through and then a 5mm one as deep as I dared. Finally I parted off using a X-acto saw held on the base of the chimney.
 The top of the flange area was cleaned off in the lathe to give a nice flat, smooth area. I also drilled this with the 2mm bit so I could peg the parts together for extra strength.
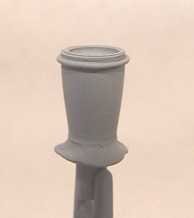
For the ridge, very thin wire normally used for in-loco electrics stuck in place with superglue located in the grove neatly. Then I glued the base and top together. A quick spray of primer showed a touch of work still do do for perfection but at least I have this vital part the right size and shape for the model. No need for panicky calls to pattern makers. Today anyway.
No comments:
Post a Comment