Wednesday, September 30, 2020

Airfix coal offices


Talking of tickling up old models, a couple of Airfix coal offices have been across the workbench for a projects. 

On the right we have one bought second-hand from my local model shop so I could turn it into a burning building for a World of Railway Project. It was horribly painted with gloss pale brown paint and the ridge tiles were missing. Most people would chuck it in the bin, I saved it and turned the little building into something useful. 

On the left we have something for a HCC magazine project. Starting with a new old stock kit, I put the windows in inside out and added cills from square plastic. New for me is scribing the roof tiles with an Olfa cutter using the raised Airfix lines between each slate as a guide. The result looks good and didn't take very long. 

I kid myself that the colour scheme is reminiscent of the Crowsnest Tramway. A better sign would be nice, but beyond my graphic design abilities. The brown wash is a little heavy-handed, although looks better in real life. My excuse was that there was a serious time-pressure on the project so I simply didn't have time to tone it down a little. 

Maybe I'll build the definitive model one day.

Tuesday, September 29, 2020

Tickled up Hornby viaduct

I can sense some of you weren't convinced by my suggestion that the Hornby R180 3-arch viaduct can look OK, so I'll show you. 

The model above was built as a project for the Hornby Collectors Club magazine last year and I'm still pretty pleased with it. 

The purple bricks (Hmmm, good name for an estate agent?) have been a painted with Humbrol 121 then coloured with pencil crayons. A dose of weathering filth powder completes the job. It's wise to stick the parapet to the arches, they are only clipped together as supplied and I should have filled the gaps under the edge which show in this low-angle view. 

Used as raw materials, these models can look the part yet are largely ignored by modellers in favour of "proper" products.

Monday, September 28, 2020

South Eastern Finescast plastic bridge arch

One area on the Selly Oak build I've struck gold on is the viaduct arches. I'd been bashing a few ideas around in my head to replicate these, including the classic R180 Hornby triple-arch viaduct. The model might be a hundred years old, but tickled up with some paint, it's not a bad looking model, and happens to be spot on the right height for the Oak.

In the end, I am saved the bother of cutting thick plastic in half and widening the arches like some mad hot-rod builder, by the good people of South Eastern Finecast. 

Rooting through my collection of plastic, I find their archway embossed sheet and realised that it might not be perfect, but with a bit of work, it will be good enough for the job. Short of scribing the bricks myself, I doubt I'd do anything better. 

Most importantly, there is a matching plain brick sheet, something not always a given as I discovered looking through one laser-cut makers range. 

Anyway, the Finecast range of plastic is here and well worth a look. The quality is as good as Slater's and the sheets available in larger sizes - handy for big jobs. 


Sunday, September 27, 2020

Bing tabletop train set

 A random photo from my collection. This one, taken at the Brighton Toy and Model Museum, shows a Bing Tabletop Train set. I'm pretty sure that isn't an authentic GWR loco, but hey ho. 

You can read more about this model on the museum website.

Saturday, September 26, 2020

Saturday Film Club: Matchbox cars to slot racers


Here's a neat little conversion - take a couple of battered Matchbox cars. Add a micro Scalextric set and you have diecast slot racers!

Friday, September 25, 2020

More stock boxes

My dad id really getting in to this box making lark. After the success of a box for Willi, he moved on to the Piko "Clean Machine". 

Satisfied with this, it was on to a couple of Playmobil models and my LGB Flyer. 

Both the diesel and Flyer had boxes, admittedly the train set box it came in for the former, but these are much easier to use. Because they don't need to survive a drop-test, the models come in and out more easily than when they are encased in tight-fitting polystyrene. 

I know that I should revere the original boxes because, according to the web, the only reason to buy a model is to maintain it's value for future sale, but I don't think like that. I want to run my models and if they ever come up for sale, its probably because I'm no longer in a position to enjoy them that way. If that happens, I probably won't care.

Thursday, September 24, 2020

Photos you didn't expect to take


When I was at school and considering my future, at no point did I ever consider it would involve standing on a Birmingham roadside taking photos of  double-decker buses passing under a bridge. 

However, I've done just that. Because as I watched them, I realised that there isn't a lot of gap between the top of the bus and the bottom of the bridge. 


A best guess is between 2 and 3 feet, nearer 2. People who have travelled on the bus through Selly Oak tell me it's quite an experience the first few times. You generally wonder if your journey will end in the local news as one of the "bridge slices the top off a bus" stories. 

Anyway, I have a fine collection of photos. The locals probably think I'm weird, but that's just how my life panned out. They didn't tell me that at school.

Wednesday, September 23, 2020

Why I'm adverse to camber

Time for a controversial blog post. 

A properly made road will have a camber - the slight slope from the centreline to the gutters to persuade water to drain off properly. If you want to know the details, watch this not very exciting video. 

Since the real road is shaped, the model road should be shaped too. But I've decided to keep the Selly Oak road flat. 

Why? 

Many reasons:

  • Model camber needs to be done really well. On my model, there is a T-junction and a side road as well as a considerable slope. I can mess around with plaster all I like, I think the result will look rubbish because I'll never get it smooth enough to satisfy me. 
  • The alternative method of putting a strip of something down the middle and then bending the road surface over the top is fine - until we get to the junction when it's back out with the plaster to try and blend things together. 
  • On the real road, when you are standing on it, the camber isn't very noticeable. 
  • I want to take photos on the model and the buses should be upright. Real vehicles have suspension, model ones don't. The bus in the photo above might be right, but would look odd in a model pic. I think the effects of the lens are more responsible for any lean than the road too. 

In conclusion, the road will be flat because I believe I can make a good-looking, flat road and I don't believe many people will notice. This probably makes me a rubbish modeller unworthy of owning a copy of MRJ. That's fine. I'm a long way from the world's best modeller. A very long way. 

But I am determined to finish this project in the time available and so shortcuts are going to be taken. If that makes me a bad person, I'm a bad person.

Tuesday, September 22, 2020

Quick road painting


With the road on place made from 3mm thick MDF, I decided that it could do with a quick coats of paint. Noth the final coat, that was going to need some messing around with tarmac colours, but something to seal the surface so it looked sort of OK in photos for magazine features. 

To do this, I nicked a trick from Chris Nevard and blasted away with Halford's car primer aerosols. Using just black and grey, I shot random bursts on to the material quickly so they mixed a little. 

The result isn't half bad. OK, I still need to do it properly, but for many models, this would be good enough. I've certainly seen worse in the past. Give it go, you might be pleasantly surprised.

Monday, September 21, 2020

My standby grass mix


Last week I was called on to produce a project build in double-quick time. This involved some grass and so I resorted to the mix that lives in my Flock-It tool. 

The colour is deliberately uninspiring - a mix of beige (Woodland Scenics call it something else, but it's beige) and a mid-green. Plus "bits" that have been hoovered up and dumped back in the hopper. 

This works well as a base-coat, and in the case of my project, was all I needed.There's plenty left, so I know that there will be another lawn or field that is going to get this uninspiring colour in the future.

Does anyone else have standby materials?

Sunday, September 20, 2020

The joy of a Model Railway

Today, we enjoy a guest blog post by James Hilton.


Over the years I have been lucky enough to have had a number of model railways that could be considered (nearly) finished, as in they were scenically and operationally complete, perhaps leaving space for improvement or extra detailing. These have varied in subject and scale, but they have always offered one thing, the joy of just ‘playing’ trains…

Now that might mean different things to different people and I’m not writing about any style of operation in particular, I have built and operated continuous run and more prototypical layouts. What I mean though, the joy that comes from seeing trains move in your miniature world. However, what I wanted to talk a tiny bit more about is the absolute key, accessibility.

My childhood layouts were permanent fixtures, both in outdoor, unheated garage or shed like buildings. This meant that I could run trains whenever I liked, at the flick of the power switch, watching the fluorescent tube flicker on and the miniature world wake up before the layout came to life as I operated perhaps a GWR branch train, modern image freight or North American mega freight. Later, when I re-discovered the hobby in my 20’s I built a layout in my garage again, and this was available to run, whenever I was… did it get used? No, I couldn’t leave the stock out, so it just sat idle most to the time. More recently I’ve build exhibition layouts and micro layouts that live in boxes, these are great fun to work on and build, projects that can be completed in a relatively short period but their storage means they’re just not used, and so as a result there is little joy.

Fast forward to C-19, and I notice the small shelf the length of my workbench, usually filled with particularly completed models, tucked under the current exhibition layout stored above it on a shelf could perhaps be used to build something… a plan was born for a tiny self contained slice of industrial standard gauge set in the early 1980s in South Wales. Progress was swift and I enjoyed building the layout. However the main point here is the joy this has brought… not only do I now have another layout that for all intents and purposes can be called ‘finished’ but, I can leave the stock on it so it is ready for operation at the flick of a switch, like the layouts of my childhood.

This is the key to me, a complete layout yes, but one that is ready whenever the mood takes me, or requires me to run some trains and loose myself in a miniature world of my own creation. Wonderful layouts that are locked away in boxes or only taken out to exhiitonts can be fun to design and build, and do provide the joy when they’re out, but the rest of the time they’re locked away from reality. My latest project shows that even the space starved have room for a project, and even better, one they can use whenever they need. This revelation has changed my opinions about railway modelling and caused a big re-think about my layout plans for the future. I can see a culling of the boxed micro layouts I have built, and a hunt for a home for an ‘always ready’ layout home in my house, workshop or garden. 
 
James Hilton
James is a professional model maker with over 30 years experience, in addition he is a kit designer and has produced kits for Planet Industrials, Narrow Planet, EuroNG and 6point5 Minimium Gauge. He keeps his own blog regularly updated, here: http://paxton-road.blogspot.co.uk 

If anyone is interested in writing a guest blog poston any topic, drop me a line.
 

Saturday, September 19, 2020

Saturday Film Club: Do white slot kits sell?

 There's always a discussion in the model railway world about un-numbered model locos. The prevailing wisdom, based on previous attempts, is that they don't sell. 

It seems the same thinking applies in the slot car world. Dave Kennedy, who has worked in the industry for years, explains.

Friday, September 18, 2020

A sunny day at Bekonscot

Bekonscot windmill

 For Friday, a shot from my recent trip to the excellent Bekonscot Model Village. The locomotive is "Bruton" a freelance 0-6-0 originally built in 1949, although re-chassised many times since then.

Thursday, September 17, 2020

Garden Rail - October 2020 - Let's build a castle!


Garden Rail October 2020

An Englishman's home is his castle, and if he wants one in his back garden, then he needs to buy a copy of October's Garden Rail where we will show him how to do it!

There's also gardening, some Isle of Man action, plenty of construction, news and letters. 

For more details and a full contents listing, head over to RMweb.

Wednesday, September 16, 2020

Adding the road


Now I can start plonking things in position to get a feel for the model. The main feature is the road so this is cut from 3mm thick MDF. I know people are funny about MDF, but it's flat, stable and if thin enough (like this) can be cut with a heavy knife, albeit with many cuts. 

Where the road crosses the canal, it's propped up on a couple of sanding blocks which give a pretty close approximation of the 6ft clearances on the real thing - I had to stoop to walk underneath. 

The track is supported 75mm above the road on foamboard T-shapes for the moment but I'll do something more solid later. 

I've lived with this for a few days, and shown it to Jason and we are both happy. The position of road, rail and canal have changed from real life, which will need to imaginative work later, but it all fits and looks nice IMHO. And if it doesn't well, it's too late as I've glued everything down by the time you read this. 


Tuesday, September 15, 2020

Bolts not hinges


Normally I'd use loose-pin hinges to attached baseboards together, but when I fitted them to the Selly Oak boards, for some reason we ended up with a 2mm gap. No idea why, but it wasn't good enough. Maybe fitting a hinge in the corner between the boards didn't work. Or maybe I'm just rubbish. 

Anyway, it was back down to the hardware shop for bolts. This isn't so bad as the boards come with alignment thingies - you can see the spike in the photo. 

Bolts are to fit a 7mm diameter hole, to match the spikes, and I bought wing-nuts and the biggest washers they sell as well. The gap is gone.

Monday, September 14, 2020

Nice, fresh baseboards


If you saw last Thursday's post, you'll know that on the latest BRM TV, I'm building a laser-cut baseboard. You'll not be surprised that that baseboard was destined for Selly Oak. You might be more surprised that I recorded the hammering many weeks ago, so the blog is playing catch-up on this project. 

The boards come from White Rose and are excellent quality. Even I can't screw up their construction. 

Both are now marked out in the 6-inch squares of the model of the model. At some point I need to take a jigsaw to the front edge of the left hand one, but that can wait a while as I measure everything up. 

The good news is that the fit comfortably in my workspace, which is good news as I'll be living with them for a while.

Sunday, September 13, 2020

A new (Olympus) pen

A few weeks ago, I was looking at my poorly Nikon DSLR and wondering if I really needed to replace it based on the sort of photos I take. 

In the comments, a couple of people suggested I ought to look at an Olympus Pen. Reading reviews, the range appeared to score well for image quality and flexibility. The suggestion in the reviews was that this is a DSLR for compact camera user. I don't have a problem with that. As I said in my original post, I'm no specialist photographer, I just like taking photos. 

I also like interesting things that are a little under the radar. A Citroen Berlingo (2nd series) is a fantastic car for example, but you never see it advertised. They are just popular with those who know how good they are, and when you learn, you understand. 

An SLR for compact users will be an anathema to many "proper" photographers, but I had a look on eBay and found a few to chose from. In the end, £60 bought me an E-PL1 that had taken 572 photos and seemed in perfect nick, along with charger and lens.

Another look and the PL1 is the noddy camera of the range, but if this ever bothers me, bodies can be picked up for under £40, including a red one which appeals quite a bit. 

Anyway, first impressions are good. The camera feels solid. The shutter makes a nice noise. The lens has to be unlocked and extended before use, and it's a bit ugly when not shut up. That's as bad as it gets so far. 

Of course I've taken some photos. You can click on these for the full-size version. 

My railcar in the garden. 

While I was out there, a dragon in need of a repaint:


A home-grown pomegranate: 


An aeroplane at Bekonscot on a sunny day:

And a few minutes later, a couple of trains:


All of these were taken with the camera on auto. I had tried some model shots in the booth, but the results weren't impressive. Not bad, just not what I needed. However, stick the camera in aperture mode and the dial on F22, read the instructions to set the ISO to 100 and things look a lot better. 


The Lego train is 12cm long, not that dissimilar in size to this:


No need for stacking there for most uses.The focus lock seemed to work well too. 

At the moment, this feels good. OK, the lens is ugly and composing on the back LCD screen isn't ideal in bright light - but then that's an issue with a compact and trying to gawp through a viewfinder too. The video mode is going to take some figuring out as efforts so far have seen it record when I didn't want it to and not when I do. That's just pressing buttons in the right order. I'm sure if I read the manual again, I'll get it. 

Thanks to those who suggested the Pen. It seems like a good move. The Nikon is currently with them for investigation, but I've hung on to the lens in case I don't have the body back. It's sale will then go towards a zoom for the Olympus.

Saturday, September 12, 2020

Saturday Film Club: Daddy-long-legs

One of the weirdest railways was the Daddy-long-legs that ran along Brighton seafront. A combination of tramcar and boat from the era when electricity was exciting and new. Sadly the line didn't last far into this* century, but there are still a few relics as the video shows. 


If you fancy reading more about the line, I recommend picking up a copy of The Extraordinary Daddy-Long-Legs Railway of Brighton by Martin Easdown. 

A terrific volume that is full of photos and postcards that I've never seen before. It tells the whole story from birth to death and I'd consider it an essential buy if you have an interest in the line. 

Buy The Extraordinary Daddy-Long-Legs Railway of Brighton from Amazon.


*Update: last

Friday, September 11, 2020

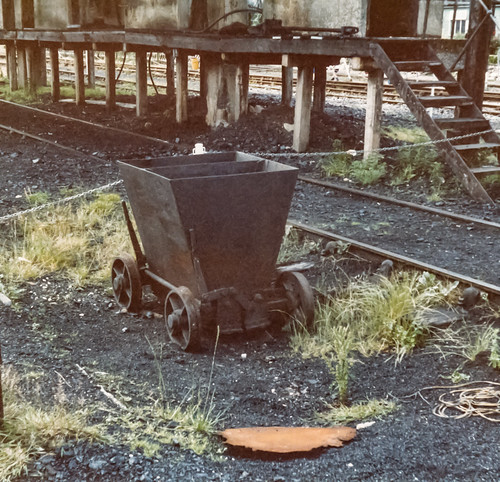
Coal hopper


Carnforth coal hopper 

Another old photo from the 1980s and Carnforth steam museum. This is (I think) a hopper wagon that would have been used to transfer fuel from a coaling stage to the tender of a steam locomotive. 

Some types of tub would run out along a short track until they we upended to coal the loco. This has bottom doors, so I assume ran out over the tender, the doors were opened and out fell the coal. 

It's a pretty filthy manual business, which is why the railways struggled to retain staff and lead to the rush to dieselise. Steam locos might be romantic, but I suspect the appeal fades when you are up at the crack of dawn in midwinter to prepare one!