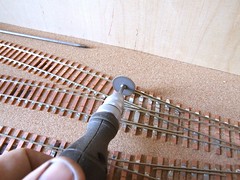
 PCB track is wonderful stuff - easy to build and very adaptable. The only downside is the chore of putting a gap in the middle of each sleeper to keep the opposing polarities of electric juice apart.
The tool to do this with is a slitting disk in a mini drill. I suppose hand tools can be used but you can't get something like a saw in everywhere and anyway, it just takes too long.
The biggest decision is how to cut the copper. I favour a thin and deep cut. Others try and wear away the metal across a wider area but only remove the metal. My methods is easier and if you are conscientious, allows the gap to be filled afterwards. To be honest I usually can't be bothered with this last step but perhaps I'll do better on this micro layout, detail matters, even the fiddly time consuming stuff.
Obligatory safety note: Slitting disks are one of the more dangerous tools we use. The disk is brittle and will snap with bits flying around the room. Protective goggles are aren't a bad idea especially if you don't wear glasses. The dust isn't good for you either so don't try and hoover it up with your nose.
Obligatory sanity note: The disk is brittle and will snap with bits flying around the room. You can't stick them back together and most shops don't stock them. If you are going a sleeper gapping on a Sunday, stock up.
3 comments:
...and get the polarity of the drill the right way round. Just done this job and the mandrill unscrewed itself.
An easy way to gap copper clad is to make a couple of cuts in the copper with a knife blade and then overheat the area in between with a soldering iron. The copper then just pops off the substrate.
Mark.
No that IS a neat idea. Must try it.The result should be very tidy.
Post a Comment